Introduction
This document describes how to configure Firepower 6.1 pxGrid remediation with Identity Services Engine (ISE). Firepower 6.1+ ISE remediation module can be used with ISE Endpoint Protection Service (EPS) to automate qurantine/blacklisting of attackers on the network access layer.
Prerequisites
Requirements
Cisco recommends that you have basic knowledge of these topics:
- Cisco ISE
- Cisco Firepower
Components Used
The information in this document is based on these software and hardware versions:
- Cisco ISE version 2.0 Patch 4
- Cisco Firepower 6.1.0
- Virtual Wireless LAN Controller (vWLC) 8.3.102.0
The information in this document was created from the devices in a specific lab environment. All of the devices used in this document started with a cleared (default) configuration. If your network is live, make sure that you understand the potential impact of any command.
Configure
This article does not cover initial configuration of ISE integration with Firepower, ISE integration with Active Directory (AD), Firepower integration with AD. For this information navigate to references section. Firepower 6.1 Remediation module allows Firepower system to use ISE EPS capabilities (quarantine, unquarantine, port shutdown) as a remediation when correlation rule is matched.
Note: Port shutdown is not available for wireless deployments.
Network Diagram

The flow description:
- A client connects to a network, authenticates with ISE and hits an authorization rule with an authorization profile which grants unrestricted access to the network.
- Traffic from the client then flows through a Firepower device.
- User starts to perform a malicious activity and hits a correlation rule which in turn triggers Firepower Management Center (FMC) to do ISE remediation via pxGrid.
- ISE assigns a EPSStatus Quarantine to the endpoint and triggers RADIUS Change of Authorization to a network access device (WLC or Switch).
- The client hits another authorization policy which assigns a restricted access (changes SGT or redirects to portal or denies access).
Note: Network Access Device (NAD) should be configured to send RADIUS Accounting to ISE in order to provide it with ip address information which is used to map ip address to an endpoint.
Configure Firepower
Step 1. Configure a pxGrid Mitigation Instance.
Navigate to Policies > Actions > Instances and add pxGrid Mitigation Instance as shown in the image.

Step 2. Configure a Remediation.
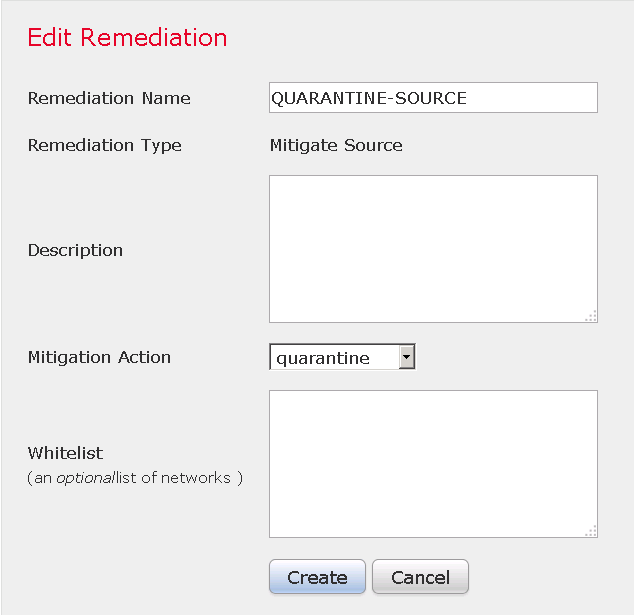
There are two types available: Mitigate Destination and Mitigate Source. In this example Source mitigation is used. Choose remediation type and click Add as shown in the image:

Assign Mitigation Action to the Remediation as shown in the image:

Step 3. Configure a Correlation rule.
Navigate to Policies > Correlation > Rule Management and click Create Rule Correlation rule is the trigger for the remediation to happen. Correlation rule can contain several conditions. In this example Correlation Rule PingDC is hit if intrusion event occurs and destination ip address is 192.168.0.121. Custom intrusion rule matching icmp echo reply is configured for the purpose of the test as shown in the image:

Step 4. Configure a Correlation policy.
Navigate to Policies > Correlation > Policy Management and click Create Policy, add rule to the policy and assign response to it as shown in the image:

Enable the correlation policy as shown in the image:

Configure ISE
Step 1. Configure Authorization Policy.
Navigate to Policy > Authorization and add a new authorization policy which will be hit after Remediation takes place. Use Session: EPSStatus EQUALS Quarantine as the condition. There are several options which can be used as a result:
- Permit Access and assign Different SGT (enforce access control restriction on network devices)
- Deny Access (user should be kicked out of the network and should not be able to connect again)
- Redirect to a blacklist portal (in this scenario custom hotspot portal is configured for this purpose

Custom Portal Configuration
In this example, the hotspot portal is configured as a blacklist. There is only an Acceptable Use Policy (AUP) page with custom text and there is no possibility to accept the AUP (this is done with JavaScript). In order to achieve this, you first need to enable JavaScript and then paste a code that hides AUP button and controls in portal customization configuration.
Step 1. Enable JavaScript.
Navigate to Administration > System > Admin Access> Settings > Portal Customization. Choose Enable Portal Customization with HTML and JavaScript and click Save.

Step 2. Create a Hotspot Portal.
Navigate to Guest Access > Configure > Guest Portals and click Create, then choose Hotspot type.

Step 3. Configure Portal Customization.
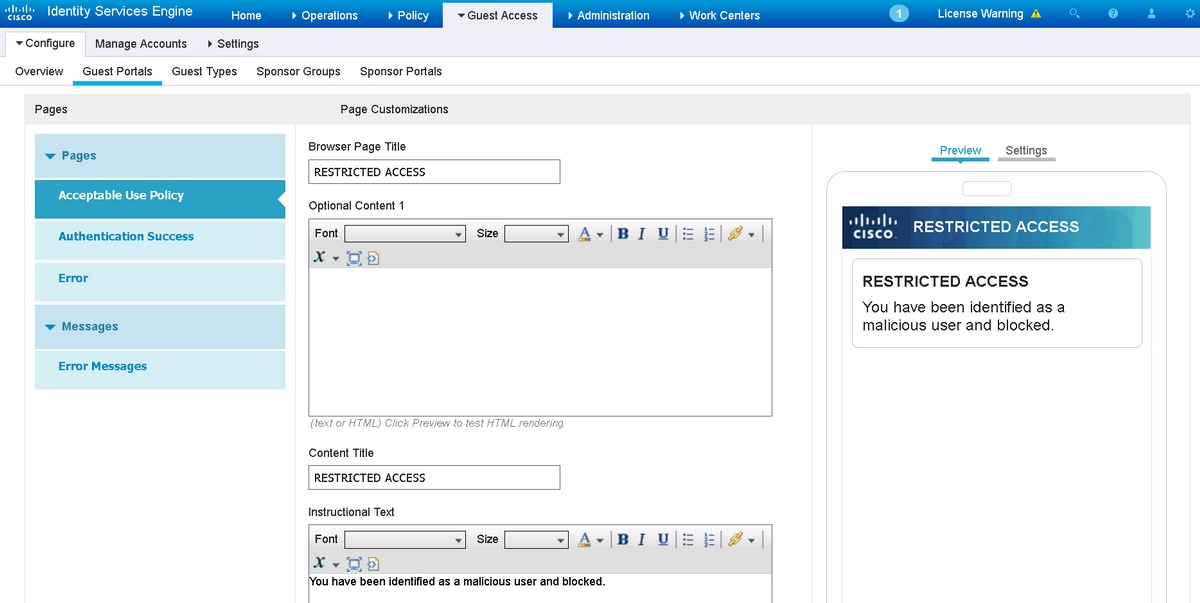
Navigate to Portal Page Customization and change titles and content to provide an appropriate warning to the user.

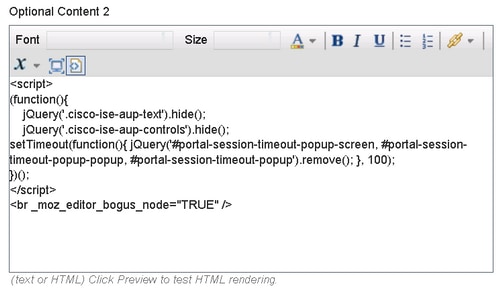
Scroll to Option Content 2, click Toggle HTML Source, and paste the script inside:
<script>
(function(){
    jQuery('.cisco-ise-aup-text').hide();
    jQuery('.cisco-ise-aup-controls').hide();
    setTimeout(function(){ jQuery('#portal-session-timeout-popup-screen, #portal-session-timeout-popup-popup, #portal-session-timeout-popup').remove(); }, 100);
})();
</script>
Click Untoggle HTML Source.

Verify
Use the information that is provided in this section in order to verify that your configuration works properly.
Firepower
Trigger for the remediation to happen is a hit of correlation policy / rule. Navigate to Analysis > Correlation > Correlation Events and verify that correlation event happened.

ISE
ISE should then trigger Radius: CoA and re-authenticate the user, these events can be verified in Operation > RADIUS Livelog.

In this example, ISE assigned different SGT MaliciousUser to the endpoint. In the case of Deny Access authorization profile the user loses wireless connection and is not able to connect again.
The remediation with blacklist portal. If remediation authorization rule is configured to redirect to the portal, it should look like this from the attacker perspective:

Troubleshoot
This section provides information you can use in order to troubleshoot your configuration.
Navigate to Analysis > Correlation > Status as shown in this image.
 Result message should return either Successful completion of remediation or particular error message. Verify syslog: System > Monitoring > Syslog and filter output with pxgrid. The same logs can be verified in /var/log/messages.
Related Information


 Feedback