Configure the CallManager to Recognize ATA 186 Using SCCP
Available Languages
Contents
Introduction
This document provides information you can use to configure Cisco CallManager to interoperate with the Cisco Analog Telephone Adapter (ATA) 186 using Skinny Client Control Protocol (SCCP) also known as "Skinny". The Cisco ATA 186 is a two port analog telephone adapter that can interface with other VoIP devices using session initiation protocol (SIP), H.323, Media Gateway Control Protocol (MGCP), or SCCP. For more information on the ATA 186 refer to Data Sheet - Cisco ATA 186 Analog Telephone Adaptor.
In the Cisco CallManager environment, H.323 or SCCP are the protocols used for communication between the Cisco CallManager and the ATA 186. However, in this document, only the communication between the ATA 186 and the Cisco CallManager that uses SCCP is discussed.
This document explains how to configure the ATA 186 with the Cisco CallManager IP address and describes two ways (auto-registration and manual) to register the ATA 186 with the Cisco CallManager using SCCP protocol.
Prerequisites
Requirements
Before you attempt this configuration, ensure that you meet these requirements:
-
Ensure the Cisco ATA 186 has received an IP address, a default gateway address from the Dynamic Host Configuration Protocol (DHCP) server, and that there is network connectivity between the Cisco ATA 186 and the Cisco CallManager.
You can disable DHCP and configure a static IP address as described here:
-
On the phone attached to port 1, pick up the handset, and press the menu button on the ATA 186 (clear button on top of the unit that glows red when a port is off-hook).
-
Press 20#, and then press 0# to disable DHCP.
-
Press 1#, and then press the appropriate kets in order to enter the IP address. For example, 10*10*10*2#.
-
Press 10#, and then press the appropriate keys in order to enter the network mask. For example, 255*255*255*0#.
-
Press 2#, and then press the appropriate keys in order to enter the IP address of the default router. For example, 10*10*10*1#.
-
Review your entries.
-
In order to review the IP address, press 21#.
-
In order to review the network mask, press 23#.
-
In order to review the default router IP address, press 22#.
-
-
Browse to the ATA 186. For example, http://<ip_address_of_ATA>/dev. Where ip_address_of_ATA is the IP address of the ATA.
Note: Refer to Cisco ATA 186 Basic Configuration for more information.
-
-
Make sure the ATA 186 has an SCCP software version loaded.
If your ATA 186 comes from the factory with an H.323/SIP image, it is necessary to load it with the SCCP image provided in the SCCP zip file. Do this by using the executable upgrade program (ata186us.exe) on a PC networked to your ATA 186. For more information on this subject, refer to Cisco ATA 186 Basic Configuration.
Components Used
The information in this document is based on these software and hardware versions:
-
Cisco CallManager version 3.0(10) or later
-
Cisco ATA 186 version 2.12.ms ata186 (Build 020124a)
The information in this document was created from the devices in a specific lab environment. All of the devices used in this document started with a cleared (default) configuration. If your network is live, make sure that you understand the potential impact of any command.
Network Diagram
This document uses this network setup:

Conventions
Refer to the Cisco Technical Tips Conventions for information on document conventions.
Configure the Cisco ATA 186 with the IP Address of the Cisco CallManager
Use this procedure to configure the Cisco ATA 186 with the IP address of the Cisco CallManager.
-
Verify the IP address of the Cisco ATA 186.
-
Go off-hook on the phone attached to the ATA 186.
-
Click the red button on top of the ATA 186.
-
You should hear interactive voice response (IVR) playing the configuration menu.
-
From the dialpad of the phone, press 80#.
-
You should hear the IVR playing the IP address of the ATA 186.
-
-
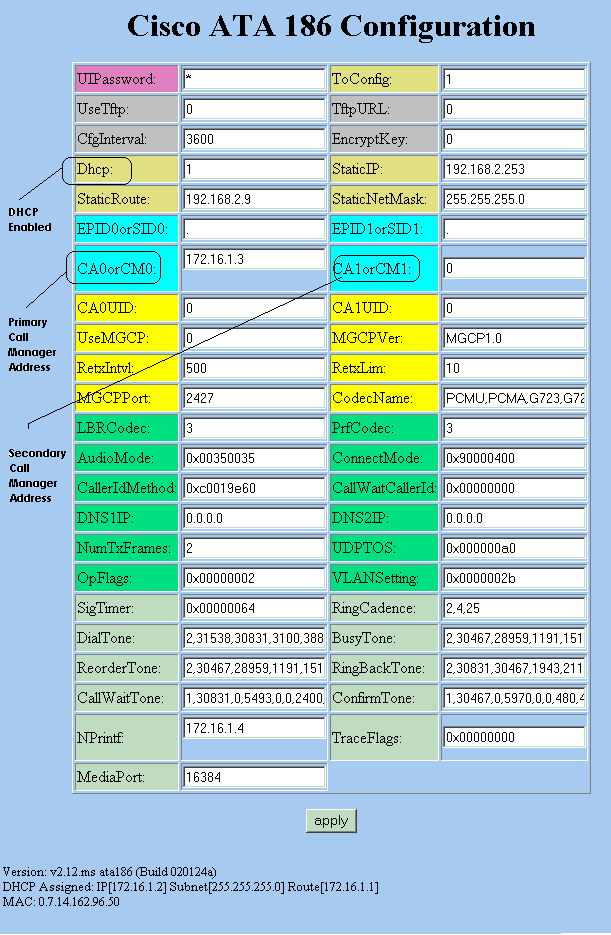
Once you know the IP address of the Cisco ATA 186, you can connect to it with a web browser at http://IP address of the ATA 186/dev (for example: http//172.16.1.2/dev).
-
Enter the IP address of the primary Cisco CallManager into the CA0orCM0 field (for this example, 172.16.1.3).
-
CA0orCM0 field: This field specifies the IP address of the TFTP server. If the required Cisco CallManager IP address and port number cannot be achieved from the TFTP server, CA0orCM0 specifies the IP address and port number of the primary Cisco CallManager that the ATA 186 should register with upon power up (as an SCCP client).
Note: If a port number is not specified, the ATA 186 assumes the default port of 2000 to contact the Cisco CallManager. If a different port number needs to be specified, then it is entered as the IP address of the ATA 186:port number using a colon (:) to separate the IP address from the port number.
-
CA1orCM1 field: This specifies the IP address and port number of the secondary Cisco CallManager. If needed, enter the IP address of the secondary Cisco CallManager in the same way as shown for the primary Cisco CallManager.
-
-
Click Apply.
Note: The CA0UID and CA1UID fields are not relevant in SCCP mode.
For more information on this subject, refer to Cisco ATA 186 Installation and Configuration Guide.
Configure Cisco CallManager 3.0, 3.1, 3.2, or 3.3 to Recognize the ATA 186 Using Auto Registration
Use this procedure to configure the Cisco CallManager 3.0, 3.1, 3.2, or 3.3 to recognize the ATA 186 using Auto Registration.
-
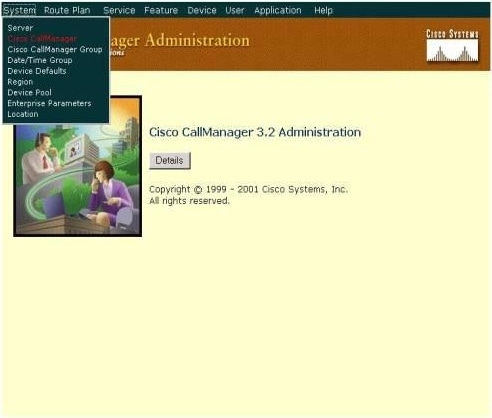
Log into Cisco CallManager to bring up the CallManager Administration screen by selecting System > Cisco CallManager.
-
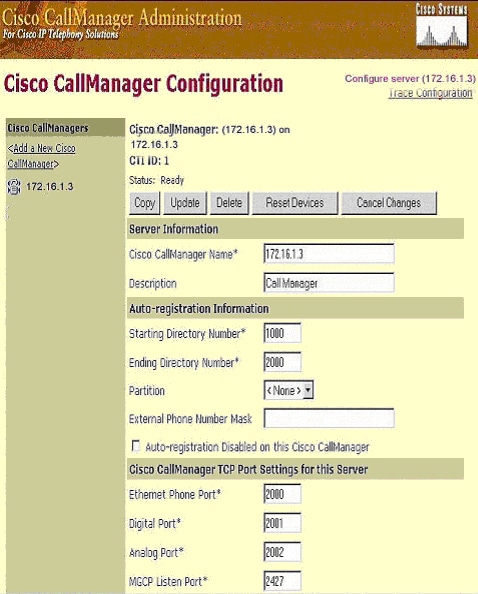
The Cisco CallManager configuration screen displays. Enter this information:
-
Under Cisco CallManagers, click the IP address of the Cisco CallManager to configure (for this example, 172.16.1.3.).
-
Enter a Starting Directory Number and an Ending Directory Number. For this example, the Starting Directory Number is 1000 and the Ending Directory Number is 2000.
-
By default, Auto Registration is disabled. Enable it by clicking the Auto-Registration Disabled on this Cisco CallManager check box.
-
Click Update above the Server Information section when finished.
-
Verify that Cisco CallManager 3.0, 3.1, 3.2, or 3.3 Recognizes the ATA 186 Device
Use this procedure to verify that Cisco CallManager 3.0, 3.1, 3.2, or 3.3 recognizes the ATA 186 device.
-
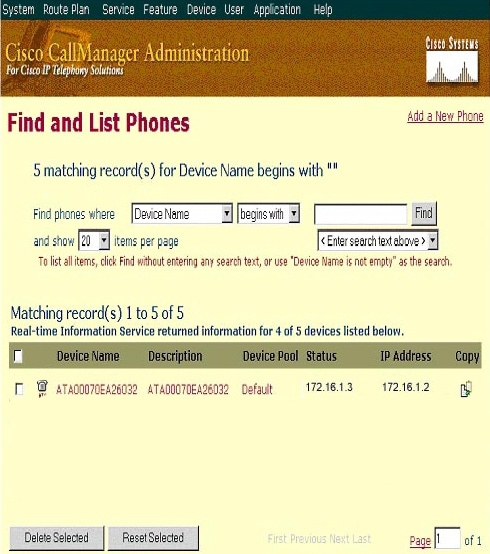
From the Cisco CallManager Administration menu bar, select Device > Phone, and click Find to bring up the Find and List screen with a list of all items connected to the Cisco CallManager.
Note: If needed, you can narrow the search to the specific phone by specifying the MAC address within the search.
-
Make sure your ATA 186 is registered with the Cisco CallManager. For the ATA 186, the fields are:
-
The MAC address of the Cisco ATA 186 is listed under the Device Name and Description fields.
-
The IP address of the Cisco CallManager is under Status.
-
The IP address of the Cisco ATA 186 is under IP address.
-
Manual Configuration of Cisco CallManager 3.0, 3.1, 3.2, or 3.3 to Recognize the ATA 186
When you configure Cisco CallManager to recognize the ATA 186, there are some differences between versions 3.0 or 3.1, and 3.2. In these examples, these differences are pointed out in italics. The screen shots are generally from version 3.2. However, if there is a major difference in the screen shots, both versions are displayed.
-
Log into Cisco CallManager to bring up the CallManager Administration screen and select System > Cisco CallManager.
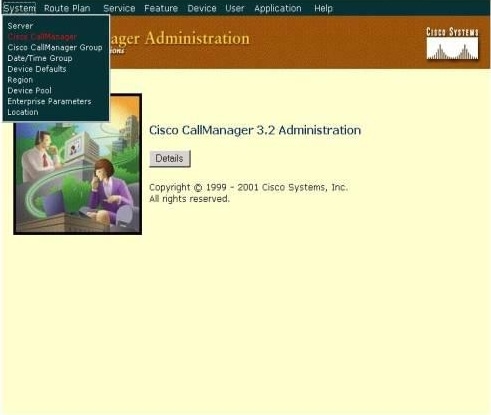
-
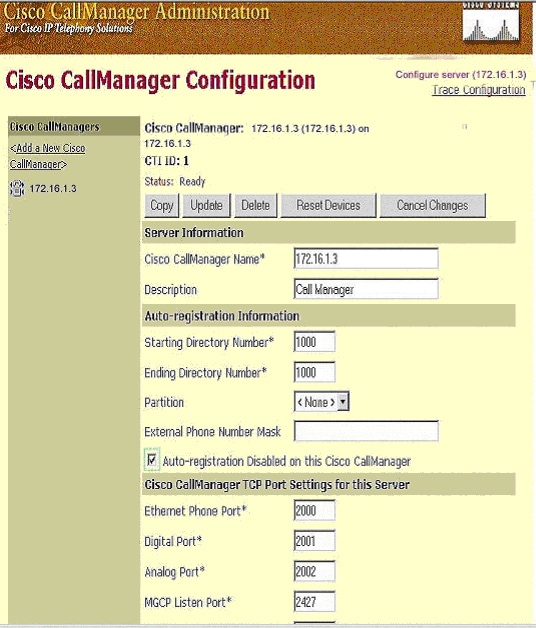
When the Cisco CallManager configuration screen displays, enter this information:
-
Under Cisco CallManagers click the Cisco CallManager's IP address (for this example 172.16.1.3.).
-
Make the Starting Directory Number and Ending Directory Number the same. For this example, the Starting Directory Number is 1000 and the Ending Directory Number is 1000.
-
Ensure Auto-registration Disabled on this Cisco CallManager is checked to disable it.
-
Click Update above the Server Information section when finished.
-
-
From the Cisco CallManager Administration menu bar, select Device > Phone to bring up the Find and List Phones screen.
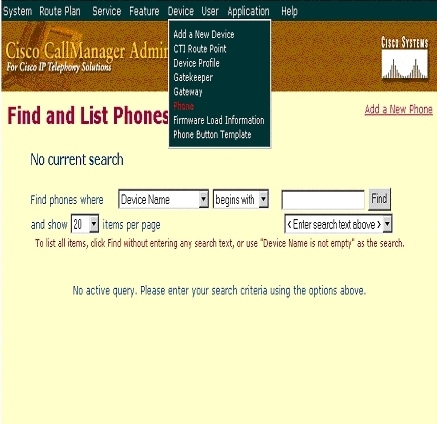
-
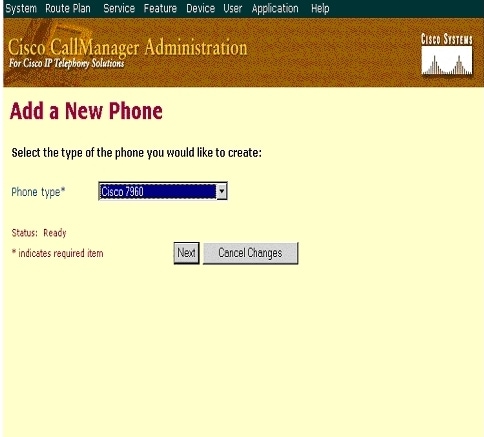
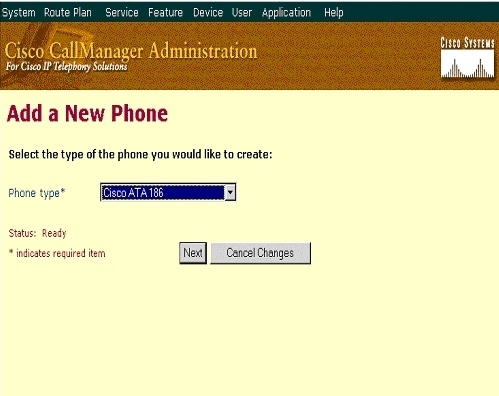
Click Add a New Phone to bring up the Add a New Phone screen.
These are slightly different in Cisco CallManager 3.0, 3.1 , 3.2, or 3.3. Both screens are displayed. Select the Phone type from the drop-down menu.
In Cisco CallManager versions 3.0 and 3.1, the ATA 186 is registered as a Cisco 7960 phone type. In Cisco CallManager version 3.2 and 3.3, the ATA 186 is registered as a Cisco ATA 186 phone type.
-
Click Next to bring up the Phone Configuration screen.
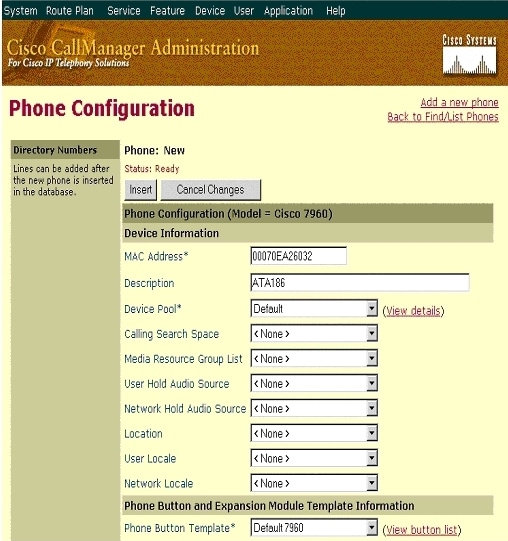
Cisco CallManager versions 3.0 and 3.1
Cisco CallManager version 3.2 or 3.3
-
For this step, the screen capture for Cisco CallManager versions 3.0 and 3.1 are shown first, then the screen capture for Cisco CallManager 3.2 and 3.3.
-
Enter the MAC address of the ATA 186 in the MAC Address field (for example, 00070ea26032).
-
Select the Device Pool* from the drop-down menu. This is set to Default, but can be set to any other device pool if specifically configured.
-
Select the Phone Button Template from the drop-down menu. In Cisco CallManager version 3.0 and 3.1, use Default 7960. In Cisco CallManager version 3.2 and 3.3, use Default ATA 186.
-
Click Insert (or Update in Cisco CallManager versions 3.2 and 3.3).
-
A window displays asking, "The phone has been added to the database. Would you like to add a directory number for line 1 of this phone now?" Click OK.
-
Add the directory numbers to the devices.
Cisco CallManager versions 3.0 and 3.1
Cisco CallManager versions 3.2 or 3.3
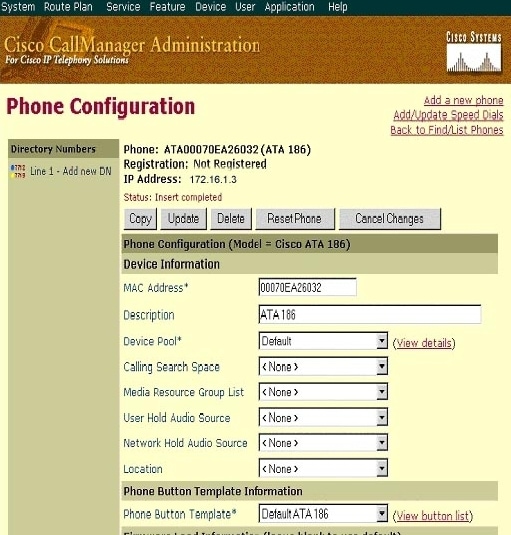
Note: The above screenshot is from Cisco CallManager 3.2. In Cisco CallManager 3.3 you have an additional field which is called AAR Calling Search Space but this is not relevant to this document. For more information on AAR Calling Search Space, refer to Automated Alternate Routing Group Configuration.
-
-
Use this procedure to add the second port on the Cisco ATA 186 to Cisco CallManager.
-
Drop the first two nibbles of the MAC address and shift the MAC address to the left, then add 01 to the right end of the MAC address. For example 00070EA26032 is port 1 and 070EA2603201 is port 2.
-
Now, just to make sure that the second port gets registered, go to the ATA web configuration. Open a web browser on a PC that can ping the ATA and type <ATAIPaddress>/dev, for example: 192.168.1.10/dev. The web browser takes you to the ATA web configuration. Go to SCCP Parameters and look for SID1; make sure that this field has a dot “.”; this enables the second port to get registered with the CCM. SID0 corresponds to the port 1 of the ATA.
-
-
Use this new MAC address and start over at step 4 to add the second port in Cisco CallManager.
-
Verify the Cisco ATA 186 is Registered on the Cisco CallManager
Use this procedure to verify the ATA 186 is registered on the Cisco CallManager.
-
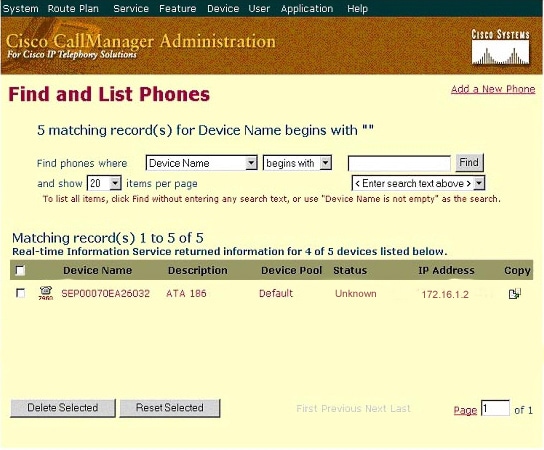
From the Cisco CallManager Administration menu bar, select Device > Phone and click Find to bring up the Find and List screen with a list all items connected to the Cisco CallManager.
Note: If needed, you can narrow the search to the specific phone by specifying the MAC address within the search.
-
Make sure your ATA 186 is registered with the Cisco CallManager.
For the ATA 186, the fields are:
-
The MAC address is under the Device Name and Description field.
-
The IP address of the Cisco CallManager is under the Status column.
-
The IP address of the Cisco ATA 186 is under the IP Address column.
-
Verify
There is currently no verification procedure available for this configuration.
Troubleshoot
This section provides information you can use to troubleshoot your configuration.
Error: DeviceTransientConnection - Transient Connection Attempt
Cisco ATA configured as a skinny device constantly drops the connection to the Cisco CallManager with the Error: DeviceTransientConnection - Transient Connection Attempt error in the Cisco CallManager event log.
The reason for this issue is that ATA Port 2 is not registered in Cisco CallManager, and it is not disabled on the ATA. As a result, when ATA Port 2 attempts to register in Cisco CallManager, Cisco CallManager rejects the registration request.
The error message in the Cisco CallManager event log is similar to this output:
Error: DeviceTransientConnection - Transient connection attempt.
Connecting Port: 2000
Device name [Optional].: SEP08a3d31f6d01
Device IP address.: 10.10.40.29
Device type. [Optional]: 7
Reason Code [Optional].: 1
App ID: Cisco CallManager
Cluster ID: HILLCCM01-Cluster
Node ID: 10.10.10.2
Explanation: A connection was established and immediately dropped before
             completing registration. Incomplete registration may indicate
             a device is rehoming in the middle of registration. The alarm
             could also indicate a device misconfiguration, database error,
             or an illegal/unknown device trying to attempt a connection.
Recommended Action: No action is required if this event was issued as a result
             of a normal device rehome.
In order to resolve this issue, you must either configure the second port in the Cisco CallManager or disable it on the ATA.
-
Disable the second analog Foreign Exchange Station (FXS) port on the ATA—Set the field EPID1 or SID1 to 0 (zero).
-
Disable the first analog FXS port on the ATA—Set the corresponding EPID0 or SID0 field to 0.
Use value 0 to disable the port(s) you do not use:
-
EPID0 or SID0 for Line 1 or Port 1
-
EPID1 or SID1 for Line 2 or Port 2
Refer to Adding the Cisco ATA to the Cisco CallManager for more information on a range of configuration field settings, which includes the one mentioned here.
SIDx specifies whether to enable the Phone 1 and/or Phone 2 ports on the Cisco ATA to register with Cisco CallManager. (EPIDx is not for SCCP.) SIDx can be one of these values:
-
0—Disables the port. The port does not attempt to register with Cisco CallManager.
-
.—Uses the default Skinny ID, which is the Cisco ATA MAC address (MAC) for the Phone 1 port and MAC[1-5]+01 for the Phone 2 port. The port attempts to register with Cisco CallManager.
For example, if the MAC address of the Cisco ATA is 00012D01073D, then SID0 is 00012D01073D and SID1 is 012D01073D01.
-
Other values are reserved.
Refer to the EPID0orSID0 and EPID1orSID1 for information on ATA ports.
Related Information
Revision History
| Revision | Publish Date | Comments |
|---|---|---|
1.0 |
06-Apr-2009 |
Initial Release |


 Feedback