Configure WLC Mesh Network for Releases 5.2 and later
Available Languages
Contents
Introduction
This document provides a basic configuration example on how to configure Point-to-Point wireless bridging deployment mode using the Mesh Network solution from Cisco Wireless LAN Controller Releases 5.2 and later.
Refer to Wireless LAN Controller Mesh Network Configuration Example for more information and for the configuration example of WLC Releases 5.1 and earlier.
This example uses two lightweight access point (LAPs). One LAP operates as a Root Access Point (RAP), the other LAP operates as a Mesh Access Point (MAP), and they are connected to a Cisco Wireless LAN Controller (WLC). The RAP is connected to the WLC through a Cisco Catalyst switch.
Prerequisites
Requirements
Cisco recommends that you have knowledge of these topics:
-
Basic knowledge of the configuration of LAPs and Cisco WLCs
-
Basic knowledge of Control And Provisioning of Wireless Access Points (CAPWAP)
-
Knowledge of the configuration of an external DHCP server and/or domain name server (DNS)
-
Basic configuration knowledge of Cisco switches
Components Used
The information in this document is based on these software and hardware versions:
-
Cisco 5508 WLC that runs firmware 7.2.110.0
-
Cisco Aironet 1520 Series Lightweight Outdoor Access Points
-
Cisco Layer 2 Switch
The information in this document was created from the devices in a specific lab environment. All of the devices used in this document started with a cleared (default) configuration. If your network is live, make sure that you understand the potential impact of any command.
Conventions
Refer to Cisco Technical Tips Conventions for more information on document conventions.
Background Information
Cisco Aironet 1520 Series Lightweight Outdoor Mesh AP
The Cisco Aironet 1520 Series mesh access points are designed to support a wide variety of applications.
The 1524SB has two 5-GHz radios are used to backhaul traffic through the mesh network, while a 2.4-GHz radio is used for client access. As a software configuration, an 802.11a radio can also be used for client access. With the 1524PS, a 5.8-GHz radio provides wireless backhaul, while a 2.4-GHz radio and a 4.9-GHz radio provide access for unlicensed Wi-Fi and licensed public safety clients.
Root Access Points
Root Access Points have wired connections, for example, Ethernet backhaul to a wired network to Wireless LAN Controller.
Mesh Access Points
Mesh Access Points have wireless connections to their Wireless LAN Controller. MAPs communicate among themselves and back to the RAP with the use of wireless connections over the 802.11a radio backhaul. MAPs use the Cisco Adaptive Wireless Path Protocol (AWPP) in order to determine the best path through the other mesh access points to the controller.
This diagram shows the relationship between RAPs and MAPs in a mesh network.
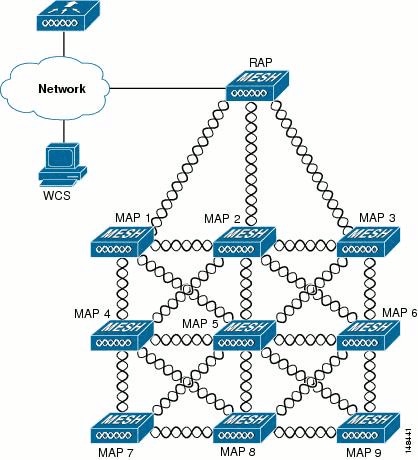
Cisco Adaptive Wireless Path Protocol Wireless Mesh Routing
The Cisco Adaptive Wireless Path Protocol (AWPP) is designed specifically for wireless mesh networking. The path decisions of AWPP are based on the link quality and the number of hops.
Ease of deployment, fast convergence, and minimal resource consumption are also key components of AWPP.
The goal of AWPP is to find the best path back to a RAP for each MAP that is part of the bridge group of the RAP. In order to do this, the MAP actively solicits for neighbor MAPs. During the solicitation, the MAP learns all of the available neighbors back to a RAP, determines which neighbor offers the best path, and then synchronizes with that neighbor.
Features Not Supported on Mesh Networks
These controller features are not supported on mesh networks:
-
Multi-country support
-
Load-based CAC—Mesh networks support only bandwidth-based, or static, CAC.
-
High availability (fast heartbeat and primary discovery join timer)
-
EAP-FASTv1 and 802.1X authentication
-
EAP-FASTv1 and 802.1X authentication
-
Locally significant certificate
-
Location-based services
Configure
In this section, you are presented with the information to configure the features described in this document.
Note: Use the Command Lookup Tool (registered customers only) to obtain more information on the commands used in this section.
Network Diagram
This document uses this network setup:

Configurations
Complete these steps in order to configure the WLC and the APs for point-to-point bridging.
-
Add the MAC address of the mesh AP to the MAC filter of the controller.
-
Define the role (RAP or MAP) of the mesh Access Point.
Add the MAC Address of the Mesh AP to the MAC Filter of the Controller
This is the GUI configuration. Complete these steps:
-
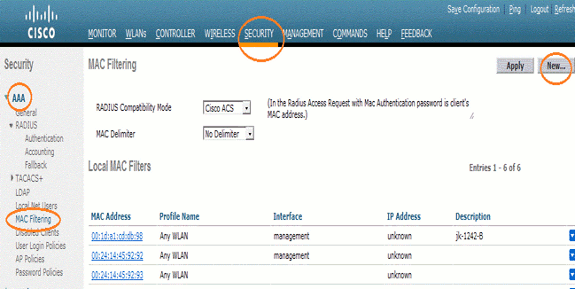
Choose Security > AAA > MAC Filtering. The MAC Filtering page appears.
-
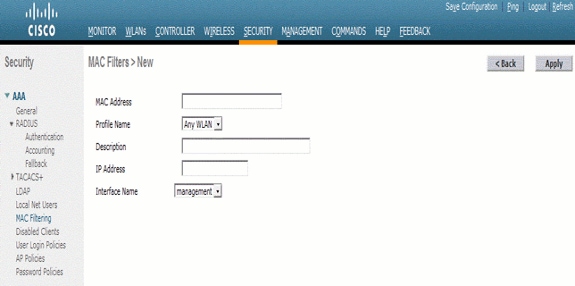
Click New. The MAC Filters > New page appears.
-
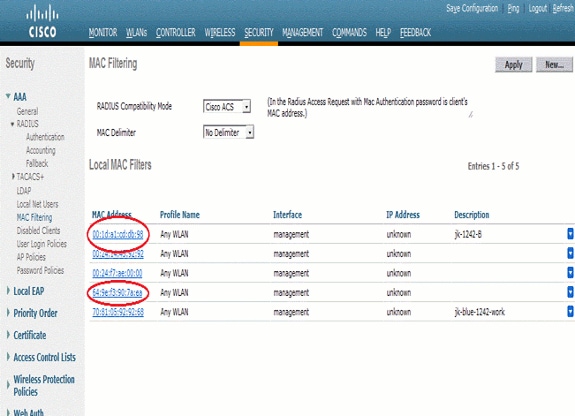
Enter the MAC address of the mesh access point. In this example, you add APs with this MAC address: 00:1d:a1:cd:db:98 and 64:9e:f3:90:7a:ea
-
From the Profile Name drop-down list, choose Any WLAN.
-
In the Description field, specify a description in order to identify the mesh access point on the controller.
-
From the Interface Name drop-down list, choose the controller interface to which the mesh access point is to connect. In this example, choose Management interface.
-
Click Apply to commit your changes. The mesh access point now appears in the list of MAC filters on the MAC Filtering page.
-
Click Save Configuration in order to save your changes.
-
Repeat the previous steps in order to add the MAC addresses of second mesh access points to the list.
Issue the config macfilter add ap_mac wlan_id command in order to add a MAC address the MAC filter. In this configuration example, add MAC address of both the mesh access points:
(Cisco Controller) >config macfilter add 00:1d:a1:cd:db:98  0
(Cisco Controller) >config macfilter add 64:9e:f3:90:7a:ea  0
Define the Role (RAP or MAP) of the mesh Access Point
This is the GUI configuration. Complete these steps:
-
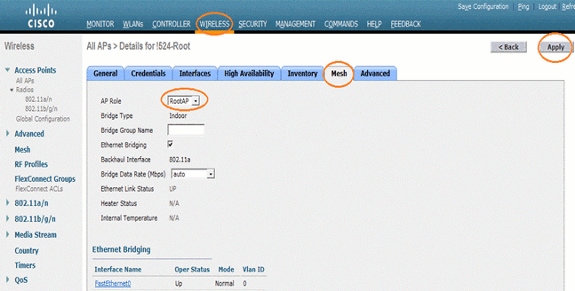
Click Wireless in order to open the All APs page.
-
Click the name of an access point. In this example, click 1524-Root. The All APs > Details (General) page appears.
-
Click on the Mesh tab.
-
Choose RootAP from the AP Role drop-down list.
-
Click Apply in order to commit your changes and to cause the access point to reboot.
-
Repeat the steps 1 to 5 in order to configure the second access point, for example 1524-Mesh, as MeshAP
Issue the config ap role {rootAP | meshAP} Cisco_AP command:
(Cisco Controller) >config ap role rootAP 1524-Root
(Cisco Controller) >config ap role meshAP 1524-Mesh
Verify
Use this section to confirm that your configuration works properly.
The Output Interpreter Tool (registered customers only) (OIT) supports certain show commands. Use the OIT to view an analysis of show command output.
After the APs register with the WLC, you can view them under the Wireless tab at the top of the GUI of the WLC:

On the CLI, you can use the show ap summary command in order to verify that the APs registered with the WLC:
(Cisco Controller) >show ap summary

>show ap summary

Number of APs.................................... 3

Global AP User Name.............................. admin
Global AP Dot1x User Name........................ Not Configured

AP Name             Slots  AP Model              Ethernet MAC       Location          Port  Country  Priority
------------------  -----  --------------------  -----------------  ----------------  ----  -------  ------
1524-Root            2     AIR-LAP1524SB-A-K9     00:24:14:45:92:92  default location  LAG      AU       4
1524SB               3     AIR-LAP1524SB-A-K9    00:24:f7:ae:00:00  default location  LAG      AU       4
1524-Mesh            2     AIR-LAP1524SB-A-K9     64:9e:f3:90:7a:ea  default location  LAG      AU       4
(Cisco Controller) >
On the CLI, you can use the show mesh ap tree commands in order to verify that the APs registered with the WLC:
(Cisco Controller) >show mesh ap tree


 =======================================================
||  AP Name [Hop Counter, Link SNR, Bridge Group Name] ||
 =======================================================

[Sector 1]
----------
!524-Root[0,0,default]
  |-1524-Mesh[1,77,default]

[Sector 2]
----------
1524SB[0,0,cisco]

----------------------------------------------------
Number of Mesh APs............................... 3
Number of RAPs................................... 2
Number of MAPs................................... 1
----------------------------------------------------

(Cisco Controller) >
Troubleshoot
This section provides information you can use to troubleshoot your configuration.
Mesh APs doesn't associate to the WLC is one of the most common issues seen in the Mesh deployment. Complete this check:
Check that the MAC Address of the access point is added in the Mac Filter list in the WLC. This can be seen in Security > Mac Filtering.
Until MAP is connected to WLC, you cannot check state of AWPP without console access on MAP.
If you know an expected parent, based on Bridge Group Name, or geography, you can log into parent through WLC, and issue some show and debug commands in order to see if child MAP attempts to connect.
-
show mesh adj child
-
debug mesh adj child
Check if Mesh State Machine has completed.
-
First, see if AP has found a parent:
1524-Mesh#show mesh status show MESH Status MeshAP in state Maint Uplink Backbone: Virtual-Dot11Radio0, hw Dot11Radio2 Configured BGN: Sr11-2106, Extended mode 0 Children: Accept child rxNeighReq 0 rxNeighRsp 7115 txNeighReq 4688 txNeighRsp 0 rxNeighRsp 55126 txNeighUpd 13770 nextchan 0 nextant 0 downAnt 0 downChan 0 curAnts 0 nextNeigh 3, malformedNeighPackets 0,poorNeighSnr 0 excludedPackets 0,insufficientMemory 0, authenticationFailures 0 Parent Changes 1, Neighbor Timeouts 2 Vector through a8b1.d4d4.f100: Vector ease 1 -1, FWD: 001d.a1cd.db98 -
This MAP is in Maint state, which indicates it has found a parent, and is in the desired AWPP or Mesh State. The parent is AP ending with MAC db98.
Another way to check is if there is a parent entry in the Mesh adjacency table, issue the show mesh adjacency parent command.
Check for IP Address—The IP Address indicates if the Key Exchange between this AP and Parent AP was successful. If there is no IP address, check the DHCP server. If only this MAP is not able to obtain an IP address, but others are, this can be the key issue.
Troubleshooting Commands
The Output Interpreter Tool (registered customers only) (OIT) supports certain show commands. Use the OIT to view an analysis of show command output.
Note: Refer to Important Information on Debug Commands before you use debug commands.
-
debug capwap detail enable —This command shows the debug of CAPWAP messages.
-
debug capwap events enable —The WLC command output shows that the LAP gets registered to the WLC.
Related Information
Revision History
| Revision | Publish Date | Comments |
|---|---|---|
1.0 |
27-Aug-2012 |
Initial Release |
Contact Cisco
- Open a Support Case

- (Requires a Cisco Service Contract)


 Feedback