
Configure an SD-Routing Device as an SSL/TLS Proxy
Overview of SSL/TLS Proxy
Today more and more apps and data reside in the cloud. As a result, majority of internet traffic is encrypted. This may lead to malware remaining hidden and lack of control over security. The TLS proxy feature allows you to configure edge devices as transparent TLS proxy. This allows the devices to identify risks that are otherwise hidden by end-to-end encrypted TLS channel. The data is re-encrypted post inspection before being sent to its destination.
| Feature Name |
Release Information |
Description |
|---|---|---|
|
Configure an SD-Routing Device as an SSL/TLS Proxy |
Cisco IOS XE 17.14.1a |
This feature allows you to configure an autonomous device as a transparent SSL/TLS proxy. These proxy devices can then decrypt incoming and outgoing TLS traffic to enable their inspection and identify risks that are hidden by end-to-end encryption. |
Traffic Flow with TLS Proxy
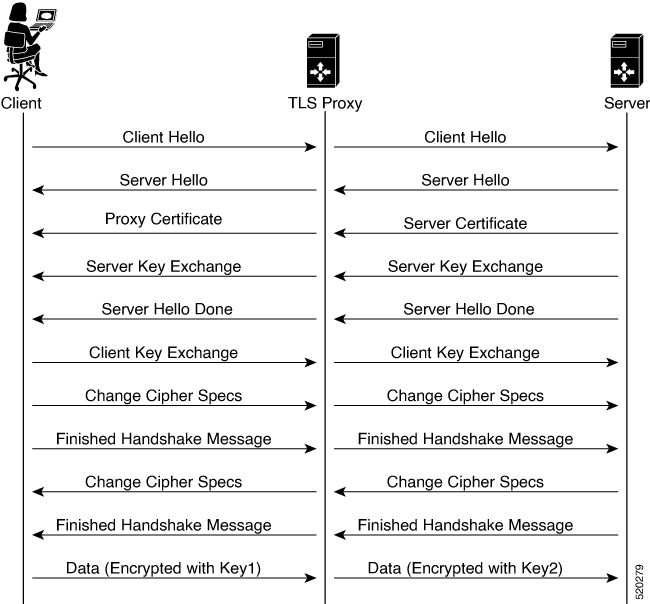
A typical TLS handshake involves authentication using certificates signed by trusted, third-party Certificate Authorities (CAs). The clients and servers must trust these CAs in order to establish trust. TLS Proxy acts as MitM and runs a CA to issue proxy certificates for the connection dynamically.
This is how traffic flows when TLS proxy is enabled:
-
A TCP connection is established between the client and the proxy, and the proxy and the server.
-
If a decryption policy is enabled for the flow, a client Hello packet is sent to the server to determine the decryption action.
-
Based on the decryption policy, one of the following actions takes place:
-
drop: If the verdict is drop, the hello packet from the client is dropped and the connection is reset.
-
do-not-decrypt: If the verdict is do-not-decrypt, the hello packet bypasses TLS proxy.
-
decrypt: If the verdict is decrypt, the packet is forwarded to the client and goes through the following:
-
TCP optimization for optimization of traffic
-
Decryption of encrypted traffic through TLS proxy
-
Re-encryption of decrypted traffic through TLS proxy
-
-
The following image shows the TLS handshake process
Supported Cipher Suites
The TLS Proxy feature supports the following cipher suites.
|
TLS_RSA_WITH_3DES_EDE_CBC_SHA |
TLS_DHE_RSA_WITH_3DES_EDE_CBC_SHA |
|
TLS_RSA_WITH_AES_128_CBC_SHA |
TLS_DHE_RSA_WITH_AES_128_CBC_SHA |
|
TLS_RSA_WITH_AES_256_CBC_SHA |
TLS_DHE_RSA_WITH_AES_256_CBC_SHA |
|
TLS_RSA_WITH_AES_128_CBC_SHA256 |
TLS_RSA_WITH_AES_256_CBC_SHA256 |
|
TLS_DHE_RSA_WITH_AES_128_CBC_SHA256 |
TLS_DHE_RSA_WITH_AES_256_CBC_SHA256 |
|
TLS_RSA_WITH_SEED_CBC_SHA |
TLS_DHE_RSA_WITH_SEED_CBC_SHA |
|
TLS_RSA_WITH_AES_128_GCM_SHA256 |
TLS_RSA_WITH_AES_256_GCM_SHA384 |
|
TLS_DHE_RSA_WITH_AES_128_GCM_SHA256 |
TLS_DHE_RSA_WITH_AES_256_GCM_SHA384 |
|
TLS_ECDHE_RSA_WITH_AES_128_CBC_SHA256 |
TLS_ECDHE_RSA_WITH_AES_128_CBC_SHA |
|
TLS_ECDHE_RSA_WITH_AES_256_CBC_SHA |
TLS_ECDHE_RSA_WITH_3DES_EDE_CBC_SHA |
|
TLS_ECDHE_RSA_WITH_AES_256_GCM_SHA384 |
TLS_ECDHE_RSA_WITH_AES_128_GCM_SHA256 |
|
TLS_ECDHE_RSA_WITH_AES_256_CBC_SHA384 |
|
Benefits of TLS Proxy
-
Monitoring of TLS traffic for any threats through transparent inspection
-
Enforcement of security polices based on the inspection of the decrypted traffic
-
Threat and malware protection for TLS traffic
Limitations TLS Proxy
-
Only RSA and its variant cipher suites are supported.
-
Certificate Revocation List (CRL) check is not supported for server certificate validation. However, you can enable OCSP from Advanced Settings in SSL Decryption policy.
-
OCSP stapling is not supported and must be explicitly disabled on the browser for the TLS session to be established.
-
IPv6 traffic is not supported.
-
TLS session resumption, renegotiation and client certificate authentication are not supported.
-
If TLS proxy crashes, it takes up to two minutes for it to be ready to serve as proxy for TLS flows again. During this time, depending upon your security settings, the flows are either bypassed or dropped.
Supported Devices and Device Requirements
The following devices support the SSL/TLS Proxy feature.
|
Release |
Supported Devices |
|---|---|
|
Cisco IOS XE Catalyst SD-WAN Release 17.14.1a |
|
Minimum Device Requirements
-
The device must have a minimum of 8 GB of DRAM; 16 GB for Cisco Catalyst 8300 Series Edge Platforms.
-
The device must have a minimum of 8 vCPUs.
Workflow to Set Up TLS Proxy for SD-Routing Devices
This workflow outlines the high-level steps required to set up TLS Proxy for SD-Routing devices using SD-WAN Manager. The detailed instructions are covered in the following sections.
|
Task |
Description |
|---|---|
|
Set up Time Synchronization |
|
|
Set up time synchronization between the Certificate Authority (CA) server and the device seeking the certificate. |
Go to Select System Profile in SD-WAN Manager. Enter details to configure NTP. |
|
Set up Certificate Authority |
|
| Determine how to configure the CA server. |
A CA issues SSL certificates to verify the authenticity and establish trust between a client and server. You can configure a CA using one of the following options:
|
|
Select devices to be configured as TLS Proxy |
|
|
Create a Configuration Group in Cisco SD-WAN Manager and associate it to the WAN edge device. |
Helps to form a logical grouping of features or configurations that can be applied to one or more devices in the network. |
|
Configure Security Policies |
|
|
Configure an embedded firewall security policy for inspection, prevention and decryption. |
Go to and follow the steps to configure the security policy. |
|
Configure additional parameters for TLS traffic decryption. |
Create an inline TLS Decryption Security Policy Add additional parameters to the Embedded Security policy created above. To do that, select the Embedded Policy created above, go to Additional Settings and create a TLS/SSL Decryption policy and associate this with the Embedded Security Policy that you created above. OR Create a Security Policy using Group of Interest Go to , add TLS/SSL Decryption Policy and follow the steps to configure the security policy. Next associate this with the Embedded Security Policy created above. |
|
Associate the TLS Decryption Policy with a Device |
|
|
Go to . Select the Embedded Security policy (has the associated TLS/SSL Decryption policy) and click Save to associate the policy with the Policy Group. Next, associate the policy group to a device and delpoy the device. |
|
Verify the TLS Proxy Configuration |
Use the following commands to verify the configuration of SSL/TLS Proxy:
|
Configure Time Synchronization
Set up time synchronization between the CA server and the device seeking the certificate.
|
Step 1 |
Click . Select System Profile and enter the following details.
|
||||||||||||||||
|
Step 2 |
Save these details. |
||||||||||||||||
Configure Certificate Authority
The following CA options are supported for configuring TLS proxy :
The following sections cover the benefits and limitations of each of the supported CA options to help you make an informed decision about choosing the CA for TLS proxy.
Enterprise CA
Use this option to manage issuing certificates through an Enterprise CA or your own internal CA. For Enterprise CA that does not support Simple Certificate Enrollment Protocol (SCEP), manual enrollment is required.
Manual enrollment involves downloading a Certificate Signing Request (CSR) for your device, getting it signed by your CA, and then uploading the signed certificate to the device through Cisco SD-WAN Manager
|
Benefits |
Limitations |
|---|---|
|
|
Configure Enterprise CA
 Note
NoteWhen configuring TLS/SSL proxy feature, trust point allows only two certificates; root certificate and certificate signed by root certificate. You cannot upload cert chain.
-
Download a CA certificate from your CA server in PEM or Base 64 format.
-
From the Cisco SD-WAN Manager menu, choose .
-
Choose Enterprise CA.
-
To upload your PEM-encoded CA certificate. click Select a file.
OR
Paste the CA certificate in the Root Certificates box.
-
Verify that the fingerprint, which auto-populates after you upload the certificate, matches your CA.
-
Click Save Certificate Authority.
-
Configure a Firewall Policy to Inspect and Decrypt TLS Traffic.
Enterprise CA with SCEP
Simple Certificate Enrollment Protocol (SCEP) is an open source protocol that is widely used to make digital certificate issuance easier, more secure, and scalable. Use this option to manage issuing certificates through an Enterprise CA or your own internal CA. If your CA supports SCEP, you can configure it to automate the certificate management process.
|
Benefits |
Limitations |
|---|---|
|
|
Configure Enterprise CA with SCEP
-
Download a CA certificate from your CA server in PEM or Base 64 format.
-
From the Cisco SD-WAN Manager menu, choose Configuration > Certificate Authority.
-
Choose Enterprise CA.
-
[Optional,but recommended] Check the Simple Certificate Enrollment Protocol (SCEP) check box.
-
Enter the SCEP server URL in the URL Base field.
-
[Optional] Enter the Challenge Password/Phrase if you have one configured.
NoteIf Enterprise CA is configured with SCEP, the Enterprise SCEP CA server should be reachable from the VRF.
-
To upload your PEM-encoded CA certificate. click Select a file
OR
Paste the CA certificate in the Root Certificates box.
-
Click Save Certificate Authority.
-
Configure a Firewall Policy to Inspect and Decrypt TLS Traffic
Cisco SD-WAN Manager as CA
Use this option to manage issuing certificates through an Enterprise CA or your own internal CA. For Enterprise CA that does not support Simple Certificate Enrollment Protocol (SCEP), manual enrollment is required.
|
Benefits |
Limitations |
|---|---|
|
|
Configure Cisco SD-WAN Manager as CA
Use SD-WAN Manager as CA if your enterprise does not have an internal CA. With this option, Cisco SD-WAN is used as a root CA and is authorized to issue subordinate CAs to the proxy devices at the edge of the network. The certificates issued by the CA can be managed through Cisco SD-WAN Manager .
-
From the Cisco SD-WAN Manager menu, choose .
-
Choose SD-WAN as CA
NoteLeave the Set SD-WAN as Intermediate CA check box not checked if you want to set SD-WAN Manager as CA.
-
Enter the requested details: Common Name, Organization, Organizational Unit, Locality, State/Province, Country Code, and Email.
-
Choose the certificate validity period from the drop-down list.
-
Click Save Certificate Authority.
-
Configure a Firewall Policy to Inspect and Decrypt TLS Traffic.
Cisco SD-WAN Manager as Intermediate CA
Use this option if you have an internal enterprise CA, but would like to use Cisco SD-WAN Manager as intermediate CA to issue and manage subordinate CA certificates.
|
Benefits |
Limitations |
|
|
Configure SD-WAN Manager as Intermediate CA
Configure Cisco SD-WAN Manager as Intermediate CA to enable a TLS proxy device to use subordinate CA certificates issued by the Cisco SD-WAN Manager .
When Cisco SD-WAN Manager is set as intermediate CA, your enterprise CA acts as the root CA and is designated as the preferred intermediate CA to issue and manage subordinate CA certificates for a proxy device. This option is suitable for enterprises that have their own internal CA but would like to use Cisco SD-WAN Manager to automate and manage certificate issuance and renewal.
-
From the menu, choose Configuration > Certificate Authority.
-
Choose SD-WAN Manager as CA.
-
Check the Set SD-WAN as Intermediate CA check box.
-
Upload the CA certificate using the Select a file option.
OR
Paste the content of the PEM-encoded CA certificate file in the Root Certificate text box.
-
Click Next.
-
Under the Generate CSR area, enter the requested details, and click Generate CSR.
The CSR field on the screen populates with the Certificate Signing Request (CSR).
-
Copy or download the CSR and upload it to the enterprise CA server to get it signed by the CA server as the subordinate CA certificate.
NoteThe process to get a CSR signed by a CA server may differ from one CA to another. Follow your standard procedure to get a CSR signed by your CA.
-
Click Save Certificate Authority.
-
Configure a Firewall Policy to Inspect and Decrypt TLS Traffic.
Upload a Subordinate CA Certificate to TLS Proxy
When Cisco SD-WAN Manager is set as intermediate CA, your enterprise CA acts as the root CA and Cisco SD-WAN Manager is designated as the preferred intermediate CA to issue and manage subordinate CA certificates for a proxy device. This option is suitable for enterprises that have their own internal CA but would like to use Cisco SD-WAN Manager to automate and manage certificate issuance and renewal.
-
From the Cisco SD-WAN Manager menu, choose .
-
Check the checkbox.
-
To upload your PEM-encoded CA certificate. click Select a file
OR
Paste the CA certificate in the Root Certificates box.
Click Next.
-
In the Intermediate Certificate text box, paste the content of the signed Cisco SD-WAN Manager certificate, and click Upload.
OR
Click Select a file and upload the CSR generated in the previous step, and click Upload
-
Verify that the Finger Print, which auto-populates after you upload the CSR, matches your CA certificate.
-
Click Save Certificate Authority.
NoteWhen a Cisco public key (PKI) certificate is installed on a device, and you want to make changes to the certificate, detach the embedded security policy from the policy group and push the policy group to the device. This will remove the existing PKI certificate and configuration. After you have made changes to the PKI certificate, re-attach the embedded security policy and then push the policy group to the device. This process updates the device for any the changes to the Cisco PKI certificate
Add Devices to a Configuration Group
Add devices to a Configuration Group.
|
Step 1 |
Click adjacent to the configuration group name and choose |
|
Step 2 |
Click and then click |
|
Step 3 |
Follow the instructions. The selected devices are listed in the table. |
Configure a Firewall Policy to Inspect and Decrypt TLS Traffic
Configure a firewall policy that defines the conditions to be met for traffic to flow between zones.
|
Step 1 |
From the Cisco SD-WAN Manager menu, go to and follow the steps to configure the firewall policy. |
||||||||||||||||||||||||||||||||||
|
Step 2 |
Create a sub-policy for source and destination zone: Zones establish the security borders of your network. A zone defines a boundary where traffic is subjected to policy restrictions as it crosses to another region of your network. |
||||||||||||||||||||||||||||||||||
|
Step 3 |
Create a security policy for inspection, decryption and prevention: |
||||||||||||||||||||||||||||||||||
|
Step 4 |
Click on Additional Settings in the Security Policy creation page, to add specific parameters for TLS/SSL decryption. |
||||||||||||||||||||||||||||||||||
|
Step 5 |
Click Create New from the TLS/SSL Decryption Policy drop-down to define the decryption policy.
Alternatively, you can also configure a TLS/SSL Decryption Policy using and add TLS/SSL Decryption Policy. Ensure that you add this policy to the Embedded policy as indicated in Step 4 above. |
||||||||||||||||||||||||||||||||||
|
Step 6 |
Save the decryption policy. |
||||||||||||||||||||||||||||||||||
Add Security Policy to Policy Group
Associate the Embeded Security Policy created above to the Policy Group. To do so:
|
Step 1 |
Click to create a new policy group. A policy group logically groups policies that can be applied to one or more sites or devices at the site in the network |
|
Step 2 |
Specify and select solution type as . Enter a description for the Policy Group. Click Create. |
|
Step 3 |
Select an embedded security policy from the drop-down list. The embedded security policy includes policies for encryption, firewall, intrusion prevention, URL filtering, and malware. |
|
Step 4 |
Click Save to save your configuration. |
|
Step 5 |
Click the pencil icon to select a device to associate with the policy group. This association ensures that when you deploy this Policy group to a device, the device inherits all the policies associated with this Policy Group. |
|
Step 6 |
Click Deploy to select sites and deploy the policy group. |
Verify TLS Proxy Configuration
Use the following commands to verify the configuration for TLS proxy.
| show sd-routing running | In Cisco SD-WAN Manager, run this command in CLI mode to verify if your configuration is applied. |
| show sd-routing running-config | In Cisco SD-WAN Manager, run this command by connecting to the device CLI through SSH |
| show crypto pki status | On your device CLI, run this command to verify that the PROXY-SIGNING-CA is present and configured correctly on the device. |
| show sslproxy statistics | On your device CLI, run this command to view TLS proxy statistics |
| show sslproxy status |
On your device CLI, run this command to verify whether TLS proxy was successfully configured and is enabled on Cisco SD-WAN Manager. In the output , Clear Mode: FALSE denotes that TLS proxy was successfully configured and enabled on Cisco SD-WAN Manager |
| show platform hardware qfp active feature utd config | On your device CLI, run this command to verify the configuration. |
| show sd-routing running-configuration|section utd-tls-decrypt | On your device CLI, run this command to verify the configuration. |
| show utd engine standard config | On your device CLI, run this command to verify the configuration |
| show utd engine standard status | On your device CLI, run this command to verify the configuration |