Configuring Antivirus Devices
Available Languages
Table Of Contents
Symantec AntiVirus Configuration
Configure the AV Server to Publish Events to MARS Appliance
Export the AntiVirus Agent List
McAfee ePolicy Orchestrator Devices
Configure ePolicy Orchestrator to Generate Required Data
Add and Configure ePolicy Orchestrator Server in MARS
Configure Cisco ICS to Send Syslogs to MARS
Add the Cisco ICS Device to MARS
Define Rules and Reports for Cisco ICS Events
Configuring Antivirus Devices
Revised: November 11, 2007Antivirus (AV) devices provide detection and prevention against known viruses and anomalies.
This chapter describes how to configure and add the following devices and systems:
•
Symantec AntiVirus Configuration
•
•
Symantec AntiVirus Configuration
To enable a Symantec AntiVirus agent as a reporting device in MARS, you must identify the Symantec System Center console as the reporting device. The Symantec System Center console receives alerts from the AV agents that it monitors, and it forwards those alerts to MARS as SNMP notifications.
When MARS receives the SNMP notification, the source IP address in the notification is that of the AV agent that originally triggered the event, rather than the Symantec System Center console that forwarded it. Therefore, MARS requires host definitions for each of the AV agents that can potentially trigger an event. These definitions are added as sub-components under the device definition of the Symantec System Center console.
As of MARS, release 4.2.1, the MARS Appliance discovers AV agents as they generate alerts, eliminating the need to manually define them. MARS parses the alert to identify the AV agent hostname and to discover the host operating system (OS). MARS uses this information to add any undefined agents as children of the Symantec System Center console as a host with either the Generic Windows (all Windows) or Generic (Unix or Linux) operating system value. You are still required to define the Symantec System Center console; however, you are not required to define each agent. The default topology presentation for discovered AV agents is within a cloud.

Note
Prior to 4.2.1, you were required to manually add each agent or by using an exported agent list, as defined in Export the AntiVirus Agent List.
Configuring the Symantec AntiVirus integration requires performing two tasks:
•
In addition, you can perform the following task to expedite populating the Agent list in MARS:
•
Configure the AV Server to Publish Events to MARS Appliance
To configure the AV server to publish events to MARS, follow these steps:
Step 1
Step 2
Step 3
Step 4
Step 5
Step 6
Unlocking the server enables you to configure it.
Figure 9-1 Symantec Unlock Server

Step 7
Figure 9-2 Symantec AV AMS

Step 8
Figure 9-3

Symantec AV Trap
Step 9
Figure 9-4 Symantec AV Send SNMP Trap

Step 10
Step 11
Figure 9-5 Symantec AV Action Msg
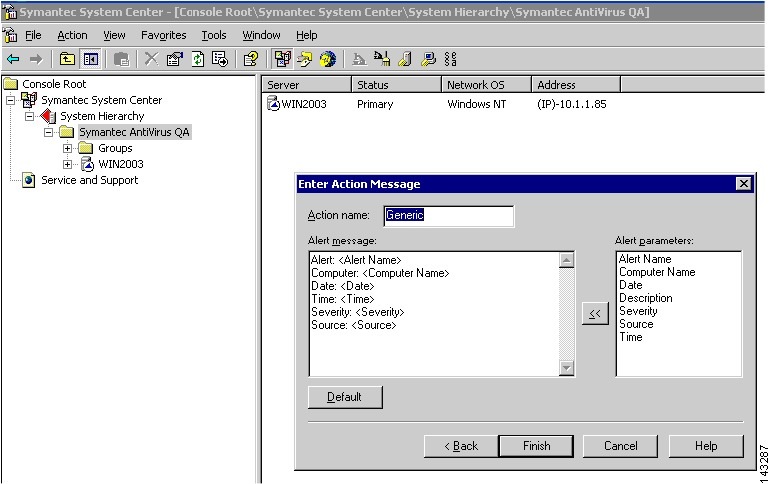
The following mandatary fields are required for MARS to parse AV traps. If these fields are among those possible, you must define these fields in order before defining any of the optional fields.
Note

•
•
•
•
•
•
Note
The following optional fields can be defined after all mandatory fields are defined:
•
•
•
•
•
The following list identifies the trap type and the full list of possible fields:
Alert: Virus Found
•
•
•
•
•
•
•
•
•
•
•
•
Alert: Virus Definition File Update
•
•
•
•
•
•
•
Alert: Symantec AntiVirus Startup/Shutdown
•
•
•
•
•
•
•
Alert: Scan Start/Stop
•
•
•
•
•
•
•
•
•
Alert: Scan Start/Stop
•
•
•
•
•
•
•
•
Alert: Default Alert
•
•
•
•
•
•
•
Alert: Configuration Change
•
•
•
•
•
•
•
Alert: Configuration Change
•
•
•
•
•
•
•
Step 12
Export the AntiVirus Agent List
While MARS discover the list of anitvirus agents that report to the Symantec System Center console automatically, you can export the list of Symantec AntiVirus Clients and Agents as a CSV file (*.csv), which enables you to use the CSV file to manually load the agents into MARS. For more information on adding agents from the file, Add Agents from a CSV File. This approach is much faster than if you had to identify the agents manually.
To generate the CSV file, follow these steps:
Step 1
Step 2
Step 3
You will use this file when you add the AntiVirus agents within the web interface.
Add the Device to MARS
Before you can identify the agents, you must add the Symantec System Center console to MARS. All AntiVirus agents forward notifications to the Symantec System Center console, and the Symantec System Center console forwards SNMP notifications to MARS. Once you define the Symantec System Center console and activate the device. MARS can discover the agents that are managed by that Symantec System Center console. However, you can also chose to manually add the agents.

Tip
To add the host and application configuration information, follow these steps:
Step 1
Step 2
Step 3
Step 4
Step 5
Step 6
•
•
Step 7
Step 8
•
•
•
Add Agent Manually
MARS can automatically discover agents or you can manually add them one at a time or in bulk using a CSV file (see Add Agents from a CSV File.) This topic explains how to manually add a single agent. The value of defining an agent is that is accelerates the discover process; however, it is not required.
To add an agent manually, follow these steps:
Step 1
Step 2
Step 3
· Device Name—The DNS entry for this device.
· Reporting IP—The IP address that the agent uses to send logs to the console.
Step 4
MARS uses interface information to calculate attack paths.
Step 5
Add Agents from a CSV File
You can generate a CSV file that contains the list of agents managed by the Symantec AV server as defined in Export the AntiVirus Agent List. Once the file is generated, you can use the file to import the list of agents into the MARS web interface as child modules of the Symantec AV server.
Note
To import the list of AV agents into MARS. follow these steps:
Step 1
Step 2
Step 3
McAfee ePolicy Orchestrator Devices
Configuring MARS to receive and process the data generated by a McAfee ePolicy Orchestrator server requires you to perform two procedures:
•
•
Configure ePolicy Orchestrator to Generate Required Data
To prepare the ePolicy Orchestrator server to forward SNMP events to MARS, follow these steps:
Step 1
Step 2

Step 3
Step 4
Step 5
Step 6
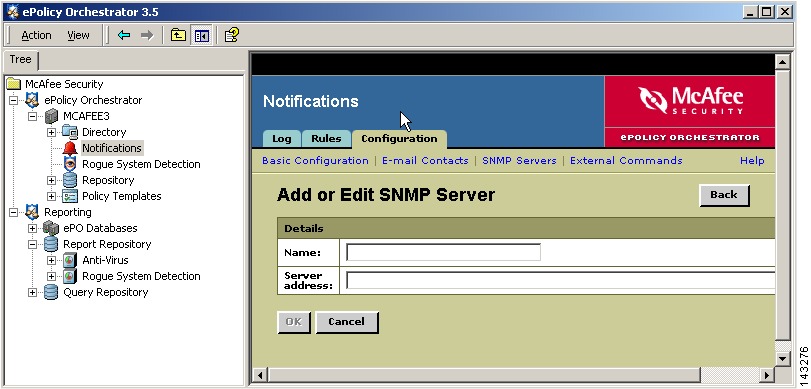
Step 7
The SNMP server is added to represent the MARS Appliance.
Step 8
You can access the Rules tab by selecting McAfee Security > ePolicy Orchestrator > <Server_Name> > Notifications > and then clicking the Rules tab.
Step 9
a.
The Describe Rule wizard page appears.

b.
c.
Figure 9-6 Set Threshold Values

d.
e.

f.
Figure 9-7 SNMP Trap Settings

g.
h.
i.
j.
k.
Add and Configure ePolicy Orchestrator Server in MARS
Before MARS can begin processing SNMP traps from ePolicy Orchestrator, you must define the ePolicy Orchestrator server as software running on a host. When ePolicy Orchestrator is defined as a reporting device, MARS can process any inspection rules that you have defined using ePolicy Orchestrator event types.
After you add the ePolicy Orchestrator server to MARS, the appliance can discover the agents that are managed by the ePolicy Ochestrator server as events are generated by those agents. You do not need to manually define the agents associated with this server.
To add an ePolicy Orchestrator server to MARS, follow these steps:
Step 1
Step 2
Step 3
Step 4
Step 5
This address is the same value as the Reporting IP address.
Step 6
Step 7
Step 8

Step 9
Step 10
Step 11
Cisco Incident Control Server
The Cisco Incident Control Server (Cisco ICS) enables extended protection across Cisco IOS routers, switches, and IPS devices. In coordination with Trend Micro's incident control solutions, Cisco ICS prevents the spread of day-zero outbreaks in three ways:
•
•
•
To complete the Cisco ICS communication settings, you must perform two tasks: configure Cisco ICS to send syslog messages to the MARS Appliance, and add the Cisco ICS management server to the MARS web interface as a reporting device.
This section contains the following topics:
•
•
•
Configure Cisco ICS to Send Syslogs to MARS
Cisco ICS publishes syslog messages to MARS. To configure Cisco ICS, you simply define a syslog server with the IP address of the MARS Appliance. You do not need to enable any special logs, and you cannot tune the messages that are sent to MARS. The Cisco ICS events for which syslog messages are geneerated have been selected to provide the most benefit to your Security Threat Mitigation (STM) system.
To prepare Cisco ICS to publish events to MARS, follow these steps:
Step 1
Step 2

Step 3

A
Step 4
Step 5
Cisco ICS now publishes syslog message to MARS. For MARS to be aware of this device, you must add the Cisco ICS device as a software application running on a host and you must click Activate in the web interface.
Add the Cisco ICS Device to MARS
Before MARS can being processing the syslog messages as Cisco ICS messages, you must define the Cisco ICS management server as an software application running on a host. After Cisco ICS is defined as a reporting device, MARS can process any inspection rules that you have defined using Cisco ICS event types.
To add a Cisco ICS server to MARS, follow these steps:
Step 1
Step 2
You can also select Add SW Security apps on an existing host if you have already defined the host within MARS, perhaps as part of the Management >IP Management settings or if you are running another application on the host, such as Microsoft Internet Information Services.
Step 3
Step 4
Step 5
This address is the same value as the Reporting IP address.
Step 6
Step 7
Step 8

Step 9
Step 10
Step 11
Define Rules and Reports for Cisco ICS Events
From Cisco ICS, MARS receives syslog messages that allow it to identify outbreaks, successful OPACL and OPSig deployments, and failed attempts to deploy. MARS stays abreast of when the OPACLs and OPSigs fire on Cisco IPS devices. MARS also monitors the Cisco ICS server for system issues, such as database failures.
These events assist MARS in providing an accurate, holistic assessment of your network. OPACL and OPSig matching events provide five-tuple correlation, which MARS uses to perform attack path analysis and verify the containment of threats. You can uses the events to define inspection rules that help you perform manual mitigation on devices that cannot use OPACLs and OPSigs.
For example, an inspection rule could be written to match the OPACL event. Your mitigation team can respond by investigating the OPACL that was pushed to the reporting device, from which they can determine the five tuple (source address and port, destination address and port and network service). Using that information, they could push equivalent ACLs to devices not managed by Cisco ICS.
When defining inspection rules or reports, you can access the list of Cisco ICS-specific events by entering Cisco ICS in the Description / CVE: field and clicking Search on the Management > Event Management page of the web interface.
There are four predefined system inspection rules for Cisco ICS:
•
•
•
•
In addition, there are five predefined reports:
•
•
•
•
•
 Feedback