Table Of Contents
Configuring Web Server Devices
Microsoft Internet Information Sever
Install and Configure the Snare Agent for IIS
To configure IIS for web logging
To add configuration information for the host
Apache Web Server on Solaris or RedHat Linux
Sun Java System Web Server on Solaris
Solaris or Linux-side Configuration
Install and Configure the Web Agent on UNIX or Linux
To configure the Apache web server for the agent
To configure the iPlanet web server for the agent
To add configuration information for the host
Configuring Web Server Devices
To use web logging with MARS, you need to configure the host, the webserver, and MARS. MARS can process up to 100 MB of web log data per receive from your host.
Note Web logging is only supported on hosts running Microsoft IIS on Windows, Apache on Solaris or Linux, or iPlanet on Solaris.
This chapter explains how to bootstrap and add the following web sever devices to MARS:
•Microsoft Internet Information Sever
•Apache Web Server on Solaris or RedHat Linux
•Sun Java System Web Server on Solaris
Microsoft Internet Information Sever
You can add computers running Microsoft Windows to MARS as reporting devices. The Microsoft Windows computer needs to run InterSect Alliance SNARE for IIS, from which MARS receives web log data.
Note Synchronize clocks of the Microsoft Windows system and the MARS to ensure times match between them.
Install and Configure the Snare Agent for IIS
To configure IIS to publish logs to MARS, you must install and configure a log agent. This agent is free from the InterSect Alliance. You can download the Snare Agent for IIS Servers from the following URL:
http://www.intersectalliance.com/projects/SnareIIS/index.html#Download
After you have downloaded and install the SNARE on the the Windows webserver, you can continue with the procedures in this section that detail the correct configuration for MARS,
To configure SNARE for web logging, follow thees steps:
Step 1 Click Start > Programs > InterSect Alliance > Audit Configuration.
Figure 13-1 Configure SNARE for Web Logging
Step 2 In Target Host enter the IP address of the MARS.
Step 3 In Log Directory, enter the directory where the logs are to be placed.
Step 4 In Destination, click the Syslog radio button.
Step 5 Click OK.
To configure IIS for web logging
Step 1 Click Start > Programs > Administrative Tools > Internet Services Manager.
Figure 13-2 Configure IIS for Web Logging
Step 2 In the Tree tab on the left, right-click Default Web Site.
Step 3 On the shortcut menu, select Properties.
Figure 13-3 Enable Logging
Step 4 In the Web Site tab:
a. Make sure Enable Logging is checked.
b. From the Active log format list, select W3C Extended Log Format.
c. Click Properties.
Figure 13-4 Select General Log Settings
d. In the General Properties tab, set the New Log Time Period to Daily.
Note The Log file directory must match the one previously set using the Audit Configuration program.
e. In the Extended Properties tab, make sure all available properties are selected.
Figure 13-5 Select Extended Log Events
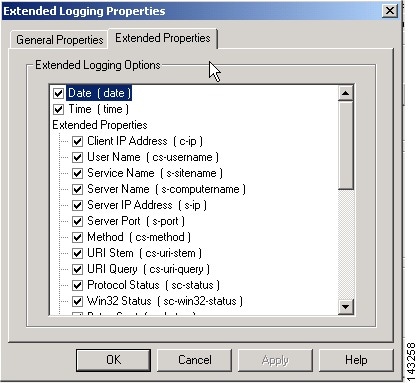
f. Click OK.
Step 5 Click OK.
MARS-side Configuration
To add configuration information for the host
Step 1 Click Admin > Security and Monitor Devices > Add
Step 2 From the Device Type list, select Add SW Security apps on a new host or Add SW security apps on existing host
Step 3 Enter the Device Name and IP Addresses if adding a new host.
Step 4 Select the Windows from Operation System list
Step 5 Click Logging Info
Step 6 For this configuration, you must check the Receive host log box
Figure 13-6 Windows Web Server Logging mechanisms
Step 7 Click Submit.
Step 8 Continue adding the interfaces.
•For the first interface, enter its name, IP address, and mask.
•For multiple interfaces, click Add Interface, and add each new interface's name, IP address, and mask.
Step 9 Add as many IP addresses and masks to the interface as you need by clicking Add IP/Network Mask.
Step 10 Click Apply.
Step 11 Click Reporting Applications tab.
Step 12 From the Select Application list, select Generic Web Server Generic.
Step 13 Click Add.
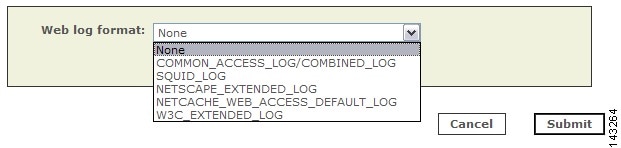
Figure 13-7 Selecting the Windows Web Log format
Step 14 Select W3C_EXTENDED_LOG format
Step 15 Click Submit.
Note Once you have configured and activated both sides, it takes two pulling intervals (default time of 10 minutes) before new events appear.
Apache Web Server on Solaris or RedHat Linux
Sun Java System Web Server on Solaris
Note The Sun Java System Web Sever was formerly known by the following product names: Netscape Enterprise Server, iPlanet Web Server, and Sun ONE Web Server,
Generic Web Server Generic
You can add computers running Solaris or Linux to MARS as reporting devices. The computer needs to run an opensource agent that sends web log data to MARS.
Solaris or Linux-side Configuration
Cisco provides an opensource logging agent and an associated configuration file for you to use. This agent can be downloaded from the software download center at the following URL:
http://www.cisco.com/cgi-bin/tablebuild.pl/cs-mars-misc
Note Synchronize clocks of the UNIX or Linux system and the MARS to ensure times match between them.
Install and Configure the Web Agent on UNIX or Linux
For MARS to recieve logs from a webserver, you must install the Web agent, (agent.pl version 1.1) on the target webserv and direct the agent to publish logs to the MARS Appliance.
Note Before you install the agent, you must have perl and curl installed on your system.
To install the agent on a UNIX or Linux hosts, follow these steps:
Step 1 Log into the host as the root user.
Step 2 Create a directory called /opt/webagent.
Step 3 Copy the files agent.pl and webagent.conf to the /opt/webagent directory.
Step 4 Set the protection of the agent script (agent.pl) so it can be read and executed by all:
cd /opt/webagentchmod 755 agent.plStep 5 Edit the configuration file (weblogagent.conf):
logfile_location = access_log_path
MARS_ip_port = MARS_ip_address
username = apassword = bWhere the following values are provided:
•access_log_path identifies the absolute path name to the web server's access log
•MARS_ip_address is the IP address of the MARS Appliance
You do not need to edit the username or password in the file.
Note You need a separate weblogagent.conf file for each access log you want to pull. We recommend naming them weblogagent1.conf, weblogagent2.conf, and so forth. Put these in the /opt/webagent directory also.
To run the agent using a configuration file other than weblogagent.conf, use the command:
agent.pl other_config_file
replacing other_config_file with the name of the web agent configuration file.
Step 6 Edit the crontab file to push the logs to the MARS at regular intervals. The following example gets new entries from the access log and pushes them to MARS every five minutes:
crontab -e5,10,15,20,25,30,35,40,45,50,55,0 * * * *(cd /opt/webagent;./agent.pl weblogagent1.conf)5,10,15,20,25,30,35,40,45,50,55,0 * * * *(cd /opt/webagent;./agent.pl weblogagent2.conf)
Web Server Configuration
To configure the Apache web server for the agent
Step 1 In the file httpd.conf, make sure the LogFormat is either common or combined and matches the format set on the MARS.
Step 2 Stop and restart the Apache server for your changes to take effect.
To configure the iPlanet web server for the agent
Step 1 In the iPlanet server administration tool, click the Preferences tab.
Step 2 In the left menu, click the Logging Options link.
Step 3 Make sure the Log File matches the log file name set on the MARS.
Step 4 Make sure the Format radio button Use Common Logfile Format is checked.
Step 5 If you have made any changes, click OK.
Step 6 If necessary, shut down and restart the iPlanet web server.
MARS-side Configuration
To add configuration information for the host
Step 1 Click Admin > Security and Monitor Devices > Add.
Step 2 From the Device Type list, select Add SW Security apps on a new host or Add SW security apps on existing host.
Step 3 Enter the Device Name and IP Addresses if adding a new host.
Step 4 Select the either Solaris or Linux from Operation System list.
Step 5 Click Logging Info.
Step 6 For this configuration, you must check the Receive host log box.
Figure 13-8 Unix or Linux Web Server Logging mechanism
Step 7 Click Submit.
Step 8 Continue adding the interfaces.
•For the first interface, enter its name, IP address, and mask.
•For multiple interfaces, click Add Interface, and add each new interface's name, IP address, and mask.
Step 9 Add as many IP addresses and masks to the interface as you need by clicking Add IP/Network Mask..
Step 10 Click Apply.
Step 11 Click Reporting Applications tab.
Step 12 From the Select Application list, select Generic Web Server Generic.
Step 13 Click Add.
Figure 13-9 Linux Operating System Web Log Format
Step 14 From the Web Log Format list, select appropriately.
Step 15 Click Submit.
Note Once you have edited a device you must click Activate for the changes to take effect.