Cisco StadiumVision Director Server Text Utility Interface
The Text Utility Interface (TUI) provides a console-based interface for use by system installers, administrators, and troubleshooting personnel. The TUI replaces the requirement for any low-level system command line (shell) access and can be used to perform routine system tasks such as modifying system configurations, changing passwords, and checking system logs. Remote TAC access and troubleshooting can both be facilitated from the TUI in the event of an outage or failure.
The Cisco StadiumVision Director and Cisco StadiumVision Director Remote servers both include a TUI interface. The remote server version of the TUI has a similar menu structure, but only provides a subset of the functions available in Cisco StadiumVision Director.
Contents
Information About the TUI
This section includes the following topics:
•![]() Working with the TUI Interface
Working with the TUI Interface
Overview of the TUI Menus
The TUI is a nested structure of menus with options that allow you to drill down to specific system tasks to be performed on the server. The primary menus are:
•![]() Main Menu
Main Menu
•![]() System Settings
System Settings
•![]() System Accounts
System Accounts
•![]() Services Control
Services Control
•![]() StadiumVision Server Administration
StadiumVision Server Administration
•![]() Troubleshooting
Troubleshooting
Table 1 provides a description of the primary menus included in the Cisco StadiumVision Director TUI.
Figure 1 shows a map of the new Cisco StadiumVision Director TUI menuing system and options.
In Cisco StadiumVision Director Release 3.1.0-797, the Cisco StadiumVision Director TUI was modified with the following changes to allow configuration of the log file retention policy for upgraded servers:
•![]() The "Backup/restore Retention Policy" sub-menu from the StadiumVision Server Administration menu is renamed to "Retention Policy."
The "Backup/restore Retention Policy" sub-menu from the StadiumVision Server Administration menu is renamed to "Retention Policy."
•![]() A new sub-menu named "Log Files" was added to the revised Retention Policy menu, with corresponding options to keep files newer than 5, 10, or 15 days.
A new sub-menu named "Log Files" was added to the revised Retention Policy menu, with corresponding options to keep files newer than 5, 10, or 15 days.
Figure 1 TUI Map for Cisco StadiumVision Director Servers
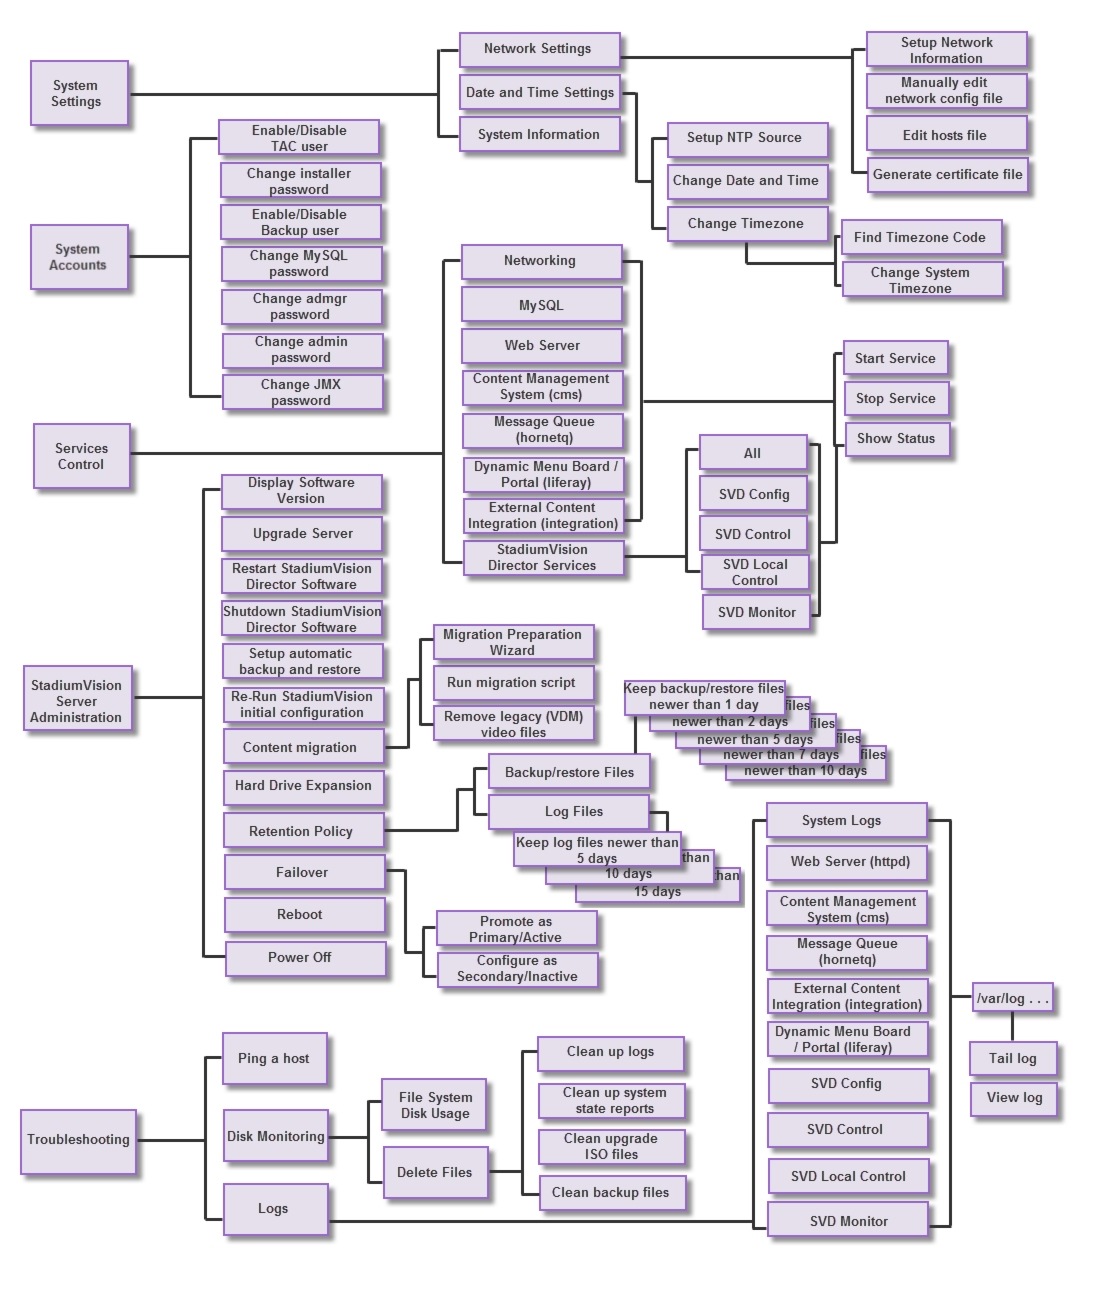
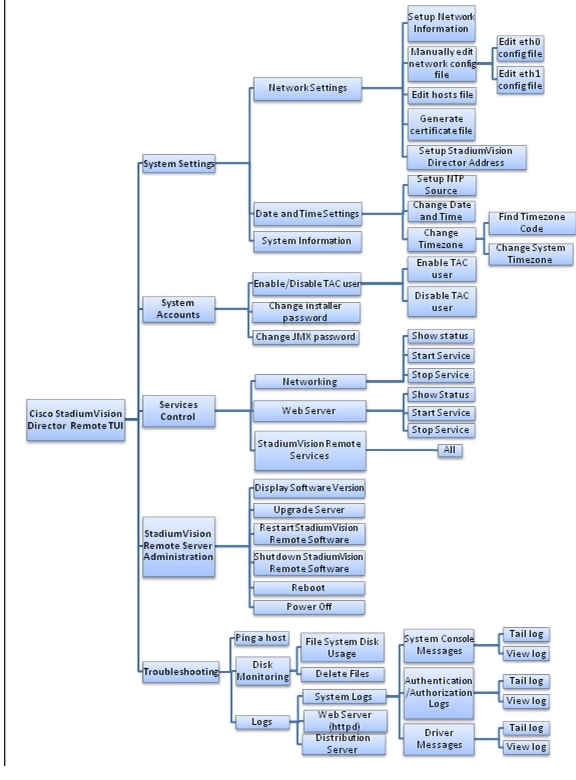
Figure 2 shows a map of the Cisco StadiumVision Director Remote TUI menuing system and options.
Figure 2 TUI Map for Cisco StadiumVision Director Remote Servers
Working with the TUI Interface
This section includes the following topics:
Menu Navigation
The Main Menu is displayed when you log in. To navigate through the menus you must type the character that corresponds to the menu area where you want to go (a, b, c, and so on) and press Enter.
To return to other menus, you must back out of the hierarchy of menus using one of the indicated keys to return you to prior menus.

File Editor
Several of the TUI options open server system files for you to modify using the Unix system vi editor. The following configuration files are editable from the TUI:
•![]() DNS information—/etc/resolv.conf
DNS information—/etc/resolv.conf
•![]() NTP server information—/etc/ntp.conf
NTP server information—/etc/ntp.conf
•![]() Server host information—/etc/hosts
Server host information—/etc/hosts
Before modifying configuration files, you should be familiar with the simple editing techniques used within the vi editor. Table 2 describes some of the more common vi Editor commands.
How to Use the TUI
This section provides information about how to use some of the areas of the TUI interface. It includes the following topics:
•![]() Displaying System Information
Displaying System Information
•![]() Configuring the System Date and Time
Configuring the System Date and Time
Logging Into the TUI
To access the TUI, you need either physical console access or an SSH client such as PuTTY.
To log into the TUI, complete the following steps:
Step 1 ![]() Do one of the following:
Do one of the following:
•![]() Access the server using a directly-attached console.
Access the server using a directly-attached console.
•![]() In the SSH client software, specify the IP address of the server that you want to access.
In the SSH client software, specify the IP address of the server that you want to access.
Step 2 ![]() When the "login as:" prompt appears, type installer and press Enter (Figure 3):
When the "login as:" prompt appears, type installer and press Enter (Figure 3):
Figure 3 TUI Login Prompt

Step 3 ![]() At the password prompt, type the installer password and press Enter.
At the password prompt, type the installer password and press Enter.

Note ![]() In a PuTTY terminal, the keystrokes for your password entry are not shown.
In a PuTTY terminal, the keystrokes for your password entry are not shown.
When the login is successful, the Main Menu is displayed along with some basic system information at the top of the screen (Figure 4).
Figure 4 Cisco StadiumVision Director TUI Main Menu
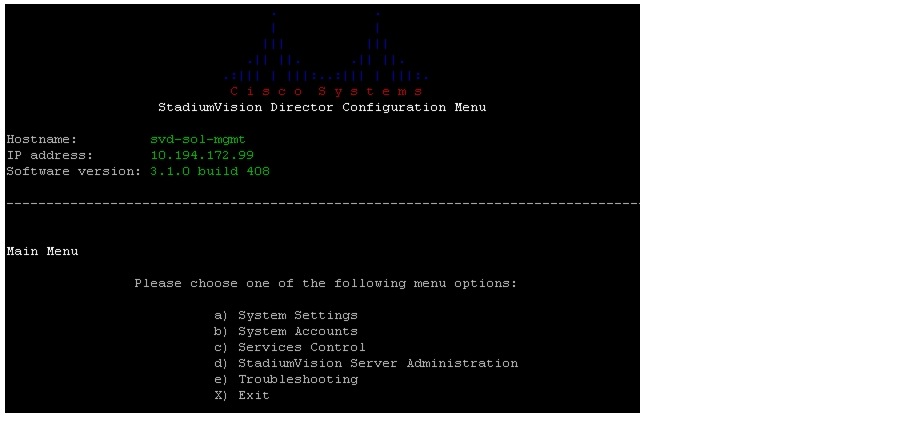

Tip ![]() Once logged in, you can change the installer password from the System Accounts > Change installer password menu option.
Once logged in, you can change the installer password from the System Accounts > Change installer password menu option.
Displaying System Information
The System Settings > System Information option allows you to obtain information about the current network configuration, hosts file, DNS configuration, NTP server, system date and time, and UUID for the server.
To display system information, complete the following steps:
Step 1 ![]() Go to the TUI Main Menu.
Go to the TUI Main Menu.
Step 2 ![]() Type a (for System Settings) and press Enter.
Type a (for System Settings) and press Enter.
Step 3 ![]() From the System Settings menu, type the letter corresponding to the System Information option and press Enter.
From the System Settings menu, type the letter corresponding to the System Information option and press Enter.
The system information is displayed on your screen.
Step 4 ![]() To return to the System Settings menu, press any key.
To return to the System Settings menu, press any key.
Configuring the System Date and Time
When you install or upgrade the Cisco StadiumVision Director or Cisco StadiumVision Director Remote servers, you need to configure the system date and time. To ensure synchronicity with redundant servers and the Cisco StadiumVision Director remote server, it is recommended that you configure a reference clock using an NTP server. You also need to configure the time zone.
•![]() Configuring an NTP Server (recommended)
Configuring an NTP Server (recommended)
•![]() Configuring the Date and Time Manually (as required)
Configuring the Date and Time Manually (as required)
•![]() Configuring the Time Zone (required)
Configuring the Time Zone (required)
Configuring an NTP Server
The System Settings > Date and Time Settings > Setup NTP Source option allows you to configure the NTP server address information on both the Cisco StadiumVision Director and Cisco StadiumVision Director Remote servers.
Standard NTP server configuration uses the word "server" followed by the Domain Name System (DNS) name or IP address of an NTP server. By default, the ntp.conf file on Cisco StadiumVision Director servers has configured the following Red Hat Linux public pool of servers:
server 0.rhel.pool.ntp.org
server 1.rhel.pool.ntp.org
server 2.rhel.pool.ntp.org
For these servers to be used as a reference clock, they must be reachable from the Cisco StadiumVision network. If you want to use your own server, be sure to add it and comment out these default pool servers in the ntp.conf file.
For more information about using NTP pool servers see the Network Time Protocol website at:
http://support.ntp.org/bin/view/Servers/NTPPoolServers
Prerequisites
Before you configure an NTP server, you should know the following information:
•![]() How to use vi editor commands.
How to use vi editor commands.
•![]() The IP address or DNS name of the NTP servers that you want to configure.
The IP address or DNS name of the NTP servers that you want to configure.
•![]() If you plan to use a public pool of NTP servers, be sure that the servers are reachable from the Cisco StadiumVision network. You do not need to do any further editing of the ntp.conf file.
If you plan to use a public pool of NTP servers, be sure that the servers are reachable from the Cisco StadiumVision network. You do not need to do any further editing of the ntp.conf file.
Procedure
To configure an NTP server, complete the following steps:
Step 1 ![]() From the TUI Main Menu, go to System Settings > Date and Time Settings > Setup NTP Source.
From the TUI Main Menu, go to System Settings > Date and Time Settings > Setup NTP Source.
A confirmation screen to Configure NTP and edit the ntp.conf file is displayed.
Step 2 ![]() To open the ntp.conf file for edit, press any key.
To open the ntp.conf file for edit, press any key.
The ntp.conf file opens in the vi editor and the cursor is positioned at the end of the last configured NTP server line. If this is not the case, navigate to the server configuration section.
Step 3 ![]() To enter INSERT line editing mode, type i.
To enter INSERT line editing mode, type i.
The vi editor changes to INSERT mode.
Step 4 ![]() If you have a server that you want to use as the reference clock source at your site, do the following:
If you have a server that you want to use as the reference clock source at your site, do the following:
•![]() Add a line and type "server ip-address" or "server dns-name," where ip-address or dns-name is replaced by the IP address or name of the NTP server that you want to configure.
Add a line and type "server ip-address" or "server dns-name," where ip-address or dns-name is replaced by the IP address or name of the NTP server that you want to configure.
•![]() Go to the lines where the pool servers are configured and add a "#" sign in front to comment them out of the configuration as shown below:
Go to the lines where the pool servers are configured and add a "#" sign in front to comment them out of the configuration as shown below:
#server 0.rhel.pool.ntp.org
#server 1.rhel.pool.ntp.org
#server 2.rhel.pool.ntp.org
Step 5 ![]() To exit INSERT mode and return to vi command mode, press Esc.
To exit INSERT mode and return to vi command mode, press Esc.
Step 6 ![]() To save your changes, type :wq.
To save your changes, type :wq.
The configuration is saved and the ntpd service is restarted. Verify that you see the "OK" confirmation that the ntpd has started.
Step 7 ![]() To return to the Date and Time Settings menu, press any key.
To return to the Date and Time Settings menu, press any key.
Configuring the Date and Time Manually
To configure the date and time manually, complete the following steps:
Step 1 ![]() From the TUI Main Menu on the server, go to System Settings > Date and Time Settings > Change Data and Time.
From the TUI Main Menu on the server, go to System Settings > Date and Time Settings > Change Data and Time.
Step 2 ![]() At the confirmation prompt, type Y to continue.
At the confirmation prompt, type Y to continue.
Step 3 ![]() Type the new date and time in the format: MMDDhhmm[[CC] YY] [.ss], where:
Type the new date and time in the format: MMDDhhmm[[CC] YY] [.ss], where:
•![]() MMDDhhmm is required (MM is month, DD is day, hh is hour, and mm is minutes).
MMDDhhmm is required (MM is month, DD is day, hh is hour, and mm is minutes).
•![]() CC is the century (first 2 digits of the year) and is optional for use with YY. For example "20" in the year 2013.
CC is the century (first 2 digits of the year) and is optional for use with YY. For example "20" in the year 2013.
•![]() YY is the last 2 digits of the year and is optional. For example "13" in the year 2013.
YY is the last 2 digits of the year and is optional. For example "13" in the year 2013.
•![]() .ss is seconds and is optional.
.ss is seconds and is optional.
Step 4 ![]() Press any key to return to the Date and Time Settings menu.
Press any key to return to the Date and Time Settings menu.
Configuring the Time Zone
Configuring the time zone is required for both the Cisco StadiumVision Director and Cisco StadiumVision Director Remote servers.
Note ![]() Although there is an option to set the time zone in the Venues interface of the Control Panel on the Cisco StadiumVision Director server, this option is informational only and is also used for proof-of-play reporting. The actual time zone for the venue is configured from the TUI on the remote server.
Although there is an option to set the time zone in the Venues interface of the Control Panel on the Cisco StadiumVision Director server, this option is informational only and is also used for proof-of-play reporting. The actual time zone for the venue is configured from the TUI on the remote server.
This section includes the following tasks:
•![]() Finding the Time Zone Code for System Configuration (optional)
Finding the Time Zone Code for System Configuration (optional)
•![]() Configuring the System Time Zone (required)
Configuring the System Time Zone (required)
•![]() Restarting the Cisco StadiumVision Software (required)
Restarting the Cisco StadiumVision Software (required)
Finding the Time Zone Code for System Configuration
Use this task to find out the time zone code that is needed when you configure the server's time zone information.
Note ![]() This task provides information only.
This task provides information only.
To find the time zone code for system configuration, complete the following steps:
Step 1 ![]() From the Date and Time Settings menu, do the following:
From the Date and Time Settings menu, do the following:
a. ![]() Select Change Timezone.
Select Change Timezone.
b. ![]() Type the number that corresponds to the applicable continent or ocean for the location of the remote server.
Type the number that corresponds to the applicable continent or ocean for the location of the remote server.
c. ![]() Type the number that corresponds to the country.
Type the number that corresponds to the country.
d. ![]() Type the number for the time zone (as applicable).
Type the number for the time zone (as applicable).
e. ![]() When the confirmation of the time zone information that you configured is displayed, type 1 (for Yes) to accept your settings, or 2 (for No) to cancel (Figure 5).
When the confirmation of the time zone information that you configured is displayed, type 1 (for Yes) to accept your settings, or 2 (for No) to cancel (Figure 5).
Figure 5 Time Zone Confirmation Prompt

f. ![]() After confirming Yes at the prompt, note the time zone string that is provided.
After confirming Yes at the prompt, note the time zone string that is provided.
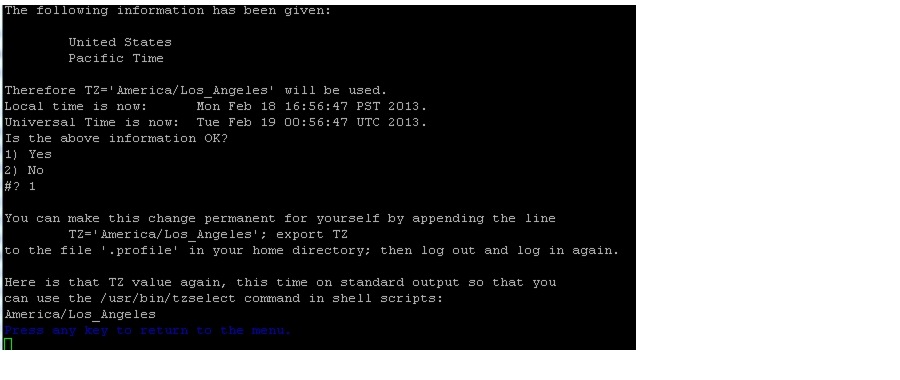
Figure 6 shows a sample time zone code for America/Los_Angeles.
Figure 6 Sample Time Zone Code
Step 2 ![]() Press any key to return to the Date and Time Settings menu.
Press any key to return to the Date and Time Settings menu.
Step 3 ![]() Configure the system time zone using the appropriate code for the server location. See the "Configuring the System Time Zone" section.
Configure the system time zone using the appropriate code for the server location. See the "Configuring the System Time Zone" section.
Configuring the System Time Zone
Prerequisites
Before you configure the system time zone, you should know the following information:
•![]() How to use vi editor commands.
How to use vi editor commands.
•![]() The time zone code for the server location. If you need to look up the time zone code, see the "Finding the Time Zone Code for System Configuration" section.
The time zone code for the server location. If you need to look up the time zone code, see the "Finding the Time Zone Code for System Configuration" section.
Procedure
To configure the system time zone so that it persists after restart of the server, complete the following steps:
Step 1 ![]() From the TUI Main Menu on the server, go to System Settings > Date and Time Settings > Change System Timezone.
From the TUI Main Menu on the server, go to System Settings > Date and Time Settings > Change System Timezone.
Step 2 ![]() At the prompt to edit the system clock file, press any key to continue.
At the prompt to edit the system clock file, press any key to continue.
The /etc/sysconfig/clock file is opened for editing.
Step 3 ![]() Use the vi editor to specify your time zone. Figure 7 shows an entry for the "America/Los_Angeles" time zone code.
Use the vi editor to specify your time zone. Figure 7 shows an entry for the "America/Los_Angeles" time zone code.
Tip ![]() The quotation marks and underscore symbols are required.
The quotation marks and underscore symbols are required.
Figure 7 Editing the Clock File

Step 4 ![]() To exit INSERT mode and return to vi command mode, press Esc.
To exit INSERT mode and return to vi command mode, press Esc.
Step 5 ![]() To save your changes, type :wq!.
To save your changes, type :wq!.
Step 6 ![]() At the prompt, press any key to return to the Date and Time Settings menu.
At the prompt, press any key to return to the Date and Time Settings menu.
Step 7 ![]() Restart the server to put the time zone changes into effect.
Restart the server to put the time zone changes into effect.
Restarting the Cisco StadiumVision Software
After you configure the time zone in the TUI on the server, you must restart the software on the Cisco StadiumVision Director or Cisco StadiumVision Director Remote server.
To restart the Cisco StadiumVision software, complete the following steps:
Step 1 ![]() From the TUI Main Menu on the server, do one of the following according to the server that you need to restart:
From the TUI Main Menu on the server, do one of the following according to the server that you need to restart:
•![]() Go to StadiumVision Server Administration > Restart StadiumVision software.
Go to StadiumVision Server Administration > Restart StadiumVision software.
•![]() Go to StadiumVision Remote Server Administration > Restart StadiumVision Remote software.
Go to StadiumVision Remote Server Administration > Restart StadiumVision Remote software.
Cisco StadiumVision Remote distribution is stopped and restarted.
Step 2 ![]() When the prompt appears, press any key to return to the Server Administration menu.
When the prompt appears, press any key to return to the Server Administration menu.
Step 3 ![]() Return to the Main Menu and exit the TUI.
Return to the Main Menu and exit the TUI.
Exiting the TUI
To exit the TUI, complete the following steps:
Step 1 ![]() Go to the TUI Main Menu.
Go to the TUI Main Menu.
Tip ![]() If you are in a TUI submenu, you will have to type R or < or , and press Enter to navigate back to the Main Menu.
If you are in a TUI submenu, you will have to type R or < or , and press Enter to navigate back to the Main Menu.
Step 2 ![]() Type X and press Enter.
Type X and press Enter.
Related Documentation
The following documents provide details about using some of the specific areas of the TUI:
•![]() Other modules in this Cisco StadiumVision Director Server Administration Guide
Other modules in this Cisco StadiumVision Director Server Administration Guide
•![]() Cisco StadiumVision Director Software Installation and Upgrade Guide
Cisco StadiumVision Director Software Installation and Upgrade Guide
 Feedback