- About this Guide
- Cisco Service Control Overview
- System Overview
- Traffic Processing Overview
- Getting Started
- Using the Network Navigator
- Using the Service Configuration Editor
- Using the Service Configuration Editor: Traffic Classification
- Using the Service Configuration Editor: Traffic Accounting and Reporting
- Using the Service Configuration Editor: Traffic Control
- Using the Service Configuration Editor: Additional Options
- Using the Subscriber Manager GUI Tool
- Using the Signature Editor
- Additional Management Tools and Interfaces
Cisco Service Control Application for Broadband User Guide, Rel. 3.5.0
Bias-Free Language
The documentation set for this product strives to use bias-free language. For the purposes of this documentation set, bias-free is defined as language that does not imply discrimination based on age, disability, gender, racial identity, ethnic identity, sexual orientation, socioeconomic status, and intersectionality. Exceptions may be present in the documentation due to language that is hardcoded in the user interfaces of the product software, language used based on RFP documentation, or language that is used by a referenced third-party product. Learn more about how Cisco is using Inclusive Language.
- Updated:
- January 9, 2011
Chapter: Using the Service Configuration Editor: Traffic Accounting and Reporting
Using the Service Configuration Editor: Traffic Accounting and Reporting
This module explains how to work with usage counters and Raw Data Records (RDRs).
Traffic Accounting and Reporting is the second step in creating a Cisco Service Control Application for Broadband (SCA BB) service configuration.
Usage Counters
The SCA BB collects and maintains various network metrics (such as volume and number of sessions) per service. This accounting takes place per subscriber, per group of subscribers (package or group of packages), and for the entire link.
Service usage counters are used by the system to generate data about the total use of each service. A service can use either its own usage counters, or those of the parent service. For example, in the default service configuration the SMTP and POP3 services share the E-Mail service usage counters. The assignment of services to usage counters is determined by the service hierarchy. How to Edit Services, page 7-8, explains how to configure the service hierarchy.
The SCA BB also collects and maintains various network metrics per package.
Package usage counters are used by the system to generate data about the total use of each package. A package can use either its own usage counters, or those of the parent package. The assignment of packages to usage counters is determined by the package hierarchy. How to Set Advanced Package Options, page 9-7, explains how to configure the package hierarchy.
Raw Data Records
Service Control Engine (SCE) platforms generate and transmit Raw Data Records (RDRs) that contain information relevant to the service provider. These RDRs contain a wide variety of information and statistics, depending on the configuration of the system. The content and structure of each type of RDR is listed in the "Raw Data Records: Formats and Field Contents" chapter of the Cisco Service Control Application for Broadband Reference Guide.
•![]() RDRs are not generated for filtered traffic (see Filtering the Traffic Flows, page 10-17).
RDRs are not generated for filtered traffic (see Filtering the Traffic Flows, page 10-17).
•![]() All RDR data is based on Layer 3 volume.
All RDR data is based on Layer 3 volume.
NetFlow records
•![]() You enable and disable the export of NetFlow records using the CLI.
You enable and disable the export of NetFlow records using the CLI.
You can export records per supported RDR type. The data in the following RDR types can be exported using NetFlow:
–![]() Subscriber Usage RDR
Subscriber Usage RDR
–![]() Package Usage RDR
Package Usage RDR
–![]() Link Usage RDR
Link Usage RDR
•![]() The NetFlow records can be sent to more than one collection device.
The NetFlow records can be sent to more than one collection device.
•![]() NetFlow records can be generated concurrently with RDRs.
NetFlow records can be generated concurrently with RDRs.
Managing RDR Settings
This section explains how to configure the generation of the different types of RDRs.
The content and structure of each type of RDR is listed in the "Raw Data Records: Formats and Field Contents" chapter of the Cisco Service Control Application for Broadband Reference Guide.
•![]() RDRs are not generated for filtered traffic (see Filtering the Traffic Flows, page 10-17).
RDRs are not generated for filtered traffic (see Filtering the Traffic Flows, page 10-17).
•![]() All RDR data is based on Layer 3 volume.
All RDR data is based on Layer 3 volume.
The RDR Settings Dialog Box
The RDR Settings dialog box allows you to control the generation of RDRs for an entire service configuration. This dialog box contains seven tabs:
•![]() Usage RDRs tab—Allows you to enable the generation each type of Usage RDR, and define their generation intervals
Usage RDRs tab—Allows you to enable the generation each type of Usage RDR, and define their generation intervals
•![]() Transaction RDRs tab—Allows you to enable the generation of Transaction RDRs and define their maximum rate of generation
Transaction RDRs tab—Allows you to enable the generation of Transaction RDRs and define their maximum rate of generation
•![]() Quota RDRs tab—Allows you to enable the generation of each type of Quota RDR, and define their generation parameters
Quota RDRs tab—Allows you to enable the generation of each type of Quota RDR, and define their generation parameters
•![]() Transaction Usage RDRs tab—Allows you to specify the packages and services for which Transaction Usage RDRs will be generated
Transaction Usage RDRs tab—Allows you to specify the packages and services for which Transaction Usage RDRs will be generated
•![]() Log RDRs tab—Allows you to specify the packages and services for which Log RDRs will be generated
Log RDRs tab—Allows you to specify the packages and services for which Log RDRs will be generated
•![]() Real-Time Subscriber RDRs tab—Allows you to enable the generation of Real-Time Subscriber Usage RDRs, and define their generation intervals and maximum rate of generation
Real-Time Subscriber RDRs tab—Allows you to enable the generation of Real-Time Subscriber Usage RDRs, and define their generation intervals and maximum rate of generation
•![]() Real-Time Signaling RDRs tab—Allows you to specify the packages and services for which Real-TimeSignaling RDRs will be generated
Real-Time Signaling RDRs tab—Allows you to specify the packages and services for which Real-TimeSignaling RDRs will be generated

Note ![]() Media Flow RDRs and Malicious Traffic Periodic RDRs are enabled and configured in the How to Edit Advanced Service Configuration Options, page 10-45.
Media Flow RDRs and Malicious Traffic Periodic RDRs are enabled and configured in the How to Edit Advanced Service Configuration Options, page 10-45.
How to Manage Usage RDRs
The four types of Usage RDRs contain data about total usage of all services included in a service usage counter:
•![]() Link Usage RDRs—For the entire link
Link Usage RDRs—For the entire link
•![]() Package Usage RDRs—For all subscribers to a particular package
Package Usage RDRs—For all subscribers to a particular package
•![]() Subscriber Usage RDRs—For a particular subscriber
Subscriber Usage RDRs—For a particular subscriber
•![]() Virtual Links Usage RDRs—For a particular group of virtual links
Virtual Links Usage RDRs—For a particular group of virtual links
You can enable or disable the generation of each type of Usage RDR, and set the generation interval for each type of Usage RDR. You can limit the generation rate of Subscriber Usage RDRs. This is advisable when there are a large number of subscribers.
By default, all four types of Usage RDRs are enabled. (Virtual Links Usage RDRs are enabled by default only if Virtual Links mode was enabled when you created the service configuration.)
Note ![]() Usage RDRs are not generated for blocked sessions. A session is blocked if the service to which the session is mapped is blocked for this user's package (see How to Define Per-Flow Actions for a Rule, page 9-14), or if the user has exceeded the allowed quota for this service (see Managing Quotas, page 9-57).
Usage RDRs are not generated for blocked sessions. A session is blocked if the service to which the session is mapped is blocked for this user's package (see How to Define Per-Flow Actions for a Rule, page 9-14), or if the user has exceeded the allowed quota for this service (see Managing Quotas, page 9-57).
For detailed information regarding the RDR purpose, default destination, content, generation logic, tag, and fields, refer to the following sections in the Cisco Service Control Application for Broadband Reference Guide:
Step 1 ![]() From the Classification tab in the left pane, choose Configuration > RDR Settings.
From the Classification tab in the left pane, choose Configuration > RDR Settings.
The RDR Settings dialog box appears.

Step 2 ![]() To enable the generation of a selected type of Usage RDR, check the appropriate Generate Usage RDRs check box.
To enable the generation of a selected type of Usage RDR, check the appropriate Generate Usage RDRs check box.
To disable the generation of a selected type of Usage RDR, uncheck the appropriate Generate Usage RDRs check box.
Step 3 ![]() To change the generation interval for a selected type of Usage RDR, enter the interval in minutes between each generation of this type of Usage RDRs in the appropriate Generate Usage RDRs field.
To change the generation interval for a selected type of Usage RDR, enter the interval in minutes between each generation of this type of Usage RDRs in the appropriate Generate Usage RDRs field.
Step 4 ![]() To limit the generation rate of Subscriber Usage RDRs, enter the maximum number of Subscriber Usage RDRs to be generated per second in the Limit the Total Rate of Subscriber Usage RDRs field.
To limit the generation rate of Subscriber Usage RDRs, enter the maximum number of Subscriber Usage RDRs to be generated per second in the Limit the Total Rate of Subscriber Usage RDRs field.
Step 5 ![]() Click OK.
Click OK.
The RDR Settings dialog box closes.
The new configuration for the generation of Usage RDRs is saved.
How to Manage Transaction RDRs
Each Transaction RDRs contains data about a single network transaction. The SCE platform can generate Transaction RDRs for selected service types. You can use these RDRs, for example, to generate statistical histograms that help understand the traffic traversing the network.
You can enable or disable the generation of Transaction RDRs, set the maximum number of Transaction RDRs generated per second, and select for which services these RDRs are generated. You can also assign a relative weight to each service. The relative weight determines the relative number of Transaction RDRs that will be generated for this service, compared to other services.
By default, at most 100 Transaction RDRs are generated per second, and all services are given the same weight.
For detailed information regarding the RDR purpose, default destination, content, generation logic, tag, and fields, refer to the "Transaction RDR" section in the Cisco Service Control Application for Broadband Reference Guide.
Step 1 ![]() From the Classification tab in the left pane, choose Configuration > RDR Settings.
From the Classification tab in the left pane, choose Configuration > RDR Settings.
The RDR Settings dialog box appears.
Step 2 ![]() Click the Transaction RDRs tab.
Click the Transaction RDRs tab.
The Transaction RDRs tab opens.
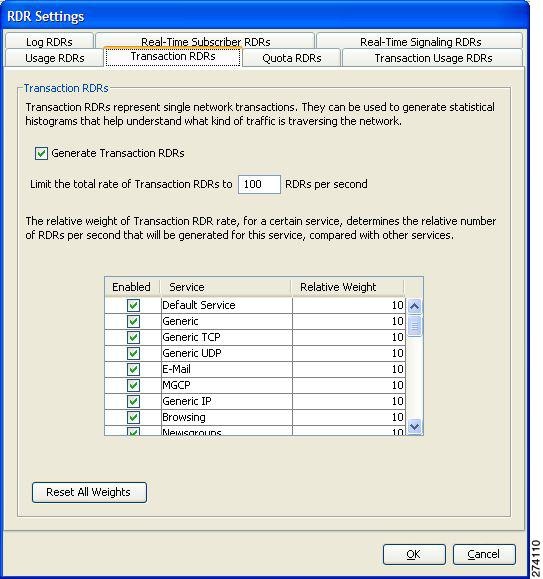
Step 3 ![]() To enable the generation of Transaction RDRs, check the Generate Transaction RDRs check box.
To enable the generation of Transaction RDRs, check the Generate Transaction RDRs check box.
To disable the generation of Transaction RDRs, uncheck the Generate Transaction RDRs check box.
Step 4 ![]() To change the maximum generation rate for Transaction RDRs, enter the desired rate in the Limit the Total Rate of Transaction RDRs field.
To change the maximum generation rate for Transaction RDRs, enter the desired rate in the Limit the Total Rate of Transaction RDRs field.
Step 5 ![]() To disable the generation of Transaction RDRs for a selected service, uncheck the Enabled check box next to the service name.
To disable the generation of Transaction RDRs for a selected service, uncheck the Enabled check box next to the service name.
Step 6 ![]() To set the relative weight for a selected service, double-click in the appropriate cell in the Relative Weight column, and enter the desired weight.
To set the relative weight for a selected service, double-click in the appropriate cell in the Relative Weight column, and enter the desired weight.
Step 7 ![]() Click OK.
Click OK.
The RDR Settings dialog box closes.
The new configuration for the generation of Transaction RDRs is saved.
How to Manage Quota RDRs
Each Quota RDR contains data for a single subscriber. There are four types of Quota RDRs:
•![]() Quota Breach RDRs—Generated when a quota breach occurs, that is, when services that try to consume from a depleted quota bucket.
Quota Breach RDRs—Generated when a quota breach occurs, that is, when services that try to consume from a depleted quota bucket.
A breached service is handled according to its breach-handling settings. For example, when the quota for a service is consumed, you can block its flows.
•![]() Remaining Quota RDRs—Generated as quota is consumed, but only if a bucket state has change since the last Remaining Quota RDR was generated.
Remaining Quota RDRs—Generated as quota is consumed, but only if a bucket state has change since the last Remaining Quota RDR was generated.
•![]() Quota Threshold Breach RDRs—Generated when the remaining quota in a bucket falls below a threshold. External systems can treat this RDR as a quota request and provision the subscriber with an additional quota before the bucket is depleted.
Quota Threshold Breach RDRs—Generated when the remaining quota in a bucket falls below a threshold. External systems can treat this RDR as a quota request and provision the subscriber with an additional quota before the bucket is depleted.
•![]() Quota State Restore RDRs—Generated when a subscriber is introduced. When a subscriber logs out, their remaining quota is stored in the Cisco Service Control Management Suite (SCMS) Subscriber Manager (SM). When the subscriber logs in again, this quota is restored from the SM.
Quota State Restore RDRs—Generated when a subscriber is introduced. When a subscriber logs out, their remaining quota is stored in the Cisco Service Control Management Suite (SCMS) Subscriber Manager (SM). When the subscriber logs in again, this quota is restored from the SM.
You can enable or disable the generation each type of Quota RDR and define the rate of generation of these RDRs.
•![]() For Remaining Quota RDRs, you can set the generation interval, and limit the generation rate (advisable when there are a large number of subscribers).
For Remaining Quota RDRs, you can set the generation interval, and limit the generation rate (advisable when there are a large number of subscribers).
•![]() For Quota Threshold RDRs, you can configure the threshold.
For Quota Threshold RDRs, you can configure the threshold.
By default, all Quota RDRs are disabled.
For detailed information regarding the RDR purpose, default destination, content, generation logic, tag, and fields, refer to the following sections in the Cisco Service Control Application for Broadband Reference Guide:
Step 1 ![]() From the Classification tab in the left pane, choose Configuration > RDR Settings.
From the Classification tab in the left pane, choose Configuration > RDR Settings.
The RDR Settings dialog box appears.
Step 2 ![]() Click the Quota RDRs tab.
Click the Quota RDRs tab.
The Quota RDRs tab opens.

Step 3 ![]() To enable the generation of Quota Breach RDRs, check the Generate Quota Breach RDRs check box.
To enable the generation of Quota Breach RDRs, check the Generate Quota Breach RDRs check box.
Step 4 ![]() To enable the generation of Remaining Quota RDRs, check the Generate Remaining Quota RDRs check box.
To enable the generation of Remaining Quota RDRs, check the Generate Remaining Quota RDRs check box.
Step 5 ![]() To change the generation interval of Remaining Quota RDRs, in the Generate Remaining Quota RDRs field, enter the interval in minutes between each generation of the RDR.
To change the generation interval of Remaining Quota RDRs, in the Generate Remaining Quota RDRs field, enter the interval in minutes between each generation of the RDR.
Step 6 ![]() To limit the maximum generation rate of Remaining Quota RDRs, in the Limit the Total Rate of Remaining Quota RDRs field, enter the maximum number of Remaining Quota RDRs to be generated per second.
To limit the maximum generation rate of Remaining Quota RDRs, in the Limit the Total Rate of Remaining Quota RDRs field, enter the maximum number of Remaining Quota RDRs to be generated per second.
Step 7 ![]() To enable the generation of Quota Threshold RDRs, check the Generate Quota Threshold RDRs check box.
To enable the generation of Quota Threshold RDRs, check the Generate Quota Threshold RDRs check box.
Step 8 ![]() To change the Threshold for Quota Threshold RDRs, in the Generate Quota Threshold RDRs field, enter the threshold for which Quota Threshold RDRs will be generated.
To change the Threshold for Quota Threshold RDRs, in the Generate Quota Threshold RDRs field, enter the threshold for which Quota Threshold RDRs will be generated.
Step 9 ![]() To enable the generation of Quota State Restore RDRs, check the Generate Quota State Restore RDRs check box.
To enable the generation of Quota State Restore RDRs, check the Generate Quota State Restore RDRs check box.
Step 10 ![]() Click OK.
Click OK.
The RDR Settings dialog box closes.
The new configuration for the generation of Quota RDRs is saved.
How to Manage Transaction Usage RDRs
Transaction Usage RDRs are generated for all transactions of selected packages or for selected services per package. Each Transaction Usage RDR contains data about a single network transaction. You can use these RDRs, for example, to build detailed usage logs for specific services and subscribers for transaction-based billing.

You can select the packages and services for which Transaction Usage RDRs are generated. The following RDRs will also be generated for these packages and services:
•![]() HTTP Transaction Usage RDR
HTTP Transaction Usage RDR
•![]() RTSP Transaction Usage RDR
RTSP Transaction Usage RDR
•![]() VoIP Transaction Usage RDR
VoIP Transaction Usage RDR
By default, no Transaction Usage RDRs are generated.
Note ![]() Media Flow RDRs are enabled in the How to Edit Advanced Service Configuration Options, page 10-45.
Media Flow RDRs are enabled in the How to Edit Advanced Service Configuration Options, page 10-45.
(When enabled, Media Flow RDRs are generated at the end of every SIP and Skype media flow; you can use them to distinguish between SIP voice and video calls.)
For detailed information regarding the RDR purpose, default destination, content, generation logic, tag, and fields, refer to the following sections in the Cisco Service Control Application for Broadband Reference Guide:
Step 1 ![]() From the Classification tab in the left pane, choose Configuration > RDR Settings.
From the Classification tab in the left pane, choose Configuration > RDR Settings.
The RDR Settings dialog box appears.
Step 2 ![]() Click the Transaction Usage RDRs tab.
Click the Transaction Usage RDRs tab.
The Transaction Usage RDRs tab opens.

Step 3 ![]() Check one or more of the following types of Transaction Usage RDRs to generate:
Check one or more of the following types of Transaction Usage RDRs to generate:
•![]() Generic TUR
Generic TUR
•![]() Protocol Specific TURs (include protocol specific information)
Protocol Specific TURs (include protocol specific information)
•![]() Extended TURs (include extended protocol specific information)
Extended TURs (include extended protocol specific information)
If you check Extended TURS, the Anonymize - Encrypt Personally Identifiable Information checkbox is enabled. Check this box to anonymize the data.
Step 4 ![]() (Optional) To enable the generation of Transaction Usage RDRs for a selected package, check the check box next to the package name in the package tree.
(Optional) To enable the generation of Transaction Usage RDRs for a selected package, check the check box next to the package name in the package tree.
The package expands to show all component services of the package; all services are checked.
Step 5 ![]() Enable the generation of Transaction Usage RDRs for selected services of a package.
Enable the generation of Transaction Usage RDRs for selected services of a package.
a. ![]() Expand the node of the desired package.
Expand the node of the desired package.
b. ![]() Check the check box next to the service name of each service for which a Transaction Usage RDR is to be generated.
Check the check box next to the service name of each service for which a Transaction Usage RDR is to be generated.
Step 6 ![]() (Optional) Limit the generation of Transaction Usage RDRs by session size.
(Optional) Limit the generation of Transaction Usage RDRs by session size.
a. ![]() Check the Generate TUR only for sessions exceeding check box.
Check the Generate TUR only for sessions exceeding check box.
The Bytes field is enabled.
b. ![]() Enter the minimum session size in bytes for which a Transaction Usage RDR should be generated for the session.
Enter the minimum session size in bytes for which a Transaction Usage RDR should be generated for the session.
Step 7 ![]() (Optional) Enable the generation of additional, interim Transaction Usage RDRs for long flows. (Usually, a Transaction Usage RDR is generated only when a flow closes.)
(Optional) Enable the generation of additional, interim Transaction Usage RDRs for long flows. (Usually, a Transaction Usage RDR is generated only when a flow closes.)
a. ![]() Check the Enable Interim TUR to be generated every check box.
Check the Enable Interim TUR to be generated every check box.
The Minutes field is enabled.
b. ![]() Enter the required time in minutes between each generation of a Transaction Usage RDR for each flow.
Enter the required time in minutes between each generation of a Transaction Usage RDR for each flow.
Step 8 ![]() Click OK.
Click OK.
The RDR Settings dialog box closes.
The new configuration for the generation of Transaction Usage RDRs is saved.
How to Manage Log RDRs
Log RDRs, which provide information about system events, are generated in response to specific actions or state changes. There are two types of Log RDRs:
•![]() Blocking RDRs—Generated each time a transaction is blocked
Blocking RDRs—Generated each time a transaction is blocked
•![]() Breach RDRs—Generated each time a bucket exceeds the global threshold
Breach RDRs—Generated each time a bucket exceeds the global threshold
You can set the maximum number of Log RDRs generated per second. You can select the packages and services for which Blocking RDRs are generated.
By default:
•![]() Blocking RDRs are generated for all packages
Blocking RDRs are generated for all packages
•![]() Breach RDRs are always generated
Breach RDRs are always generated
Note ![]() At most 20 Log RDRs are generated per second.
At most 20 Log RDRs are generated per second.
For detailed information regarding the RDR purpose, default destination, content, generation logic, tag, and fields, refer to the following sections in the Cisco Service Control Application for Broadband Reference Guide:
Step 1 ![]() From the Classification tab in the left pane, choose Configuration > RDR Settings.
From the Classification tab in the left pane, choose Configuration > RDR Settings.
The RDR Settings dialog box appears.
Step 2 ![]() Click the Log RDRs tab.
Click the Log RDRs tab.
The Log RDRs tab opens.
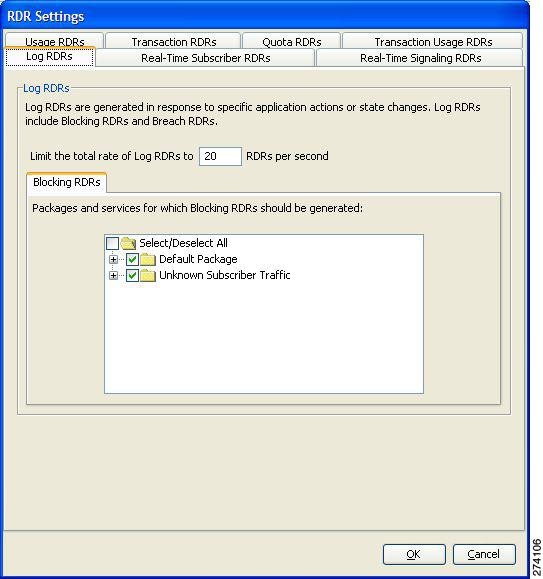
Step 3 ![]() To change the maximum generation rate for Log RDRs, enter the desired rate in the Limit the Total Rate of Log RDRs field.
To change the maximum generation rate for Log RDRs, enter the desired rate in the Limit the Total Rate of Log RDRs field.
Step 4 ![]() To enable the generation of Blocking RDRs for selected packages, check the check box next to the package name in the package tree.
To enable the generation of Blocking RDRs for selected packages, check the check box next to the package name in the package tree.
The package expands to show all component services of the package; all the services are checked.
Step 5 ![]() Enable the generation of Blocking RDRs for selected services of a package.
Enable the generation of Blocking RDRs for selected services of a package.
a. ![]() Expand the node of the desired package.
Expand the node of the desired package.
b. ![]() Check the check box next to the service name of each desired service.
Check the check box next to the service name of each desired service.
Step 6 ![]() Click OK.
Click OK.
The RDR Settings dialog box closes.
The new configuration for the generation of Log RDRs is saved.
How to Manage Real-Time Subscriber Usage RDRs
Real-Time Subscriber Usage RDRs, which report subscriber usage, are generated for each individual subscriber for each service used, at specified intervals. These RDRs permit a more granular monitoring of selected subscribers when necessary.
For more information about selecting subscribers to be monitored, see Selecting Subscribers for Real-Time Usage Monitoring, page 13-12.
You can enable or disable the generation of Real-Time Subscriber Usage RDRs, set the generation interval for these RDRs, and set the maximum number generated per second.
By default, Real-Time Subscriber Usage RDRs:
•![]() Are enabled (but only for selected subscribers)
Are enabled (but only for selected subscribers)
•![]() Are generated for each subscriber once every minute
Are generated for each subscriber once every minute
•![]() Are limited to 100 RDRs generated per second
Are limited to 100 RDRs generated per second
For detailed information regarding the RDR purpose, default destination, content, generation logic, tag, and fields, refer to the "Real-Time Subscriber Usage RDR" section in the Cisco Service Control Application for Broadband Reference Guide.
Step 1 ![]() From the Classification tab in the left pane, choose Configuration > RDR Settings.
From the Classification tab in the left pane, choose Configuration > RDR Settings.
The RDR Settings dialog box appears.
Step 2 ![]() Click the Real-Time Subscriber RDRs tab.
Click the Real-Time Subscriber RDRs tab.
The Real-Time Subscriber RDRs tab opens.
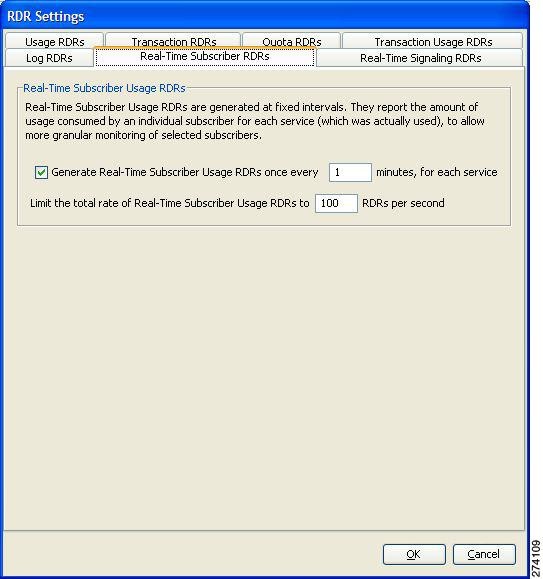
Step 3 ![]() To enable the generation of Real-Time Subscriber Usage RDRs, check the Generate Real-Time Subscriber Usage RDRs check box.
To enable the generation of Real-Time Subscriber Usage RDRs, check the Generate Real-Time Subscriber Usage RDRs check box.
Step 4 ![]() To change the generation interval for Real-Time Subscriber Usage RDRs, enter the desired interval in minutes between each generation of the RDRs in the Generate Real-Time Subscriber Usage RDRs field.
To change the generation interval for Real-Time Subscriber Usage RDRs, enter the desired interval in minutes between each generation of the RDRs in the Generate Real-Time Subscriber Usage RDRs field.
Step 5 ![]() To limit the generation rate of Real-Time Subscriber Usage RDRs, enter the maximum number of Real-Time Subscriber Usage RDRs to be generated per second in the Limit the total rate of Real-Time Subscriber Usage RDRs field.
To limit the generation rate of Real-Time Subscriber Usage RDRs, enter the maximum number of Real-Time Subscriber Usage RDRs to be generated per second in the Limit the total rate of Real-Time Subscriber Usage RDRs field.
Step 6 ![]() Click OK.
Click OK.
The RDR Settings dialog box closes.
The new configuration for the generation of Real-Time Subscriber Usage RDRs is saved.
How to Manage Real-Time Signaling RDRs
Real-Time Signaling RDRs, which are generated at the beginning and end of a flow, at specified intervals after the beginning of the flow, and at the beginning and end of a network attack, can be used to signal external systems concerning events detected by the SCE platform, allowing real-time actions to be taken across the network.
There are two groups of Real-Time Signaling RDRs:
•![]() Flow Signaling RDRs:
Flow Signaling RDRs:
–![]() Flow Start Signaling RDRs
Flow Start Signaling RDRs
–![]() Flow Stop Signaling RDRs
Flow Stop Signaling RDRs
–![]() Flow Interim Signaling RDRs
Flow Interim Signaling RDRs
•![]() Attack Signaling RDRs:
Attack Signaling RDRs:
–![]() Attack Start Signaling RDRs
Attack Start Signaling RDRs
–![]() Attack Stop Signaling RDRs
Attack Stop Signaling RDRs
You can enable or disable the generation of Flow Signaling RDRs for selected packages, or for selected services per package. You can set the generation interval for Flow Interim Signaling RDRs, which can be generated only if Flow Start and Flow Stop Signaling RDRs are enabled.
You can enable or disable the generation of Attack Signaling RDRs for selected packages.
Note ![]() Malicious Traffic Periodic RDRs are enabled and configured in the How to Edit Advanced Service Configuration Options, page 10-45.
Malicious Traffic Periodic RDRs are enabled and configured in the How to Edit Advanced Service Configuration Options, page 10-45.
For detailed information regarding the RDR purpose, default destination, content, generation logic, tag, and fields, refer to the following sections in the Cisco Service Control Application for Broadband Reference Guide:
By default, no Real-Time Signaling RDRs are generated.
Step 1 ![]() From the Classification tab in the left pane, choose Configuration > RDR Settings.
From the Classification tab in the left pane, choose Configuration > RDR Settings.
The RDR Settings dialog box appears.
Step 2 ![]() Click the Real-Time Signaling RDRs tab.
Click the Real-Time Signaling RDRs tab.
The Real-Time Signaling RDRs tab opens.
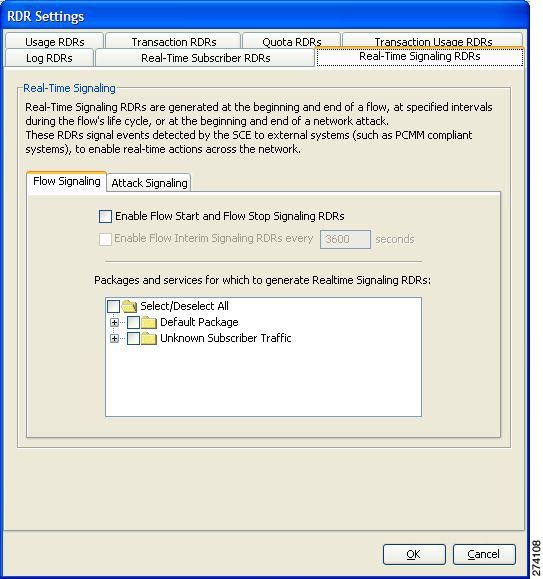
Step 3 ![]() To enable the generation of Flow Start and Flow Stop Signaling RDRs, check the Enable Flow Start and Flow Stop Signaling RDRs check box.
To enable the generation of Flow Start and Flow Stop Signaling RDRs, check the Enable Flow Start and Flow Stop Signaling RDRs check box.
Note ![]() Generation of Flow Start and Flow Stop Signaling RDRs is not supported when unidirectional classification is enabled. If you try to check the Enable Flow Start and Flow Stop Signaling RDRs check box when unidirectional classification is enabled, an RDR Settings Error message appears.
Generation of Flow Start and Flow Stop Signaling RDRs is not supported when unidirectional classification is enabled. If you try to check the Enable Flow Start and Flow Stop Signaling RDRs check box when unidirectional classification is enabled, an RDR Settings Error message appears.
Click OK, and continue at Step 8.
The Enable Flow Interim Signaling RDRs check box is enabled.
Step 4 ![]() To enable the generation of Flow Interim Signaling RDRs, check the Enable Flow Interim Signaling RDRs check box.
To enable the generation of Flow Interim Signaling RDRs, check the Enable Flow Interim Signaling RDRs check box.
The Enable Flow Interim Signaling RDRs field is enabled.
Step 5 ![]() To change the generation interval for Flow Interim Signaling RDRs, enter the interval in minutes between each generation of the RDRs in the Enable Flow Interim Signaling RDRs field.
To change the generation interval for Flow Interim Signaling RDRs, enter the interval in minutes between each generation of the RDRs in the Enable Flow Interim Signaling RDRs field.
Step 6 ![]() To enable the generation of Flow Interim Signaling RDRs for selected packages, check the check box next to the package name in the package tree.
To enable the generation of Flow Interim Signaling RDRs for selected packages, check the check box next to the package name in the package tree.
The package expands to show all component services of the package; all the services are checked.
Step 7 ![]() To enable the generation of Flow Interim Signaling RDRs for selected services of a package:
To enable the generation of Flow Interim Signaling RDRs for selected services of a package:
a. ![]() Expand the node of the desired package.
Expand the node of the desired package.
b. ![]() Check the check box next to the service name of each desired service.
Check the check box next to the service name of each desired service.
Step 8 ![]() To enable the generation of Attack Signaling RDRs:
To enable the generation of Attack Signaling RDRs:
a. ![]() In the body of the Real-Time Signaling RDRs tab, click the Attack Signaling tab.
In the body of the Real-Time Signaling RDRs tab, click the Attack Signaling tab.
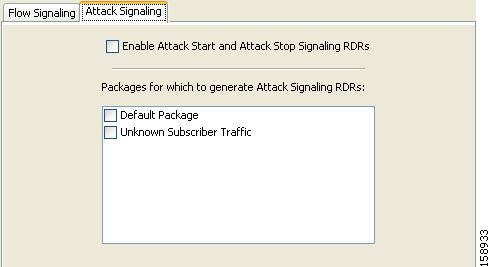
b. ![]() Check the Enable Attack Start and Attack Stop Signaling RDRs check box.
Check the Enable Attack Start and Attack Stop Signaling RDRs check box.
Step 9 ![]() To enable the generation of Attack Signaling RDRs for selected packages, check the check box next to the package name in the package list.
To enable the generation of Attack Signaling RDRs for selected packages, check the check box next to the package name in the package list.
Step 10 ![]() Click OK.
Click OK.
The RDR Settings dialog box closes.
The new configuration for the generation of Real-Time Signaling RDRs is saved.
 Feedback