- About This Guide
-
- Introduction to the Security Appliance
- Getting Started
- Enabling Multiple Context Mode
- Configuring Interfaces for the Cisco ASA 5505 Adaptive Security Appliance
- Configuring Ethernet Settings and Subinterfaces
- Adding and Managing Security Contexts
- Configuring Interface Parameters
- Configuring Basic Settings
- Configuring IP Routing
- Configuring Multicast Routing
- Configuring DHCP, DDNS, and WCCP Services
- Configuring IPv6
- Configuring AAA Servers and the Local Database
- Configuring Failover
-
- Firewall Mode Overview
- Identifying Traffic With Access Lists
- Applying NAT
- Permitting or Denying Network Access
- Applying AAA for Network Access
- Applying Filtering Services
- Using Modular Policy Framework
- Managing AIP SSM and CSC SSM
- Preventing Network Attacks
- Applying QoS Policies
- Applying Application Layer Protocol Inspection
- Configuring ARP Inspection and Bridging Parameters
-
- Configuring IPSec and ISAKMP
- Configuring L2TP over IPSec
- Setting General VPN Parameters
- Configuring Tunnel Groups, Group Policies, and Users
- Configuring IP Addresses for VPN
- Configuring Remote Access VPNs
- Configuring Network Admission Control
- Configuring Easy VPN on the ASA 5505
- Configuring the PPPoE Client
- Configuring LAN-to-LAN VPNs
- Configuring WebVPN
- Configuring SSL VPN Client
- Configuring Certificates
- Glossary
- Index
Enabling Multiple Context Mode
This chapter describes how to use security contexts and enable multiple context mode. This chapter includes the following sections:
•![]() Enabling or Disabling Multiple Context Mode
Enabling or Disabling Multiple Context Mode
Security Context Overview
You can partition a single security appliance into multiple virtual devices, known as security contexts. Each context is an independent device, with its own security policy, interfaces, and administrators. Multiple contexts are similar to having multiple standalone devices. Many features are supported in multiple context mode, including routing tables, firewall features, IPS, and management. Some features are not supported, including VPN and dynamic routing protocols.
This section provides an overview of security contexts, and includes the following topics:
•![]() Common Uses for Security Contexts
Common Uses for Security Contexts
•![]() How the Security Appliance Classifies Packets
How the Security Appliance Classifies Packets
•![]() Management Access to Security Contexts
Management Access to Security Contexts
Common Uses for Security Contexts
You might want to use multiple security contexts in the following situations:
•![]() You are a service provider and want to sell security services to many customers. By enabling multiple security contexts on the security appliance, you can implement a cost-effective, space-saving solution that keeps all customer traffic separate and secure, and also eases configuration.
You are a service provider and want to sell security services to many customers. By enabling multiple security contexts on the security appliance, you can implement a cost-effective, space-saving solution that keeps all customer traffic separate and secure, and also eases configuration.
•![]() You are a large enterprise or a college campus and want to keep departments completely separate.
You are a large enterprise or a college campus and want to keep departments completely separate.
•![]() You are an enterprise that wants to provide distinct security policies to different departments.
You are an enterprise that wants to provide distinct security policies to different departments.
•![]() You have any network that requires more than one security appliance.
You have any network that requires more than one security appliance.
Unsupported Features
Multiple context mode does not support the following features:
•![]() Dynamic routing protocols
Dynamic routing protocols
Security contexts support only static routes. You cannot enable OSPF or RIP in multiple context mode.
•![]() VPN
VPN
•![]() Multicast
Multicast
Context Configuration Files
This section describes how the security appliance implements multiple context mode configurations and includes the following sections:
Context Configurations
The security appliance includes a configuration for each context that identifies the security policy, interfaces, and almost all the options you can configure on a standalone device. You can store context configurations on the internal Flash memory or the external Flash memory card, or you can download them from a TFTP, FTP, or HTTP(S) server.
System Configuration
The system administrator adds and manages contexts by configuring each context configuration location, allocated interfaces, and other context operating parameters in the system configuration, which, like a single mode configuration, is the startup configuration. The system configuration identifies basic settings for the security appliance. The system configuration does not include any network interfaces or network settings for itself; rather, when the system needs to access network resources (such as downloading the contexts from the server), it uses one of the contexts that is designated as the admin context. The system configuration does include a specialized failover interface for failover traffic only.
Admin Context Configuration
The admin context is just like any other context, except that when a user logs in to the admin context, then that user has system administrator rights and can access the system and all other contexts. The admin context is not restricted in any way, and can be used as a regular context. However, because logging into the admin context grants you administrator privileges over all contexts, you might need to restrict access to the admin context to appropriate users. The admin context must reside on Flash memory, and not remotely.
If your system is already in multiple context mode, or if you convert from single mode, the admin context is created automatically as a file on the internal Flash memory called admin.cfg. This context is named "admin." If you do not want to use admin.cfg as the admin context, you can change the admin context.
How the Security Appliance Classifies Packets
Each packet that enters the security appliance must be classified, so that the security appliance can determine to which context to send a packet. This section includes the following topics:

Note ![]() If the destination MAC address is a multicast or broadcast MAC address, the packet is duplicated and delivered to each context.
If the destination MAC address is a multicast or broadcast MAC address, the packet is duplicated and delivered to each context.
Valid Classifier Criteria
This section describes the criteria used by the classifier, and includes the following topics:
Unique Interfaces
If only one context is associated with the ingress interface, the security appliance classifies the packet into that context. In transparent firewall mode, unique interfaces for contexts are required, so this method is used to classify packets at all times.
Unique MAC Addresses
If multiple contexts share an interface, then the classifier uses the interface MAC address. The security appliance lets you assign a different MAC address in each context to the same shared interface, whether it is a shared physical interface or a shared subinterface. By default, shared interfaces do not have unique MAC addresses; the interface uses the physical interface burned-in MAC address in every context. An upstream router cannot route directly to a context without unique MAC addresses. You can set the MAC addresses manually when you configure each interface (see the "Configuring the Interface" section on page 7-2), or you can automatically generate MAC addresses (see the "Automatically Assigning MAC Addresses to Context Interfaces" section on page 6-11).
NAT Configuration
If you do not have unique MAC addresses, then the classifier intercepts the packet and performs a destination IP address lookup. All other fields are ignored; only the destination IP address is used. To use the destination address for classification, the classifier must have knowledge about the subnets located behind each security context. The classifier relies on the NAT configuration to determine the subnets in each context. The classifier matches the destination IP address to either a static command or a global command. In the case of the global command, the classifier does not need a matching nat command or an active NAT session to classify the packet. Whether the packet can communicate with the destination IP address after classification depends on how you configure NAT and NAT control.
For example, the classifier gains knowledge about subnets 10.10.10.0, 10.20.10.0 and 10.30.10.0 when the context administrators configure static commands in each context:
•![]() Context A:
Context A:
static (inside,shared) 10.10.10.0 10.10.10.0 netmask 255.255.255.0
•![]() Context B:
Context B:
static (inside,shared) 10.20.10.0 10.20.10.0 netmask 255.255.255.0
•![]() Context C:
Context C:
static (inside,shared) 10.30.10.0 10.30.10.0 netmask 255.255.255.0

Note ![]() For management traffic destined for an interface, the interface IP address is used for classification.
For management traffic destined for an interface, the interface IP address is used for classification.
Invalid Classifier Criteria
The following configurations are not used for packet classification:
•![]() NAT exemption—The classifier does not use a NAT exemption configuration for classification purposes because NAT exemption does not identify a mapped interface.
NAT exemption—The classifier does not use a NAT exemption configuration for classification purposes because NAT exemption does not identify a mapped interface.
•![]() Routing table—If a context includes a static route that points to an external router as the next-hop to a subnet, and a different context includes a static command for the same subnet, then the classifier uses the static command to classify packets destined for that subnet and ignores the static route.
Routing table—If a context includes a static route that points to an external router as the next-hop to a subnet, and a different context includes a static command for the same subnet, then the classifier uses the static command to classify packets destined for that subnet and ignores the static route.
Classification Examples
Figure 3-2 shows multiple contexts sharing an outside interface. The classifier assigns the packet to Context B because Context B includes the MAC address to which the router sends the packet.
Figure 3-1 Packet Classification with a Shared Interface using MAC Addresses
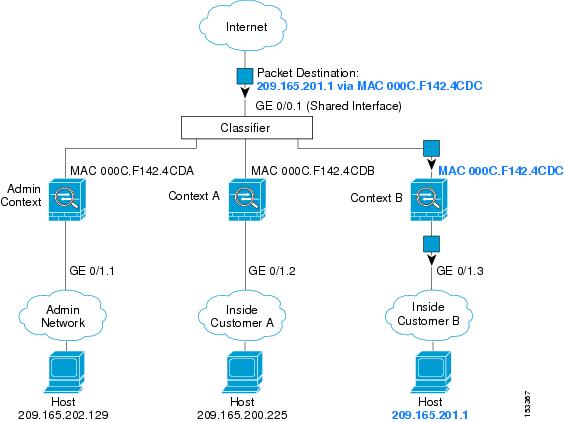
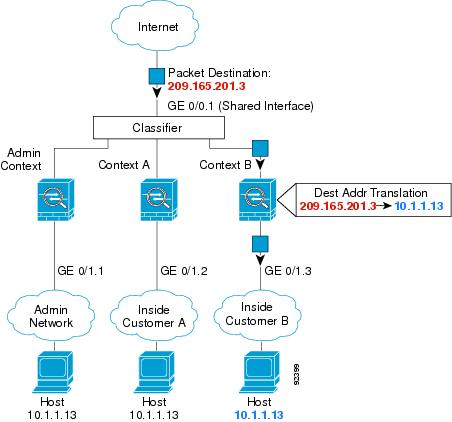
Figure 3-2 shows multiple contexts sharing an outside interface without MAC addresses assigned. The classifier assigns the packet to Context B because Context B includes the address translation that matches the destination address.
Figure 3-2 Packet Classification with a Shared Interface using NAT
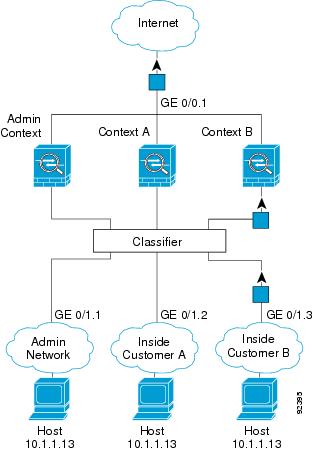
Note that all new incoming traffic must be classified, even from inside networks. Figure 3-3 shows a host on the Context B inside network accessing the Internet. The classifier assigns the packet to Context B because the ingress interface is Gigabit Ethernet 0/1.3, which is assigned to Context B.

Note ![]() If you share an inside interface and do not use unique MAC addresses, the classifier imposes some major restrictions. The classifier relies on the address translation configuration to classify the packet within a context, and you must translate the destination addresses of the traffic. Because you do not usually perform NAT on outside addresses, sending packets from inside to outside on a shared interface is not always possible; the outside network is large, (the Web, for example), and addresses are not predictable for an outside NAT configuration. If you share an inside interface, we suggest you use unique MAC addresses.
If you share an inside interface and do not use unique MAC addresses, the classifier imposes some major restrictions. The classifier relies on the address translation configuration to classify the packet within a context, and you must translate the destination addresses of the traffic. Because you do not usually perform NAT on outside addresses, sending packets from inside to outside on a shared interface is not always possible; the outside network is large, (the Web, for example), and addresses are not predictable for an outside NAT configuration. If you share an inside interface, we suggest you use unique MAC addresses.
Figure 3-3 Incoming Traffic from Inside Networks
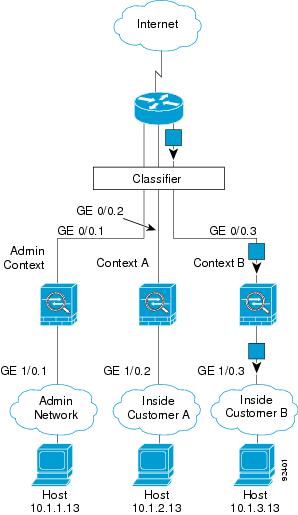
For transparent firewalls, you must use unique interfaces. Figure 3-4 shows a host on the Context B inside network accessing the Internet. The classifier assigns the packet to Context B because the ingress interface is Gigabit Ethernet 1/0.3, which is assigned to Context B.
Figure 3-4 Transparent Firewall Contexts
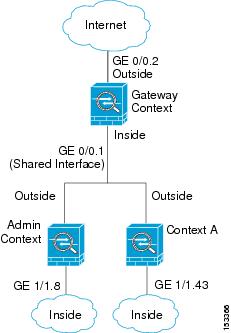
Cascading Security Contexts
Placing a context directly in front of another context is called cascading contexts; the outside interface of one context is the same interface as the inside interface of another context. You might want to cascade contexts if you want to simplify the configuration of some contexts by configuring shared parameters in the top context.

Note ![]() Cascading contexts requires that you configure unique MAC addresses for each context interface. Because of the limitations of classifying packets on shared interfaces without MAC addresses, we do not recommend using cascading contexts without unique MAC addresses.
Cascading contexts requires that you configure unique MAC addresses for each context interface. Because of the limitations of classifying packets on shared interfaces without MAC addresses, we do not recommend using cascading contexts without unique MAC addresses.
Figure 3-5 shows a gateway context with two contexts behind the gateway.
Figure 3-5 Cascading Contexts
Management Access to Security Contexts
The security appliance provides system administrator access in multiple context mode as well as access for individual context administrators. The following sections describe logging in as a system administrator or as a a context administrator:
System Administrator Access
You can access the security appliance as a system administrator in two ways:
•![]() Access the security appliance console.
Access the security appliance console.
From the console, you access the system execution space.
•![]() Access the admin context using Telnet, SSH, or ASDM.
Access the admin context using Telnet, SSH, or ASDM.
See Chapter 40, "Managing System Access," to enable Telnet, SSH, and SDM access.
As the system administrator, you can access all contexts.
When you change to a context from admin or the system, your username changes to the default "enable_15" username. If you configured command authorization in that context, you need to either configure authorization privileges for the "enable_15" user, or you can log in as a different name for which you provide sufficient privileges in the command authorization configuration for the context. To log in with a username, enter the login command. For example, you log in to the admin context with the username "admin." The admin context does not have any command authorization configuration, but all other contexts include command authorization. For convenience, each context configuration includes a user "admin" with maximum privileges. When you change from the admin context to context A, your username is altered, so you must log in again as "admin" by entering the login command. When you change to context B, you must again enter the login command to log in as "admin."
The system execution space does not support any AAA commands, but you can configure its own enable password, as well as usernames in the local database to provide individual logins.
Context Administrator Access
You can access a context using Telnet, SSH, or ASDM. If you log in to a non-admin context, you can only access the configuration for that context. You can provide individual logins to the context. See See Chapter 40, "Managing System Access," to enable Telnet, SSH, and SDM access and to configure management authentication.
Enabling or Disabling Multiple Context Mode
Your security appliance might already be configured for multiple security contexts depending on how you ordered it from Cisco. If you are upgrading, however, you might need to convert from single mode to multiple mode by following the procedures in this section. ASDM does not support changing modes, so you need to change modes using the CLI.
This section includes the following topics:
•![]() Backing Up the Single Mode Configuration
Backing Up the Single Mode Configuration
•![]() Enabling Multiple Context Mode
Enabling Multiple Context Mode
•![]() Restoring Single Context Mode
Restoring Single Context Mode
Backing Up the Single Mode Configuration
When you convert from single mode to multiple mode, the security appliance converts the running configuration into two files. The original startup configuration is not saved, so if it differs from the running configuration, you should back it up before proceeding.
Enabling Multiple Context Mode
The context mode (single or multiple) is not stored in the configuration file, even though it does endure reboots. If you need to copy your configuration to another device, set the mode on the new device to match using the mode command.
When you convert from single mode to multiple mode, the security appliance converts the running configuration into two files: a new startup configuration that comprises the system configuration, and admin.cfg that comprises the admin context (in the root directory of the internal Flash memory). The original running configuration is saved as old_running.cfg (in the root directory of the internal Flash memory). The original startup configuration is not saved. The security appliance automatically adds an entry for the admin context to the system configuration with the name "admin."
To enable multiple mode, enter the following command:
hostname(config)# mode multiple
You are prompted to reboot the security appliance.
Restoring Single Context Mode
If you convert from multiple mode to single mode, you might want to first copy a full startup configuration (if available) to the security appliance; the system configuration inherited from multiple mode is not a complete functioning configuration for a single mode device. Because the system configuration does not have any network interfaces as part of its configuration, you must access the security appliance from the console to perform the copy.
To copy the old running configuration to the startup configuration and to change the mode to single mode, perform the following steps in the system execution space:
Step 1 ![]() To copy the backup version of your original running configuration to the current startup configuration, enter the following command in the system execution space:
To copy the backup version of your original running configuration to the current startup configuration, enter the following command in the system execution space:
hostname(config)# copy flash:old_running.cfg startup-config
Step 2 ![]() To set the mode to single mode, enter the following command in the system execution space:
To set the mode to single mode, enter the following command in the system execution space:
hostname(config)# mode single
The security appliance reboots.
 Feedback