Deploying Cisco Virtualized Workload Mobility with EMC and VMware
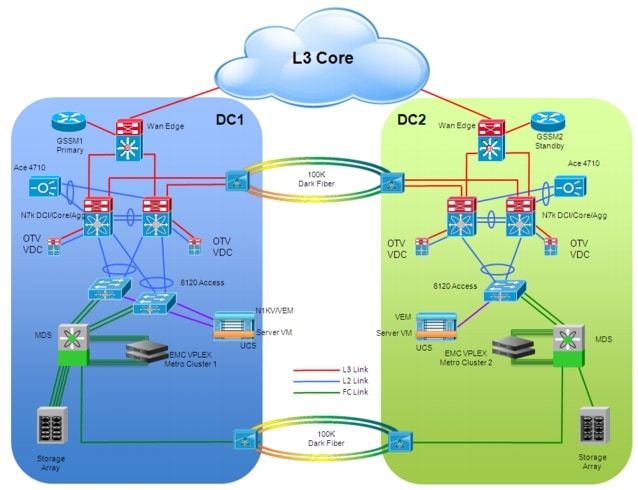
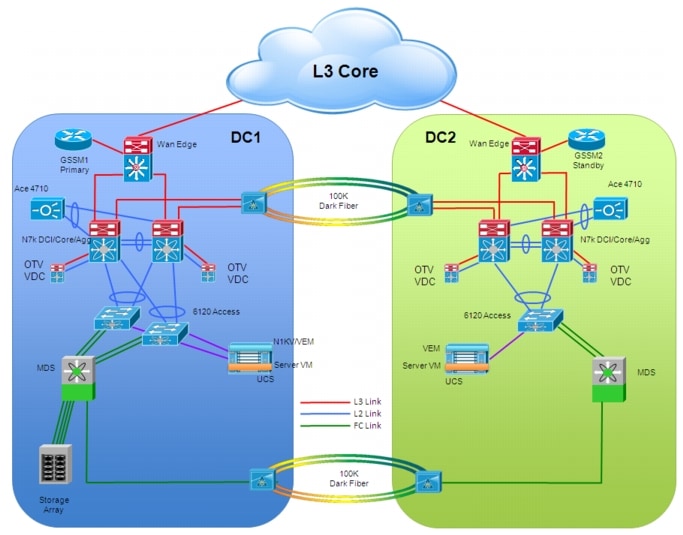
The validation environment used consisted of one test topology, consisting of two data centers. Figure 1-1 presents a high-level architecture view of the test topology used in validation.
Figure 1-1 Test Topology Overview
Validation Platforms
Table 1-1 provides a summary of the platforms leveraged in the validation environment as well as which specific test topologies used the technologies. Two other data points provided in Table 1-1 include the particular software versions used for each platform and any 3rd party (non-Cisco) platforms used.
 |
Note |
Validation Scale
While scalability was not a focus of system validation, Table 1-2 is provided to highlight certain scale points at which the system was tested.
Validation Methodology
The ability of the system to enable workload migration was the focus of the validation done on the test topology. The general procedure of a given test case was as follows:
1. ![]() Initiate application traffic from Client 1
Initiate application traffic from Client 1
2. ![]() Initiate server workload migration (e.g. DC1 to DC2)
Initiate server workload migration (e.g. DC1 to DC2)
3. ![]() Characterize Client 1 traffic impact
Characterize Client 1 traffic impact
4. ![]() Initiate application traffic from Client 2
Initiate application traffic from Client 2
5. ![]() Initiate server workload migration (e.g. DC2 to DC1)
Initiate server workload migration (e.g. DC2 to DC1)
6. ![]() Characterize Client 1 & 2 traffic impact
Characterize Client 1 & 2 traffic impact
From these generalized steps, information was gathered to satisfy the four goals of the validation, as outlined above.
Application Traffic Profile
Application traffic (Layer 7) was used in all of the validation test cases. Spirent Avalanche was employed to emulate a client that would initiate requests to applications running on virtual machines on the Cisco UCS. HTTP(S), FTP (reads & writes), and SQL traffic were employed.
The application servers were set up in one of two ways: Single-tier or multi-tier.
Single Tier Application Deployment
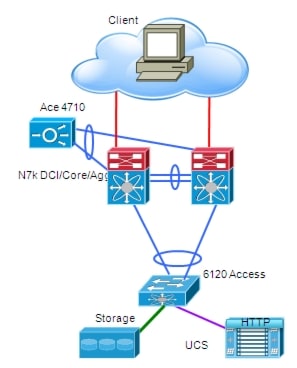
In the single tier deployment, client requests (HTTP or FTP) would hit the ACE load balancer then be sent directly to the HTTP or FTP application server. The HTTP or FTP server would serve data from it's SAN-connected storage back to the client (Figure 1-2).
Figure 1-2 Single Tier Application Traffic Flow
Multi-Tier Application Deployment
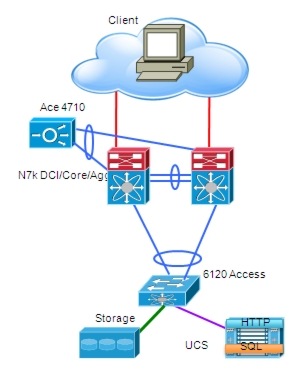
In the multi-tier deployment, client requests would hit the ACE as HTTP requests. The first tier would be an HTTP server that would serve up an HTML form page from its SAN-connected storage. The second tier server was an SQL database that would handle the SQL read or write requests from the HTTP tier. The HTTP server would be on one VLAN and the SQL server would be on another VLAN. The HTTP server would then respond back to the client with a success or failure based on the status of the SQL action (Figure 1-3).
Figure 1-3 Multi-Tier Application Traffic Flow
LAN Extension
LAN extension solutions are commonly used to extend subnets beyond the traditional Layer 3 boundaries of a single data center. Stretching the network space across two or more data centers can accomplish many things. Doing so also presents a challenge, since providing these LAN extension capabilities may have an impact on the overall network design. Simply allowing Layer 2 connectivity between sites that were originally connected only at Layer 3 would have the consequence of creating new traffic patterns between the sites: STP BPDUs, unicast floods, broadcasts, ARP requests, and so on. This can create issues, some of them related to attacks (ARP or flood storms), others related to stability issues (size of STP domain) or scale (ARP caches or MAC address table sizes). This section of the document discusses some of these issues and provides recommendations to alleviate them.
vPC over Dark Fiber
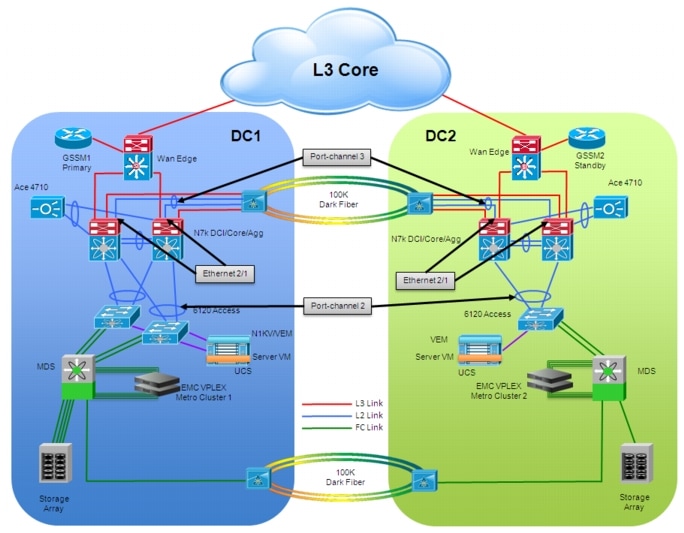
The virtual Port Channel (vPC) functionality allows establishing port channel distributed across two devices, allowing redundant yet loop-free topology. Compared to traditional STP-based environments, vPC allows redundant paths between a downstream device and its two upstream neighbors. With STP, the port channel is a single logical link that allows for building Layer 2 topologies that offer redundant paths without STP blocking redundant links.
Figure 1-4 vPC Topology
Spanning-Tree Configuration
The main advantage of bundling together the physical point-to-point links interconnecting the sites consist in being capable of extending VLANs without creating L2 looped topologies. As a consequence, the recommendation is to filter Spanning Tree BPDUs across the logical port-channel established between sites, so to be able to isolate the STP domains. Essentially, the idea is to replace STP with LACP as control plane protocol.
Example STP Filter
interface port-channel3
description L2 VPC 3 Trunk to dc2a-agg-7k1 eth 2/1
switchport
switchport mode trunk
switchport trunk allowed vlan 1,2500-2999
spanning-tree port type edge trunk
spanning-tree bpdufilter enable
mtu 9216
vpc 3
The spanning-tree bpdufilter enable command in the example above forces the interface to not send any BPDUs and drops all BPDUs that it receives. The command needs to be on all 4 Nexus 7000 aggregation switches on port channel between the data centers.
Root bridge placement is very important to ensure network stability and reachability. Typically the root bridge is located at the L2/L3 boundary in the network. In the DCI topology, this boundary exists in the Nexus 7000 at the aggregation layer.
To ensure the root is at the aggregation layer, the STP priority should be set such that the Nexus 7000 is chosen as the root in the STP calculations. There is a root for spanning tree within each isolated data center and we prevent the root from going over the DCI link to the other data center. This ensures localized STP calculations.
Example STP Priority
spanning-tree vlan 2500-2999,3500-3509 priority 28672
 |
Note |
The vPC peer switch feature was introduced to address performance concerns around STP convergence. This feature allows a pair of Cisco Nexus 7000 Series devices to appear as a single STP root in the Layer 2 topology. This feature eliminates the need to pin the STP root to the vPC primary switch and improves vPC convergence if the vPC primary switch fails.
The vPC peer-gateway capability allows a vPC switch to act as the active gateway for packets that are addressed to the router MAC address of the vPC peer. This feature enables local forwarding of such packets without the need to cross the vPC peer-link. In this scenario, the feature optimizes use of the peer-link and avoids potential traffic loss. Configuring the peer-gateway feature needs to be done on both primary and secondary vPC peers and is non-disruptive to the operations of the device or to the vPC traffic.
The vPC peer-switch and peer-gateway features can be configured globally under the vPC domain submode.
Example vPC Peer-Switch and Peer-Gateway
vpc domain 3
peer-switch
peer-keepalive destination 10.0.183.47 source 10.0.183.35
peer-gateway
It is also recommended to use the spanning-tree root guard command to ensure the ports toward the access layer of the topology cannot become a root port.
interface port-channel2
description vpc 2 - eth 2/25 to dc1a-acc-6k eth2/1
switchport
switchport mode trunk
switchport trunk allowed vlan 1,2500-2999,3500-3509
spanning-tree guard root
mtu 9216
vpc 2
Cisco TrustSec (CTS)
The requirement for LAN extension cryptography is increasingly prevalent, to meet federal and regulatory requirements. To accomplish this, CTS was enabled on the 4 dark fiber connections. You can manually configure Cisco TrustSec on an interface if your Cisco NX-OS device does not have access to a Cisco Secure ACS or authentication is not needed because you have the MAC address authentication bypass feature enabled. You must manually configure the interfaces on both ends of the connection. An example of the required configuration is in the example below.
Example CTS
interface Ethernet2/1
ip port access-group HSRPv1_Filtering in
cts manual
sap pmk 1234
switchport
switchport mode trunk
switchport trunk allowed vlan 1,2500-2999
rate-mode dedicated force
mtu 9216
channel-group 3 mode active
no shutdown
The cts manual command configures the interface into CTS manual mode. The sap pmk command configures the SAP pairwise master key (PMK) and operation mode.
The key argument is a hexadecimal value with an even number of characters and a maximum length of 32 characters. The commands need to be on both sides of the links between the data centers.
 |
Note |
OTV over Dark Fiber
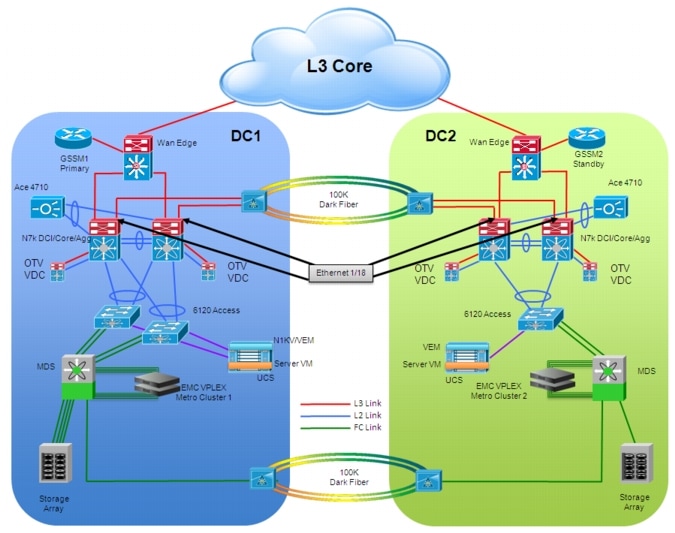
Overlay Transport Virtualization (OTV) is an IP-based functionality that has been designed from the ground up to provide Layer 2 extension capabilities over any transport infrastructure: Layer 2 based, Layer 3 based, IP switched, label switched, and so on. The only requirement from the transport infrastructure is providing IP connectivity between remote data center sites. In addition, OTV provides an overlay that enables Layer 2 connectivity between separate Layer 2 domains while keeping these domains independent and preserving the fault-isolation, resiliency, and load-balancing benefits of an IP-based interconnection.
The current implementation on the Nexus 7000 enforces the separation between SVI routing and OTV encapsulation for a given VLAN. This is an important consideration for the tested scenario, since the Nexus 7000 aggregation switches would actually have to perform both functionalities. This separation can be achieved with the traditional workaround of having two separate network devices to perform these two functions. However, a cleaner and less intrusive solution is tested here by introducing the use of Virtual Device Contexts (VDCs) available with Nexus 7000 platforms. Two VDCs would be deployed: an OTV VDC dedicated to perform the OTV functionality and a Routing VDC used to provide SVI routing support.
Figure 1-5 OTV Topology
Spanning-Tree Configuration
When using OTV, there is no need to explicitly configure BPDU filtering to prevent the creation of a larger STP domain extending between the two sites.
Just as in the case of the vPC over dark fiber, the root bridge placement is very important. Since the configuration is the same for the OTV over dark fiber use case, please reference the configuration examples in the previous section.
Cisco TrustSec (CTS)
CTS encryption has the same implications in the case of OTV over dark fiber as in vPC over dark fiber. The only difference is that there are only L3 links between the data centers that need to be protected. These L3 links, interfaces ethernet 1/18 in the OTV topology diagram, are between the routed VDCs in the Nexus 7000 in each data center. The OTV VDC has no knowledge of the CTS encryption.
Since all other considerations are similar, please refer to the vPC over dark fiber use case in the previous section.
Path Optimization
The deployment of LAN extension technologies implies that the same LAN/IP subnet gets stretched between two (or more) data center locations. As a consequence, a given IP address loses its linkage to a specific location. A mechanism is usually desired to optimize the traffic flows between any client and a specific data center service and also between server tiers (specifically for multi-layer application deployments). This is done in order to minimize the "tromboning effect" of traffic going back and forth across the LAN extension connection established between sites.
Egress Path Optimization
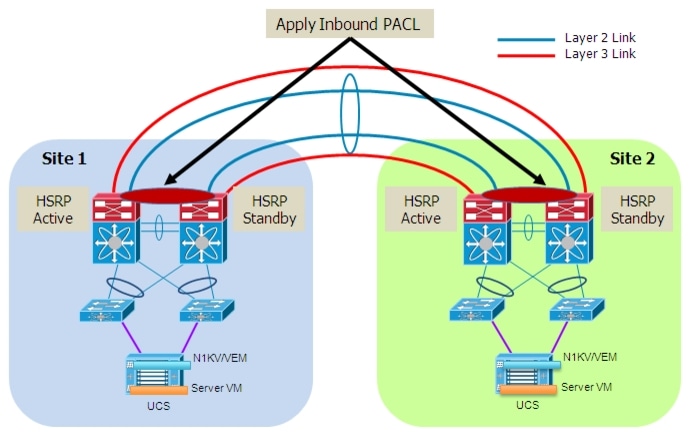
In order to optimize the server-client flows and the local routing of traffic between different subnets, it is recommended to leverage First Hop Redundancy Protocol (FHRP) Isolation, which allows providing an active default gateway in each location for the VLANs that are stretched between sites. This FHRP isolation functionality can be achieved in different ways depending on the specific LAN extension technology deployed.
For the vPC over dark fiber model discussed above, inbound port access lists (PACL) are used. Figure 1-6 highlights the specific case where HSRP is used as the FHRP on the Nexus 7000 devices acting as default gateway for all the hosts.
Figure 1-6 HSRP Isolation Across the vPC Connection
 |
Note |
The behavior shown above can be achieved by applying an inbound PACL on the DCI connection (logical vPC port-channel) so to be able to drop the incoming HSRP frame originated in the remote site. Notice that a VLAN ACL (VACL) defined on the aggregation Nexus 7000 switches could not be used for the same purpose, as it would also prevent the exchange of HSRP messages between the local aggregation devices.
It is worth noticing how the specific Nexus 7000 hardware implementation would cause the aggregation switches to learn the HSRP vMAC from the messages received on the DCI connection before these packets can actually be dropped by the applied PACL. In the validated topology, this does not represent a problem, since information for this vMAC is already known locally (static entry), so the dynamic entry learned via the DCI connection is never added to the table. This is true for both HSRP Active and Standby devices, when vPC is used to connect these to the rest of the switch (HSRP behavior is improved when integrated with vPC to provide active-active data plane first-hop routing capabilities).
The PACL configuration denies the HSRP control packets from entering the Nexus 7000, but the control packets are still on the DCI link. The configuration required to deny HSRP control packets from entering the Nexus 7000 is below.
Example HSRP Port ACL (PACL)
ip access-list HSRPv1_Filtering
10 deny udp any 224.0.0.2/32 eq 1985
20 permit ip any any
interface port-channel3
description L2 VPC 3 Trunk to dc2a-agg-7k1 eth 2/1
shutdown
switchport
switchport mode trunk
switchport trunk allowed vlan 1,2500-2999
ip port access-group HSRPv1_Filtering in
spanning-tree port type edge trunk
spanning-tree bpdufilter enable
mtu 9216
vpc 3
Forcing the localization of the HSRP prevents the server from having to go to the remote data center for default gateway routing. This will keep the DCI link from being crossed twice when a server is sending traffic to another server in the same data center but on a different VLAN. It will also optimize the server-to-client traffic flows.
Similarly to what was discussed for the vPC-based approach, it is possible to provide a specific configuration to filter HSRP messages and prevent them to be exchanged across the logical OTV overlay. The recommended approach in this case consists in defining a VLAN ACL on the OTV VDC and applying it to the set of VLANs that need to be extended, which is different from the PACL approach discussed in the vPC scenario above.
Figure 1-7 HSRP Isolation Across the OTV Overlay

A couple of additional considerations are required in this case:
•![]() The filtering of HSRP happens now before the messages are sent to the other site. This is due to the application of a VACL instead than a PACL (as already mentioned a PACL can only be applied in the inbound direction).
The filtering of HSRP happens now before the messages are sent to the other site. This is due to the application of a VACL instead than a PACL (as already mentioned a PACL can only be applied in the inbound direction).
•![]() Because of a specific Nexus 7000 HW implementation, even if the HSRP messages are dropped by the VACL once they get to the OTV VDC, this does not prevent the OTV device from learning the HSRP vMAC from the received frame. As a consequence, an OTV control protocol update is created for that vMAC and sent to the other OTV devices connected to the same overlay. Even if this behavior should not have functional impact on the solution, it is recommended to apply a simple configuration (route-map) to the OTV control plane to avoid sending this specific update.
Because of a specific Nexus 7000 HW implementation, even if the HSRP messages are dropped by the VACL once they get to the OTV VDC, this does not prevent the OTV device from learning the HSRP vMAC from the received frame. As a consequence, an OTV control protocol update is created for that vMAC and sent to the other OTV devices connected to the same overlay. Even if this behavior should not have functional impact on the solution, it is recommended to apply a simple configuration (route-map) to the OTV control plane to avoid sending this specific update.
 |
Note |
Example HSRP VACL Filters
AGG-A-OTV-VDC#
ip access-list HSRPv1
10 permit udp any 224.0.0.2/32 eq 1985
ip access-list IP_ALL
10 permit ip any any
vlan access-map HSRPv1_Filtering 10
match ip address HSRPv1
action drop
vlan access-map HSRPv1_Filtering 20
match ip address IP_ALL
action forward
vlan filter HSRPv1_Filtering vlan-list 2500-2563
The vlan access-map command creates the filter that is then applied to the VLANs where we do not want to forward the HSRP control packets. This filter is applied to the VLANs using the vlan filter command.
 |
Note |
Example HSRP route-map
mac-list HSRPv1_vMAC seq 10 deny 0000.0c07.ac00 ffff.ffff.ff00
mac-list HSRPv1_vMAC seq 20 permit 0000.0000.0000 0000.0000.0000
route-map HSRPv1_Filtering permit 10
match mac-list HSRPv1_vMAC
otv-isis default
vpn Overlay200
redistribute filter route-map HSRPv1_Filtering
The mac-list consists of the well-known HSRP virtual MAC (vMAC) of 0000.0c07.acxx. The first 5 bytes of the MAC address are always the same regardless of the HSRP group. The last byte of the MAC address are determined by the HSRP group. Using a mask of ffff.ffff.ff00 means to match the first 5 bytes exactly and the last byte can be any value. This will ensure you filter all HSRP virtual MAC addresses.
The otv-isis is the control protocol for OTV. To prevent the OTV device from sending the learned HSRP vMAC, a route-map that specifically blocks the vMAC address is applied to the OTV control protocol using the redistribute filter command. All other MAC addresses are allowed.
Ingress Path Optimization
For client-server flows optimization (inbound direction), an additional level of intelligence is required to provide information on which specific location the service is available and avoid a sub-optimal traffic path across the L2 connection established between sites. As previously mentioned, this may cause an asymmetric traffic path that would break once stateful devices (FW, load balancers, etc.) are deployed as part of the solution. If only FHRP isolation is used, this will be the case, therefore an additional optimization must be used.
The following section presents a specific DNS based ingress path optimization solution based on the integration of Cisco Application Control Engine (ACE), Cisco Global Site Selector (GSS) and VMware vCenter.
DNS Based Functionality with GSS, ACE, and vCenter Integration
The specific approach validated and discussed in this document to optimize the inbound client to server traffic flows is DNS based and leverage the following components:
•![]() Cisco Global Site Selector (GSS)
Cisco Global Site Selector (GSS)
•![]() Cisco Application Control Engine (ACE), deployed as an appliance
Cisco Application Control Engine (ACE), deployed as an appliance
•![]() VMware vCenter
VMware vCenter
GSS
A GSS system comprises of between one and eight GSS devices, each independently answering DNS queries.
A GSS can run in one of three modes;
•![]() Primary GSS Manager (GSSM)—Performs DNS functions as normal, along with providing a centralized GUI for configuration and statistics gathering for the GSS system
Primary GSS Manager (GSSM)—Performs DNS functions as normal, along with providing a centralized GUI for configuration and statistics gathering for the GSS system
•![]() Standby GSSM—Performs DNS functions as well as acting as a backup to the Primary GSSM, in the event of failure of that device. All changes to the GSS database, made on the Primary GSSM, are synchronized with the Standby GSSM.
Standby GSSM—Performs DNS functions as well as acting as a backup to the Primary GSSM, in the event of failure of that device. All changes to the GSS database, made on the Primary GSSM, are synchronized with the Standby GSSM.
•![]() GSS—Performs DNS functions according to the configurations made on the Primary GSSM.
GSS—Performs DNS functions according to the configurations made on the Primary GSSM.
In this phase of testing, two GSS devices were used; one configured as the primary GSSM (gssm1) and the other as the secondary GSSM (gssm2).
Each data center has a GSS 4492 connected to the WAN edge of the network. One of the gigabit ethernet interfaces is connected to the out-of-band management network and the other gigabit ethernet interface, Gig Ethernet 4/1, is L3 connected in-band to the WAN edge device of the local data center.
Figure 1-8 GSS Deployment

The two GSS are also configured in a Primary/Standby GSSM pair and are able to respond to queries regardless of their primary or standby role.
The primary GSSM performs content routing as well as centralized management functions for the GSS network. The primary GSSM serves as the organizing point of the GSS network, hosting the embedded GSS database that contains configuration information for all of your GSS resources, such as individual GSS devices and DNS rules. Other GSS devices report their status to the primary GSSM. The primary GSSM offers a single, centralized GUI for monitoring and administering your entire GSS network.
Figure 1-9 Primary GSSM GUI

Before you configure request routing or add GSS devices to your GSS network, first configure and enable a primary GSSM. From privileged EXEC mode on the CLI of your primary GSSM GSS device, enter the gss enable gssm-primary command to configure your GSS device as the primary GSSM in the GSS network.
Example Configure Primary GSSM
gssm1.example.com# gss enable gssm-primary
The standby GSSM performs GSLB functions for the GSS network even while operating in standby mode. In addition, the standby GSSM can be configured to act as the primary GSSM should the primary GSSM need to go offline for repair or maintenance, or becomes unavailable to communicate with other GSS devices. As with the primary GSSM, the standby GSSM is configured to run the GSSM GUI and contains a duplicate copy of the embedded GSS database that is currently installed on the primary GSSM. Any configuration or network changes affecting the GSS network are synchronized between the primary and the standby GSSM. The GSSM sends DNS application configuration changes to all GSS's in the network over TCP ports 2001 - 2009 using a secure session (RMI over SSL). These configuration changes only include IP addresses and DNS names.
To configure the standby GSS device as a standby GSSM, enter the gss enable gssm-standby command from privileged EXEC mode to enable your standby GSSM device and direct it to the primary GSSM in your GSS network. This command registers the standby GSSM with the primary GSSM.
Example Configure Secondary GSSM
gssm2.example.com# gss enable gssm-standby gssm1.example.com
The GSS (Global Site Selector) performs routing of DNS queries based on DNS rules and conditions configured using the primary GSSM. Each GSS is known to and synchronized with the GSSM, but individual GSS devices do not report their presence or status to the other. Each GSS on your network delegates authority to the GSS devices that serve DNS requests.
To configure the GSSMs to also serve DNS requests, use the gss enable command from privileged EXEC mode to enable your GSS device as a GSS and direct it to the primary GSSM in your GSS network.
Example Configure GSS
gssm1.example.com# gss enable gss gssm1.example.com
Once the configuration above is completed, the GSS device must be activated. This is done from the primary GSSM.
After you log in to the CLI and enable privileged EXEC mode, you enter the gslb command to access the global server load-balancing configuration mode. From this mode, you must activate the GSS using the gss-device activate command.
Example Activate GSS DNS Requests
gssm1(config-gslb)# gss-device gssm1.cisco.com activate
After the GSS devices in the network have been activated, the Global Server Load Balancing (GSLB) configuration can be put into place.
The ACE in each data center associates a different Virtual IP (VIP) address to each given workload (1:1 mapping). This implies that when the workload is deployed in DC1, external clients can access it by connecting to VIP_1 address, whereas VIP_2 is used once the workload is moved to DC2.
These VIP addresses need to be configured on the GSS so that when a client does a DNS query to the DNS server and the DNS server queries the GSS as authoritative for that domain, the GSS will return the correct response.
To accomplish this, both addresses (VIP_1 and VIP_2) are configured in the GSLB, but only one is active at a time.
Example GSLB VIP configuration
gssm1.example.com(config-gslb)#
domain-list VM1 owner System
domain vm1.ph4dci.com
answer vip 8.1.1.1 name VM1-DC1 manual-reactivation disable activate
answer vip 8.2.2.1 name VM1-DC2 manual-reactivation disable suspend
answer-group VM1 owner System type vip
answer-add 8.1.1.1 name VM1-DC1 weight 1 order 0 load-threshold 254 activate
answer-add 8.2.2.1 name VM1-DC2 weight 1 order 0 load-threshold 254 suspend
dns rule VM1 owner System source-address-list Anywhere domain-list VM1 query a activate
clause 1 vip-group VM1 method round-robin ttl 20 count 1 sticky disable
manual-reactivation disable activate
 |
Note |
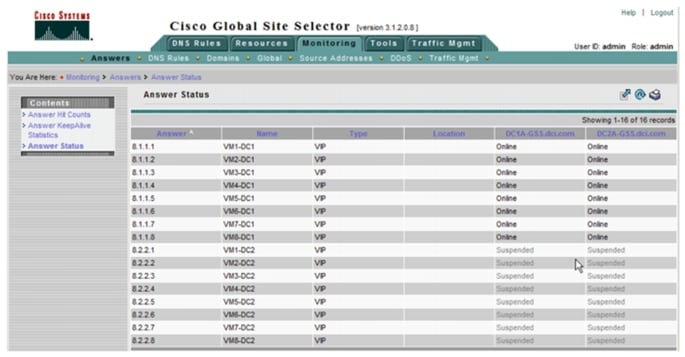
The answer vip configuration lines determine which answer the GSS will respond with when queried. As can be seen here, one is active and the other is suspended. The active entry is the one the GSS will respond with. The manual-reactivation disable command ensures the GSS automatically reverts to using the active answer when it returns to an online state.
From the GUI, the active and suspended entries can be monitored for both the primary and standby GSSM.
Figure 1-10 GSSM Monitoring
 |
Note |
ACE
A separate ACE is deployed in each data center site. The ACE is connected to the aggregation layer devices leveraging a vPC connection.
Since the intent was not to test the load balancing aspect of the ACE module, the 8 server farms are configured with one VM per server farm. There is also one VIP per server farm as mentioned in the design guide document.
The example below represents a single VIP workflow when the VIP is located in DC1. The external VIP address for server 1 is 8.1.1.1. The GSS will resolve the DNS query to this address when the VM is in DC1. The internal address of the VM is 10.25.1.111, in this example. When the ACE receives traffic destined to the external address, it will change the destination address to the internal address based on the policy-maps defined for the type of traffic that you want to be handled by the ACE.
Example DC1 ACE VIP & Server Farm
rserver host VM1
ip address 10.25.1.111
inservice
serverfarm host SRV1
rserver VM1
inservice
class-map match-all VIP-SRV1
2 match virtual-address 8.1.1.1 tcp any
policy-map type loadbalance first-match L4-POL-SRV1
class class-default
serverfarm SRV1
policy-map multi-match VIP-MM-SRV
class VIP-SRV1
loadbalance vip inservice
loadbalance policy L4-POL-SRV1
loadbalance vip icmp-reply
nat dynamic 1 vlan 2501
inspect ftp
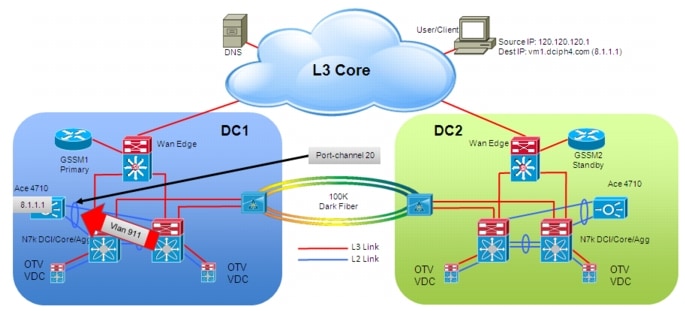
The ACE in DC1 is configured for L3 routing between the ACE and the Nexus 7000 aggregation switches for the client side flows. Since there is a port channel between the Nexus 7000 and the ACE to extend the server VLANs to the ACE, another VLAN is extended and configured for L3. The port-channel 20 and VLAN 911 are shown in Figure 1-11. A static default route on the N7K is used to send all server to client traffic across this VLAN. The service-policy is used on the client to server traffic so that the VIP addressing can be taken care of in the ACE.
Example DC1 ACE L3 Client Side VLAN
access-list ANY line 8 extended permit ip any any
interface vlan 911
description Client side VLAN
ip address 9.1.1.251 255.255.255.0
access-group input ANY
service-policy input VIP-MM-SRV
no shutdown
ip route 0.0.0.0 0.0.0.0 9.1.1.254
Figure 1-11 ACE DC1 Client Side
In regards to the Nexus 7000 aggregation devices, the vPC is configured to trunk the server VLANs as well as the L3 VLAN to the ACE. The L3 VLAN is configured to have HSRP to allow for failover in case of a device failure. The VIP addresses are statically routed across the L3 VLAN interface.
Example DC1 Nexus 7000 Client Side
interface port-channel20
switchport
switchport mode trunk
switchport trunk allowed vlan 911,2501-2508
spanning-tree port type normal
spanning-tree guard root
mtu 9216
vpc 20
interface Vlan911
no shutdown
mtu 9216
no ip redirects
ip address 9.1.1.253/24
ip ospf passive-interface
ip router ospf 200 area 0.0.0.0
ip pim sparse-mode
hsrp 1
preempt delay minimum 180 reload 300
priority 253
timers 1 3
ip 9.1.1.254
ip route 8.1.1.0/24 9.1.1.251
Source NAT (S-NAT) functionality has been validated in the solution, to ensure stitching of egress traffic back to the ACE that received the original ingress flow.
Figure 1-12 ACE Server Side

The source IP is changed to an address identifying the ACE itself (10.25.1.113 in the example below) as the source of the traffic and the destination IP address, which was changed from the VIP address to the internal address in the example above, is left unchanged.
Example DC1 ACE Server Side VLAN
interface vlan 2501
description Server side VLAN
ip address 10.25.1.112 255.255.255.0
access-group input ANY
nat-pool 1 10.25.1.113 10.25.1.113 netmask 255.255.255.0 pat
no shutdown
The ACE in DC2 is configured similarly. The server internal IP addresses are the same in the server farm since we are using OTV to L2 extend the server VLANs between DC1 and DC2. However the other IP addresses in the ACE need to be changed since they are specific to the ACE in each data center.
The VIP address needs to be different so a more direct path can be established to the site, avoiding the sub-optimal path across the DCI connection. In the example below is highlighted the change that needs to be made in the VIP configuration. The remainder of the configuration in the DC1 example is the same.
Example DC2 ACE VIP & Server Farm
class-map match-all VIP-SRV1
2 match virtual-address 8.2.2.1 tcp any
The ACE in DC2 is also configured for L3 routing between the ACE and the Nexus 7000 aggregation switches for the client side flows. A port-channel and static route, just as in DC1, are similarly configured.
Example DC2 ACE L3 Client Side VLAN
access-list ANY line 8 extended permit ip any any
interface vlan 921
description Client side VLAN
ip address 9.2.1.251 255.255.255.0
access-group input ANY
service-policy input VIP-MM-SRV
no shutdown
ip route 0.0.0.0 0.0.0.0 9.2.1.254
Figure 1-13 ACE DC2 Client Side
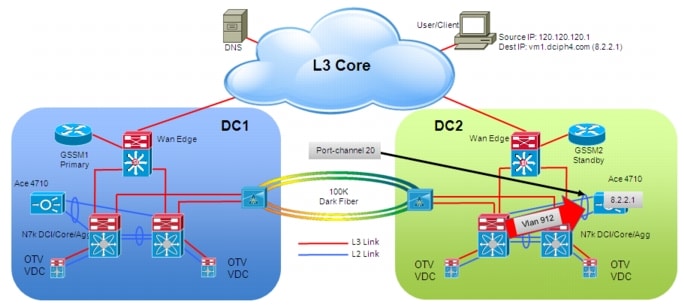
The Nexus 7000 aggregations devices are also configured as in DC1, with the changes to the VIP address.
Example DC2 Nexus 7000 L3 Client Side VLAN
interface Vlan921
no shutdown
mtu 9216
no ip redirects
ip address 9.2.1.253/24
ip ospf passive-interface
ip router ospf 200 area 0.0.0.0
ip pim sparse-mode
hsrp 1
preempt delay minimum 180 reload 300
priority 253
timers 1 3
ip 9.2.1.254
ip route 8.2.2.0/24 9.2.1.251
The SNAT configuration for the DC2 ACE is slightly different from the DC1 ACE. As in the case of the DC1 ACE, the source IP address is changed to the address identifying the ACE itself.
Figure 1-14 ACE DC2 Server Side
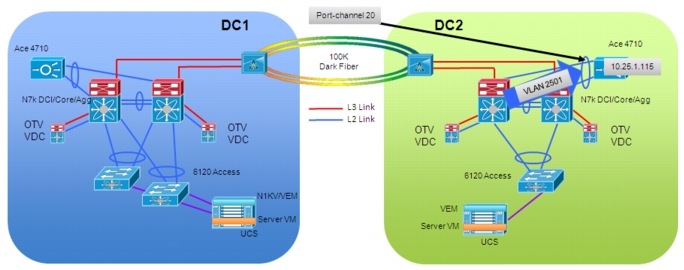
Since the ACE in DC1 is being identified as 10.25.1.113, in the example, a different address needs to be chosen for the ACE in DC2. In the example below, 10.25.1.115 is being used.
Example DC2 ACE Server Side VLAN
interface vlan 2501
description Server side VLAN
ip address 10.25.1.114 255.255.255.0
access-group input ANY
nat-pool 1 10.25.1.115 10.25.1.115 netmask 255.255.255.0 pat
no shutdown
The default load balancing method for the ACE is src-dest-port. To simplify the flows for troubleshooting purposes, the method was changed to src-dest-ip. This matches the method on the Nexus 7000.
vCenter integration
vCenter is intimately involved in the vMotion process for the servers. When a workload mobility event is required, it is initiated from the vCenter GUI or via API calls to the vCenter via scripts.
Once the vCenter completes the vMotion event for each server, vCenter needs to change the GSS GSLB configuration such that the GSS answers the DNS queries with the new location of the VM. This is accomplished by configuring an alarm for each VM to be triggered once the vMotion completes in vCenter. This alarm then runs a TCL script that updates the GSS device.
The alarms must be configured for each VM and for each direction, DC1 to DC2 and DC2 to DC1. Starting on the alarms tab definitions view for the VM in vCenter, right click in the window and select New Alarm.
Figure 1-15 vCenter New Alarm

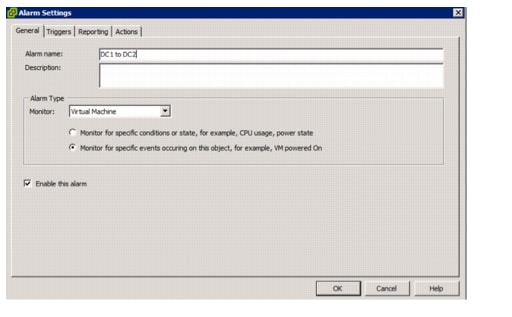
In the alarm settings dialog box on the general tab, type an alarm name and select alarm type Monitor for specific events occurring on this object.
Figure 1-16 Settings General Tab
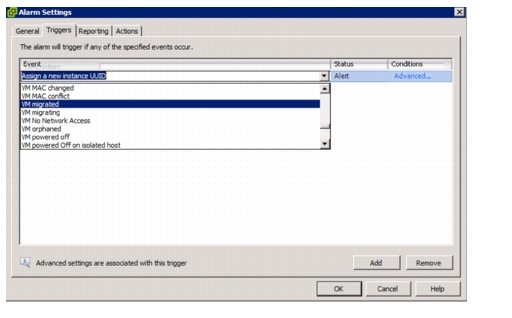
Click the Triggers tab and add a trigger. Initially it will be Assign a new instance UUID (in vCenter 4.1). Click twice on the event name and a drop down box will appear. Change the event to VM migrated.
Figure 1-17 Alarm Settings Triggers
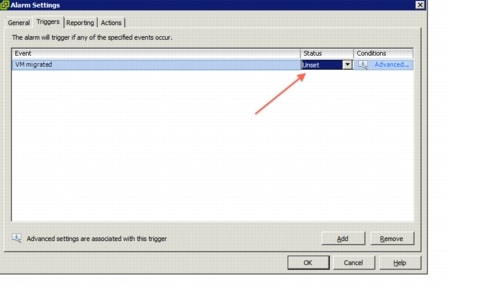
When configuring the triggers under the alarms settings, for the VM migrated event, you should configure the status to Unset. Without this setting, the event will not be triggered on a second migration, unless the user acknowledges the first alarm.
Figure 1-18 vCenter Alarm Unset
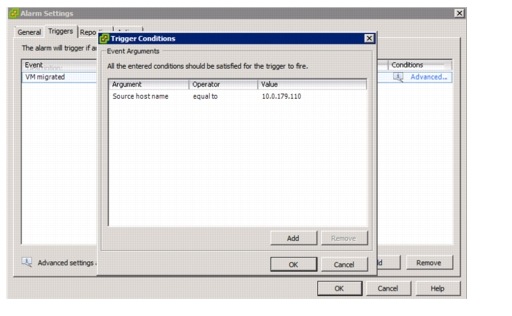
Since each alarm has to be directional, we must configure an advanced condition for the source host name, ie the ESXi host the VM is moving from. Click the Advanced link on the condition column to bring up the Trigger Conditions dialog box. Add a trigger condition and select Source host name and put in the ESXi host name the VM will be on when it starts the vMotion process.
Figure 1-19 Trigger Conditions
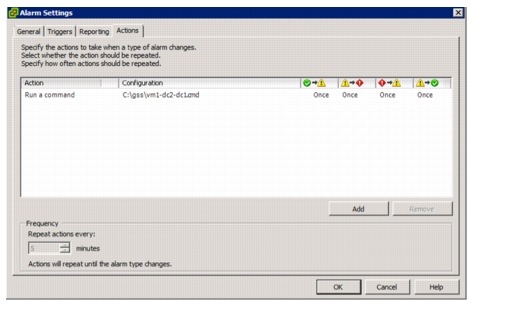
Next the action must be configured. Click the Actions tab and then add an action. Using the dropdown, change the action to Run a command. When the alarm is triggered, the action run a command is initiated on the vCenter machine. The command configuration is a local command file on the vCenter. This was required because the command call in vCenter does not allow parameters to be passed to the script being called. Therefore a specific command file is required for each VM and direction.
Figure 1-20 Alarm Actions
The command file is located in a directory on the vCenter server and contains a call to the tclsh application to read and evaluate the TCL script to change which VIP address is active in the GSS.
Example Command File Contents
C:\Tcl\bin\tclsh.exe c:\gss\gss.tcl P4-SQL-Server-1 DC1-2
The TCL script is also located on the vCenter server. The TCL script accepts the arguments of vmName and data center. The vmName is used to determine which lines of the GSS GSLB to change so that the GSS will answer the DNS query with the correct IP address once moved. The data center argument is used to specify direction of the move. The script can be changed to handle multiple VM servers. Only 2 servers are shown in the example for simplicity.
Example TCL script
# load the Expect package into Tcl
package require Expect
if {$argc != 2} {
puts "Usage: tclsh85 $argv0 <vmName> <datacenter>"
puts "Datacenter options are: DC1-2 DC2-1"
exit 0
}
#### Configuration Options ##########################################
set gssIP "10.0.183.39"
set gssUser "admin"
set gssPass "default"
set gssEnable "default"
array set serverIP {
P4-SQL-Server-1,DC1 "8.1.1.1"
P4-SQL-Server-1,DC2 "8.2.2.1"
P4-SQL-Server-2,DC1 "8.1.1.2"
P4-SQL-Server-2,DC2 "8.2.2.2"
}
array set vipName {
P4-SQL-Server-1,DC1 "VM1-DC1"
P4-SQL-Server-1,DC2 "VM1-DC2"
P4-SQL-Server-2,DC1 "VM2-DC1"
P4-SQL-Server-2,DC2 "VM2-DC2"
}
#### End Configuration Options ######################################
set vm [lindex $argv 0]
set dc [lindex $argv 1]
set killscript 0
set varList [list serverIP($vm,DC1) serverIP($vm,DC2) vipName($vm,DC1) vipName($vm,DC2)]
foreach var $varList {
if {![info exists $var]} {
set $killscript 1
puts "ERROR: Variable \"$var\" does not exist."
}
}
if {$killscript} {
exit 1
}
# telnet into GSS
spawn telnet $gssIP
expect "Cisco GSS"
expect "login:"
send "$gssUser\r"
expect "Password:"
send "$gssPass\r"
expect ">"
send "enable\r"
expect "Password:"
send "$gssEnable\r"
expect "#"
send "config term\r"
expect "#"
send "gslb\r"
if {[string equal $dc "DC1-2"]} {
     send "answer vip $serverIP($vm,DC1) name $vipName($vm,DC1) manual-reactivation
disable suspend\r"
expect "#"
     send "answer vip $serverIP($vm,DC2) name $vipName($vm,DC2) manual-reactivation
disable activate\r"
expect "#"
} elseif {[string equal $dc "DC2-1"]} {
     send "answer vip $serverIP($vm,DC2) name $vipName($vm,DC2) manual-reactivation
disable suspend\r"
expect "#"
     send "answer vip $serverIP($vm,DC1) name $vipName($vm,DC1) manual-reactivation
disable activate\r"
expect "#"
} else {
puts "ERROR: Invalid argument for datacenter. Expect \"DC1-2\" or \"DC2-1\"."
}
send "end\r"
expect "#"
send "exit\r"
expect ">"
send "exit\r"
expect eof
exit 0
Server Virtualization
Server virtualization decouples applications deployment from physical server purchases. When servers are configured into virtualization pools, a data center becomes a dynamic entity in which resources are used efficiently, and the allocation of virtual machines to physical servers can be adjusted dynamically to best balance efficiency and performance. And when these virtual machines need to be moved, network persistence, security and storage compliance need to be considered.
Virtual Machine Deployment
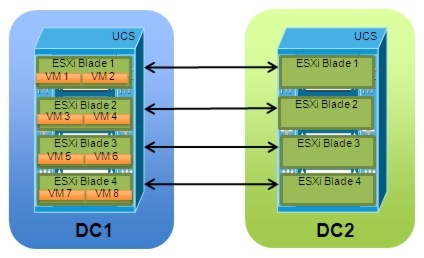
The applications servers used in the testing were deployed across multiple ESXi hosts in the data center. The test topology consisted of one UCS Chassis in DC1 with 4 blade servers and another UCS chassis in DC2 with 4 blade servers. There was also 12 other non-UCS ESXi servers deployed in DC2 to give a total of 20 ESXi hosts for the topology.
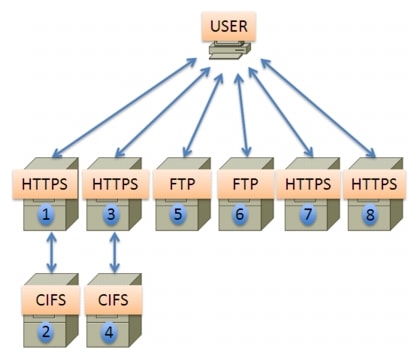
FTP, HTTPS, and CIFS were used as applications for testing purposes. VM server pairs 1-2 and 3-4 were configured in a 2-tier model. VM servers 1 and 3 were configured as web servers for HTTPS traffic. VM servers 2 and 4 were configured to provide CIFS file sharing to servers 1 and 3, respectively. When the client requests a file from server 1, it would need to use the CIFS file-share to get the actual file on server 2 and then send the file to the client. The same setup was used for servers 3 and 4.
VM Servers 5 thru 8 were deployed in a single tier model. VM servers 5 and 6 were configured as FTP servers. VM servers 7 and 8 were configured as webservers for HTTPS without using the CIFS file-share.
Figure 1-21 VM server Tiers
These 8 servers were deployed in pairs on each of the 4 UCS server blades in DC1, initially. When moving the servers to DC2, they would be moved to the corresponding UCS blade in DC2 while maintaining the same deployment model. The same was true for DC2 to DC1 operations as well.
Figure 1-22 ESXi VM Server Placement and Movement
There were 32 Windows XP VMs and 960 Linux VMs also on the network during testing and were mostly used to create vethernet ports on the Nexus 1000V. The 992 VMs were deployed between the 20 ESX servers and were not directly used for the workload mobility tests.
Nexus 1000V
Nexus 1000V allows the policy configuration to move with a virtual machine during live migration, ensuring persistent network, security, and storage compliance, resulting in improved business continuance, performance management, and security compliance. Another goal of the testing is to allow the deployment of the Nexus 1000V Distributed Virtual Switch (DVS) in a stretched fashion between physical data center sites. This can be achieved independently from the specific ESXi cluster deployment. This means that the VEM modules forming a given Nexus 1000V switch can be deployed on ESXi hosts belonging to separate ESXi clusters or to a single stretched cluster.
The Nexus 1000V is deployed in a stretched fashion between the physical data centers. When deploying the VSMs, it is required that the active and standby VSM be deployed into the same physical data center. It is also recommended to deploy them on separate ESXi hosts, to enhance the redundancy.
For testing, the VSMs are deployed in DC1 on separate ESXi hosts. L3 is the chosen transport mode for the control traffic between the VSM and VEMs.
Figure 1-23 ESXi 4.1 Deployment with Nexus 1000V on Cisco UCS
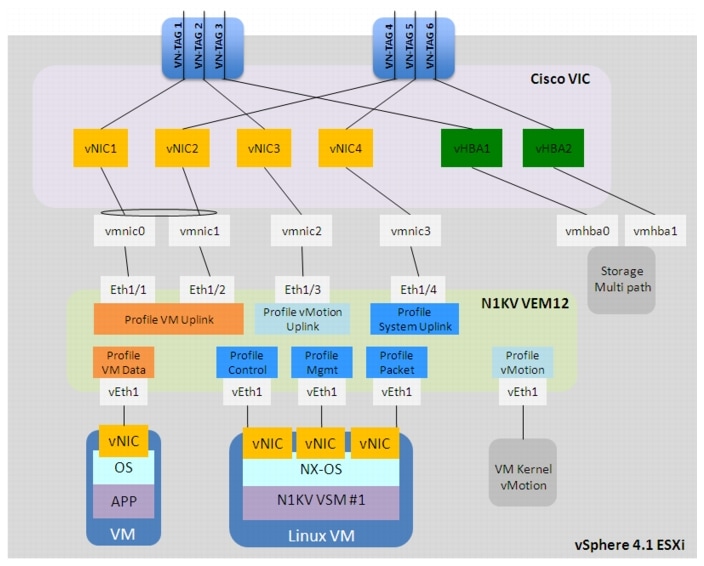
To configure the Nexus 1000V into L3 transport mode, the svs mode must be set to L3 under the svs-domain. The control and packet VLAN that is configured under the svs-domain is then ignored. Once configured, the system creates a control0 interface. The IP address on this interface is the IP address of the VSM. It needs to be on one of the l3 control VLANs described later in this section.
Example L3 Transport Mode
svs-domain
domain id 1
control vlan 1
packet vlan 1
svs mode L3 interface control0
interface control0
ip address 10.0.181.10/24
Since there are 2 data centers, you need 2 separate VLANs trunked on the system uplink ports for this purpose. It is worth noticing that the VSM used to manage the various VEMs was deployed as a virtual machine connected to the same VEM module it needs to manage. Since that is the case, these VLANs must be configured as system VLANs under the system uplink port-profile, SystemMgmt in the example below. On initial booting of the ESXi hosts, the VEM will bring up and forward on those system VLANs before it has the full configuration downloaded from the VSM, thus preventing a potential "chicken-and-egg" situation.
Example System uplinks
port-profile type ethernet SystemMgmt
vmware port-group
switchport mode trunk
switchport trunk allowed vlan 179,181,2562-2563
no shutdown
system vlan 179,181
state enabled
During testing, VLAN 179 is used in DC2 and VLAN 181 is used in DC1 for the L3 control VLANs. This means that the VSMs and VEMs that reside in DC1 will be on VLAN 181 and the VEMs that are in DC2 will be on VLAN 179.On the port profiles of these VLANs, you must configure capability l3control. This informs the Nexus 1000V which profile to use for L3 control traffic. You must also configure system vlan under these port profiles as well.
Example L3 Control
port-profile type vethernet l3control_179
capability l3control
vmware port-group
switchport access vlan 179
switchport mode access
no shutdown
system vlan 179
description DC1 L3 Control Vlan 179
state enabled
port-profile type vethernet l3control_181
capability l3control
vmware port-group
switchport access vlan 181
switchport mode access
no shutdown
system vlan 181
description DC2 L3 Control Vlan 181
state enabled
It is important to keep in mind that VLAN 181 where the active/standby VSMs are deployed in DC1 needs to be extended across the DCI connection to exist also in DC2. This is to allow these virtual machines network connectivity once the vMotion process is completed, in the case of a VSM migration event. This is required independently from the transport type (L2 or L3) used for control plane communication between the active VSM and the distributed VEMs.
The interfaces part of the "VM Uplink" port profile is configured as part of a port-channel. The interesting point is that each virtual interface part of this bundle is actually connected to an independent upstream Fabric Interconnect device. In order for this to work, it is required to configure the Nexus 1000V to operate in vPC Host Mode (vPC-HM). To configure the Nexus 1000V, the mac-pinning option should be used on the channel-group configuration. Refer to the following example.
Example Nexus 1000V vPC-HM
port-profile type ethernet VMtraffic
vmware port-group
switchport mode trunk
switchport trunk allowed vlan 2501-2556
channel-group auto mode on mac-pinning
no shutdown
description all vm traffic
state enabled
Another aspect of the workload mobility use case is the ability of the Nexus 1000V to move the port profiles when the VMs are moved from one data center to another. Comparing the configuration before and after the moves, we are able to see that the port profiles are moved, including any of the features enabled on them.
To determine which virtual ethernet interface is assigned to which VM, use the show interface virtual command. Looking at P4-SQL-Server-5 for example, we see that the vethernet is 10 and the module is 5. The module is the Virtual Ethernet Module (VEM) that is configured on the ESXi host when the N1KV is deployed and represents a virtual linecard to the Nexus 1000V. The module number 5 was assigned to 10.0.182.130 when the VEM was powered on and registered with the VSM.
Example Show Virtual Interface Before vMotion
------------------------------------------------------------------------
Port Adapter Owner Mod Host
------------------------------------------------------------------------
Veth1 vmk1 VMware VMkernel 5 10.0.182.130
Veth2 vmk1 VMware VMkernel 4 10.0.182.140
Veth3 vmk2 VMware VMkernel 5 10.0.182.130
Veth4 vmk0 VMware VMkernel 3 10.0.182.120
Veth5 vmk1 VMware VMkernel 3 10.0.182.120
Veth6 vmk0 VMware VMkernel 5 10.0.182.130
Veth7 vmk2 VMware VMkernel 3 10.0.182.120
Veth8 vmk0 VMware VMkernel 4 10.0.182.140
Veth9 vmk2 VMware VMkernel 4 10.0.182.140
Veth10 Net Adapter 1 P4-SQL-Server-5 5 10.0.182.130
Veth11 Net Adapter 1 P4-Other-017 5 10.0.182.130
Veth12 Net Adapter 1 P4-Other-018 5 10.0.182.130
Veth13 Net Adapter 1 P4-Other-019 5 10.0.182.130
Veth14 Net Adapter 1 P4-Other-020 5 10.0.182.130
Veth15 Net Adapter 2 P4-SQL-Server-5 5 10.0.182.130
Veth16 Net Adapter 2 P4-SQL-Server-6 5 10.0.182.130
 |
Note |
Taking a look at the show port-profile command before the workload mobility, the port-profile VMNetwork_2505_isolated is where vethernet 10 assigned.
Example Show Port-Profile Before vMotion
port-profile VMNetwork_2505_isolated
type: Vethernet
description: VLAN2505 isolation ports
status: enabled
max-ports: 32
inherit:
config attributes:
switchport mode private-vlan host
ip port access-group vm-acl in
service-policy output vm-qos
switchport private-vlan host-association 2505 1505
switchport port-security
switchport port-security violation protect
no shutdown
evaluated config attributes:
switchport mode private-vlan host
ip port access-group vm-acl in
service-policy output vm-qos
switchport private-vlan host-association 2505 1505
switchport port-security
switchport port-security violation protect
no shutdown
assigned interfaces:
Vethernet10
port-group: VMNetwork_2505_isolated
system vlans: none
capability l3control: no
capability iscsi-multipath: no
port-profile role: none
port-binding: static
This output verifies that the features enabled on this port profile govern the server attached to vethernet 10.
One of the features tested was private-vlans. Using the show vlan private-vlan command, it is shown that vethernet 10 is using 2505 isolated.
Example Show vlan private-vlan Before vMotion
Primary Secondary Type Ports
------- --------- --------------- ----------------------------------
2505 1505 isolated Po1, Po2, Po3, Po4,
Po5, Po6, Po7, Po8,
Po9, Po10, Po11, Po12,
Po13, Po14, Po15, Po16,
Po17, Po18, Po19, Po20,
Veth10, Eth3/4, Eth3/5, Eth4/4,
Eth4/5, Eth5/4, Eth5/5, Eth6/4,
Eth6/5, Eth7/4, Eth7/5, Eth8/4,
Eth8/5, Eth9/4, Eth9/5, Eth10/4,
Eth10/5, Eth11/2, Eth12/2, Eth13/2,
Eth15/2, Eth16/2, Eth17/2, Eth18/2,
Eth19/2, Eth20/2, Eth21/2, Eth22/2,
Eth23/2
Once the workload mobility has completed, notice that vethernet 10 is now located on module 9.
Example Show Virtual Interface After vMotion
-----------------------------------------------------------------------
Port Adapter Owner Mod Host
-----------------------------------------------------------------------
Veth1 vmk1 VMware VMkernel 5 10.0.182.130
Veth2 vmk1 VMware VMkernel 4 10.0.182.140
Veth3 vmk2 VMware VMkernel 5 10.0.182.130
Veth4 vmk0 VMware VMkernel 3 10.0.182.120
Veth5 vmk1 VMware VMkernel 3 10.0.182.120
Veth6 vmk0 VMware VMkernel 5 10.0.182.130
Veth7 vmk2 VMware VMkernel 3 10.0.182.120
Veth8 vmk0 VMware VMkernel 4 10.0.182.140
Veth9 vmk2 VMware VMkernel 4 10.0.182.140
Veth10 Net Adapter 1 P4-SQL-Server-5 9 10.0.180.130
Veth11 Net Adapter 1 P4-Other-017 5 10.0.182.130
Veth12 Net Adapter 1 P4-Other-018 5 10.0.182.130
Veth13 Net Adapter 1 P4-Other-019 5 10.0.182.130
Veth14 Net Adapter 1 P4-Other-020 5 10.0.182.130
Veth15 Net Adapter 2 P4-SQL-Server-5 9 10.0.180.130
Veth16 Net Adapter 2 P4-SQL-Server-6 9 10.0.180.130
Module 9 is what was assigned to 10.0.180.130 when the VEM was powered on and registered with the VSM.
Checking the show port-profile command once again, verify that vethernet 10 is still associated.
Example Show Port-Profile After vMotion
port-profile VMNetwork_2505_isolated
type: Vethernet
description: VLAN2505 isolation ports
status: enabled
max-ports: 32
inherit:
config attributes:
switchport mode private-vlan host
ip port access-group vm-acl in
service-policy output vm-qos
switchport private-vlan host-association 2505 1505
switchport port-security
switchport port-security violation protect
no shutdown
evaluated config attributes:
switchport mode private-vlan host
ip port access-group vm-acl in
service-policy output vm-qos
switchport private-vlan host-association 2505 1505
switchport port-security
switchport port-security violation protect
no shutdown
assigned interfaces:
Vethernet10
port-group: VMNetwork_2505_isolated
system vlans: none
capability l3control: no
capability iscsi-multipath: no
port-profile role: none
port-binding: static
Verifying the show vlan private-vlan command, it is shown that vethernet 10 is still using 2505 isolated.
Example Show vlan private-vlan After vMotion
Primary Secondary Type Ports
------- --------- --------------- ----------------------------------
2505 1505 isolated Po1, Po2, Po3, Po4,
Po5, Po6, Po7, Po8,
Po9, Po10, Po11, Po12,
Po13, Po14, Po15, Po16,
Po17, Po18, Po19, Po20,
Veth10, Eth3/4, Eth3/5, Eth4/4,
Eth4/5, Eth5/4, Eth5/5, Eth6/4,
Eth6/5, Eth7/4, Eth7/5, Eth8/4,
Eth8/5, Eth9/4, Eth9/5, Eth10/4,
Eth10/5, Eth11/2, Eth12/2, Eth13/2,
Eth15/2, Eth16/2, Eth17/2, Eth18/2,
Eth19/2, Eth20/2, Eth21/2, Eth22/2,
Eth23/2
During testing with port-security configured on the Nexus 1000V, there were occasional problems with traffic being blocked after a vMotion on some of the Microsoft Windows 2008 servers. It was found that on occasion, the Windows server would report the incorrect MAC address to the Nexus 1000V in the form of 0000.0000.MACA as seen in this example:
Example MAC Issue
TopoB-N1kv# show port-security address int vethernet 19
Secure Mac Address Table
----------------------------------------------------------------------
Vlan Mac Address Type Ports Configured Age
(mins)
---- ----------- ------ ----- ---------------
1506 0000.0000.0408 DYNAMIC Vethernet19 0
1506 0050.56A9.0408 DYNAMIC Vethernet19 0
----------------------------------------------------------------------
Notice how the last section is the same as the "real" MAC address. Because the default port-security max secure address list is set to 1, the Nexus 1000V does not allow the "real" MAC address to register itself in the secure address list after the bogus one already has registered. After this occurs, that Windows 2008 server cannot communicate with the outside world thus interrupting traffic.
A defect (CSCto11322) points to a possible problem with the Windows 2000 driver in conjunction with the E1000 network adapter used on the VMs. The problem is mostly sporadic; the defect mentioned numerous power cycles before the issue could be reproduced. To alleviate this issue in testing, the number of allowed port-security MAC addresses was raised to 2.
UCS 6100 to Nexus 7000 connectivity
The Cisco Unified Computing System (UCS) allows for the establishment of a server farm architecture that enables system resources to be allocated dynamically and flexibly to meet individual virtual machine requirements within a common, consistent resource pool.
Figure 1-24 6100 to Nexus 7000 Connections
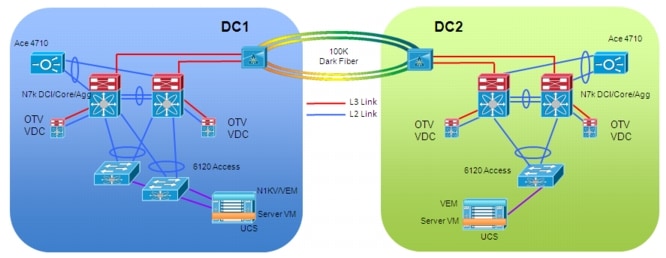
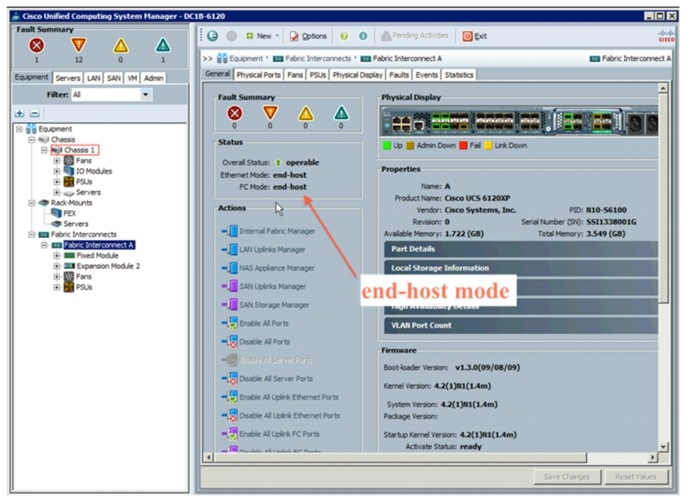
The 6100 Fabric Interconnect devices are deployed in end-host mode, which represents the recommended option when compared to the switch mode of operation. The 6100 is connected to the pair of Nexus 7000 using a vPC configuration. This provides load balancing and redundancy from the 6100 to the rest of the network.
Figure 1-25 6100 End Host Mode
Initially the topology was configured to have one interface from the 6100 to the management network and another interface the test topology. While testing, however, it was noticed that some MAC addresses were not being learned on the Nexus 1000V.
It was determined that the topology configuration was creating a disjointed L2 domain. In the tested release of code (4.2(1)N1(1.4m)), disjointed L2 domains are not supported.
 |
Note |
vCenter/ESXi
Each ESXi host that is managed by vCenter that is to be used for workload VMs should have a VMKernel interface configured for vMotion traffic. This interface is configured on a VLAN that is also extended between the data centers. Even though vMotion traffic is TCP based and a vMotion over L3 will work, VMware currently only supports L2 based vMotion events.
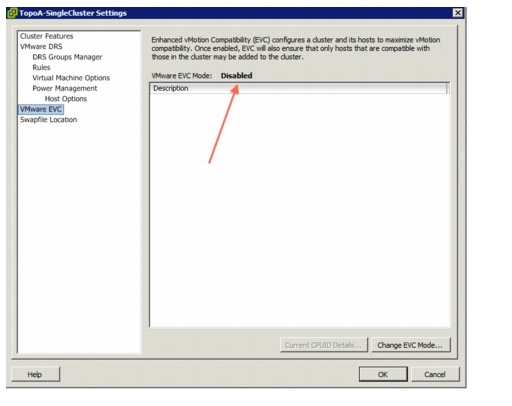
Enhanced vMotion Compatibility (EVC) simplifies vMotion compatibility issues across CPU generations. EVC automatically configures server CPUs with Intel FlexMigration or AMD-V Extended Migration technologies to be compatible with older servers.
After EVC is enabled for a cluster in the vCenter inventory, all hosts in that cluster are configured to present identical CPU features and ensure CPU compatibility for vMotion. The features presented by each host are determined by selecting a predefined EVC baseline. vCenter does not permit the addition of hosts that cannot be automatically configured to be compatible with the EVC baseline. For testing purposes, there was a mix of Intel-based and AMD-based ESXi hosts in the same cluster. However, some of these hosts were not compatible with the EVC baseline. When this is the case, you must have Enhanced vMotion Compatibility (EVC) disabled for the cluster.
Figure 1-26 EVC Disabled
 |
Note |
During testing, a script was used to schedule the workload mobility events in vCenter. After the daylight savings time change, we noticed that the scheduling was off by about 1 hour.
The issue is caused by vCenter Server storing and processing scheduled task times in UTC. vCenter Server uses UTC to preserve a reference time for clients and hosts that are running on different time zones. UTC does not have daylight savings advancements, so after the DST change; scheduled tasks run one hour earlier or later.
 |
Note |
Path of a packet from Nexus 7000 to Virtual Machine
Traffic flows from the Nexus 7000 to the 6100 via the port channel (Po101) between them.
Figure 1-27 Path of a Packet Nexus 7000 to VM
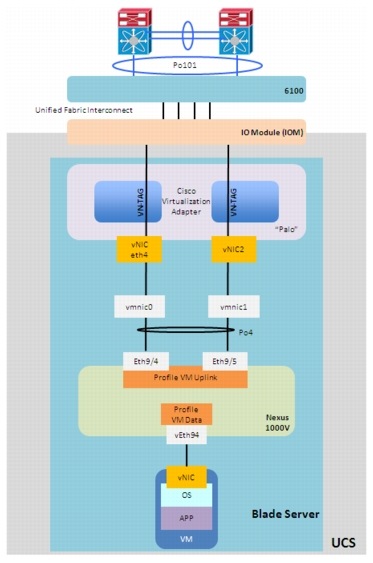
Once in the 6100, it sends the traffic to the UCS via the unified fabric interconnect links between the 6100 and the UCS into the IO Module on the UCS. This traffic is tagged with a specific identifier tag assigned by the UCS manager to each vNIC deployed on the Cisco virtualization adapter. From here the traffic is forwarded to the VMware ESXi kernel. The ESXi kernel passes the packet to the Nexus 1000V VEM module that handles the software switching decisions to get the packet to the correct virtual ethernet (vEth94 above) toward the VM.
Virtual Security Gateway (VSG)
Cisco Virtual Security Gateway (VSG) is a virtual firewall for Cisco Nexus 1000V Series Switches that delivers security and compliance for virtual computing environments. Cisco VSG uses virtual network service data path (vPath) technology embedded in the Cisco Nexus 1000V Series Virtual Ethernet Module (VEM), offering transparent insertion and efficient deployment. VSG also introduces the Cisco Virtual Network Management Center (VNMC), which is used to manage VSG(s).
The VNMC is a virtual appliance that provides centralized device and security policy management for the VSG. VNMC uses security profiles for template-based configuration of security policies. A security profile is a collection of security policies that can be predefined and applied on an on-demand basis at the time of virtual machine instantiation.
The VNMC should be deployed in the management area of the data center, typically where the vCenter Servers are deployed.
When installing VNMC by deploying the Open Virtualization Format (OVF) template, under the "VNMC DNS" area on the Properties page, both the Hostname and the Domain name must be entered. If either option is not configured, the deployment settings do get validated and the VM gets deployed but the VM will fail to power up with the error message as to "hostname not configured" or "Domain name not configured". The only workaround is to delete the VM and redeploy.
Figure 1-28 VNMC Hostname and Domain Name
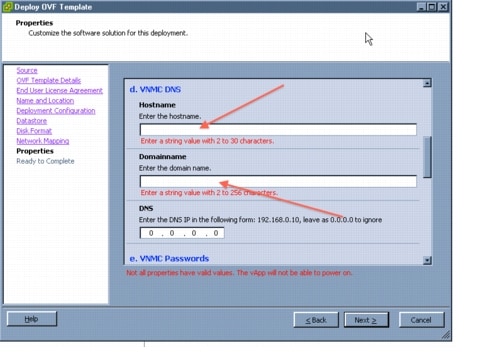
This issue has been resolved in VNMC version 1.2 that will be release later this year.
 |
Note |
When deploying the stretched VSG model, similarly to how discussed for the VSMs, both active and standby VSGs are deployed in DC1. It is recommended to deploy each VSG in an active-standby pair on a separate VMware ESXi host in the same data center.
As in the case of the VSM deployment, the VSG virtual machines are connected to the same VEM that is hosting the virtual machine. However, there is no requirement for a special system VLAN to be used. There is also no special consideration in regards to separate or stretched ESXi cluster models.
As can be seen in Figure 1-29, the active VSG (VSG1) is deployed in DC1 on ESXi host 10.0.181.110.
Figure 1-29 VSG1 Deployment
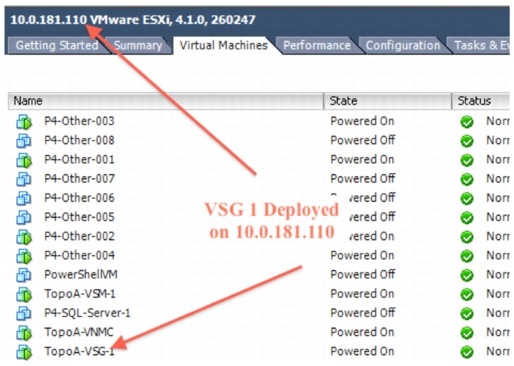
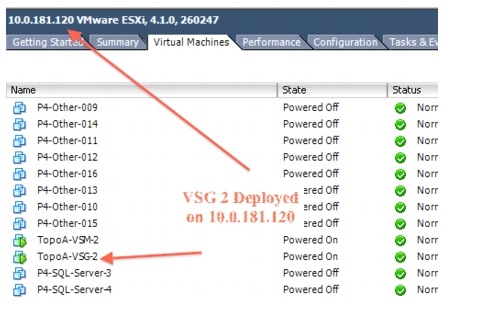
The standby VSG (VSG2) is deployed on 10.0.181.120 which is also in DC1. Deploying the VSG VMs on separate ESXi hosts is recommended to enhance the redundancy of the firewall should one of the ESXi hosts have a problem.
Figure 1-30 VSG 2 Deployment
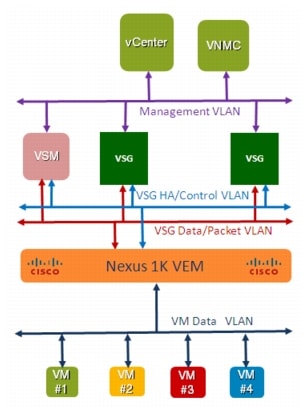
Three vNICs/networks are required for the VSG within the data center - Management, Data, and HA/Control. In Figure 1-31, the management VLAN is between the VSG, VSM, vCenter and VNMC. The Data and HA VLAN is between the VSG, VSM and VEMs.
Figure 1-31 VSG vNICs
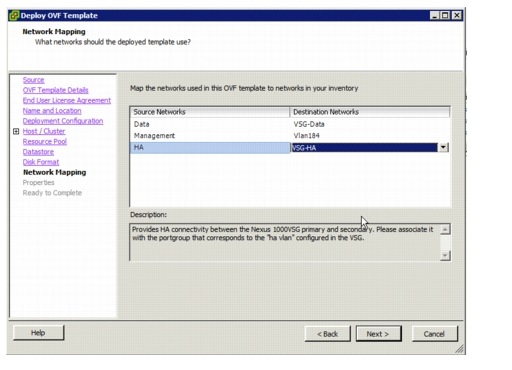
Prior to deploying the VSG OVA, it is suggested to have the Nexus 1000V port-profiles defined for these three networks so that the destination networks can be associated with the VSG during the deployment of the OVA.
Figure 1-32 VSG Network Mapping
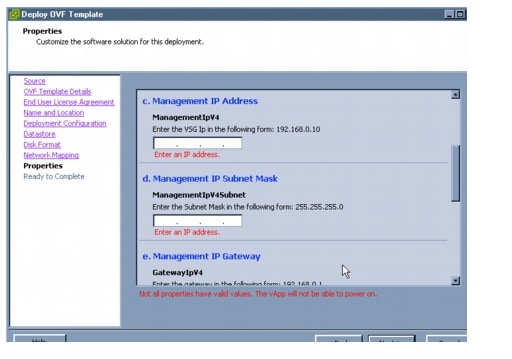
Since the VNMC communicates with vCenter, VSM, and the VSG over the management VLAN, Vlan184 was used for the VSG deployment. This interface is configured during the VSG OVA deployment in vCenter.
Figure 1-33 VSG Management Interface Configuration
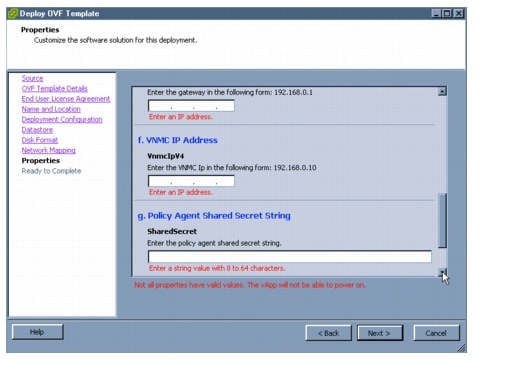
In addition to the management interface configurations, the VNMC IP address is also configured on the VSG during the OVA deployment.
Figure 1-34 VSG VNMC IP address
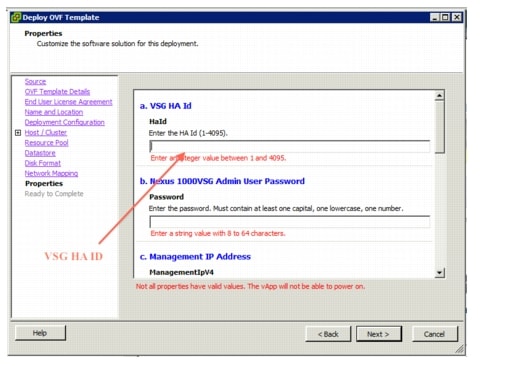
The HA, or high availability vNIC is for communication and synchronization between the active and standby VSGs. Only the configuration is synchronized between the active and standby VSG. The HA ID is configured during the VSG OVA installation. This ID will not conflict with the domain ID of the Nexus 1000V.
Figure 1-35 VSG HA ID
The data path vNIC is used for packets that are redirected from the VEMs vPath to the VSG for policy evaluation. The Nexus 1000V port-profile for the data interface was configured as displayed in the following example.
Example VSG Data Interface Port-profile
port-profile type vethernet VSG-Data
vmware port-group
switchport mode access
switchport access vlan 2563
no shutdown
state enabled
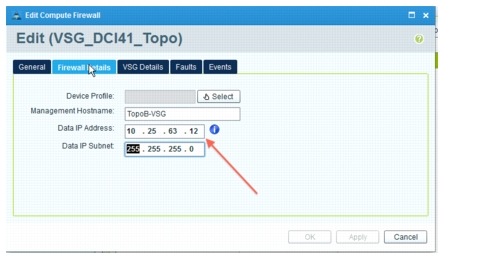
The data interface on the VSG is configured on the VNMC.
Figure 1-36 VSG Data Path Interface
When the vPath on the VEM intercepts a packet that needs to be sent to the VSG for evaluation, it encapsulates the original packet with an outer L2 header and sends it to the MAC address of the VSG. Since this is a L2 packet, a L2 adjacency is required between the VEM and VSG, even though an IP address is assigned to the data interface. This means that the VLAN (VLAN 2563) that is used for the data path needs to be extended between the data centers.
When the VSG receives the packet and checks the security policy configured on the port-profile of the incoming packet, described later in this section, it returns whether the packet should be allowed or dropped. The vPath on the VEM is then programmed with this information and no longer needs to communicate with the VSG for that specific traffic flow.
It is important to highlight that vPath tracks Layer 4 information for all the traffic flows (sequence numbers, TCP flags, etc.). This is the type of information referred to as the "state" information later in this document. However, there are some stateful applications that require dynamic opening of additional TCP/UDP sessions as part of the application communication. Support for application level protocol fixup is required to dynamically allow additional connections by doing packet inspection. In the first release of VSG, this capability is limited to FTP, RSH and TFTP, with a plan to add more in future releases.
The VSG-VEM interaction is critical to ensure that the security policies can be applied when new flows are intercepted by the vPath functionality in the VEM. Since the active/standby VSGs would most likely be deployed in a single site, it is expected that the failure of the DCI connection would cause the impossibility for vPath to forward to the active VSG the first packet of new flows established to/from VMs belonging to the VEMs in the remote site. Under these circumstances, it is possible to configure what should be the policy enforcement behavior: if the "fail open" option is selected, new flows to/from these VMs will be allowed bypassing the security policy. If the "fail close" option is chosen, then new flows will not be allowed and communication to/from the VMs will be prevented. Existing flows will continue to flow without interruption, independently from the chosen mode of operation.
 |
Note |
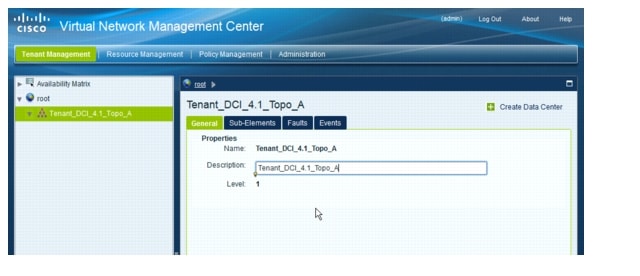
The security policy configurations are done on the VNMC GUI. The first item to configure is the tenant.
Figure 1-37 VNMC Tenant Configuration
Once the tenant is configured, the security profiles can be configured. When configuring the security profiles, a number of rules can be added to a single policy. These policies are evaluated in the order listed in the GUI.
Figure 1-38 VNMC Security Policy
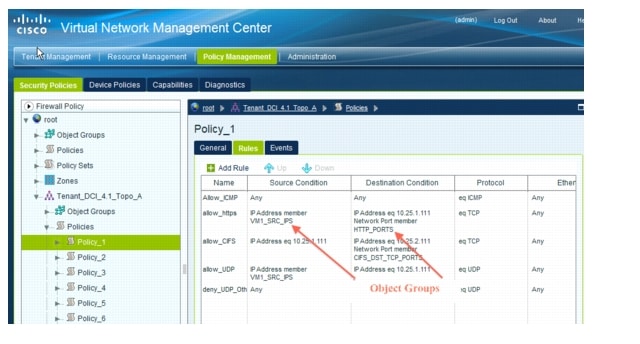
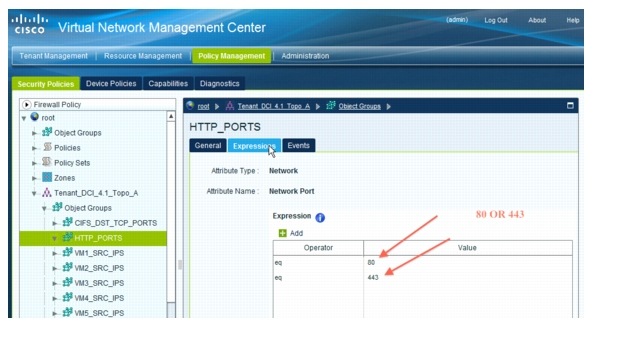
The condition in a each rule definition is done in an "and" fashion. For example, the destination condition in the allow_https rule will match is the ip address 10.25.1.111 and network port number that is a member of the HTTP_PORTS group. If the rule also wants to have an A or B type condition as well, the "or" conditions must be deployed in object groups. In the example above, and shown in more detail below, HTTP_PORTS is an object group that contains TCP port 80 and 443. These are evaluated in the rule, as the TCP port can be 80 or 443. Other options are available in the object groups' configurations.
Figure 1-39 VNMC Object Group HTTP_PORTS
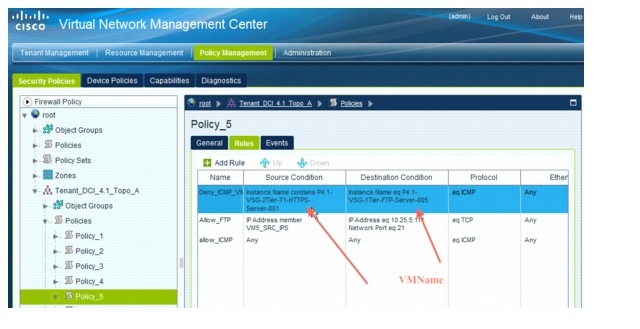
Another option for security policy rules is the ability to use VM attributes in the rule conditions. An example of using the VM attribute VMName is shown below.
Figure 1-40 VNMC VM Attribute
For testing and tracking purposes, the logging function was enabled on each rule.
Figure 1-41 Enable Logging
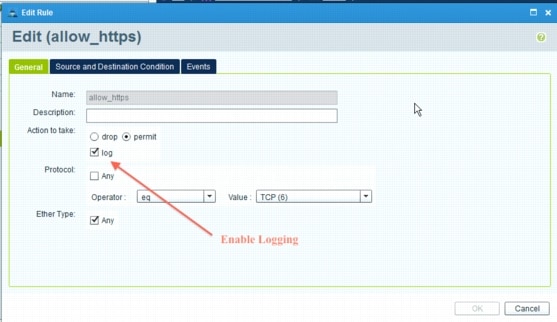
When enabled, each packet that corresponds to the rule creates a log message on the VSG and to the syslog server, if configured.
Example Logging Output
2011 Jul  6 15:34:48 TopoB-VSG %POLICY_ENGINE-6-POLICY_LOOKUP_EVENT:
policy=Policy_Set_2@root/Tenant_DCI_4.1_Topo_A
rule=Policy_2/deny_CIFS_other@root/Tenant_DCI_4.1_Topo_A action=Drop direction=egress
src.net.ip-address=10.25.2.115 src.net.port=25137 dst.net.ip-address=10.25.2.111
dst.net.port=445 net.protocol=6 net.ethertype=800
2011 Jul  6 15:34:48 TopoB-VSG %POLICY_ENGINE-6-POLICY_LOOKUP_EVENT:
policy=Policy_Set_2@root/Tenant_DCI_4.1_Topo_A
rule=Policy_2/deny_CIFS_other@root/Tenant_DCI_4.1_Topo_A action=Drop direction=egress
src.net.ip-address=10.25.2.115 src.net.port=25138 dst.net.ip-address=10.25.2.111
dst.net.port=445 net.protocol=6 net.ethertype=800
Once the rules and policies are configured, they are then grouped into policy sets. These policy sets are what is used to configure the security profile on the Nexus 1000V.
Figure 1-42 VNMC Policy Set
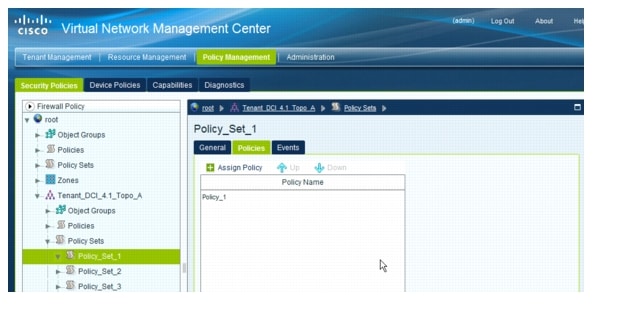
To prepare the traffic VM's port-profile for firewall protection, the following information is needed: VSG Data vNIC IP and VLAN-ID, security policy set name, and organization name. Using the org and vn-service commands, the security policy is applied to the port-profile on the Nexus 1000V.
Example Apply security policy to port-profile on the Nexus 1000V
port-profile type vethernet VMNetwork_2501
vmware port-group
switchport mode access
switchport access vlan 2501
vn-service ip-address 10.25.63.12 vlan 2563 security-profile Policy_Set_1
org root/Tenant_DCI_4.1_Topo_A
no shutdown
description VLAN2501 Access Ports
state enabled
In the above example, the organization name always starts at the root level and then includes the tenant name as configured on the VNMC.
Once this is configured on the Nexus 1000V, any vEthernet that is included in this port-profile will have the security policy applied to it.
Example Output show port-profile name VMNetwork_2501
# sh port-profile name VMNetwork_2501
port-profile VMNetwork_2501
type: Vethernet
description: VLAN2501 Access Ports
status: enabled
max-ports: 32
inherit:
config attributes:
switchport mode access
service-policy output vm-qos
switchport access vlan 2501
ip port access-group vm-acl in
vn-service ip-address 10.25.63.12 vlan 2563 security-profile Policy_Set_1
org root/Tenant_DCI_4.1_Topo_A
no shutdown
evaluated config attributes:
switchport mode access
service-policy output vm-qos
switchport access vlan 2501
ip port access-group vm-acl in
vn-service ip-address 10.25.63.12 vlan 2563 security-profile
Policy_Set_1
org root/Tenant_DCI_4.1_Topo_A
no shutdown
assigned interfaces:
Vethernet43
Vethernet44
Vethernet45
Vethernet46
Vethernet113
port-group: VMNetwork_2501
system vlans: none
capability l3control: no
capability iscsi-multipath: no
port-profile role: none
port-binding: static
When the VNMC is initially configured, it contacts the vCenter to gather the VM attributes so that it can be used in defining security policies. If the attributes change, the vCenter notifies the VNMC directly.
The VNMC is also in contact with the VSM to know what IP to DVPort mappings, service profiles, etc are used on the VSM.
The VSM is in contact with the VEM for control path information. The VSM configures the VEM with the VSG connection information and bindings that are to be used for the profiles it is using.
Figure 1-43 VSG System Path
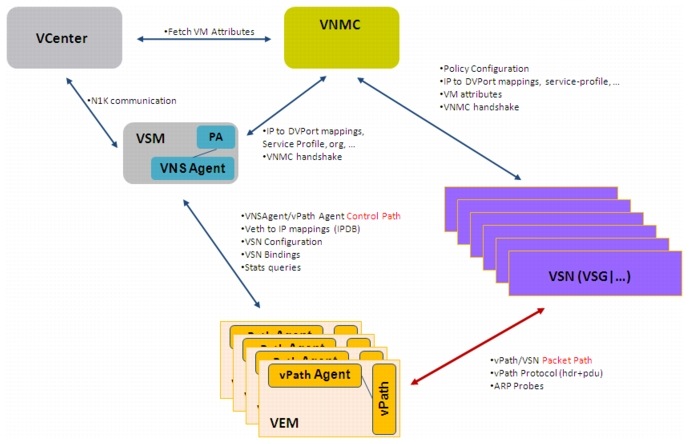
The VEM is in direct contact with the VSG for packet path information. For port profiles that have a vn-service profile configured, the vPath Flow Manager determines what action to take when a packet is received. When the first packet of a flow is received, the flow manager encapsulates the packet MAC-in-MAC and redirects it to the VSG for evaluation. The VSG evaluates the packet and sends back the packet with a permit or deny action.
The flow manager receives the packet from the VSG and it extracts the policy decision and programs it into the flow. The detoured packet is now subjected to the new policy on the flow and is permitted or denied based on the evaluation the flow manager received from the VSG. The rest of the stream is evaluated by the cached policy until it ages out or is over-ridden with a later policy decision.
Storage Elasticity
One of the most underrated components of a holistic DCI solution is the storage deployment. This becomes specifically relevant in the workload mobility scenario, where in order to be able to move VMs across data center sites, it is critical to ensure a consistent access to the storage for the ESXi hosts where the VMs reside.
Shared Storage Model
The shared storage model is conceptually the simplest: all the ESXi hosts deployed in both data center sites have access to the same disk array, which is physically available in DC1. When deploying this approach in the context of a virtualized workload mobility solution, some restrictions in terms of distance and latency between sites become suddenly apparent, considering that hosts located in remote sites will have to perform all their I/O operations (read and write) to the centralized disk array. This model may be deployable in scenarios where workload mobility is deployed between sites in close proximity to each other (few Kms) like it would be the case for example when the data centers are connected to a common Campus network. For comparison purposes, the shared storage model was tested at 100Km.
Figure 1-44 Shared Storage Model
EMC VPLEX Metro
VPLEX Metro by EMC provides an Active/Active approach that integrates caching functionality with the actual capability of distributing disk arrays in separate locations.
The VPLEX family uses a unique clustering architecture, which breaks the boundaries of a data center and allows servers at multiple data centers to have read/write access to shared block storage devices. Two VPLEX clusters deployed in separate sites can be connected together to form a VPLEX Metro solution.
A VPLEX Metro cluster is deployed in each data center site with two engines in each cluster. The front-end and back-end Fibre Channel interfaces of the directors in the cluster are connected to the SAN (implemented with a MDS switch in each data center), providing connectivity to the ESXi hosts and the back-end storage array. In testing, a single fabric was used for this connectivity since redundancy and failover of the SAN fabric was beyond the scope of the solution.
Figure 1-45 VPLEX SAN Topology Overview
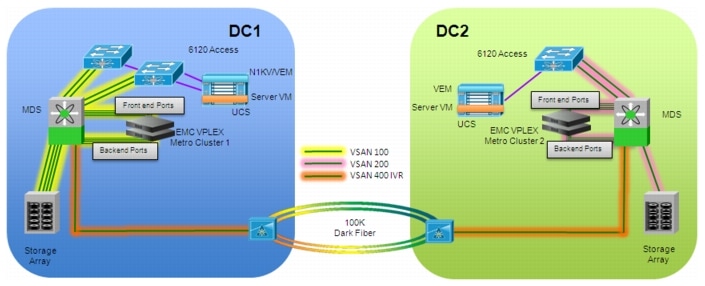
The MDS switches are configured with VSAN 100 in DC1 and VSAN 200 in DC2. They are connected together over a 100Km dark fiber and configured to use IVR between the data centers.
Each connected device is configured to be in the local data centers VSAN. Zoning is configured for each PWWN connected.
Each data center has a disk array connected to the MDS. These arrays are zoned to the local cluster via the back-end ports. The example below shows only 1 of the back-end ports, however each back-end port needs to be zoned on the MDS to the disk array.
Example Array - VPLEX Zoning on MDS
zone name EMC-VPLEX-E1-IOM-B2-0_to_DMX1475 vsan 100
member pwwn 50:06:04:82:d5:2d:f8:e6
! [DMX1475-FA-7AB]
member pwwn 50:00:14:42:50:08:84:20
! [DC1-VPLEX-E1-IOM-B2-0]
member pwwn 50:06:04:8a:d5:2d:f8:d6
! [DMX1475-FA-7DA]
member pwwn 50:06:04:8a:d5:2d:f8:d8
! [DMX1475-FA-9DA]
member pwwn 50:06:04:8a:d5:2d:f8:c8
! [DMX1475-FA09CA]
The VPLEX clusters synchronize the data with each other over the back-end ports. These must be zoned together over the IVR link so that they can communicate. Each back-end port on DC1 VPLEX Cluster will be zoned to all the back-end ports on DC2 VPLEX Cluster. This will be done for each back-end port in DC1. The same will then be done for DC2 back-end ports. An example of the MDS zoning configuration of one of the DC1 back-end ports to the 8 back-end ports on DC2 is below.
Example VPLEX - VPLEX Zoning on MDS
ivr zone name IVR_DC1-VPLEX-E1-A4-2_to_DC2-VPLEX-ALL-WAN
member pwwn 50:00:14:42:40:08:84:42 vsan 100
member pwwn 50:00:14:42:40:05:55:42 vsan 200
member pwwn 50:00:14:42:40:05:55:43 vsan 200
member pwwn 50:00:14:42:50:05:55:42 vsan 200
member pwwn 50:00:14:42:50:05:55:43 vsan 200
member pwwn 50:00:14:42:40:05:14:42 vsan 200
member pwwn 50:00:14:42:50:05:14:42 vsan 200
member pwwn 50:00:14:42:40:05:14:43 vsan 200
member pwwn 50:00:14:42:50:05:14:43 vsan 200
The VPLEX Metro clusters are configured to provide a virtual LUN to the ESXi hosts. EMC calls the virtual LUN a distributed device.
Figure 1-46 VPLEX Virtual LUN - Distributed Device

On the back end, each array has a thin provisioned data device that is being presented to the cluster.
These thin devices must be of the same size. The validated version of VPLEX Metro (4.2) is not able to query the array for specific usage of the thin device and thus when synchronizing it copies the entire allocated disk space. If the thin device is over-subscribed, this presents a problem and the synchronization fails and the over-subscribed device is taken offline from the clusters point of view. Therefore, over-subscription is not allowed.
 |
Note |
Figure 1-47 VPLEX Storage Array Devices
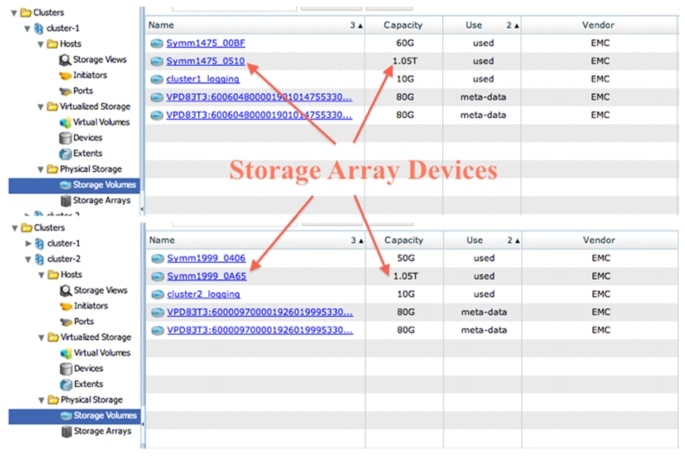
The ESXi hosts in DC1 are zoned together with the front-end ports of the VPLEX Metro cluster in DC1. This allows the ESXi hosts in DC1 to have access to the virtual LUN that is being presented by the cluster. It is suggested to have a different zone for each ESXi host to facilitate easier troubleshooting.
Depending on the number of front-end ports from the VPLEX, the number of member pwwn will vary. The example below shows only 4 of the front-end ports configure on the MDS.
Example ESXi - VPLEX Zoning on MDS
zone name EMC-VPLEX-FRONT-END_to_DC1-UCS1-SRV1 vsan 100
member pwwn 20:00:00:25:b5:01:01:01
! [DC1-UCS1-SRV1-HBA1]
member pwwn 50:00:14:42:40:08:84:02
member pwwn 50:00:14:42:40:08:84:12
member pwwn 50:00:14:42:50:08:84:00
member pwwn 50:00:14:42:50:08:84:10
The ESXi hosts in DC2 are zoned together with the front-end ports of the VPLEX Metro cluster in DC2. This allows the ESXi hosts in DC2 to have access to the same virtual LUN.
Once zoning is complete, all ESXi hosts should be able to use the distributed volume.
Figure 1-48 vCenter ESXi Distributed Volume
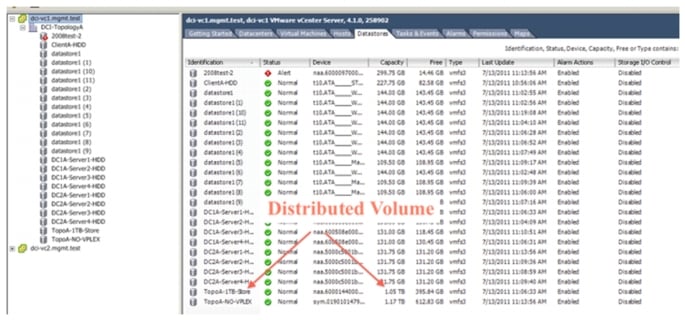
802.1AE is enabled on the MDS interfaces connecting to the dark fiber to provide encryption services for all the SAN extension traffic. This could be, for example, driven by specific compliance requirements and does not have any impact on traffic throughput, since the MDS performs 802.1AE encryption at wire speed in the port ASICs.
Example MDS Encryption Configuration
interface fc1/23
fcsp on
fcsp esp manual
ingress-sa 2011
egress-sa 2011
 |
Note |
Workload Mobility Results
Below are the results of the validation of the above deployment of EMC VPLEX Metro with stretched Nexus 1000V, OTV and ESXi clustering. Where appropriate, a comparison with the shared storage model will be presented.
Traffic Profile
Traffic for the test topology was created using FTP and HTTPS test tools as well as other packet generation tools such as Spirent TestCenter. These test tools are able to show transfer rates, outage times and successful transactions before, during and after the workload mobility is performed. Even though the results information provided in each use case is a subset of the overall information that was collected during testing, it is a representation of how the system performed for the particular use case.
Shared Storage
Shared storage was used initially for the storage model to provide a comparison to the EMC VPLEX Metro. The ESXi cluster deployment model had no bearing on the shared storage model when tested, as the traffic results were similar in both the separate and stretched ESXi cluster setups. All other aspects of the network, Nexus 1000V, OTV LAN extension, etc. were the same as in the Separate and Stretched ESXi clusters described in later sections.
As shown in the storage elasticity section above, in the shared storage model, the storage is physically located in DC1 and zoned such that all ESXi hosts in both data centers can see the same storage.
Figure 1-49 NAS Access to Shared Storage Model
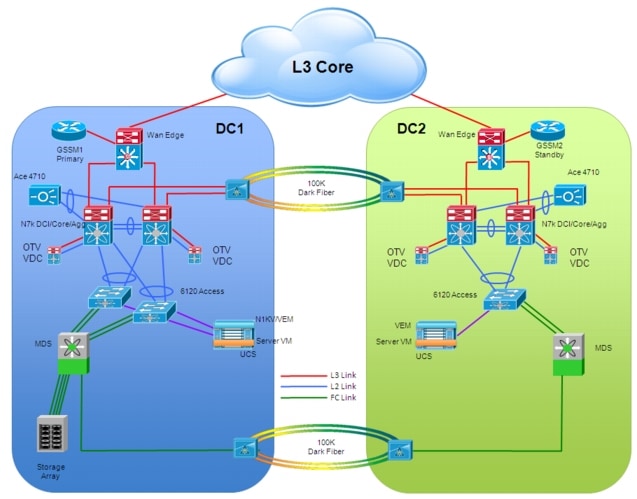
Once the traffic is started, issuing the show conn command on the ACE in DC1 shows that the connections are traversing the DC1 ACE to get to the servers in DC1.
Example DC1 ACE show conn output Before vMotion
total current connections: 48
conn-id np dir proto vlan source destination state
----------+--+---+-----+----+---------------------+---------------------+------+
1278357 1 in TCP 911 120.120.120.18:39324 8.1.1.8:443 ESTAB
1278345 1 out TCP 2508 10.25.8.111:443 10.25.8.113:21695 CLOSED
1297632 1 in TCP 911 120.120.120.13:12813 8.1.1.3:18979 ESTAB
1293558 1 out TCP 2503 10.25.3.111:49727 10.25.3.113:47898 ESTAB
1297586 1 in TCP 911 120.120.120.13:12812 8.1.1.3:21 ESTAB
1297562 1 out TCP 2503 10.25.3.111:21 10.25.3.113:47897 ESTAB
1298267 1 in TCP 911 120.120.120.13:12814 8.1.1.3:21 ESTAB
1298303 1 out TCP 2503 10.25.3.111:21 10.25.3.113:47899 ESTAB
1298295 1 in TCP 911 120.120.120.13:12815 8.1.1.3:18980 ESTAB
1298319 1 out TCP 2503 10.25.3.111:49728 10.25.3.113:47900 ESTAB
Application traffic performance before and after the VMs were moved between data centers was recorded.
When using shared storage, the servers must use the FC extension over the dark fiber to get to the storage array when moved to DC2.
Figure 1-50 shows the cumulative rate of the VM servers' throughput rates, in kbps, before and after the vMotion occurs. Notice that before the vMotion occurred, the application traffic was at an average rate of 795566 kbps, after the vMotion occurred, the rate decreased to an average of 605408 kbps which is a decrease of 23.9% in performance.
Figure 1-50 Original Client Shared Storage Read Application Traffic Performance
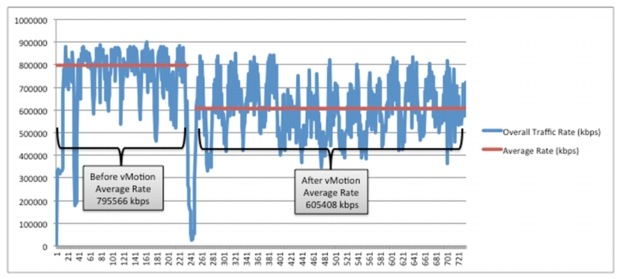
Remember that the original traffic streams are still entering the network at DC1. They are then traversing the OTV LAN extension over to DC2, which is 100km away, to the server. The server then must read the data from the storage array back in DC1 across the FC extension, another 100km. The crossing of the FC extension and of the OTV LAN extension attributes to 4 trips across the 100km distance and thus causes the rate reduction seen above. Below is a graphical representation of this crossing of the 100km.
Figure 1-51 Shared Storage Original Client Traffic Flow
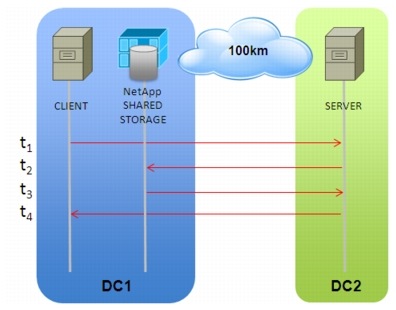
After each vMotion is complete, the vCenter uses an alarm trigger to initiate the script to change the GSS entries to point to DC2. This configuration was described earlier in the path optimization section.
Once the GSS has been updated, new traffic flows enter the network at DC2. Issuing the show conn command on the ACE in DC2 shows that the connections are now traversing the DC2 ACE.
Example DC2 ACE show conn output
total current connections: 16
conn-id np dir proto vlan source destination state
----------+--+---+-----+----+---------------------+---------------------+------+
1038027 1 in TCP 921 120.120.120.24:59065 8.2.2.4:21 ESTAB
1037995 1 out TCP 2504 10.25.4.111:21 10.25.4.115:20387 ESTAB
1038040 1 in TCP 921 120.120.120.24:59066 8.2.2.4:8626 ESTAB
1038018 1 out TCP 2504 10.25.4.111:49696 10.25.4.115:20388 ESTAB
1038403 1 in TCP 921 120.120.120.28:52134 8.2.2.8:443 ESTAB
1038381 1 out TCP 2508 10.25.8.111:443 10.25.8.115:9832 ESTAB
1038471 1 in TCP 921 120.120.120.26:7282 8.2.2.6:443 ESTAB
1038459 1 out TCP 2506 10.25.6.111:443 10.25.6.115:5988 ESTAB
1038462 1 in TCP 921 120.120.120.25:56681 8.2.2.5:443 ESTAB
1038472 1 out TCP 2505 10.25.5.111:443 10.25.5.115:10222 ESTAB
1038477 1 in TCP 921 120.120.120.27:14654 8.2.2.7:443 ESTAB
1038470 1 out TCP 2507 10.25.7.111:443 10.25.7.115:10645 ESTAB
1038607 1 in TCP 921 120.120.120.23:18670 8.2.2.3:21 ESTAB
1038510 1 out TCP 2503 10.25.3.111:21 10.25.3.115:30092 ESTAB
1038611 1 in TCP 921 120.120.120.23:18671 8.2.2.3:11882 ESTAB
1038622 1 out TCP 2503 10.25.3.111:49737 10.25.3.115:30093 ESTAB
This removes the OTV LAN extension 100km part of the delay, however the FC storage extension delay is still relevant.
Figure 1-52 Client-Server Optimization Only
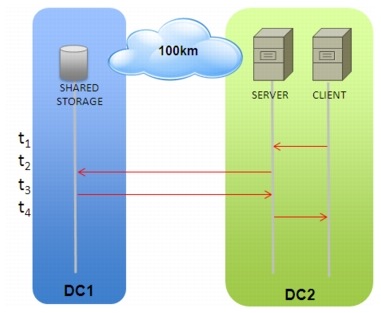
This means that the number of trips across the 100km is lowered to 2. The rate is expected to be between the two extremes of zero crossings (which was 795566 kbps) and 4 crossings (605408 kbps). In Figure 1-53, notice that the average transfer rate is 770000 kbps
Figure 1-53 New Client Shared Storage Read Application Performance
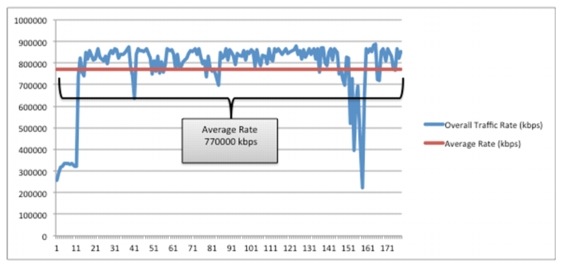
To verify the original traffic flows are continuing via DC1, compare the output of the show conn command on the DC1 ACE before and after the vMotion is complete. In the output below, you can see that total current connections are less than before the vMotion occurred. This is due to the connections finishing the transfer and closing.
Example DC1 ACE show conn Output After vMotion
total current connections: 42
conn-id np dir proto vlan source destination state
----------+--+---+-----+----+---------------------+---------------------+------+
1322106 1 in TCP 911 120.120.120.17:62019 8.1.1.7:443 ESTAB
1287151 1 out TCP 2507 10.25.7.111:443 10.25.7.113:51163 ESTAB
1304858 1 in TCP 911 120.120.120.13:12817 8.1.1.3:18981 ESTAB
1304860 1 out TCP 2503 10.25.3.111:49729 10.25.3.113:47902 ESTAB
1304875 1 in TCP 911 120.120.120.13:12816 8.1.1.3:21 ESTAB
1304866 1 out TCP 2503 10.25.3.111:21 10.25.3.113:47901 ESTAB
1307459 1 in TCP 911 120.120.120.13:12818 8.1.1.3:21 ESTAB
1307410 1 out TCP 2503 10.25.3.111:21 10.25.3.113:47903 ESTAB
1307466 1 in TCP 911 120.120.120.13:12820 8.1.1.3:21 ESTAB
1307490 1 out TCP 2503 10.25.3.111:21 10.25.3.113:47905 ESTAB
1307475 1 in TCP 911 120.120.120.13:12819 8.1.1.3:18982 ESTAB
This will also help to verify that the movement of the VMs from DC1 to DC2 disconnected none of the connections.
For a write operation, the number of times across the 100 km distance is the same as in the read scenario. For completeness, the traffic rates are provided for comparison to the EMC VPLEX Metro setup.
For the client to server flow that is entering into the network via DC1, the traffic rates were basically flat when compared before and after the vMotion of the VM server from DC1 to DC2.
Figure 1-54 Client Shared Storage Write Application Performance
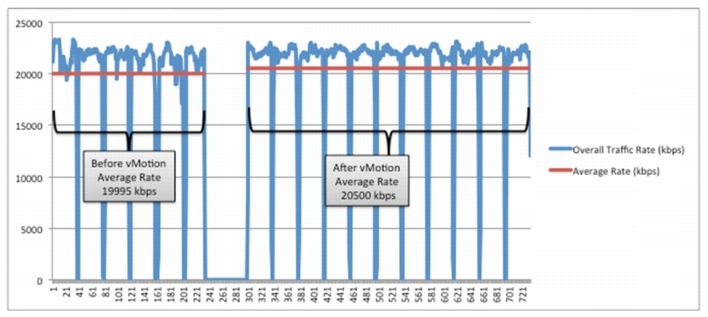
Separate VMware ESXi Clusters
The EMC VPLEX Metro with Nexus 1000V and OTV use case was done with two different methods of VMware ESXi clustering. Separate clusters were used for the first iteration of the use case.
Figure 1-55 ESXi Separate Cluster
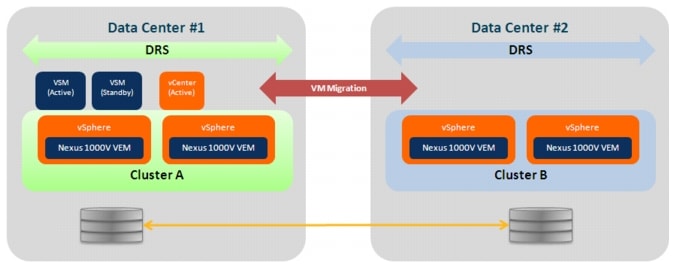
The ESXi hosts in the topology are configured so that there is one ESXi cluster in DC1 and one ESXi cluster in DC2. With 2 separate clusters, all vMotion operations are done sequentially. As described previously, there are 4 ESXi hosts in DC1 and 16 ESXi hosts in DC2. Initially the VMs are deployed so that the 8 test VMS are on DC1 hosts 1-4 with 2 on each host and the Windows XP VMs are deployed with 8 on each host in DC1. All the Linux VMs are deployed in DC2. There are 20 VMs on each of the 12 non-UCS ESXi hosts, and 180 VMs on each of the UCS ESXi hosts.
With this configuration, there are 40 VMs in DC1 cluster and 960 in DC2 cluster.
Figure 1-56 ESXi Separate Cluster vCenter
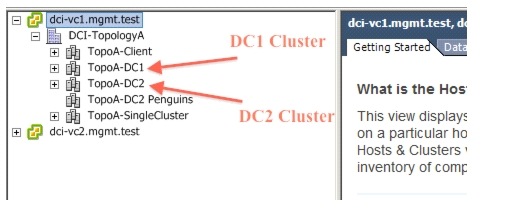
A vMotion is initiated for the 8 VM servers. All vMotions are scheduled to occur at the same time, however since the network is in the separate ESXi cluster configuration, all the servers will move sequentially.
The time it takes each VM to move between data centers varies depending on the amount of used memory in the VM. In testing, the times varied between 26 and 60 seconds with the average being 40 seconds from start to finish.
During the vMotion, there is a period of time that the servers must be offline to change ownership from one ESXi host to another. To measure how applications would be affected by this downtime, FTP and HTTPS transfers were initiated before the vMotion was to occur, and allowed to continue to run during the move to the other data center. The downtime of the client to server traffic varied from 4 to 14 seconds with the average being 6 seconds of actual outage time.
|
|
|
|
|---|---|---|
VM 1 |
* |
* |
VM 2 |
* |
* |
VM 3 |
6 |
10 |
VM 4 |
10 |
14 |
VM 5 |
9 |
5 |
VM 6 |
5 |
5 |
VM 7 |
5 |
4 |
VM 8 |
4 |
4 |
 |
Note |
Overall, the entire vMotion of 8 VMs took 254 to 443 seconds from start to finish with an average of 318 seconds. This is due to all the servers needing to vMotion in sequential order.
|
|
|
|---|---|
DC1->DC2 #1 |
443 |
DC1->DC2 #2 |
264 |
DC2->DC1 #1 |
309 |
DC2->DC1 #2 |
254 |
Since the same storage is presented to the ESXi hosts in both data centers for both shared storage and VPLEX, storage vMotion is not required.
The application performance before and after the VMs were moved between data centers was recorded.
When the server is located in DC1 and the client enters DC1 for a read operation, none of the traffic traverses the 100km distance between the data centers since the server and storage are both located in the same data center.
Figure 1-57 DC1 EMC VPLEX Server-Storage Communication
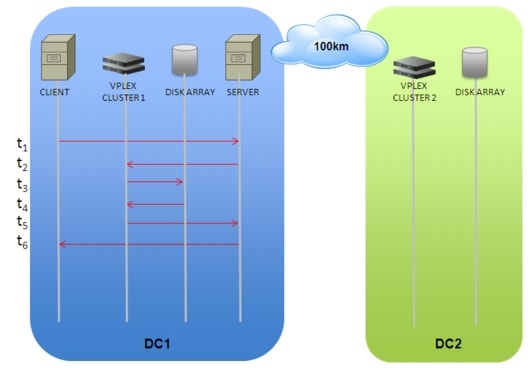
Figure 1-58 shows the cumulative rate of the VM servers' throughput rates, in kbps, before and after the vMotion occurs. Notice that before the vMotion occurred, the application traffic was at an average rate of 803000 kbps, after the vMotion occurred, the rate decreased to an average of 730000 kbps which is a decrease of 9% in performance. This is an improvement of 14.9% over the shared storage deployment.
Figure 1-58 Original Client EMC VPLEX Read Application Traffic Performance
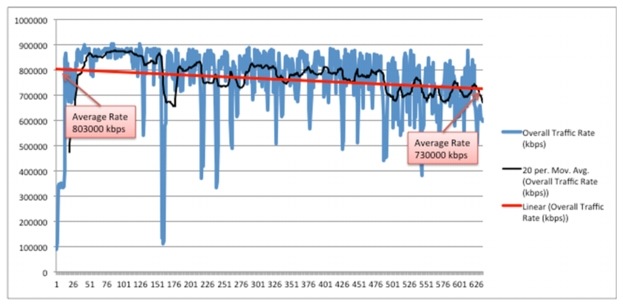
Remember that the original traffic streams are still entering the network at DC1. They are then traversing the OTV LAN extension over to DC2, which is 100km away, to the server. However, instead of the server having read the data from the storage array back in DC1 across the FC extension, another 100km, the server reads the data from the local EMC VPLEX cluster, thus eliminating the need to traverse the FC extension.
EMC VPLEX Metro solves the FC extension delay for read operations by having a synchronous copy of the data in DC2. This enables the server to access a local copy of the data instead of having to traverse the FC extension to retrieve the data.
Figure 1-59 Storage Optimization Only
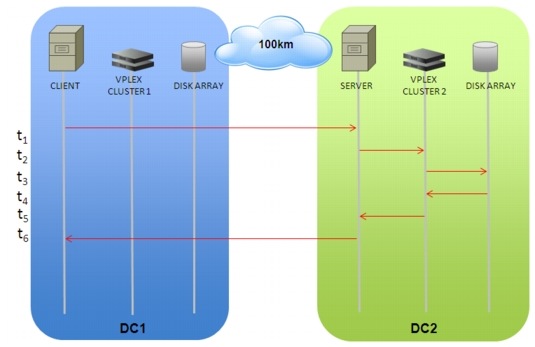
Since the GSS is updated after the vMotion of the server completes, all new flows to the server enter DC2 directly. This removes the need to traverse the OTV LAN extension. The new traffic streams that entered via DC2 had no noticeable traffic degradation as compared to when the VMs were in DC1.
Figure 1-60 Separate New Client VPLEX Read Application Performance
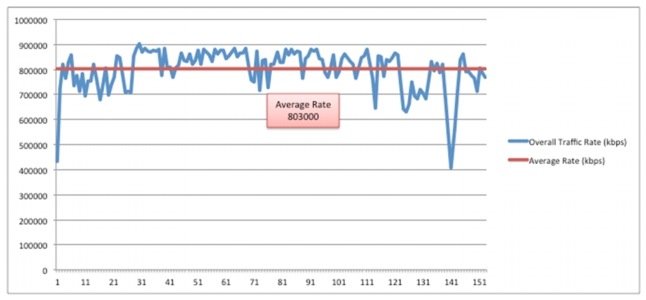
Note for the new client, the client to server communication and the server to storage communication are optimized, providing equivalent application performance when the server was in DC1 and the client was entering the data center via DC1.
Figure 1-61 Optimization of Client-Server and Server-Storage Communication
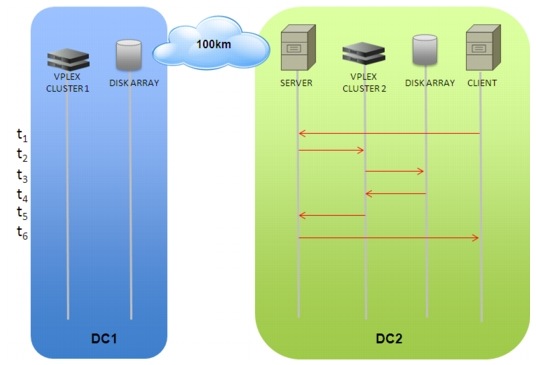
The traffic profiles for EMC VPLEX during write operations is different than during read operations. As described in the design guide document, write operations are done in a synchronous manner to both the array in DC1 and in DC2. This means when the servers are in DC1, write operations must still utilize the FC extension to DC2.
Figure 1-62 VPLEX Write Server in DC1
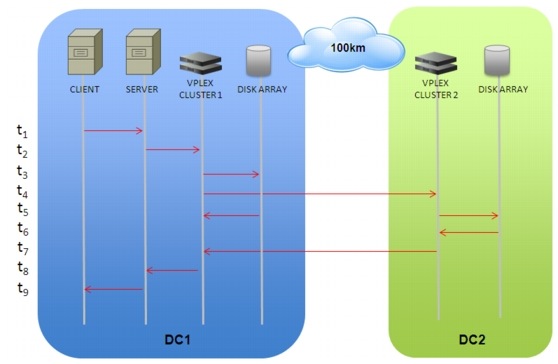
Once the vMotion is complete, the write operations will utilize the OTV LAN extension as well. The original client to server write traffic had no noticeable performance change after the VM was moved to DC2. Both before and after the vMotion, which occurred in the figure below at 426sec mark, the write traffic rate was average 20000 kbps.
Figure 1-63 Separate Original Client VPLEX Write Application Performance
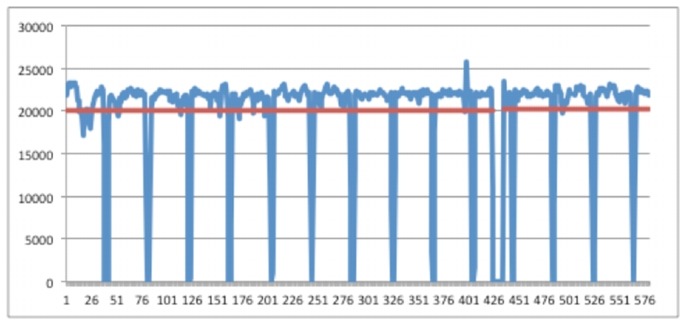
The new write traffic streams that entered via DC2 also had no degradation when compared to the client via DC1 streams.
Figure 1-64 Separate New Client VPLEX Write Application Performance
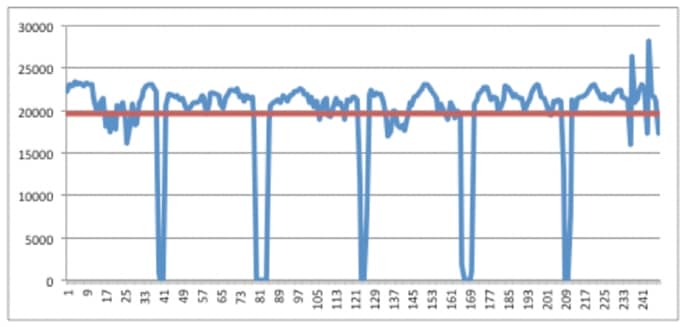
Stretched VMware ESXi Clusters
The second method for configuring the ESXi clustering is via a stretched cluster.
Figure 1-65 ESXi Stretched Cluster
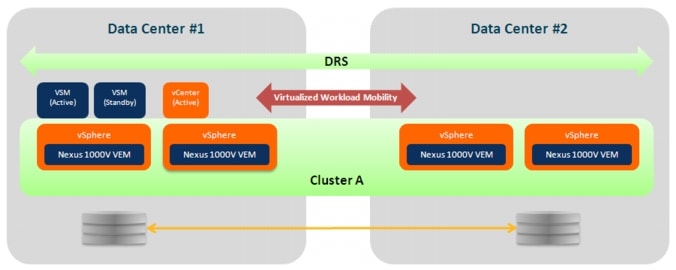
The ESXi hosts in the topology are configured so that there is one ESXi cluster including all the ESXi hosts in DC1 and DC2. As described previously, there are 4 ESXi hosts in DC1 and 16 ESXi hosts in DC2. Initially the VMs are deployed so that the 8 test VMs are on DC1 hosts 1-4 with 2 on each host and the Windows XP VMs are deployed with 8 on each host in DC1. All the Linux VMs are deployed in DC2. There are 20 Linux VMs on each of the 12 non-UCS ESXi hosts, and 180 Linux VMs on each of the UCS ESXi hosts. With this configuration, there are 1000 VMs in the cluster.
Figure 1-66 ESXi Stretched Cluster vCenter
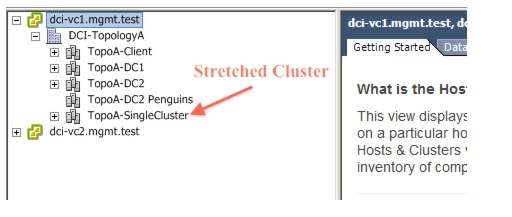
The ESXi hosts in the topology are configured so that there is only one ESXi cluster across DC1 and DC2. In a single cluster, vSphere 4.1 can support 8 concurrent vMotions when the bandwidth between the ESXi hosts is 10Gbps.
 |
Note |
A workload mobility operation is initiated for the 8 VM servers. Since the network is in the stretched ESXi cluster configuration, all the servers will move in parallel.
Just as in the separate ESXi cluster configuration, after each vMotion is complete, the vCenter uses an alarm trigger to initiate the script to change the GSS entries to point to DC2. This was described earlier in the path optimization section.
The time it takes each VM to move between data centers varies depending on the amount of used memory in the VM. In testing, the times varied between 68 and 269 seconds with the average being 184 seconds from start to finish.
As in the separate cluster case, traffic was started before the vMotions were to occur to be able to measure the impact of the event on the application. The downtime of the client to server traffic varied from 11 to 209 seconds with the average being 77 seconds of actual outage time.
 |
Note |
Overall, the entire vMotion of 8 VMs took 133 to 269 seconds from start to finish with an average of 184 seconds. Notice how this is a much shorter time than in the case of separate ESXi clusters. This is because the moves are all happening in parallel.
|
|
|
|---|---|
DC1->DC2 #1 |
133 |
DC1->DC2 #2 |
188 |
DC2->DC1 #1 |
269 |
DC2->DC1 #2 |
229 |
The outage times and individual VM move times were greater than the separate cluster model. The test topology was setup in a sub-optimal fashion with one data store for all the ESXi hosts to share. This in turn caused a backlog of iSCSI locks on the VMFS when the ESXi hosts are trying to access the data store during the vMotioning of the VMs. These can be seen on the ESXi server messages log.
Example iSCSI Lock Log
Jul 24 13:08:31 vmkernel: 57:17:16:29.059 cpu10:10700266)FS3: 8496: Long VMFS3 rsv time on
'TopoA-1TB-Store' (held for 203 msecs). # R: 1, # W: 1 bytesXfer: 5 sectors
Jul 24 13:08:32 vmkernel: 57:17:16:30.438 cpu10:10700266)FS3: 8496: Long VMFS3 rsv time on
'TopoA-1TB-Store' (held for 398 msecs). # R: 1, # W: 1 bytesXfer: 5 sectors
Jul 24 13:08:35 vmkernel: 57:17:16:33.108 cpu8:10700266)FS3: 8496: Long VMFS3 rsv time on
'TopoA-1TB-Store' (held for 268 msecs). # R: 1, # W: 1 bytesXfer: 5 sectors
To help alleviate this contention on the data store, a number of tuning and optimizations can be done to the storage part of the network.
 |
Note |
Since the network is the same except for the ESXi cluster configuration, when tested, the shared storage model had similar performance characteristics as the separate cluster model. These were described in the shared storage results in the previous section.
As before, EMC VPLEX Metro solves the FC extension delay by having a synchronous copy of the data in DC2.
When the server is located in DC1 and the client enters DC1, none of the traffic traverses the 100km distance between the data centers since the server and storage are both located in the same data center.
Figure 1-67 DC1 EMC VPLEX Server-Storage Communication
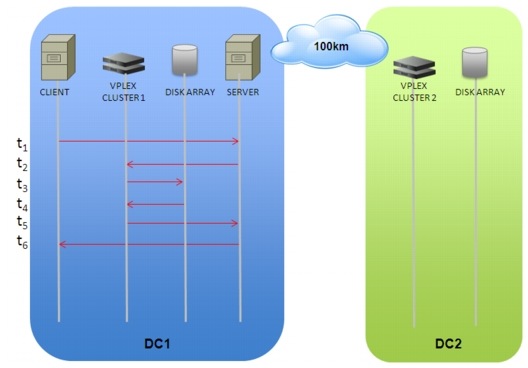
Figure 1-68 shows the cumulative rate of the VM servers' throughput rates, in kbps, before and after the vMotion occurs. Notice that before the vMotion occurred, the application traffic was at an average rate of 645000 kbps, however after the vMotion occurred, the rate decreased to an average of 565000 kbps which is a decrease of 12% in performance. This is an improvement of 11.9% over the shared storage deployment.
Figure 1-68 Stretched Original Client EMC VPLEX Read Application Traffic Performance
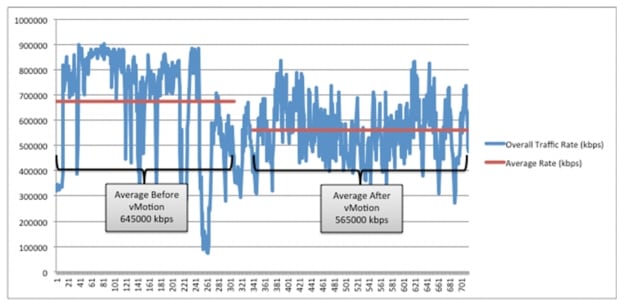
Remember that the original traffic streams are still entering the network at DC1. They are then traversing the OTV LAN extension over to DC2, which is 100km away, to the server. However, instead of the server having read the data from the storage array back in DC1 across the FC extension, another 100km, the server reads the data from the local EMC VPLEX cluster, thus eliminating the need to traverse the FC extension.
EMC VPLEX Metro solves the FC extension delay for read operations by having a synchronous copy of the data in DC2. This enables the server to access a local copy of the data instead of having to traverse the FC extension to retrieve the data.
Figure 1-69 Storage Optimization Only
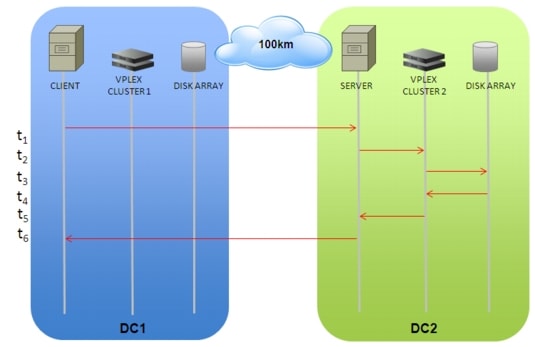
Since the GSS is updated after the vMotion of the server completes, all new flows to the server enter DC2 directly. This removes the need to traverse the OTV LAN extension. The new traffic streams that entered via DC2 however had no noticeable traffic degradation as compared to when the VMs were in DC1.
Figure 1-70 Stretched New Client VPLEX Read Application Performance
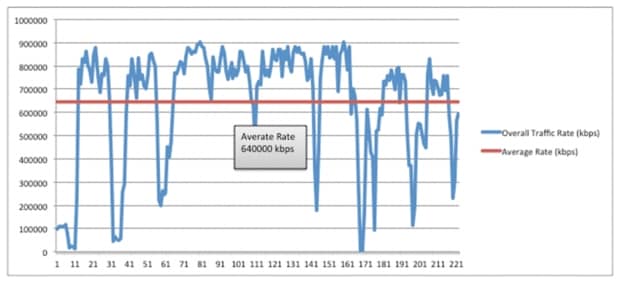
Note for the new client, the client to server communication and the server to storage communication are optimized, providing equivalent application performance when the server was in DC1 and the client was entering the data center via DC1.
As in the separate ESXi cluster configuration, for traffic streams that are writing traffic to the server, the performance is slightly different than in the read scenario.
Figure 1-71 Optimization of Client-Server and Server-Storage Communication
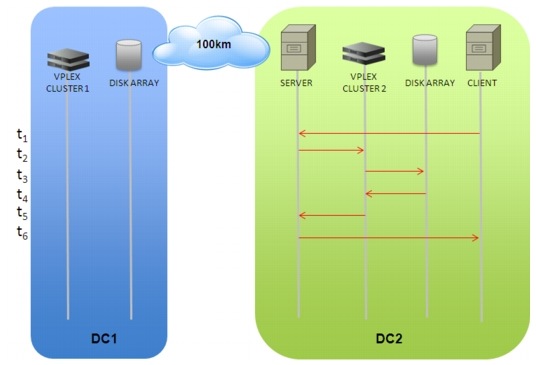
in the separate ESXi cluster configuration, for traffic streams that are writing traffic to the server, the performance is slightly different than in the read scenario.
The traffic profiles for EMC VPLEX during write operations is different than during read operations. As described in the design guide document, write operations are done in a synchronous manner to both the array in DC1 and in DC2. This means when the servers are in DC1, write operations must still utilize the FC extension to DC2.
Figure 1-72 VPLEX Write Server in DC1
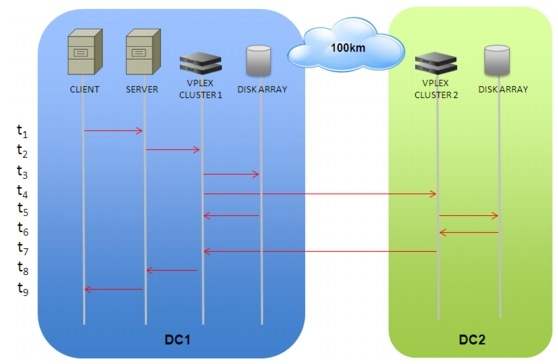
Once the vMotion is complete, the write operations will utilize the OTV LAN extension as well. The original client to server write traffic had no noticeable performance change after the VM was moved to DC2. Both before and after the vMotion, which occurred in the figure below, the write traffic rate was average 21000 kbps.
Figure 1-73 Stretched Original Client VPLEX Write Application Performance
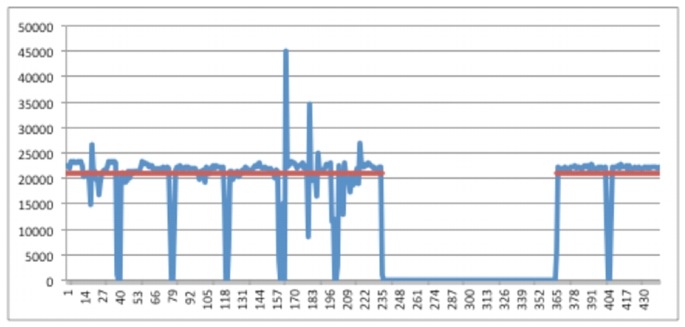
The new write traffic streams that entered via DC2 also had no degradation when compared to the client via DC1 streams.
Figure 1-74 Stretched New Client VPLEX Write Application Performance
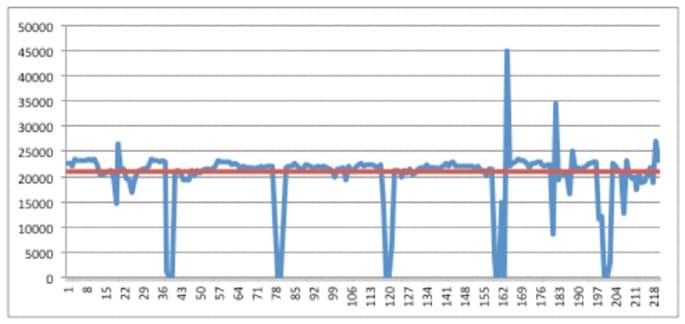
Summary of Deployment Recommendations
The Virtualized Workload Mobility solution allows for live migration of virtual machines between data centers located 100Km apart. Various functional components of the solution were considered.
LAN Extension
The deployment of OTV over dark fiber brings up several design advantages when compared to the vPC-based solution.
•![]() Provisioning of Layer 2 and Layer 3 connectivity leveraging the same dark fiber connections reduces the number of dark fiber required between the data centers.
Provisioning of Layer 2 and Layer 3 connectivity leveraging the same dark fiber connections reduces the number of dark fiber required between the data centers.
•![]() Native failure domain isolation: there is no need to explicitly configure BPDU filtering to prevent the creation of a larger STP domain extending between the two sites. Also, ARP optimization is also provided in order to limit the amount of ARP broadcast frames exchanged between data center locations.
Native failure domain isolation: there is no need to explicitly configure BPDU filtering to prevent the creation of a larger STP domain extending between the two sites. Also, ARP optimization is also provided in order to limit the amount of ARP broadcast frames exchanged between data center locations.
•![]() Improved Layer 2 data plane isolation: The required storm-control configuration is simplified in the OTV deployment scenario because of the native suppression of unknown unicast frames and for the broadcast containment capabilities of the protocol (broadcast containment is a roadmap item at the time of writing of this document).
Improved Layer 2 data plane isolation: The required storm-control configuration is simplified in the OTV deployment scenario because of the native suppression of unknown unicast frames and for the broadcast containment capabilities of the protocol (broadcast containment is a roadmap item at the time of writing of this document).
•![]() Native multi-homing LAN extension capabilities, which would allow extending the service to additional remote sites in a very simple fashion.
Native multi-homing LAN extension capabilities, which would allow extending the service to additional remote sites in a very simple fashion.
The deployment of OTV implies that the same LAN/IP subnet gets stretched between two (or more) data center locations. While removing the need to re-IP the VM once it is moved, a given IP address loses its linkage to a specific location. A mechanism is usually desired to optimize the traffic flows between any client and a specific data center service.
Path Optimization
In order to optimize the server to client (egress) traffic flows, it is required to deploy a local active default gateway for all the hosts belonging to a given extended VLAN. Notice that doing so, not only ensure to optimize traffic directed toward a given client, but avoid also tromboning of traffic for inter-subnet routing inside each data center location. When deploying egress path optimization in the context of a virtualized workload mobility deployment, it is also important to ensure that the same virtual MAC (vMAC) and virtual IP (vIP) are associated to the default gateway active in each location.
In this way, a workload moved between DC1 and DC2 (for example leveraging VMware vMotion) would maintain in the ARP cache the information it had before moving, so the same (vMAC, vIP) combination can be used to route traffic outside its own subnet once migrated to the new location.
The recommended solution to achieve this goal consist in defining the same FHRP (HSRP) group in each site and filter the FHRP messaging across the LAN extension connection. This prevents the HSRP nodes in the local Data Center from communicating with the HSRP nodes in the remote Data Center and allows each HSRP group to operating independently from one another. The virtual machine IP default gateway is configured for the HSRP Virtual IP address, and since the HSRP VIP is the same in each Data Center (together with the vMAC, since the same HSRP group is configured), the VM IP default gateway does not need to change, and remains active, as the VM moves from one Data Center to another.
The optimization of egress traffic flows represents only half of the challenge. In many scenarios it is highly desirable to ensure optimization also for the ingress traffic flows (client to server), in order to avoid asymmetric routing scenarios where traffic directed to the client exits from DC2 and the return flows directed to the server enters through DC1. This becomes mandatory when deploying stateful services (like firewall and load balancer services). In order to avoid breaking established sessions once the workload is moved to the new location, the ACE and GSS are utilized to provide a DNS based ingress path optimization.
To achieve this, the following network elements are deployed:
•![]() A separate ACE is deployed in each data center site. The ACE is connected to the aggregation layer devices leveraging a vPC connection. Traffic from the client enters the ACE via a L3 VLAN across the vPC.
A separate ACE is deployed in each data center site. The ACE is connected to the aggregation layer devices leveraging a vPC connection. Traffic from the client enters the ACE via a L3 VLAN across the vPC.
•![]() The ACE in each data center associates a different Virtual IP (VIP) address to each given workload (1:1 mapping). This implies that when the workload is deployed in DC1, external clients can access it by connecting to VIP_1 address, whereas VIP_2 is used once the workload is moved to DC2. This is the basic assumption of every DNS based ingress optimization technique, since the use of a unique VIP per site is what allows the GSS to redirect traffic to the right location where the workload is deployed.
The ACE in each data center associates a different Virtual IP (VIP) address to each given workload (1:1 mapping). This implies that when the workload is deployed in DC1, external clients can access it by connecting to VIP_1 address, whereas VIP_2 is used once the workload is moved to DC2. This is the basic assumption of every DNS based ingress optimization technique, since the use of a unique VIP per site is what allows the GSS to redirect traffic to the right location where the workload is deployed.
•![]() The ACE then used source network address translation (SNAT) to send the traffic via L2 to the destination server. This is to ensure stitching of egress traffic back to the ACE that received the original ingress flow.
The ACE then used source network address translation (SNAT) to send the traffic via L2 to the destination server. This is to ensure stitching of egress traffic back to the ACE that received the original ingress flow.
•![]() At least one GSS per DC should be deployed to provide redundancy. Each GSS is connected to one WAN edge device. These two GSS are configured as an Active/Standby GSSM (Global Site Selector Manager) pair and are able to respond to queries regardless of their active or standby role. It is possible to deploy additional GSS nodes simply operating as peers of the GSSM pair.
At least one GSS per DC should be deployed to provide redundancy. Each GSS is connected to one WAN edge device. These two GSS are configured as an Active/Standby GSSM (Global Site Selector Manager) pair and are able to respond to queries regardless of their active or standby role. It is possible to deploy additional GSS nodes simply operating as peers of the GSSM pair.
•![]() VMware vCenter is required to take an action (i.e. update the entry in GSS associated to a given workload), once the vMotion for the workload is completed. In the simplest fashion, this can be done only on a single VM level. As a consequence, this solution only addresses where a single VM is used to represent a specific application.
VMware vCenter is required to take an action (i.e. update the entry in GSS associated to a given workload), once the vMotion for the workload is completed. In the simplest fashion, this can be done only on a single VM level. As a consequence, this solution only addresses where a single VM is used to represent a specific application.
Server Virtualization
The Cisco Nexus 1000V switch is a software switch on a server that delivers Cisco VN-Link services to virtual machines hosted on that server. It takes advantage of the VMware vSphere framework to offer tight integration between server and network environments and help ensure consistent, policy-based network capabilities to all servers in the data center.
Nexus 1000V allows policy to move with a virtual machine during live migration, ensuring persistent network, security, and storage compliance, resulting in improved business continuance, performance management, and security compliance. A single Nexus 1000V should be deployed between the data centers to allow for the policy profiles to migrate with the VM. This removes the need to any rebuilding of policy definitions by the user and thus increases the speed and efficiency of the workload move. The active and standby VSM for the Nexus 1000V should be deployed in the same data center.
Cisco Virtual Security Gateway (VSG) is a virtual firewall for Cisco Nexus 1000V Series Switches that delivers security and compliance for virtual computing environments. Cisco VSG uses virtual network service data path (vPath) technology embedded in the Cisco Nexus 1000V Series Virtual Ethernet Module (VEM), offering transparent insertion and efficient deployment. Utilizing the VSG allows the security policies to move with the VM when a workload is moved.
Storage Elasticity
EMC VPLEX with the EMC GeoSynchrony operating system breaks physical barriers of data centers and allows users to access data for read and write operations at different geographical locations concurrently. This is achieved by synchronously replicating data between the data centers while depending on the hosts accessing the storage devices to manage the consistency through the use of intelligent distributed lock management. This capability in a VMware context enables functionality that not available earlier. Specifically, the ability to concurrently access the same set of devices independent of the physical location enables geographical vMotion based on the VMware virtualization platform. This allows for transparent load sharing between multiple sites while providing the flexibility of migrating workloads between sites in anticipation of planned events, such as hardware maintenance. Furthermore, in case of an unplanned event that causes disruption of services at one of the data centers, the failed services can be quickly and easily restarted at the surviving site with minimal effort.
It is recommend deploying the EMC VPLEX, utilizing same size data LUNs, for the active-active storage. This allows the VM to have equal access to the data from both data centers. For workload mobility, this means that there should be little to no difference whether the VM is in one data center or the other.
Workload Mobility Results
In summary, the ESXi cluster model used determines the time it will take for the entire workload mobility event to occur. Having the ability to move 8 VMs concurrently decreases the overall time needed on average by 134 seconds, or 42%. When considered with the number of VMs that may need to be moved, this near 50% reduction in time can be critical. The EMC VPLEX Metro configuration also provides a number of benefits over the shared storage model. First of all with the inherent synchronization of the data between the data centers, a backup mechanism is built in. Secondly, having a local active-active storage with the VPLEX provides an average improvement of 13.4% in applications performance as compared to the shared storage model at 100km.
Summary of Deployment Caveats
•![]() CSCtn18346 - GSS 4492 running version 3.1(2) fails to boot up to "Normal Operation" or [runmode=5] and may be stuck in [runmode=0] when the "ip name-server" command is missing from the non-gslb configuration.
CSCtn18346 - GSS 4492 running version 3.1(2) fails to boot up to "Normal Operation" or [runmode=5] and may be stuck in [runmode=0] when the "ip name-server" command is missing from the non-gslb configuration.
•![]() Data store deployment tuning and provisioning is essential for optimized VM migration with low application impact. Please contact EMC and VMware to discuss the options.
Data store deployment tuning and provisioning is essential for optimized VM migration with low application impact. Please contact EMC and VMware to discuss the options.
•![]() A defect (CSCto11322) points to a possible problem with the Windows 2000 driver in conjunction with the E1000 network adapter used on the VMs. The problem is mostly sporadic; the defect mentioned numerous power cycles before the issue could be reproduced. To alleviate this issue in testing, the number of allowed port-security MAC addresses was raised to 2.
A defect (CSCto11322) points to a possible problem with the Windows 2000 driver in conjunction with the E1000 network adapter used on the VMs. The problem is mostly sporadic; the defect mentioned numerous power cycles before the issue could be reproduced. To alleviate this issue in testing, the number of allowed port-security MAC addresses was raised to 2.
•![]() Disjoined L2 domains are not supported on the current release of 6100 software.
Disjoined L2 domains are not supported on the current release of 6100 software.
•![]() Enhanced vMotion Compatibility (EVC) needs to be disabled for the ESXi cluster when there are a mix of Intel and AMD based in the same cluster.
Enhanced vMotion Compatibility (EVC) needs to be disabled for the ESXi cluster when there are a mix of Intel and AMD based in the same cluster.
•![]() vCenter stores and processes scheduled tasks times in UTC and thus does not have daylight savings time. Due to this scheduled tasks will run one hour earlier after the DST change.
vCenter stores and processes scheduled tasks times in UTC and thus does not have daylight savings time. Due to this scheduled tasks will run one hour earlier after the DST change.
•![]() During the VNMC configuration, you must configure the hostname and domain name or the VNMC will not power up. This is resolved in VNMC release 1.2.
During the VNMC configuration, you must configure the hostname and domain name or the VNMC will not power up. This is resolved in VNMC release 1.2.
•![]() The "fail open" and "fail close" modes of the VSG are set at the port profile level. However, currently there is no support for a mixed mode configuration in a given VSG, which means the same mode is used for all the port profiles associated to that policy node.
The "fail open" and "fail close" modes of the VSG are set at the port profile level. However, currently there is no support for a mixed mode configuration in a given VSG, which means the same mode is used for all the port profiles associated to that policy node.
•![]() The validated version of VPLEX Metro (4.2) is not able to query the array for specific usage of the thin device and thus when synchronizing it copies the entire allocated disk space. If the thin device is over-subscribed, this presents a problem and the synchronization fails and the over-subscribed device is taken offline from the clusters point of view. Therefore, over-subscription is not allowed.
The validated version of VPLEX Metro (4.2) is not able to query the array for specific usage of the thin device and thus when synchronizing it copies the entire allocated disk space. If the thin device is over-subscribed, this presents a problem and the synchronization fails and the over-subscribed device is taken offline from the clusters point of view. Therefore, over-subscription is not allowed.
•![]() For applications that utilize a large number of sub-page or small block IO, please consult with EMC.
For applications that utilize a large number of sub-page or small block IO, please consult with EMC.
•![]() To alleviate a backlog of iSCSI locks on the ESXi hosts during vMotion, please consult with EMC and VMware for tuning and performance consideration on data store deployment.
To alleviate a backlog of iSCSI locks on the ESXi hosts during vMotion, please consult with EMC and VMware for tuning and performance consideration on data store deployment.
 Feedback