Installation Note for Fan Tray Assemblies in Catalyst 4500 Series Switches
Available Languages
Table of Contents
Installation Note for Fan Tray Assemblies in Catalyst 4500 Series Switches
Removing and Replacing the Chassis Fan Assembly
Obtaining Documentation and Submitting a Service Request
Fan Assembly Overview

Note![]() For complete environmental specifications, including airflow requirements, refer to Appendix A, “Specifications,” in the Catalyst 4500 Series Installation Guide. The guide is available online at http://www.cisco.com/en/US/docs/switches/lan/catalyst4500/hardware/installation/guide/78-14409-08/4500inst.html
For complete environmental specifications, including airflow requirements, refer to Appendix A, “Specifications,” in the Catalyst 4500 Series Installation Guide. The guide is available online at http://www.cisco.com/en/US/docs/switches/lan/catalyst4500/hardware/installation/guide/78-14409-08/4500inst.html
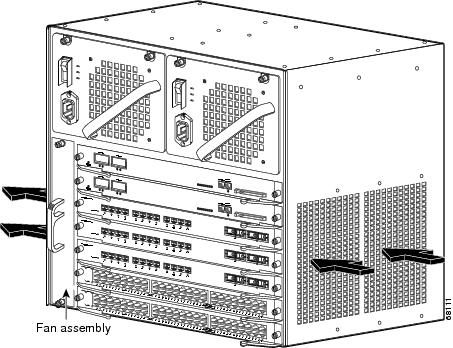
The system fan assembly provides cooling air for the internal chassis components. The fan assembly is a tray of fans that you can insert and remove from the chassis while the system is on line. The Catalyst 4503 fan assembly has two fans, the Catalyst 4506 fan assembly has four fans, and the Catalyst 4507R fan assembly has six fans. The fans draw in fresh air from one side and exhaust air on the other side. Catalyst 4503 airflow is shown in Figure 1. Catalyst 4506 airflow is shown in Figure 2. Catalyst 4507R airflow is shown in Figure 3.

Figure 1 Catalyst 4503 Airflow
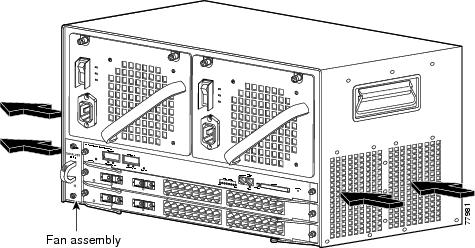
Figure 2 Catalyst 4506 Airflow
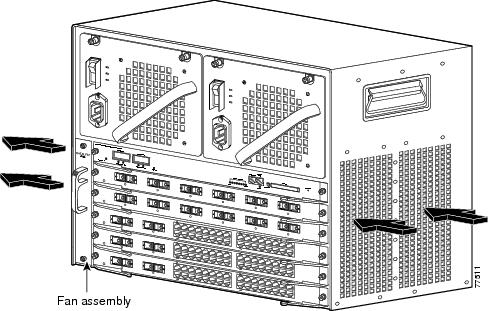
Figure 3 Catalyst 4507R Airflow
Removing and Replacing the Chassis Fan Assembly
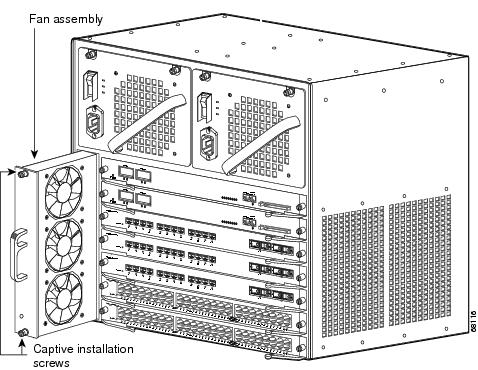
This section describes how to remove and install the chassis fan assembly for the Catalyst 4500 series switches. See Figure 4 for the Catalyst 4503 system fan assembly, Figure 5 for the Catalyst 4506 system fan assembly, and Figure 6 for the Catalyst 4507R system fan assemblies.
Required Tools
You will need a Phillips screwdriver for the following two procedures.
Figure 4 Catalyst 4503 System Fan Assembly
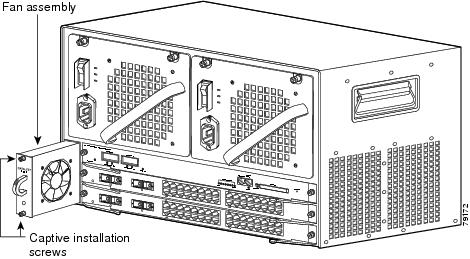
Figure 5 Catalyst 4506 System Fan Assembly
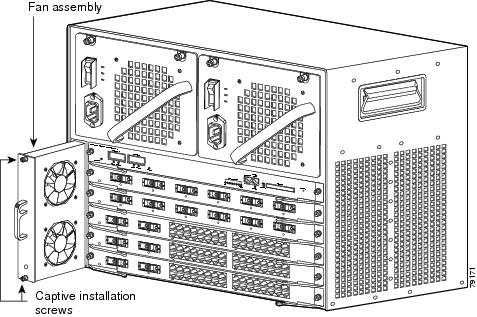
Figure 6 Catalyst 4507R System Fan Assembly
Removing the Fan Assembly
Follow these steps to remove the existing chassis fan assembly:
Step 1![]() Loosen the two captive installation screws on the fan assembly by turning them counterclockwise.
Loosen the two captive installation screws on the fan assembly by turning them counterclockwise.
Step 2![]() Grasp the fan assembly with both hands and pull it outward; wiggle it if necessary to unseat it from the backplane. Slide it out of the chassis and put it someplace where it will not be dropped or stepped on.
Grasp the fan assembly with both hands and pull it outward; wiggle it if necessary to unseat it from the backplane. Slide it out of the chassis and put it someplace where it will not be dropped or stepped on.


Installing the Fan Assembly
Follow these steps to install the new fan assembly:
Step 1![]() Hold the fan assembly with the fans facing to the right.
Hold the fan assembly with the fans facing to the right.
Step 2![]() Place the fan assembly into the fan assembly bay so it rests on the chassis, and then lift the fan assembly up slightly, aligning the top and bottom guides.
Place the fan assembly into the fan assembly bay so it rests on the chassis, and then lift the fan assembly up slightly, aligning the top and bottom guides.
Step 3![]() Slide the fan assembly into the chassis until the two captive installation screws make contact with the chassis.
Slide the fan assembly into the chassis until the two captive installation screws make contact with the chassis.
Step 4![]() Using a screwdriver, tighten the two captive installation screws by turning them clockwise.
Using a screwdriver, tighten the two captive installation screws by turning them clockwise.
Verifying the Installation
Note![]() To check the operation of the fans, you need to power up the chassis.
To check the operation of the fans, you need to power up the chassis.
Follow these steps to verify that the new fan assembly was installed correctly:
Step 1![]() Listen for the fans; you should immediately hear them operating. If you do not hear them, ensure that the fan assembly is inserted completely in the chassis and that the faceplate is flush with the switch back panel.
Listen for the fans; you should immediately hear them operating. If you do not hear them, ensure that the fan assembly is inserted completely in the chassis and that the faceplate is flush with the switch back panel.
Step 2![]() If after several attempts the fans do not operate, or if you experience trouble with the installation (for instance, if the captive installation screws do not align with the chassis holes), contact the Cisco Technical Assistance Center (TAC) for assistance.
If after several attempts the fans do not operate, or if you experience trouble with the installation (for instance, if the captive installation screws do not align with the chassis holes), contact the Cisco Technical Assistance Center (TAC) for assistance.
Related Documentation
For other installation and configuration information, refer to this publication:
Obtaining Documentation and Submitting a Service Request
For information on obtaining documentation, submitting a service request, and gathering additional information, see the monthly What’s New in Cisco Product Documentation, which also lists all new and revised Cisco technical documentation, at:
http://www.cisco.com/en/US/docs/general/whatsnew/whatsnew.html
Subscribe to the What’s New in Cisco Product Documentation as a Really Simple Syndication (RSS) feed and set content to be delivered directly to your desktop using a reader application. The RSS feeds are a free service and Cisco currently supports RSS version 2.0.
This document is to be used in conjunction with the documents listed in the “Related Documentation” section.
CCDE, CCENT, Cisco Eos, Cisco HealthPresence, the Cisco logo, Cisco Lumin, Cisco Nexus, Cisco StadiumVision, Cisco TelePresence, Cisco WebEx, DCE, and Welcome to the Human Network are trademarks; Changing the Way We Work, Live, Play, and Learn and Cisco Store are service marks; and Access Registrar, Aironet, AsyncOS, Bringing the Meeting To You, Catalyst, CCDA, CCDP, CCIE, CCIP, CCNA, CCNP, CCSP, CCVP, Cisco, the Cisco Certified Internetwork Expert logo, Cisco IOS, Cisco Press, Cisco Systems, Cisco Systems Capital, the Cisco Systems logo, Cisco Unity, Collaboration Without Limitation, EtherFast, EtherSwitch, Event Center, Fast Step, Follow Me Browsing, FormShare, GigaDrive, HomeLink, Internet Quotient, IOS, iPhone, iQuick Study, IronPort, the IronPort logo, LightStream, Linksys, MediaTone, MeetingPlace, MeetingPlace Chime Sound, MGX, Networkers, Networking Academy, Network Registrar, PCNow, PIX, PowerPanels, ProConnect, ScriptShare, SenderBase, SMARTnet, Spectrum Expert, StackWise, The Fastest Way to Increase Your Internet Quotient, TransPath, WebEx, and the WebEx logo are registered trademarks of Cisco Systems, Inc. and/or its affiliates in the United States and certain other countries.
 Feedback
Contact Cisco
- Open a Support Case

- (Requires a Cisco Service Contract)