- Introduction
- Installing Required Software
- Configuring Cisco Business Communications Solution Verified Designs
- Continuing Cisco BCS Verified Designs Configuration Using CLI
- Configuring Security on the Voice Network
- Appendix A: Cisco CallManager Express Bundles
- Appendix B: QCT Utilities
- Appendix C: Cisco BCS Verified Designs Configuration Example
Continuing the Cisco BCS Verified Designs Configuration Using CLI
This chapter describes the procedures using the command line interface (CLI) to continue Cisco Business Communications Solution Verified Designs configuration. Perform the procedures in this chapter using a terminal emulation utility such as Hyperterminal through the console port of your router.
Each procedure provides a list of summary and detailed steps that you can follow. Follow the detailed steps if you need examples and explanations of each CLI entry.
Contents
This chapter provides the following sections:
•![]() Configuring Subinterfaces for VLANs
Configuring Subinterfaces for VLANs
•![]() Configuring a DHCP IP Address Pool for the Data Network
Configuring a DHCP IP Address Pool for the Data Network
•![]() Configuring Separate Data and Voice VLANs
Configuring Separate Data and Voice VLANs
Configuring Subinterfaces for VLANs
This task creates subinterfaces for a Cisco LAN switch that will be carry voice and data on the network.
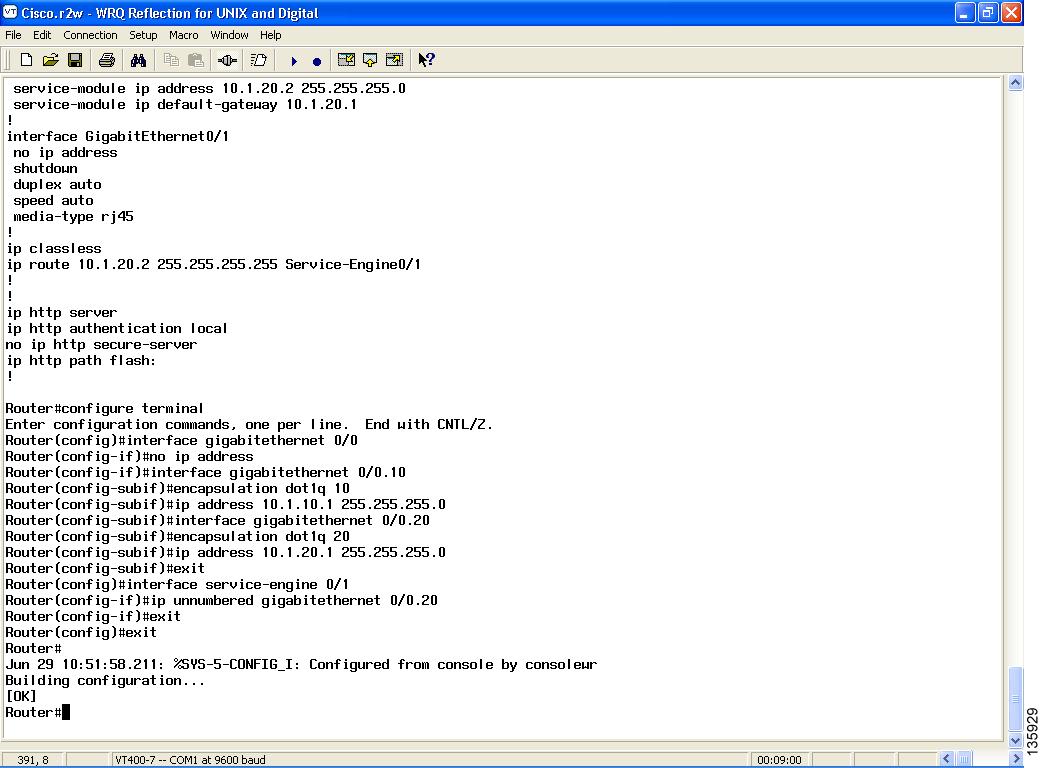
Summary steps (see Figure 110) list the steps necessary to configure the subinterfaces. For detailed steps including examples, see Table 6.
Figure 110 CLI for Configuring Subinterfaces for VLANs
Summary Steps
1. ![]() enable
enable
2. ![]() configure terminal
configure terminal
3. ![]() interface gigabitethernet slot/port
interface gigabitethernet slot/port
4. ![]() no ip address
no ip address
5. ![]() interface gigabitethernet slot/port.subinterface
interface gigabitethernet slot/port.subinterface
6. ![]() encapsulation dot1q vlan-id
encapsulation dot1q vlan-id
7. ![]() ip address subnet mask
ip address subnet mask
8. ![]() interface gigabitethernet slot/port.subinterface
interface gigabitethernet slot/port.subinterface
9. ![]() encapsulation dot1q vlan-id
encapsulation dot1q vlan-id
10. ![]() ip address subnet mask
ip address subnet mask
11. ![]() exit
exit
12. ![]() interface service-engine slot/port
interface service-engine slot/port
13. ![]() ip unnumbered gigabitethernet slot/port.subinterface
ip unnumbered gigabitethernet slot/port.subinterface
14. ![]() exit
exit
15. ![]() exit
exit
16. ![]() wr
wr

Note ![]() It is recommended to save a copy of the router configuration for backup purposes.
It is recommended to save a copy of the router configuration for backup purposes.
Detailed Steps
Table 6 Detailed Steps for Configuring Subinterfaces for VLANs
Testing the Installation
At this point, IP phones should no longer be connected to Cisco CME. No dial tone should be present if the speaker button is pressed.
Note ![]() If the IP phones seem as if they still have a configuration, the phones have not timed out yet.
If the IP phones seem as if they still have a configuration, the phones have not timed out yet.
What to Do Next
Once you configure subinterfaces for a Cisco LAN switch using Summary or Detailed Steps, proceed to configure your DHCP IP address pool for the data network (see the "Configuring a DHCP IP Address Pool for the Data Network" section).
Configuring a DHCP IP Address Pool for the Data Network
This section describes the configuration of a DHCP IP address pool for your data network. If you do not already have a DHCP pool setup for your data, use this section to set up the data IP subnet.
This procedure creates a large shared pool of IP addresses, in which all DHCP clients receive the same information.
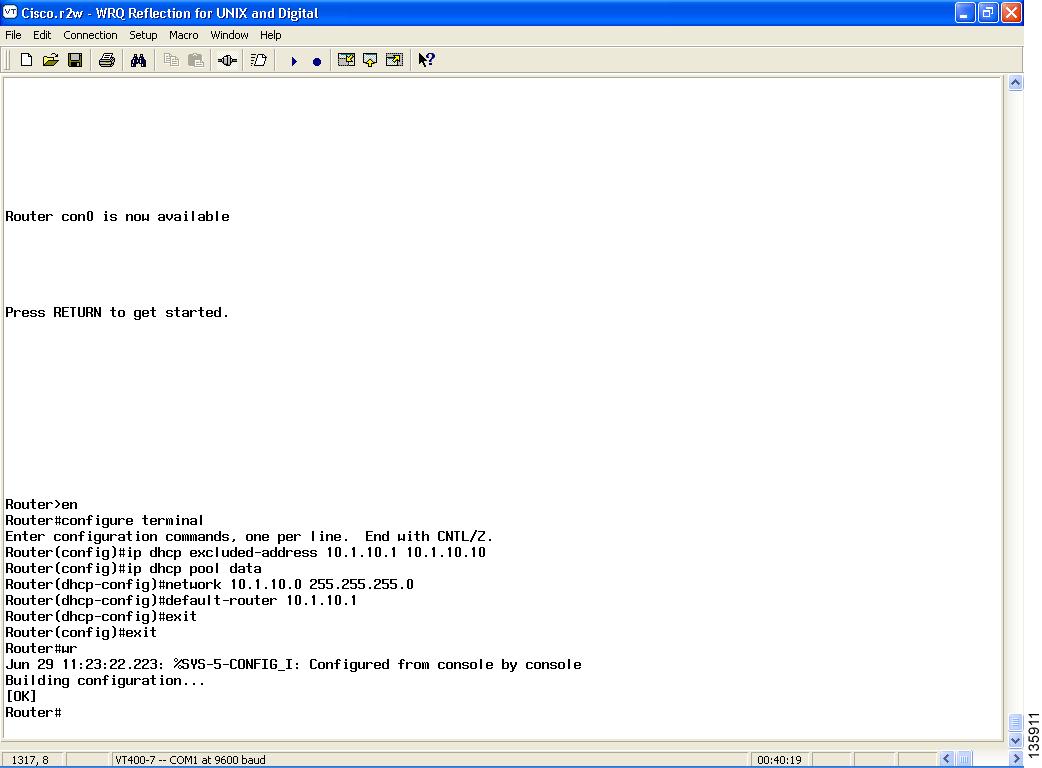
Summary steps (see Figure 111) list the steps necessary to set up a DHCP IP address pool for the data network. For detailed steps with examples, see Table 7.
Figure 111 Configuring DHCP IP Address Pool for Data
Summary Steps
1. ![]() enable
enable
2. ![]() configure terminal
configure terminal
3. ![]() ip dhcp excluded-address low-ip-address [high-ip-address]
ip dhcp excluded-address low-ip-address [high-ip-address]
4. ![]() ip dhcp pool pool-name
ip dhcp pool pool-name
5. ![]() network ip-address [mask | /prefix-length]
network ip-address [mask | /prefix-length]
6. ![]() default-router ip-address
default-router ip-address
7. ![]() exit
exit
8. ![]() exit
exit
9. ![]() wr
wr
Note ![]() It is recommended to save a copy of the router configuration for backup purposes.
It is recommended to save a copy of the router configuration for backup purposes.
Detailed Steps
Table 7 Detailed Steps for Configuring a DHCP IP Address Pool
Testing the Installation
The DHCP server is now set up for the data side of the network. Perform the following steps to ensure that DHCP is properly set up.
Step 1 ![]() Enter the show ip dhcp server stat command to ensure that the DHCP server is running and to display any queries made to it.
Enter the show ip dhcp server stat command to ensure that the DHCP server is running and to display any queries made to it.
Step 2 ![]() Enter the show ip dhcp pool command to display configured DHCP pools.
Enter the show ip dhcp pool command to display configured DHCP pools.
What to Do Next
Once you configure a DHCP IP pool for the data network using the Summary or Detailed Steps, proceed to configure separate voice and data VLANs for the data network (see the "Configuring Separate Data and Voice VLANs" section).
Configuring Separate Data and Voice VLANs
It is recommended that you create separate VLANs for voice and data on your switch.
Summary steps (see Figure 112) list the steps necessary to set up separate VLANs for your voice and data networks. For detailed steps with examples, see Table 8.
Figure 112 Configuring Separate Data and Voice VLANs

Summary Steps
1. ![]() enable
enable
2. ![]() vlan data
vlan data
3. ![]() vlan vlan-number name vlan-name (for data)
vlan vlan-number name vlan-name (for data)
4. ![]() vlan vlan-number name vlan-name (for voice)
vlan vlan-number name vlan-name (for voice)
5. ![]() apply
apply
6. ![]() exit
exit
7. ![]() configure terminal
configure terminal
8. ![]() interface vlan vlan-number
interface vlan vlan-number
9. ![]() ip address ip-address subnet mask
ip address ip-address subnet mask
10. ![]() exit
exit
11. ![]() interface vlan vlan-number
interface vlan vlan-number
12. ![]() ip address ip-address subnet mask
ip address ip-address subnet mask
13. ![]() exit
exit
14. ![]() exit
exit
15. ![]() wr
wr
Note ![]() It is recommended to save a copy of the switch configuration for backup purposes.
It is recommended to save a copy of the switch configuration for backup purposes.
Detailed Steps
Table 8 Detailed Steps for Configuring Separate Data and Voice VLANs
Figure 113 summarizes the LAN switch interface configuration.
Figure 113 LAN Switch Interface Configuration

This completes the voice network configuration.
Testing the Installation
VLANs are now configured on the switch. Use the show interface command to verify that the VLANs are configured. IP addresssing will not appear in any routing table until the interfaces are running.
Once the switch is configured, IP phones and stations should connect using different IP addressing.
Step 1 ![]() Enter the ipconfig command to see the IP configuration.
Enter the ipconfig command to see the IP configuration.
Step 2 ![]() Press settings on the IP phone and look for IP addressing under Network Configuration.
Press settings on the IP phone and look for IP addressing under Network Configuration.
Step 3 ![]() Plug in multiple IP phones and initiate a call.
Plug in multiple IP phones and initiate a call.
What to Do Next
To configure security on the voice network, see the "Configuring Security on the Voice Network" section.
 Feedback