- Introduction
- Installing Required Software
- Configuring Cisco Business Communications Solution Verified Designs
- Continuing Cisco BCS Verified Designs Configuration Using CLI
- Configuring Security on the Voice Network
- Appendix A: Cisco CallManager Express Bundles
- Appendix B: QCT Utilities
- Appendix C: Cisco BCS Verified Designs Configuration Example
Configuring Security on the Voice Network
This chapter describes the procedure for configuring security on your Cisco BCS Verified Designs network using Cisco Security Device Manager (SDM). Cisco SDM is a web-based device management tool supported on Cisco ISR routers. Cisco SDM provides smart wizards to help you add security to your voice network.
When configuring security on Cisco Business Communications Solution Verified Designs, accept all default values presented by the Cisco SDM windows. This enables a generic security level that provides basic security for the voice network.
Contents
This chapter contains the following sections:
•![]() Configuring Intrusion Prevention
Configuring Intrusion Prevention
Launching Cisco SDM
Step 1 ![]() Launch Cisco SDM from the Start menu on your PC (see Figure 114):
Launch Cisco SDM from the Start menu on your PC (see Figure 114):
Figure 114 Launching Cisco SDM

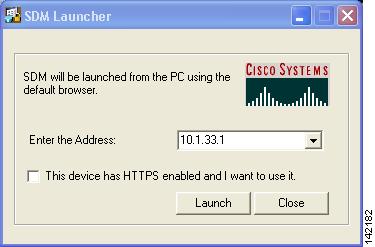
Step 2 ![]() When prompted, enter the IP address of your Cisco CME router (see Figure 115):
When prompted, enter the IP address of your Cisco CME router (see Figure 115):
Figure 115 SDM Launcher
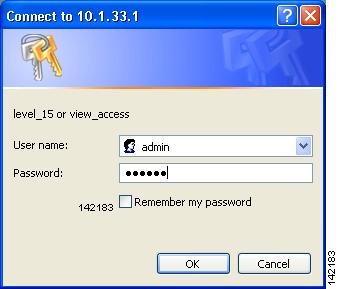
Step 3 ![]() Enter your SDM level-15 username and password (see Figure 116):
Enter your SDM level-15 username and password (see Figure 116):
Figure 116 Level_15 Access Prompt

Note ![]() If you need to create a user account defined with privilege level 15 (enable privileges), enter the following command in global configuration mode, replacing username and password with the strings that you want to use:
If you need to create a user account defined with privilege level 15 (enable privileges), enter the following command in global configuration mode, replacing username and password with the strings that you want to use:
Router(config)# username username privilege 15 secret 0 password
Step 4 ![]() Click Yes on any security warning that you receive (see Figure 117):
Click Yes on any security warning that you receive (see Figure 117):
Figure 117 Security Warning

Cisco SDM downloads the current configuration (see Figure 118):
Figure 118 SDM Status Dialog

Once Cisco SDM installs, the Cisco SDM home page appears (see Figure 119):
Figure 119 SDM Home Page

Step 5 ![]() Click Configure on the Cisco SDM Home page menu.
Click Configure on the Cisco SDM Home page menu.
The Cisco SDM task bar appears on the left (see Figure 120):
Figure 120 Cisco SDM Task Bar

Configuring Intrusion Prevention
The Intrusion Prevention System (IPS) is a Cisco SDM feature that allows you to configure signatures on the router to detect and prevent intrusive traffic on your network. The file ips.tar must be present in router flash or disk memory for IPS to run, and the Cisco IOS image on the router must support IPS.
IPS allows you to selectively enable, disable, edit, and delete signatures the router uses. You can select the interfaces and traffic directions on which to apply IPS, create rules that determine which traffic is examined, import Signature Definition Files (SDFs), and specify SDF locations for the router.
Perform the following steps to configure intrusion protection for your voice network.
Step 1 ![]() Click Intrusion Prevention from Tasks.
Click Intrusion Prevention from Tasks.
The Cisco IPS window appears (see Figure 121).
Figure 121 Cisco SDM Intrusion Prevention System

Step 2 ![]() Click Launch IPS.
Click Launch IPS.
Once Cisco SDM loads the IPS configuration (see Figure 122),
Figure 122 IPS Configuration Status

Message
the Cisco SDM Intrusion Prevention window appears (see Figure 123):
Figure 123 Cisco SDM Intrusion Prevention System

Step 3 ![]() Click Configure.
Click Configure.
The IPS Rules window appears (seeFigure 124):
Figure 124 IPS Rules Window

The IPS Rules window automatically configures its rules set for Cisco Business Communications Solution Verified Designs.
If desired, click View SDEE Messages to view message (see Figure 125):
Figure 125 SDEE Messages

Step 4 ![]() When you finish viewing SDEE messages, click Close.
When you finish viewing SDEE messages, click Close.
Step 5 ![]() Click Signatures.
Click Signatures.
The IPS Signatures window appears (see Figure 126):
Figure 126 IPS Signatures

IPS Ssignatures are automatically assigned to Cisco Business Communications Solution Verified Designs.
Step 6 ![]() Click Global Settings.
Click Global Settings.
The IPS Global Settings window appears (see Figure 127):
Figure 127 IPS Global Settings

IPS global settings appear for the network.
Step 7 ![]() Click Save.
Click Save.
Step 8 ![]() Click Yes to copy the configuration to the router (see Figure 128):
Click Yes to copy the configuration to the router (see Figure 128):
Figure 128 Acknowledging Configuration Copying

Step 9 ![]() When you are finished with IPS, select exit from the File menu and click Yes to confirm your exit
When you are finished with IPS, select exit from the File menu and click Yes to confirm your exit
(see Figure 129):
Figure 129 Exiting IPS

Configuring a Basic Firewall
A firewall is a set of rules used to protect the resources of your LAN. These rules filter the packets arriving at the router. If a packet does not meet the criteria specified in the rule, it is dropped. If it does meet the criteria, it is allowed to pass through the interface that the rule is applied to. Cisco SDM Firewall Wizard secures your firewall by using predefined rules to protect your voice network from the most common outside attacks.
Perform the following steps to configure a basic firewall for the voice network.
Step 1 ![]() Click Firewall and ACL from Tasks.
Click Firewall and ACL from Tasks.
The Cisco SDM Firewall and ACL window appears (see Figure 130):
Figure 130 Cisco SDM Firewall and ACL Window

Step 2 ![]() Select Basic Firewall.
Select Basic Firewall.
Step 3 ![]() Click Launch the selected task.
Click Launch the selected task.
The Cisco SDM Basic Firewall Configuration Wizard window appears (see Figure 131):
Figure 131 Cisco SDM Firewall Wizard

Step 4 ![]() Click Next.
Click Next.
The Basic Firewall Interface Configuration window appears (see Figure 132):
Figure 132 Basic Firewall Interface Configuration Window
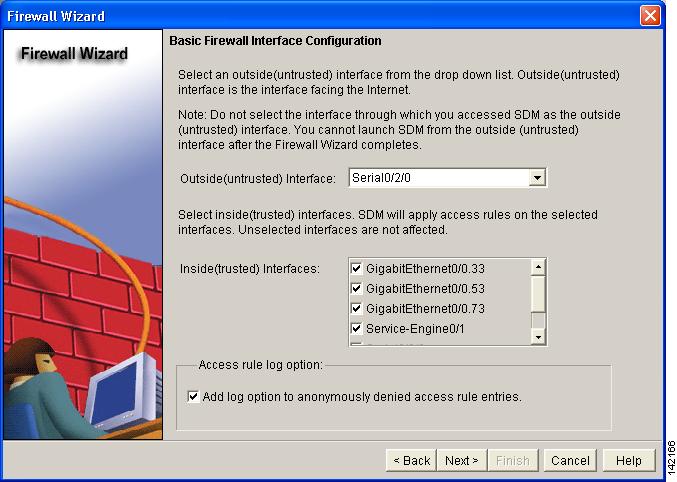
Step 5 ![]() By default, the outside untrusted interface appears in the drop-down menu.
By default, the outside untrusted interface appears in the drop-down menu.
Step 6 ![]() Click Next.
Click Next.
Step 7 ![]() Click Yes to acknowledge any warning that appears (see Figure 133):
Click Yes to acknowledge any warning that appears (see Figure 133):
Figure 133 Cisco SDM Detection Warning

Step 8 ![]() Click OK to acknowledge any warning that appears (see Figure 134):
Click OK to acknowledge any warning that appears (see Figure 134):
Figure 134 Cisco SDM Launch Warning

The Firewall Summary window appears (see Figure 135):
Figure 135 Cisco SDM Firewall Summary Window

Step 9 ![]() Click Finish.
Click Finish.
The Routing Traffic Configuration dialog appears (see Figure 136):
Figure 136 Routing Traffic Configuration Dialog

Step 10 ![]() Click OK.
Click OK.
The Command Delivery Status dialog appears (see Figure 137):
Figure 137 Command Delivery Status Dialog

Step 11 ![]() Click OK.
Click OK.
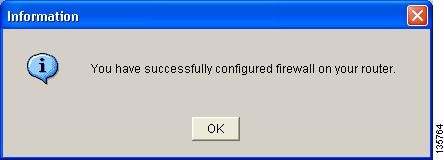
The successfully configured firewall dialog appears (see Figure 138):
Figure 138 Successfully Configured Firewall Dialog
Step 12 ![]() Click OK.
Click OK.
The Edit Firewall Policy window appears (see Figure 139):
Figure 139 Edit Firewall Policy/ACL Window

Step 13 ![]() Click Save to save the firewall configuration.
Click Save to save the firewall configuration.
Click Yes to acknowledge the write to startup warning (see Figure 140):
Figure 140 Cisco SDM Write to Startup Config Warning

Figure 141 shows an example of the firewall configuration.
Figure 141 Firewall Configuration

Performing a Security Audit
The Security Audit wizard tests your router configuration to determine if any potential security problems exist in the configuration, and then presents you with a window that lets you identify which of those security problems you want to fix. Once the problems are identified, the Security Audit wizard makes the necessary changes to the router configuration to fix those problems.
Perform the following steps to have Cisco SDM perform a security audit and then fix the problems that it finds.
Step 1 ![]() Click Security Audit from Tasks.
Click Security Audit from Tasks.
The Cisco SDM Security Audit window appears (see Figure 142):
Figure 142 Cisco SDM Security Audit Window

Step 2 ![]() Click Perform security audit.
Click Perform security audit.
The Security Audit Wizard Welcome window appears (see Figure 143):
Figure 143 Cisco SDM Security Audit Wizard Welcome Window

Step 3 ![]() Click Next.
Click Next.
The Security Audit Interface Configuration window appears (see Figure 144):
Figure 144 Cisco Security Audit Interface Configuration Window

Step 4 ![]() Click Next.
Click Next.
The Security Audit wizard tests your router configuration to determine which possible security problems may exist. A window showing the progress of this action appears (see Figure 145), listing all of the configuration options being tested, and whether the current router configuration passes those tests.
Figure 145 Security Audit Actions
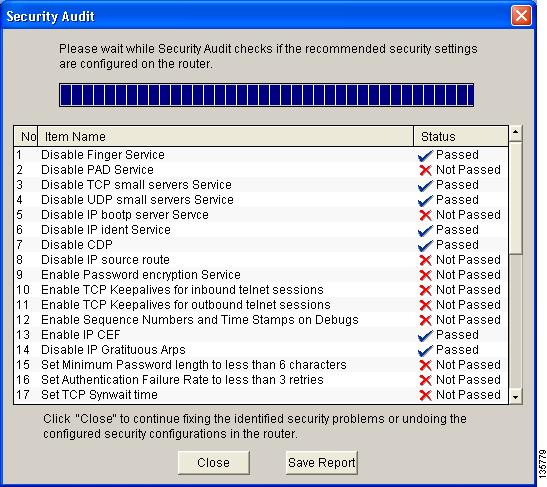
If you want to save this report to a file, click Save Report.
Step 5 ![]() Click Close.
Click Close.
The Security Audit Report Card window appears, showing a list of possible security problems (see Figure 146):
Figure 146 Cisco Security Audit Report Card

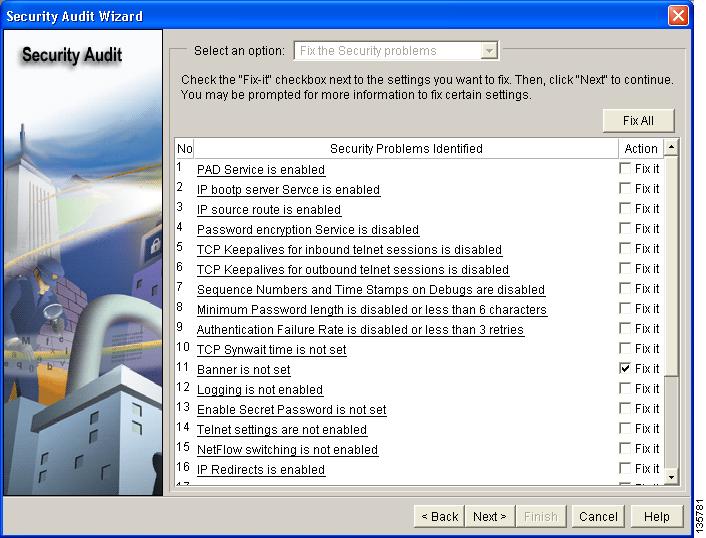
Step 6 ![]() Check the Fix it check boxes next to any problems that you want Cisco SDM to fix (see Figure 147). For a description of the problem and a list of the Cisco IOS commands that will be added to your configuration, click the problem description to display a help page about that problem.
Check the Fix it check boxes next to any problems that you want Cisco SDM to fix (see Figure 147). For a description of the problem and a list of the Cisco IOS commands that will be added to your configuration, click the problem description to display a help page about that problem.
Figure 147 Cisco SDM Fix It Boxes
Step 7 ![]() Click Next.
Click Next.
Step 8 ![]() The Security Audit wizard may display one or more windows requiring you to enter information to fix certain problems. Enter the information as required and click Next for each of those windows. For more information on security audit fix it procedures, see the "Security Audit" chapter of the Cisco SDM User's Guide.
The Security Audit wizard may display one or more windows requiring you to enter information to fix certain problems. Enter the information as required and click Next for each of those windows. For more information on security audit fix it procedures, see the "Security Audit" chapter of the Cisco SDM User's Guide.
The Summary page shows a list of all the configuration changes that Security Audit will make.
Step 9 ![]() Click Finish to deliver those changes to your router.
Click Finish to deliver those changes to your router.
Security is now configured on the voice network.
Step 10 ![]() Click Yes to exit Security Audit Wizard (see Figure 148):
Click Yes to exit Security Audit Wizard (see Figure 148):
Figure 148 Exiting Security Audit Wizard

The installation of Cisco BCS Verified Designs is now finished.
 Feedback