- Preface
- Chapter 1 - Product Overview
- Chapter 2 - Preparing for Installation
- Chapter 3 - Installing the Client Adapter
- Chapter 4 - Using the Profile Manager
- Chapter 5 - Configuring the Client Adapter
- Chapter 6 - Using EAP Authentication
- Chapter 7 - Performing Diagnostics
- Chapter 8 - Using the Aironet Client Monitor (ACM)
- Chapter 9 - Routine Procedures
- Chapter 10 - Troubleshooting
- Appendix A - Technical Specifications
- Appendix B - Translated Safety Warnings
- Appendix C - Declarations of Conformity and Regulatory Information
- Appendix D - Channels, Power Levels, and Antenna Gains
- Appendix E - Configuring the Client Adapter through the Windows XP Operating System
- Appendix F - Performing a Site Survey
- Glossary
- Index
Cisco Aironet 350 and CB20A Wireless LAN Client Adapters Installation and Configuration Guide for Windows, OL-1394-09
Bias-Free Language
The documentation set for this product strives to use bias-free language. For the purposes of this documentation set, bias-free is defined as language that does not imply discrimination based on age, disability, gender, racial identity, ethnic identity, sexual orientation, socioeconomic status, and intersectionality. Exceptions may be present in the documentation due to language that is hardcoded in the user interfaces of the product software, language used based on RFP documentation, or language that is used by a referenced third-party product. Learn more about how Cisco is using Inclusive Language.
- Updated:
- May 4, 2007
Chapter: Chapter 10 - Troubleshooting
- Accessing the Latest Troubleshooting Information
- Interpreting the Indicator LEDs
- Troubleshooting the Client Adapter
- Using the Troubleshooting Utility
- Client Adapter Recognition Problems
- Resolving Resource Conflicts
- Problems Associating to an Access Point
- Problems Authenticating to an Access Point
- Problems Connecting to the Network
- Prioritizing Network Connections
- Parameters Missing from Profile Manager Screen
- Windows Wireless Network Connection Icon Shows Unavailable Connection (Windows XP Only)
- Creating Strong Passwords
- Error Messages
Troubleshooting
This chapter provides information for diagnosing and correcting common problems that may be encountered when installing or operating the client adapter.
The following topics are covered in this chapter:
•![]() Accessing the Latest Troubleshooting Information
Accessing the Latest Troubleshooting Information
•![]() Interpreting the Indicator LEDs
Interpreting the Indicator LEDs
•![]() Troubleshooting the Client Adapter
Troubleshooting the Client Adapter
Accessing the Latest Troubleshooting Information
This chapter provides basic troubleshooting tips for your client adapter. For more up-to-date and complex troubleshooting information, refer to the TAC web site. To access this site, go to Cisco.com, click Technical Support > Hardware Support > Wireless Devices. Then choose your product and Troubleshooting to find information on the problem you are experiencing.
Interpreting the Indicator LEDs

Note ![]() Mini PCI cards do not have LEDs.
Mini PCI cards do not have LEDs.
The client adapter shows messages and error conditions through its two LEDs:
•![]() Link Integrity/Power LED (green)—This LED lights when the client adapter is receiving power and blinks slowly when the adapter is linked with the network.
Link Integrity/Power LED (green)—This LED lights when the client adapter is receiving power and blinks slowly when the adapter is linked with the network.
•![]() Link Activity LED (amber)—This LED blinks quickly when the client adapter is receiving or transmitting data and blinks in a repeating pattern to indicate an error condition.
Link Activity LED (amber)—This LED blinks quickly when the client adapter is receiving or transmitting data and blinks in a repeating pattern to indicate an error condition.
Table 10-1 interprets the LED messages during normal operation. Table 10-2 interprets the LED error condition messages.
|
|
|
|
|---|---|---|
Off |
Off |
Client adapter is not receiving power, or an error has occurred. |
Off |
1 blink at 2-second rate |
RAM failure. Refer to the "Obtaining Technical Assistance" section in the Preface for technical support information. |
Off |
2-second pause, 2 fast blinks, 1-second pause, 1 blink |
A configuration error has occurred (for example, static WEP is enabled in ACU, but the client adapter has not been programmed with a valid WEP key). Recheck your client adapter's configuration settings. |
Off |
2 fast blinks, 2-second pause |
Flash boot block checksum failure. Refer to the "Obtaining Technical Assistance" section in the Preface for technical support information. |
Off |
3 fast blinks, 2-second pause |
Firmware checksum failure. Refer to the "Obtaining Technical Assistance" section in the Preface for technical support information. |
Off |
4 fast blinks, 2-second pause |
MAC address error (error reading MAC chip). Reload the firmware. |
Off |
5 fast blinks, 2-second pause |
Physical layer (PHY) access error. Refer to the "Obtaining Technical Assistance" section in the Preface for technical support information. |
Off |
6 fast blinks, 2-second pause |
Incompatible firmware. Load the correct firmware version. |
Troubleshooting the Client Adapter
This section provides troubleshooting tips should you encounter problems with your client adapter. Use Table 10-3 to quickly locate specific troubleshooting information.
Using the Troubleshooting Utility
The Cisco Wireless LAN Adapter Troubleshooting Utility enables you to identify and resolve configuration and association problems with your client adapter. It is meant to be used only when the client adapter is in infrastructure mode as it assesses the connection between the adapter and an access point.
Follow the instructions in one of the subsections below to use the utility to diagnose your client adapter's operation, save a detailed report to a text file, or access online help.
Diagnosing Your Client Adapter's Operation
Step 1 ![]() Perform one of the following to activate the troubleshooting utility:
Perform one of the following to activate the troubleshooting utility:
•![]() Open ACU; choose Troubleshooting from the Options drop-down menu.
Open ACU; choose Troubleshooting from the Options drop-down menu.
•![]() Right-click the ACM icon; choose Troubleshooting from the pop-up menu.
Right-click the ACM icon; choose Troubleshooting from the pop-up menu.
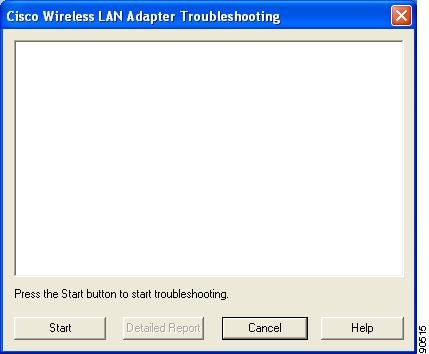
The Cisco Wireless LAN Adapter Troubleshooting screen appears (see Figure 10-1).
Figure 10-1 Cisco Wireless LAN Adapter Troubleshooting Screen
Step 2 ![]() Click Start. The utility performs the following series of eight tests to check the operation of your client adapter and to pinpoint specific problems if they exist:
Click Start. The utility performs the following series of eight tests to check the operation of your client adapter and to pinpoint specific problems if they exist:
1. ![]() Checking driver installation
Checking driver installation
2. ![]() Checking client adapter insertion
Checking client adapter insertion
3. ![]() Checking the client adapter's radio (to see if it is turned on)
Checking the client adapter's radio (to see if it is turned on)
4. ![]() Checking the client adapter's association to an access point
Checking the client adapter's association to an access point
5. ![]() Checking authentication
Checking authentication
6. ![]() Checking the receive interrupt
Checking the receive interrupt
7. ![]() Checking network settings
Checking network settings
8. ![]() Checking the client adapter's connection to the access point
Checking the client adapter's connection to the access point
The utility runs until it completes successfully or a problem is discovered. It then displays the results (see Figure 10-2).
Figure 10-2 Cisco Wireless LAN Adapter Troubleshooting Screen (with Test Results)
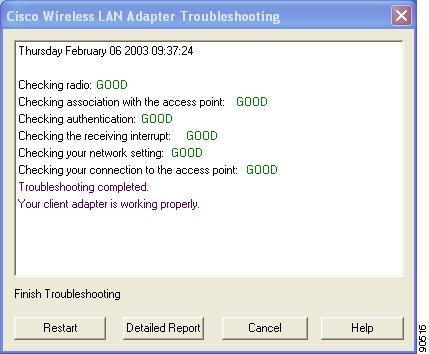
One of the following status messages appears for each test:
•![]() GOOD—The test completed successfully.
GOOD—The test completed successfully.
•![]() ERROR—The test failed because the client adapter is not configured properly to establish a connection with an access point.
ERROR—The test failed because the client adapter is not configured properly to establish a connection with an access point.
•![]() WARNING—The test failed for one of the following reasons:
WARNING—The test failed for one of the following reasons:
–![]() The utility is unable to access the client's IP address. Either an incorrect IP address was entered, or an IP address was not received from the DHCP server. Contact your system administrator.
The utility is unable to access the client's IP address. Either an incorrect IP address was entered, or an IP address was not received from the DHCP server. Contact your system administrator.
–![]() The utility is unable to access the access point's IP address. Contact your system administrator.
The utility is unable to access the access point's IP address. Contact your system administrator.
–![]() The exact cause cannot be determined. Contact your system administrator.
The exact cause cannot be determined. Contact your system administrator.
Note ![]() You can click Stop at any time to stop the testing process, or you can click Restart once the testing process has stopped to run the test again.
You can click Stop at any time to stop the testing process, or you can click Restart once the testing process has stopped to run the test again.
Note ![]() If auto profile selection is enabled but the client adapter is not associated or authenticated, the utility repeats the testing process continually so the client adapter can be tested with new profiles.
If auto profile selection is enabled but the client adapter is not associated or authenticated, the utility repeats the testing process continually so the client adapter can be tested with new profiles.
Step 3 ![]() To view more detailed information, click Detailed Report. A report appears that explains the purpose of each test and the results for your client adapter.
To view more detailed information, click Detailed Report. A report appears that explains the purpose of each test and the results for your client adapter.
Note ![]() The report contains valuable information that, if necessary, could be used by TAC to analyze any problems. Follow the instructions in the next section if you want to save the report to a text file.
The report contains valuable information that, if necessary, could be used by TAC to analyze any problems. Follow the instructions in the next section if you want to save the report to a text file.
Step 4 ![]() If a problem is discovered, the report provides some possible repair suggestions. Follow the repair instructions carefully and run the troubleshooting utility again.
If a problem is discovered, the report provides some possible repair suggestions. Follow the repair instructions carefully and run the troubleshooting utility again.
Step 5 ![]() Click Close to exit the detailed report.
Click Close to exit the detailed report.
Step 6 ![]() Click Cancel to exit the troubleshooting utility.
Click Cancel to exit the troubleshooting utility.
Saving the Detailed Report to a Text File
Follow these steps to save the detailed troubleshooting report to your computer's hard drive.
Step 1 ![]() Click Save on the detailed report screen. The Save As screen appears. A filename of the following format appears automatically in the File name field: TSyymmddhhmm, where yymmddhhmm represents the date and time that the troubleshooting utility was started. For example, TS0211211230 indicates that the utility was started on 11/21/02 at 12:30.
Click Save on the detailed report screen. The Save As screen appears. A filename of the following format appears automatically in the File name field: TSyymmddhhmm, where yymmddhhmm represents the date and time that the troubleshooting utility was started. For example, TS0211211230 indicates that the utility was started on 11/21/02 at 12:30.
Note ![]() You can change the filename by typing a new name in the File name field.
You can change the filename by typing a new name in the File name field.
Step 2 ![]() Use the Save in box at the top of the screen to specify the location on your computer's hard drive where the file will be saved. The default location is My Documents.
Use the Save in box at the top of the screen to specify the location on your computer's hard drive where the file will be saved. The default location is My Documents.
Note ![]() If you specify a different location, the new location becomes the default location going forward.
If you specify a different location, the new location becomes the default location going forward.
Step 3 ![]() Click Save. The file is saved as a text file in the location specified.
Click Save. The file is saved as a text file in the location specified.
Accessing Online Help
Follow these steps to access general troubleshooting information about your client adapter.
Step 1 ![]() Click Help on the Cisco Wireless LAN Adapter Troubleshooting screen. An overview of the troubleshooting utility appears.
Click Help on the Cisco Wireless LAN Adapter Troubleshooting screen. An overview of the troubleshooting utility appears.
Step 2 ![]() Click Help Topics at the top of the screen. From the Help Topics screen, you can access additional information.
Click Help Topics at the top of the screen. From the Help Topics screen, you can access additional information.
•![]() To access information on specific topics, double-click Troubleshooting Tips on the Contents page, the desired topic (such as Radio LEDs), and the desired subtopic (such as LED Error Condition Messages).
To access information on specific topics, double-click Troubleshooting Tips on the Contents page, the desired topic (such as Radio LEDs), and the desired subtopic (such as LED Error Condition Messages).
•![]() To search for a specific topic, click the Index tab, choose an index entry, and click Display.
To search for a specific topic, click the Index tab, choose an index entry, and click Display.
•![]() To search for a specific word or phrase, click the Find tab, and follow the instructions in the Find Setup Wizard window.
To search for a specific word or phrase, click the Find tab, and follow the instructions in the Find Setup Wizard window.
Step 3 ![]() Click Cancel to exit the Help Topics screen.
Click Cancel to exit the Help Topics screen.
Client Adapter Recognition Problems
Note ![]() This section does not apply to mini PCI cards.
This section does not apply to mini PCI cards.
If your client adapter is not being recognized by your computer's PCMCIA adapter, check your computer's BIOS and make sure that the PC card controller mode is set to PCIC compatible.
Note ![]() A computer's BIOS varies depending on the manufacturer. For support on BIOS-related issues, consult your computer's manufacturer.
A computer's BIOS varies depending on the manufacturer. For support on BIOS-related issues, consult your computer's manufacturer.
Resolving Resource Conflicts
Note ![]() This section does not apply to mini PCI cards.
This section does not apply to mini PCI cards.
If you encounter problems while installing your client adapter on a computer running a Windows operating system, you may need to specify a different interrupt request (IRQ) or I/O range for the adapter.
The default IRQ for the client adapter is IRQ 10, which may not work for all systems. Follow the steps for your specific operating system to obtain an available IRQ.
During installation the adapter's driver installation script scans for an unused I/O range. The installation can fail if the I/O range found by the driver installation script is occupied by another device but not reported by Windows. An I/O range might not be reported if a device is physically present in the system but not enabled under Windows. Follow the steps for your specific operating system to obtain an available I/O range.
Resolving Resource Conflicts in Windows 2000
Step 1 ![]() Double-click My Computer, Control Panel, and System.
Double-click My Computer, Control Panel, and System.
Step 2 ![]() Click the Hardware tab and Device Manager.
Click the Hardware tab and Device Manager.
Step 3 ![]() Double-click Network Adapters and the Cisco Systems Wireless LAN Adapter.
Double-click Network Adapters and the Cisco Systems Wireless LAN Adapter.
Step 4 ![]() In the General screen, the Device Status field indicates if a resource problem exists. If a problem is indicated, click the Resources tab.
In the General screen, the Device Status field indicates if a resource problem exists. If a problem is indicated, click the Resources tab.
Step 5 ![]() Uncheck the Use automatic settings check box.
Uncheck the Use automatic settings check box.
Step 6 ![]() Under Resource Settings or Resource Type, click Input/Output Range.
Under Resource Settings or Resource Type, click Input/Output Range.
Step 7 ![]() Look in the Conflicting Device list at the bottom of the screen. If it indicates that the range is being used by another device, click the Change Setting button.
Look in the Conflicting Device list at the bottom of the screen. If it indicates that the range is being used by another device, click the Change Setting button.
Step 8 ![]() Scroll through the ranges in the Value dialog box and choose one that does not conflict with another device. The Conflict Information window at the bottom of the screen indicates if the range is already being used.
Scroll through the ranges in the Value dialog box and choose one that does not conflict with another device. The Conflict Information window at the bottom of the screen indicates if the range is already being used.
Step 9 ![]() Click OK.
Click OK.
Step 10 ![]() Under Resource Settings or Resource Type, click Interrupt Request.
Under Resource Settings or Resource Type, click Interrupt Request.
Step 11 ![]() Look in the Conflicting Device list at the bottom of the screen. If it indicates that the IRQ is being used by another device, click the Change Setting button.
Look in the Conflicting Device list at the bottom of the screen. If it indicates that the IRQ is being used by another device, click the Change Setting button.
Step 12 ![]() Scroll through the IRQs in the Value dialog box and choose one that does not conflict with another device. The Conflict Information window at the bottom of the screen indicates if the IRQ is already being used.
Scroll through the IRQs in the Value dialog box and choose one that does not conflict with another device. The Conflict Information window at the bottom of the screen indicates if the IRQ is already being used.
Step 13 ![]() Click OK.
Click OK.
Step 14 ![]() Reboot your computer.
Reboot your computer.
Resolving Resource Conflicts in Windows XP
Note ![]() These instructions assume you are using Windows XP's classic view, not its category view.
These instructions assume you are using Windows XP's classic view, not its category view.
Step 1 ![]() Double-click My Computer, Control Panel, and System.
Double-click My Computer, Control Panel, and System.
Step 2 ![]() Click the Hardware tab and Device Manager.
Click the Hardware tab and Device Manager.
Step 3 ![]() Under Network Adapters, double-click the Cisco Systems Wireless LAN Adapter.
Under Network Adapters, double-click the Cisco Systems Wireless LAN Adapter.
Step 4 ![]() In the General screen, the Device Status field indicates if a resource problem exists. If a problem is indicated, click the Resources tab.
In the General screen, the Device Status field indicates if a resource problem exists. If a problem is indicated, click the Resources tab.
Step 5 ![]() Uncheck the Use automatic settings check box.
Uncheck the Use automatic settings check box.
Step 6 ![]() Under Resource Settings, click I/O Range.
Under Resource Settings, click I/O Range.
Step 7 ![]() Look in the Conflicting Device list at the bottom of the screen. If it indicates that the range is being used by another device, click the Change Setting button.
Look in the Conflicting Device list at the bottom of the screen. If it indicates that the range is being used by another device, click the Change Setting button.
Step 8 ![]() Scroll through the ranges in the Value dialog box and choose one that does not conflict with another device. The Conflict Information window at the bottom of the screen indicates if the range is already being used.
Scroll through the ranges in the Value dialog box and choose one that does not conflict with another device. The Conflict Information window at the bottom of the screen indicates if the range is already being used.
Step 9 ![]() Click OK.
Click OK.
Step 10 ![]() Under Resource Settings, click IRQ.
Under Resource Settings, click IRQ.
Step 11 ![]() Look in the Conflicting Device list at the bottom of the screen. If it indicates that the IRQ is being used by another device, click the Change Setting button.
Look in the Conflicting Device list at the bottom of the screen. If it indicates that the IRQ is being used by another device, click the Change Setting button.
Step 12 ![]() Scroll through the IRQs in the Value dialog box and choose one that does not conflict with another device. The Conflict Information window at the bottom of the screen indicates if the IRQ is already being used.
Scroll through the IRQs in the Value dialog box and choose one that does not conflict with another device. The Conflict Information window at the bottom of the screen indicates if the IRQ is already being used.
Step 13 ![]() Click OK.
Click OK.
Step 14 ![]() Reboot your computer.
Reboot your computer.
Problems Associating to an Access Point
Follow the instructions below if your client adapter fails to associate to an access point.
•![]() If possible, move your workstation a few feet closer to an access point and try again.
If possible, move your workstation a few feet closer to an access point and try again.
•![]() Make sure that the client adapter is securely inserted in your computer's client adapter slot.
Make sure that the client adapter is securely inserted in your computer's client adapter slot.
•![]() If you are using a PCI client adapter, make sure that the antenna is securely attached.
If you are using a PCI client adapter, make sure that the antenna is securely attached.
•![]() Make sure that the access point is turned on and operating.
Make sure that the access point is turned on and operating.
•![]() Check that all parameters are set properly for both the client adapter and the access point. These include the SSID, EAP authentication, WEP activation, network type, channel, etc.
Check that all parameters are set properly for both the client adapter and the access point. These include the SSID, EAP authentication, WEP activation, network type, channel, etc.
•![]() If the client adapter still fails to establish contact, refer to the "Obtaining Technical Assistance" section in the Preface for technical support information.
If the client adapter still fails to establish contact, refer to the "Obtaining Technical Assistance" section in the Preface for technical support information.
Problems Authenticating to an Access Point
If your client adapter is a 40-bit card and EAP is enabled, the adapter can associate but not authenticate to access points using 128-bit encryption. To authenticate to an access point using 128-bit encryption, you have two options:
•![]() Purchase a 128-bit client adapter. This is the most secure option.
Purchase a 128-bit client adapter. This is the most secure option.
•![]() Disable static WEP for the client adapter and configure the adapter and the access point to associate to mixed cells. This option presents a security risk because your data is not encrypted as it is sent over the RF network.
Disable static WEP for the client adapter and configure the adapter and the access point to associate to mixed cells. This option presents a security risk because your data is not encrypted as it is sent over the RF network.
Problems Connecting to the Network
After you have installed the appropriate firmware, driver, client utilities, and security modules, contact your IS department if you have a problem connecting to the network. Proxy server, network protocols, and further authentication information might be needed to connect to the network.
Prioritizing Network Connections
If you have more than one network adapter enabled (such as a Cisco Aironet client adapter and an Ethernet card), you can choose which one to use by assigning a priority to your network connections.
Follow these steps to prioritize your network connections.
Step 1 ![]() Right-click the My Network Places icon on your desktop.
Right-click the My Network Places icon on your desktop.
Step 2 ![]() Click Properties.
Click Properties.
Step 3 ![]() Choose the Advanced menu option at the top of the screen.
Choose the Advanced menu option at the top of the screen.
Step 4 ![]() Choose Advanced Settings. Your network connections are listed in the Connections box on the Adapters and Bindings tab.
Choose Advanced Settings. Your network connections are listed in the Connections box on the Adapters and Bindings tab.
Step 5 ![]() Use the arrows beside the Connections box to move the network connection that you want to use to the top.
Use the arrows beside the Connections box to move the network connection that you want to use to the top.
Step 6 ![]() Click OK.
Click OK.
Parameters Missing from Profile Manager Screen
If some parameters are unavailable on the Profile Manager screen, your system administrator may have used an administrative tool to deactivate these parameters. In this case, these parameters cannot be selected.
Windows Wireless Network Connection Icon Shows Unavailable Connection (Windows XP Only)
If your computer is running Windows XP and you configured your client adapter using ACU, the Windows Wireless Network Connection icon in the Windows system tray may be marked with a red X and show an unavailable connection even though a wireless connection exists. This condition is caused by a conflict between ACU and Windows XP's wireless network settings. Simply ignore the Windows icon and use the ACM icon to check the status of your client adapter's wireless connection.
Creating Strong Passwords
Cisco recommends the use of strong passwords for LEAP authentication. Because strong passwords are difficult to guess, they minimize the risk of successful attacks by rogue access points. Some characteristics of strong passwords include:
•![]() A minimum of 10 characters
A minimum of 10 characters
•![]() A mixture of uppercase and lowercase letters
A mixture of uppercase and lowercase letters
•![]() At least one numeric character or one non-alphanumeric character, such as !#@$%
At least one numeric character or one non-alphanumeric character, such as !#@$%
•![]() No form of your username or user ID
No form of your username or user ID
•![]() A word that is not found in the dictionary (domestic or foreign)
A word that is not found in the dictionary (domestic or foreign)
Some examples of strong passwords include:
•![]() cnw84FriDAY, which comes from "Cannot wait for Friday"
cnw84FriDAY, which comes from "Cannot wait for Friday"
•![]() 4yosc10cP!, which comes from "For your own safety, choose a 10-character password!"
4yosc10cP!, which comes from "For your own safety, choose a 10-character password!"
Note ![]() Cisco recommends that you create your own strong passwords rather than use these sample passwords.
Cisco recommends that you create your own strong passwords rather than use these sample passwords.
Error Messages
This section provides a list of error messages that may appear during the installation, configuration, or use of your client adapter. The error messages are divided into six sections (general, installation, LEAP authentication, EAP-FAST authentication, PEAP authentication, and EAP-SIM authentication). The messages are listed in alphabetical order within each section, and an explanation as well as a recommended user action are provided for each message. Table 10-4 enables you to quickly locate the error messages you need.
|
|
|
|---|---|
General |
|
Installation |
|
LEAP authentication |
|
EAP-FAST authentication |
|
PEAP authentication |
|
EAP-SIM authentication |
General Error Messages
This section lists general error messages that may appear at any time and are not related to authentication attempts.
Error Message Bad Firmware Image File (filename)
Explanation The selected firmware file is corrupt and will not be sent to the client adapter.
Recommended Action Choose a different firmware file and try to load it.
Error Message Card Removed at xx:xx
Explanation The client adapter was ejected from the computer.
Recommended Action Reinsert the client adapter if you wish to resume wireless communications.
Error Message An error occurred while trying to make the selected profile active.
Explanation An error occurred when you selected a profile in ACM.
Recommended Action Check the profile's configuration parameters in ACU or select a new profile.
Error Message Error Reading filename
Explanation A problem occurred while the computer was reading the firmware file from the disk.
Recommended Action Re-copy the firmware file to a floppy disk or to your computer's hard drive and try to load it again or select a different firmware file and try to load it.
Error Message Error Writing to Flash Memory
Explanation A problem occurred while the firmware was being flashed.
Recommended Action Eject the client adapter and reinsert it. If the client adapter functions properly, the firmware was flashed successfully. If the client adapter does not function or functions improperly, your client adapter may need to be returned for service. Refer to the "Technical Assistance Center" section in the Preface for information on contacting TAC.
Error Message Firmware Incompatible with Hardware
Explanation The selected firmware file does not work with the client adapter.
Recommended Action Choose a different firmware file and try to load it.
Error Message Firmware Upgrade Failed
Explanation A problem occurred while the firmware was being flashed.
Recommended Action Eject the client adapter and reinsert it. If the client adapter functions properly, the firmware was flashed successfully. If the client adapter does not function or functions improperly, your client adapter may need to be returned for service. Refer to the "Technical Assistance Center" section in the Preface for information on contacting TAC.
Error Message    The installation will complete and applications will be installed when
a wireless LAN client adapter is inserted. If an adapter is already inserted,
remove and reinsert the adapter or reboot the machine.
Explanation The installation program was most likely run without a client adapter inserted in the computer.
Recommended Action Insert a client adapter into your computer's client adapter slot. The installation program will then complete. If a client adapter was already inserted in your computer, eject and reinsert the adapter or reboot your computer.
Error Message    LEAP support has not been installed on this computer. You will not be
able to authenticate with this or any other profile configured to use LEAP.
Explanation A LEAP profile was selected for use in ACM, but the LEAP security module was not selected during installation. Therefore, the client adapter will not be able to authenticate using this profile (or any other profile that is configured for LEAP).
Recommended Action Run the installation program again and enable the LEAP security module.
Error Message    Maximum power save mode will be temporarily disabled while you are
running this application!
Explanation The client adapter cannot be run in Max PSP mode while ACU is running.
Recommended Action No user action is required. The client adapter automatically runs in Fast PSP mode while ACU is running.
Error Message No Cisco Aironet client adapters have been installed on this computer.
Explanation ACM started but found no installed client adapters.
Recommended Action Follow the instructions in Chapter 3, to install a client adapter.
Error Message No Wireless LAN Client Adapters Found
Explanation A client adapter is not inserted in the computer.
Recommended Action Insert a client adapter if you wish to start wireless communications.
Error Message No Wireless LAN Client Adapters Installed!
Explanation An attempt was made to start ACU without a client adapter being inserted in the computer. ACU cannot execute if a client adapter is not inserted because it needs to be able to read from and write to the adapter.
Recommended Action Insert a client adapter and start ACU.
Error Message    Please close ACU in order to use it with the Wireless LAN Adapter you
selected using the System Tray Icon.
Explanation Only one instance of ACU can be running at a time. However, an attempt was made to activate ACU for a second client adapter when ACU was already running.
Recommended Action Click OK, close ACU, and then activate ACU for the desired adapter.
Error Message This program is already running.
Explanation ACM started when another instance of ACM was already running.
Recommended Action No action is required. The new instance of ACM exits.
Error Message Reauthenticate Failed
Explanation The Reauthenticate option was selected from the Commands drop-down menu in ACU, but the reauthentication attempt failed.
Recommended Action Re-enter your username and password and try to authenticate again or select another EAP profile.
Error Message    Restarting the client adapter will cause you to lose your network
connection. Are you sure you want to restart your client adapter?
Explanation The Restart Card option was selected from the Commands drop-down menu in ACU, which may cause you to lose your network connection.
Recommended Action If you want to reinitialize your client adapter, click Yes. Otherwise, click No.
Error Message Unable to Open filename
Explanation The selected firmware file cannot be found.
Recommended Action Re-copy the firmware file to a floppy disk or to your computer's hard drive and try to load it again or select a different firmware file and try to load it.
Error Message Wireless Connection Unavailable. (Windows XP only)
Explanation ACU was used to configure the client adapter on Windows XP, but the Use Windows to configure my wireless network settings check box in Windows XP is checked. This message appears even if the client adapter is associated to an access point.
Recommended Action Uncheck the Use Windows to configure my wireless network settings check box in Windows XP to force Windows to display the correct status.
Error Message    You cannot run a link test because your client adapter is not
associated.
Explanation An attempt was made to run a link test while the client adapter was not associated to an access point or other wireless device.
Recommended Action Run the link test after the client adapter is associated to an access point or another wireless device.
Error Message    You cannot run a link test because your client adapter's radio is
turned off.
Explanation An attempt was made to run a link test while the client adapter's radio was off.
Recommended Action Turn on the client adapter's radio by choosing Radio On from the Commands drop-down menu in ACU; then run the link test.
Error Message    You must enter WEP key 1! (Press the "Static WEP Keys" button to open
the Static WEP Keys dialog box.)
Explanation Static WEP was selected on the Network Security screen, but a WEP key was not entered.
Recommended Action Click Static WEP Keys on the Network Security screen. Then follow the instructions in the "Entering a New Static WEP Key" section to enter a static WEP key.
Error Message You must specify an IP address before running a link test.
Explanation An attempt was made to run a link test although the IP address of the access point or other wireless device with which to test the RF link was not specified.
Recommended Action In the Linktest screen's IP Address of Access Point field, enter the IP address of the access point or other wireless device with which you want to test the RF link.
Error Message    You need to be an administrator or a user with administrative rights
to install Aironet Client Utility. Please log on as a different user and try again.
Explanation A non-administrative user attempted to install ACU. The ACU installation process terminates.
Recommended Action Log on as a different user and attempt the installation process again.
Error Message Your Wireless LAN Adapter is not inserted!
Explanation One of two conditions is present: 1) a client adapter is not inserted in your computer or 2) ACU was started with one variety of client adapter inserted (such as a PCM352), the adapter was subsequently ejected, and another variety was inserted (such as a CB20A).
Recommended Action Perform one of the following: 1) insert a client adapter into your computer if one is not present or 2) shut down ACU and restart it.
Installation Error Messages
This section lists error messages that may appear during installation of the client adapter's software components.
Error Message    Administrator privileges are required to run the installation. Please
log in as an administrator to run this installation. Select OK to exit.
Explanation Administrative privileges are required to run the Install Wizard.
Recommended Action Log in as an administrator and run the Install Wizard again.
Error Message Failed to copy files to hard drive: Aborting now
Explanation An error occurred while the Install Wizard attempted to copy files to the computer's hard drive.
Recommended Action Make sure your hard drive has sufficient room for the installation files. If it does, download and run a new copy of the Install Wizard.
Error Message HardwareList found no drivers to load
Explanation The driver installer could not find the driver files, so the files were not copied to the computer's hard drive or were deleted after being copied.
Recommended Action Rerun the Install Wizard.
Error Message InstallData.txt file not found: aborting now
Explanation Some of the installation files are missing.
Recommended Action Download and run a new copy of the Install Wizard.
Error Message    InstallData.txt has a bad checksum. Please replace it with the
original.
Explanation A checksum error has occurred.
Recommended Action Download and run a new copy of the Install Wizard.
Error Message An InstallShield process is running. Stop the process or reboot.
Explanation Another InstallShield application is currently running. Conflicts can arise when multiple InstallShield applications are run simultaneously.
Recommended Action Close the applications and run them separately.
Error Message Invalid configuration binary, aborting now
Explanation The configuration binary has been corrupted due to a bad checksum.
Recommended Action Download and run a new copy of the Install Wizard.
Error Message    RPC server is not enabled. Please enable RPC service and rerun the
installation.
Explanation The Remote Process Call (RPC) service, which runs on Windows 2000 and XP computers, is not enabled.
Recommended Action Enable the RPC service and rerun the Install Wizard.
Error Message This installation package does not support Windows 95.
Explanation An attempt was to install the client adapter software on a computer running Windows 95, which is not a supported operating system.
Recommended Action Install the client adapter software on a computer running Windows 2000 or XP.
LEAP Authentication Error Messages
This section lists error messages that may occur during LEAP authentication.
Error Message    The combination of domain name and user name exceeds the maximum number
of characters (64) that is supported. Please uncheck Include Windows Logon Domain
with User Name in ACU or use shorter names.
Explanation The combination of characters entered for the username and domain name in the Windows login screen or the Enter Wireless Network Password screen exceeds the maximum number supported by LEAP, which is 64.
Recommended Action Perform one of the following:
–![]() Uncheck the Include Windows Logon Domain with User Name check box in the LEAP Settings screen of ACU.
Uncheck the Include Windows Logon Domain with User Name check box in the LEAP Settings screen of ACU.
–![]() Enter a set of credentials (username, password, and domain name) with fewer characters.
Enter a set of credentials (username, password, and domain name) with fewer characters.
Error Message    The current profile does not require any user credentials to be
entered.
Explanation The Manual Login option was selected in ACU, but the active profile is not configured for LEAP. The LEAP authentication process aborts.
Recommended Action If you want the client adapter to LEAP authenticate, select a profile that is configured for LEAP.
Error Message    The password entered exceeds the maximum number of characters (32) that
is supported. Please use a shorter password.
Explanation The password that was entered exceeds the maximum number of characters supported by LEAP, which is 32.
Recommended Action Re-enter the password, making sure it contains no more than 32 characters.
Error Message    The profile will be disabled until you select the Reauthenticate
option, log off and on, reboot your system, or eject and reinsert the client
adapter. Are you sure?
Explanation The username and password for your current profile have expired or are no longer valid. When the Enter Wireless Network Password screen appeared, prompting you to enter your new username and password, you chose Cancel. The profile was disabled to prevent accidental authentication attempts in the future.
Recommended Action Click No, enter your new username and password when the Enter Wireless Network Password screen reappears, and click OK. The client adapter should authenticate using your new credentials. If the profile uses saved credentials, edit the profile in ACU by changing the username and password on the LEAP Settings screen and save your changes. (If you click Yes, the profile is disabled until you choose Reauthenticate from ACM or the Commands drop-down menu in ACU, log off and on, reboot your system, or eject and reinsert the card.)

Error Message    A recently installed program has disabled the Welcome screen and Fast
User Switching. To restore these features, you must uninstall the program. The
following file name might help you identify the program that made the change:
cswGina.dll. (Windows XP only)
Explanation The LEAP security module was selected during installation on a Windows XP computer; then the Change the Way Users Log On or Off option was selected under Windows XP's User Accounts.
Recommended Action If the LEAP security module is selected during installation, you cannot use Windows XP's fast user switching feature. If you want to use fast user switching and do not want to use LEAP, you must run the installation program again and deselect the LEAP security module.
Error Message    The saved user name and password entered for this profile are no longer
valid and have failed LEAP authentication. Enter a new user name and password.
Remember to change them permanently in the profile using Aironet Client Utility's
Profile Manager.
Explanation The username and password for your current profile, which uses saved credentials, have expired or are no longer valid; therefore, your client adapter is unable to LEAP authenticate.
Recommended Action When the Enter Wireless Network Password screen appears, enter your new username and password and click OK. The client adapter should authenticate using your new credentials. Then edit the profile in ACU by changing the username and password on the LEAP Settings screen and save your changes.
Error Message    The system timed out while attempting to authenticate the wireless
user. You can increase the LEAP timeout value for this profile and try again. If
authentication continues to time out, it can indicate that a portion of the network
is down. Do you want to try this profile again?
Explanation The client adapter was unable to LEAP authenticate within the amount of time specified by the LEAP authentication timeout value.
Recommended Action Click Yes to try again to authenticate using this profile or click No to cancel the operation. If the authentication attempt fails again, increase the authentication timeout value on the LEAP Settings screen and try again.
Error Message    The user name and password entered are no longer valid and have failed
LEAP authentication. Please enter a new user name and password.
Explanation The username and password for your current profile have expired or are no longer valid; therefore, your client adapter is unable to LEAP authenticate.
Recommended Action When the Enter Wireless Network Password screen appears, enter your new username and password and click OK. The client adapter should authenticate using your new credentials.
Error Message The user name entered is not valid.
Explanation The username that was entered is not valid.
Recommended Action Re-enter the username.
Error Message    The user name exceeds the maximum number of characters (64) that is
supported.
Explanation The username that was entered exceeds the maximum number of characters supported by LEAP, which is 64.
Recommended Action Re-enter the username, making sure it contains no more than 64 characters.
Error Message    The wireless adapter doesn't support LEAP. Please make sure that you
have installed the correct client adapter and updated your adapter's firmware.
Explanation LEAP authentication failed because the client adapter's firmware does not support LEAP.
Recommended Action Make sure that you have installed the correct client adapter and are using the firmware included in the Install Wizard file.
Error Message Wireless authentication failed. Re-enter your username and password.
Explanation LEAP authentication failed.
Recommended Action Perform one of the following:
–![]() Re-enter the LEAP username and password or cancel the LEAP authentication.
Re-enter the LEAP username and password or cancel the LEAP authentication.
–![]() To start another LEAP authentication process, choose Reauthenticate from ACM or the Commands drop-down menu in ACU, log off and log in again, or choose Manual Login from the Commands drop-down menu in ACU.
To start another LEAP authentication process, choose Reauthenticate from ACM or the Commands drop-down menu in ACU, log off and log in again, or choose Manual Login from the Commands drop-down menu in ACU.
EAP-FAST Authentication Error Messages
This section lists error messages that may occur during EAP-FAST authentication.
Error Message    The AP (MAC xx:xx:xx:xx:xx:xx) failed to authenticate itself while
attempting to provide you with a valid credential. This can indicate an attack on
your password. Using a strong password will reduce the chance of your password
being compromised. If this failure happens again, contact your system
administrator to report a rogue access point. Try again with your current password?
Explanation The access point failed to authenticate while attempting to provision your PAC. This can indicate an attack on your password by a rogue access point.
Recommended Action Click Yes to attempt to authenticate again using your current password or click No to cancel the operation. If the authentication attempt fails again, contact your system administrator to report a rogue access point, and use strong passwords in the future to reduce the chance of your password being compromised. Refer to the "Creating Strong Passwords" section for tips on creating strong passwords.
Error Message    The AP (MAC xx:xx:xx:xx:xx:xx) timed out while attempting to provide
you with a valid credential. This can indicate an attack on your password. Using
a strong password will reduce the chance of your password being compromised. If
this timeout happens again, contact your system administrator to report a
potential rogue access point. Try again with your current password?
Explanation The access point timed out while attempting to provision your PAC. This could be caused by a server outage or the radio being out of range, or it could indicate an attack on your password by a rogue access point.
Recommended Action Click Yes to attempt to authenticate again using your current password or click No to cancel the operation. If the timeout occurs again, contact your system administrator to report a potential rogue access point, and use strong passwords in the future to reduce the chance of your password being compromised. Refer to the "Creating Strong Passwords" section for tips on creating strong passwords.
Error Message    The combination of domain name and user name exceeds the maximum number
of characters (64) that is supported. Please uncheck Include Windows Logon Domain
with User Name in ACU or use shorter names.
Explanation The combination of characters entered for the username and domain name in the Windows login screen or the Enter Wireless Network Password screen exceeds the maximum number supported by EAP-FAST, which is 64.
Recommended Action Perform one of the following:
–![]() Uncheck the Include Windows Logon Domain with User Name check box in the EAP-FAST Settings screen of ACU.
Uncheck the Include Windows Logon Domain with User Name check box in the EAP-FAST Settings screen of ACU.
–![]() Enter a set of credentials (username, password, and domain name) with fewer characters.
Enter a set of credentials (username, password, and domain name) with fewer characters.
Error Message    Could not find a valid credential for username xxx. Re-enter your
username. If the username is correct, use Aironet Client Utility to manually import
a credential (e.g., PAC) file or turn on "Allow Automatic PAC Provisioning for
This Profile."
Explanation A valid PAC was not found for your username.
Recommended Action Click OK. Then perform one of the following:
–![]() Re-enter your username.
Re-enter your username.
–![]() If the username is correct, use the EAP-FAST Settings screen in ACU to either enable automatic PAC provisioning or import a PAC file.
If the username is correct, use the EAP-FAST Settings screen in ACU to either enable automatic PAC provisioning or import a PAC file.
Error Message    The credential authority listed in your profile (xxx) does not match
the server to which you are trying to connect. There is a matching credential
authority on your system (yyy). Use this matching credential authority and save
it to the profile?
Explanation The PAC that you selected for this profile does not match the server to which the client adapter is connecting. However, a matching PAC has been found in your PAC database.
Recommended Action Click Yes to use the matching PAC and to update the profile with this new PAC or click No to cancel the operation and to leave the profile as is. If you click No, the client adapter is unable to authenticate using the existing profile.
Error Message    The current profile does not require any user credentials to be
entered.
Explanation The Manual Login option was selected in ACU, but the active profile is not configured for EAP-FAST. The EAP-FAST authentication process aborts.
Recommended Action If you want the client adapter to EAP authenticate, select a profile that is configured for EAP-FAST.
Error Message The entered passwords do not match.
Explanation You entered different values in the New Password and Confirm New Password fields on the Change Password screen. They must be identical.
Recommended Action Re-enter your new password in both fields.
Error Message Error opening file: <filename>.
Explanation An error occurred while a PAC file was being imported. The operation was not completed.
Recommended Action Try again to import the PAC file. If the same message appears, obtain a new PAC file from your system administrator and import it using the EAP-FAST Settings screen.
Error Message Error reading file: <filename>.
Explanation An error occurred while a PAC file was being imported. The operation was not completed.
Recommended Action Try again to import the PAC file. If the same message appears, obtain a new PAC file from your system administrator and import it using the EAP-FAST Settings screen.
Error Message    An error was encountered while changing your password. Please try
again.
Explanation An error occurred when you attempted to change your EAP-FAST password.
Recommended Action Re-enter your password on the Change Password screen.
Error Message    The file contains a PAC that will replace an existing PAC already
provisioned on your system. Would you like to replace the existing PAC?
Explanation You tried to import a PAC file with the same PAC ID as a previously imported PAC file.
Recommended Action Click Yes to replace the existing PAC with the new one from the imported file or click No to cancel the operation.
Error Message The file does not contain a valid PAC: <filename>.
Explanation An error occurred while a PAC file was being imported. The operation was not completed.
Recommended Action Try again to import the PAC file. If the same message appears, obtain a new PAC file from your system administrator and import it using the EAP-FAST Settings screen.
Error Message The file is not a valid PAC file: <filename>.
Explanation The PAC file that you tried to import has an incorrect format or cannot be decrypted.
Recommended Action Try again to import the PAC file. If the same message appears, obtain a new PAC file from your system administrator and import it using the EAP-FAST Settings screen.
Error Message    In order to correctly update your local account with the new password,
log out and then in using your new password.
Explanation Windows did not recognize the new password with which you attempted to log in.
Recommended Action Log out. Then log in again using your new password.
Error Message Insufficient memory or other system error.
Explanation An error occurred while a PAC file was being imported. The operation was not completed.
Recommended Action Try again to import the PAC file. If the same message appears, obtain a new PAC file from your system administrator and import it using the EAP-FAST Settings screen.
Error Message An internal error occurred.
Explanation An error occurred while a PAC file was being imported. The operation was not completed.
Recommended Action Try again to import the PAC file. If the same message appears, obtain a new PAC file from your system administrator and import it using the EAP-FAST Settings screen.
Error Message    Invalid PAC found for one or more authorities listed in the local PAC
database.
Explanation An error occurred while the PAC authority drop-down list was being initialized. One or more PAC files could not be read successfully.
Recommended Action Obtain new PAC files from your system administrator and import them using the EAP-FAST Settings screen.
Error Message The old password does not match the password previously entered.
Explanation The password entered in the Old Password field on the Change Password screen does not match the password that was used previously.
Recommended Action Re-enter your old password in the Old Password field.
Error Message The PAC Authority selection was reset due to a change in the settings.
Explanation You changed one of the settings that controls whether global or per-user PAC authorities are listed (that is, the Use Saved User Name and Password option or the No Network Connection Unless User Is Logged In check box), and the currently selected PAC authority does not have a PAC provisioned in the other list.
For example, if you changed the No Network Connection Unless User Is Logged In check box from checked to unchecked, the PAC authority drop-down list would change from per user to global. If the PAC authority selection in the per-user list was XYZ but you had never provisioned a PAC from XYZ in the global list, then after switching to the global list the PAC authority would be set to None and this message would appear.
Recommended Action Either return the setting that you changed to its previous value in order to maintain the PAC authority list as it was (per user or global) or import a new PAC file if the PAC authority list is now set to None.
Error Message    The PAC file you are about to import will be made accessible to all
users of this system. Do you wish to continue?
Explanation You imported a PAC file for a profile that was configured for global PACs. Global PACs are enabled when you choose the Use Saved User Name and Password option, uncheck the No Network Connection Unless User Is Logged In check box on the EAP-FAST Settings screen, or use the Novell Network login prompt or any other third-party login application that does not share its credentials with the EAP-FAST supplicant.
Recommended Action Click Yes to import the PAC file, which will be accessible to all users of your system, or click No to cancel the operation.
Error Message    The password entered exceeds the maximum number of characters (32) that
is supported. Please use a shorter password.
Explanation The password that was entered exceeds the maximum number of characters supported by EAP-FAST, which is 32.
Recommended Action Re-enter the password, making sure it contains no more than 32 characters.
Error Message    The profile will be disabled until you select the Reauthenticate
option, log off and on, reboot your system, or eject and reinsert the client
adapter. Are you sure?
Explanation The username and password for your current profile have expired or are no longer valid. When the Enter Wireless Network Password screen appeared, prompting you to enter your new username and password, you chose Cancel. The profile was disabled to prevent accidental authentication attempts in the future.
Recommended Action Click No, enter your new username and password when the Enter Wireless Network Password screen reappears, and click OK. The client adapter should authenticate using your new credentials. If the profile uses saved credentials, edit the profile in ACU by changing the username and password on the EAP-FAST Settings screen and save your changes. (If you click Yes, the profile is disabled until you choose Reauthenticate from ACM or the Commands drop-down menu in ACU, log off and on, reboot your system, or eject and reinsert the card.)
Error Message    The profile will be disabled until you select the Reauthenticate
option, reboot your system, or eject and reinsert the client adapter. Are you sure?
Explanation The username and password for your current profile have expired or are no longer valid. When the Enter Wireless Network Password screen appeared, prompting you to enter your new username and password, you chose Cancel. The profile was disabled to prevent accidental authentication attempts in the future.
Recommended Action Click No, enter your new username and password when the Enter Wireless Network Password screen reappears, and click OK. The client adapter should authenticate using your new credentials. If the profile uses saved credentials, edit the profile in ACU by changing the username and password on the EAP-FAST Settings screen and save your changes. (If you click Yes, the profile is disabled until you choose Reauthenticate from ACM or the Commands drop-down menu in ACU, reboot your system, or eject and reinsert the card.)
Error Message    A recently installed program has disabled the Welcome screen and Fast
User Switching. To restore these features, you must uninstall the program. The
following file name might help you identify the program that made the change:
cswGina.dll. (Windows XP only)
Explanation The EAP-FAST security module was selected during installation on a Windows XP computer; then the Change the Way Users Log On or Off option was selected under Windows XP's User Accounts.
Recommended Action If the EAP-FAST security module is selected during installation, you cannot use Windows XP's fast user switching feature. If you want to use fast user switching and do not want to use EAP-FAST, you must run the installation program again and deselect the EAP-FAST security module.
Error Message    Registration requires that this device be initialized with a new
security credential. Do you wish to obtain a security credential?
Explanation The client adapter's authentication attempt failed because a valid PAC was not found.
Recommended Action Click Yes to provision a new PAC for this server using your existing credentials or click No to cancel the operation. If you click No, the client adapter is unable to authenticate using the existing profile.
Error Message    Registration requires that this device be initialized with a security
credential, but the attempt to issue a valid credential has failed. Contact your
administrator.
Explanation PAC provisioning has failed, most likely due to a configuration issue on the server. No PAC has been provisioned for this profile.
Recommended Action Contact your system administrator for assistance.
Error Message    The system timed out while attempting to authenticate the wireless
user. You can increase the EAP-FAST timeout value for this profile and try again.
If authentication continues to time out, it can indicate that a portion of the
network is down. Do you want to try this profile again?
Explanation The client adapter was unable to EAP authenticate within the amount of time specified by the EAP-FAST authentication timeout value.
Recommended Action Click Yes to try again to authenticate using this profile or click No to cancel the operation. If the authentication attempt fails again, increase the authentication timeout value on the EAP-FAST Settings screen and try again.
Error Message    Unable to access a PAC for one or more authorities listed in the local
PAC database.
Explanation An error occurred while the PAC authority drop-down list was being initialized. One or more PAC files could not be read successfully.
Recommended Action Obtain new PAC files from your system administrator and import them using the EAP-FAST Settings screen.
Error Message The user name entered is not valid.
Explanation The username that was entered is not valid.
Recommended Action Re-enter the username.
Error Message    The user name exceeds the maximum number of characters (64) that is
supported.
Explanation The username that was entered exceeds the maximum number of characters supported by EAP-FAST, which is 64.
Recommended Action Re-enter the username, making sure it contains no more than 64 characters.
Error Message    The wireless adapter doesn't support EAP-FAST. Please make sure that
you have installed the correct client adapter and updated your adapter's firmware.
Explanation EAP-FAST authentication failed because the client adapter's firmware does not support EAP-FAST.
Recommended Action Make sure that you have installed the correct client adapter and are using the firmware included in Install Wizard version 1.3 or later.
Error Message    Wireless authentication failed. Re-enter your username and password.
Warning: If you are sure that you have typed in the right user name and password,
you may have connected to a rogue AP. This can indicate an attack on your password.
Using a strong password will reduce the chance of your password being compromised.
If this failure happens again, contact your system administrator to report a
potential rogue access point (MAC 00:40:96:e2:b1:78).
Explanation The client adapter's authentication attempt failed either because the wrong user credentials were entered or the username does not match the provisioned PAC.
Recommended Action Click OK; then perform one of the following:
–![]() If you are sure you entered the correct credentials, contact your system administrator to report a potential rogue access point, and use strong passwords in the future to reduce the chance of your password being compromised. Refer to the "Creating Strong Passwords" section for tips on creating strong passwords.
If you are sure you entered the correct credentials, contact your system administrator to report a potential rogue access point, and use strong passwords in the future to reduce the chance of your password being compromised. Refer to the "Creating Strong Passwords" section for tips on creating strong passwords.
–![]() If the wrong credentials were entered, re-enter your EAP-FAST credentials when the Enter Wireless Network Password screen appears.
If the wrong credentials were entered, re-enter your EAP-FAST credentials when the Enter Wireless Network Password screen appears.
–![]() If the username does not match the provisioned PAC and automatic provisioning is enabled for this profile, the following message appears: "You do not appear to be registered with the authentication server. Registration requires that this device be initialized with a security credential. Do you wish to obtain a security credential?" Perform one of the recommended actions for this message below.
If the username does not match the provisioned PAC and automatic provisioning is enabled for this profile, the following message appears: "You do not appear to be registered with the authentication server. Registration requires that this device be initialized with a security credential. Do you wish to obtain a security credential?" Perform one of the recommended actions for this message below.
–![]() If the username does not match the provisioned PAC and manual provisioning is enabled for this profile, use the EAP-FAST Settings screen in ACU to either enable automatic PAC provisioning or import a PAC file.
If the username does not match the provisioned PAC and manual provisioning is enabled for this profile, use the EAP-FAST Settings screen in ACU to either enable automatic PAC provisioning or import a PAC file.
Note ![]() To start another EAP-FAST authentication process, choose Reauthenticate from ACM or the Commands drop-down menu in ACU, log off and log in again, or choose Manual Login from the Commands drop-down menu in ACU.
To start another EAP-FAST authentication process, choose Reauthenticate from ACM or the Commands drop-down menu in ACU, log off and log in again, or choose Manual Login from the Commands drop-down menu in ACU.
Error Message    You do not appear to be registered with the authentication server.
Registration requires that this device be initialized with a security credential.
Do you wish to obtain a security credential?
Explanation Automatic PAC provisioning is enabled for this profile. However, a valid PAC matching the server to which the client adapter is connecting could not be found.
Recommended Action Click Yes to provision a new PAC for this server using your existing credentials or click No to cancel the operation. If you click No, the client adapter is unable to authenticate using the existing profile.
Error Message    You must re-enter the saved password! (Press the "Configure" button to
open the EAP-FAST Settings dialog box.)
Explanation You changed an old LEAP profile (one that was created using ACU version 6.2 or earlier) with a saved username and password to EAP-FAST.
Recommended Action Re-enter your saved password on the EAP-FAST Settings screen or click Cancel to cancel the operation.
Error Message    You must select a PAC for this profile! (Press the "Configure" button
to open the EAP-FAST Settings dialog box.)
Explanation Automatic provisioning was disabled during installation or by your system administrator, and no PAC authority was selected on the EAP-FAST Settings screen in ACU.
Recommended Action Choose a PAC authority from the drop-down list on the EAP-FAST Settings screen. If the list is empty, import a PAC file.
Error Message You must select a PAC when using manual PAC provisioning.
Explanation You clicked OK on the EAP-FAST Settings screen when automatic provisioning was disabled and no PAC authority was selected.
Recommended Action Either enable automatic provisioning or choose a PAC authority from the drop-down list. If the list is empty, import a PAC file.
PEAP Authentication Error Messages
This section lists error messages that may occur during PEAP authentication. The messages are divided into six subsections based on the type of database that is used with PEAP. Use Table 10-5 to quickly locate the error messages for your database.
For All PEAP-Supported Databases
Error Message    PEAP failed initialization. Please make sure that PEAP is installed
correctly and Trusted Root Certificate Authority certificate is installed
correctly.
Explanation The PEAP authentication process failed during initialization, most likely because the specified root certificate is missing from the system.
Recommended Action Make sure that PEAP and the Trusted Root Certificate Authority certificate are installed correctly.
Error Message    You have connected to a server that is signed by Root Certification
Authority xxx, which is different than the specified trusted CA. Do you want to
accept this connection? Warning: Connecting to a server signed with untrusted CA
might compromise your security.
Explanation The client adapter has established a connection to a certificate server other than the specified trusted CA.
Recommended Action If you want the client adapter to connect to this server even though it may present a security risk, click Yes. Otherwise, click No.
Error Message    You have connected to server xxx. Do you want to accept the connection?
Warning: Connecting to an unsecured server might compromise your security.
Explanation The client adapter has established a connection to the server specified.
Recommended Action If you want the client adapter to connect to this server even though it may present a security risk, click Yes. Otherwise, click No.
For Windows NT or 2000 Domain Databases
Error Message    New Password and Confirm New Password entered do not match. Please try
it again.
Explanation You entered different values in the New Password and Confirm New Password fields on the Change Password screen. They must be identical.
Recommended Action Re-enter your new password in both fields.
Error Message    The old password you supplied doesn't match what you entered
previously. Please try it again.
Explanation The password entered in the Old Password field on the Change Password screen does not match the password that was used previously.
Recommended Action Re-enter your old password in the Old Password field.
Error Message    Your domain password has been successfully changed on the server. To
synchronize any Windows password that might be locally cached, you must also
manually change the password in Windows.
Explanation You have successfully changed your domain password using the Static Password screen. However, if you also have a locally cached Windows password, you must manually change it to synchronize it with your domain password.
Recommended Action Press Ctrl-Alt-Delete, choose Change Password, and enter your old password once and your new password twice.
For All OTP Databases
Error Message    Failed to change your PIN. Error code xxx. Run Software Token program
to fix it.
Explanation Your attempt to change your PIN using the Change PIN screen failed due to a problem with the software token program.
Recommended Action Run the software token program and then try to change your PIN again.
Error Message Invalid PIN. Please try again.
Explanation The PIN that you entered is invalid.
Recommended Action Re-enter your PIN.
Error Message New PIN and Confirm New PIN do not match. Please try them again.
Explanation You entered different values in the New PIN and Confirm New PIN fields on the Change PIN screen. They must be identical.
Recommended Action Re-enter your new PIN in both fields.
Error Message New PIN is invalid. Please try it again.
Explanation The PIN that you entered in the New PIN field on the Change PIN screen is invalid.
Recommended Action Re-enter your new PIN.
Error Message The old PIN you supplied is invalid. Please try it again.
Explanation The old PIN that you entered on the Change PIN screen is invalid.
Recommended Action Re-enter your old PIN.
Error Message    Please check either Support Hardware Token or Support Software Token.
One of them must be selected.
Explanation While the client adapter was being configured for PEAP authentication, the One Time Password option was selected on the Generic Token Card Properties screen, but neither the Support Hardware Token nor the Support Software Token option was selected.
Recommended Action Check either the Support Hardware Token check box or the Support Software Token check box or both.
Error Message Your PIN has expired. Please change your PIN.
Explanation The PIN that you have been using to authenticate has expired.
Recommended Action Follow the instructions in the "After Your PIN Expires (OTP Databases Only)" section to change your PIN.
For OTP Databases Using Secure Computing SofToken Version 1.3
Error Message    Could not find SofToken.exe in the program path specified. Please make
sure SofToken is installed correctly and the correct program path is entered.
Explanation SofToken.exe is not located at the path you entered on the Generic Token Card Properties screen.
Recommended Action Make sure that SofToken is installed correctly; then re-enter the program path.
Error Message    Error getting data from SofToken server. Please make sure SofToken is
installed correctly and the correct program path is entered.
Explanation An error occurred while attempting to get data from the SofToken server.
Recommended Action Make sure that SofToken is installed correctly and the correct program path is entered.
Error Message    Initialization of SofToken library failed. Please make sure SofToken
is installed correctly and the correct program path is entered.
Explanation An error occurred with the SofToken program.
Recommended Action Make sure that SofToken is installed correctly and the correct program path is entered.
Error Message The program path entered exceeds the maximum length allowed (255).
Explanation The program path entered on the Generic Token Card Properties screen contains more characters than the field allows.
Recommended Action Re-enter the path using a maximum of 255 characters. If necessary, move SofToken.exe to a directory with a shorter path.
Error Message Program path must be specified for SofToken Version 1.3.
Explanation Secure Computing SofToken Version 1.3 was selected from the Supported Type drop-down box on the Generic Token Card Properties screen, but the SofToken program path was not entered.
Recommended Action Enter the path to the SofToken program in the SofToken Program Path field.
Error Message    SofToken is not set up to allow processing from SofToken calls. Calls
have been disabled from the SofToken Manager, the SofToken program does not have
any valid users yet, or the last person to use SofToken was not initialized
correctly.
Explanation The SofToken program is not set up to process SofToken API calls.
Recommended Action Make sure that SofToken is configured to enable SofToken calls and verify that you are set up as a valid user.
Error Message    Unable to launch SofToken.exe. Please make sure SofToken is installed
correctly and the correct program path is entered.
Explanation An error occurred with the SofToken program.
Recommended Action Make sure that SofToken is installed correctly and the correct program path is entered.
Error Message    Unable to load SofToken library. Please make sure that SofToken is
installed correctly.
Explanation An error occurred with the SofToken program.
Recommended Action Make sure that SofToken is installed correctly and the correct program path is entered.
For OTP Databases Using Secure Computing SofToken II Version 2.0
Error Message    Error getting the OTP password for the user. Run SofToken II to ensure
the user is set up correctly.
Explanation An error occurred while attempting to obtain the OTP password for the user.
Recommended Action Run the SofToken II program to make sure that the user is set up properly.
Error Message    Failed to load data from the OTP database for User ID: xxxx. Run
SofToken II to ensure the user is set up correctly.
Explanation An error occurred while attempting to load data from the OTP database for the specified user.
Recommended Action Run the SofToken II program to make sure that the specified user is set up properly.
Error Message Here is the hint you entered when you created your PIN: xxxx.
Explanation You entered an invalid PIN.
Recommended Action Use the hint to help you remember your PIN; then re-enter it.
Error Message    Unable to load SofToken II library. Please make sure that SofToken II
is installed correctly.
Explanation An error occurred with the SofToken II program.
Recommended Action Make sure that SofToken II is installed correctly.
For OTP Databases Using RSA SecurID Version 2.5
Error Message Error getting password from RSA SecurID Software Token.
Explanation An error occurred while attempting to obtain the user password from the RSA SecurID program.
Recommended Action Run the RSA SecurID program to make sure that the user is set up properly.
Error Message    Unable to load RSA library. Please make sure that RSA SecurID Software
Token is installed correctly.
Explanation An error occurred with the RSA SecurID program.
Recommended Action Make sure that RSA SecurID is installed correctly.
Error Message Unable to open RSA Token service.
Explanation An error occurred with the RSA SecurID program.
Recommended Action Make sure that RSA SecurID is installed correctly.
EAP-SIM Authentication Error Messages
This section lists error messages that may occur during EAP-SIM authentication.
Error Message Client_handleResponseIdentity error.
Explanation When asked to perform an authentication, the EAP-SIM supplicant encountered an error retrieving your network username from the SIM card. This error may occur if an invalid SIM card (such as one intended for mobile phone use) is inserted in the card reader or if Windows encounters a processing error.
Note ![]() The eight-digit hexadecimal error code in the message may assist technical support in troubleshooting your problem.
The eight-digit hexadecimal error code in the message may assist technical support in troubleshooting your problem.
Recommended Action Make sure that you have a valid SIM card that was provided to you for wireless network access and that it is inserted properly. If the problem occurs several times in a row, reboot your computer.
Error Message    For the changes to take effect, please restart your WLAN card (or your
computer) NOW.
Explanation The changes you made on the SIM Authentication Properties screen can take effect only if you perform a complete reauthentication. Otherwise, your wireless network connection may appear to be stuck in the "Validating identity" state.
Recommended Action Turn off your client adapter's radio, wait a few seconds, and then turn the radio back on. Refer to the "Turning Your Client Adapter's Radio On or Off" section for instructions.
Error Message GetUserPin returned error.
Explanation Windows encountered an error while prompting for or retrieving the PIN.
Note ![]() The eight-digit hexadecimal error code in the message may assist technical support in troubleshooting your problem.
The eight-digit hexadecimal error code in the message may assist technical support in troubleshooting your problem.
Recommended Action Wait until the system tries to authenticate the client adapter again (approximately 30 to 60 seconds) and enter a valid PIN. Do not click Cancel or otherwise interfere with the normal operation of Windows. If the problem persists, reboot your computer.
Error Message Maximum length of PIN is 8 characters.
Explanation You tried to enter a PIN that is longer than eight characters. SIM card PINs are restricted to a maximum length of eight alphanumeric characters.
Recommended Action Delete one or more characters from the PIN field or delete all of the characters you entered and retype the complete PIN.
Error Message Network authentication aborted.
Explanation When you were asked to enter a PIN, you clicked the Cancel button and cancelled the authentication process. The EAP-SIM supplicant will not attempt to authenticate to the network.
Note ![]() The system will try to authenticate automatically within 30 to 60 seconds.
The system will try to authenticate automatically within 30 to 60 seconds.
Recommended Action If you want to authenticate to the network and establish a wireless network connection, enter the valid PIN for your SIM card. If you do not want to establish a connection, consider turning off or ejecting the client adapter; otherwise, the system will reprompt you every 30 to 60 seconds.
Error Message Network rejected user authentication.
Explanation The service provider's network has rejected your authentication attempt. This is most likely due to an expired or invalid SIM card or an invalidated account. However, it could also occur if the service provider at your current location does not allow access to the network for subscribers of your service provider.
Recommended Action Make sure that your account is in good standing and that you have a valid SIM card. Switch to a SIM card that is valid at the current location and try again.
Error Message Please check your smartcard reader and insert your SIM card.
Explanation When asked to perform an authentication, the EAP-SIM supplicant could not get the smartcard reader to initialize within a reasonable time (that is, 90 seconds for the first try and 5 minutes for subsequent tries). Most likely, the reader is not plugged in correctly, or the computer no longer recognizes it.
Note ![]() The eight-digit hexadecimal error code in the message may assist technical support in troubleshooting your problem.
The eight-digit hexadecimal error code in the message may assist technical support in troubleshooting your problem.
Recommended Action Follow these steps.
Step 1 ![]() Install a smartcard reader if you have not done so.
Install a smartcard reader if you have not done so.
Step 2 ![]() If a reader is installed, make sure that it is inserted completely into the PCMCIA slot (PCMCIA model) or that the connector cable is inserted properly into the serial or USB connector (serial/USB port model).
If a reader is installed, make sure that it is inserted completely into the PCMCIA slot (PCMCIA model) or that the connector cable is inserted properly into the serial or USB connector (serial/USB port model).
Step 3 ![]() Make sure that the system recognizes your reader. It should be listed under Smart card readers in Windows device manager. If your reader is not listed, eject and reinsert the reader (PCMCIA model) or disconnect and reconnect the cable (serial/USB port model).
Make sure that the system recognizes your reader. It should be listed under Smart card readers in Windows device manager. If your reader is not listed, eject and reinsert the reader (PCMCIA model) or disconnect and reconnect the cable (serial/USB port model).
Step 4 ![]() If the computer still does not recognize your reader, reboot the computer with the reader installed.
If the computer still does not recognize your reader, reboot the computer with the reader installed.
Error Message Please check your smartcard reader and SIM card, then try again.
Explanation The EAP-SIM supplicant has detected a general smartcard-related error (that is, not one of the specific errors included in this section) and has aborted the authentication process.
Note ![]() The eight-digit hexadecimal error code in the title may assist technical support in troubleshooting your problem.
The eight-digit hexadecimal error code in the title may assist technical support in troubleshooting your problem.
Recommended Action Follow these steps.
Step 1 ![]() Make sure that your smartcard reader is installed properly and that your SIM card is inserted properly.
Make sure that your smartcard reader is installed properly and that your SIM card is inserted properly.
Step 2 ![]() Follow the Recommended Action instructions for the "Please check your smartcard reader and try again" error message below.
Follow the Recommended Action instructions for the "Please check your smartcard reader and try again" error message below.
Step 3 ![]() Follow the Recommended Action instructions for the "Please insert your SIM card and try again" error message on page 39.
Follow the Recommended Action instructions for the "Please insert your SIM card and try again" error message on page 39.
Step 4 ![]() If you are sure that the reader and card are both inserted properly, wait until the system tries to authenticate again. This should occur within 30 to 60 seconds.
If you are sure that the reader and card are both inserted properly, wait until the system tries to authenticate again. This should occur within 30 to 60 seconds.
Step 5 ![]() If the problem persists, try restarting the client adapter or rebooting your computer.
If the problem persists, try restarting the client adapter or rebooting your computer.
Error Message Please check your smartcard reader and try again.
Explanation Windows could not detect a smartcard reader in the system. You may not have installed a reader, or this may happen after resuming Windows from suspend or hibernation.
Recommended Action Follow these steps.
Step 1 ![]() Install a smartcard reader if you have not done so.
Install a smartcard reader if you have not done so.
Step 2 ![]() If a reader is installed, make sure that it is inserted completely into the PCMCIA slot (PCMCIA model) or that the connector cable is inserted properly into the serial or USB connector (serial/USB port model).
If a reader is installed, make sure that it is inserted completely into the PCMCIA slot (PCMCIA model) or that the connector cable is inserted properly into the serial or USB connector (serial/USB port model).
Step 3 ![]() Make sure that the system recognizes your reader. It should be listed under Smart card readers in Windows device manager. If your reader is not listed, eject and reinsert the reader (PCMCIA model) or disconnect and reconnect the cable (serial/USB port model).
Make sure that the system recognizes your reader. It should be listed under Smart card readers in Windows device manager. If your reader is not listed, eject and reinsert the reader (PCMCIA model) or disconnect and reconnect the cable (serial/USB port model).
Step 4 ![]() If the computer still does not recognize your reader, reboot the computer with the reader installed.
If the computer still does not recognize your reader, reboot the computer with the reader installed.
Error Message Please contact your service provider to unblock your card.
Explanation You have exceeded your SIM card's retry limit by entering too many incorrect PINs in a row.
Recommended Action Contact your service provider's customer service center to get the card unblocked. The phone number may be printed on your SIM card.
Error Message Please do not switch SIM cards after authenticating.
Explanation The EAP-SIM supplicant has detected that the network username stored on the currently inserted SIM card differs from the username that was used in a previous authentication. Due to this mismatch, authentication may fail.
Recommended Action If the currently inserted SIM card is recognized by the network, authentication may succeed or fail, depending on the network configuration. If your client adapter is authenticated, you may ignore this message. Otherwise, replace the SIM card currently inserted with the SIM card that was used for your first authentication and wait until the system tries to authenticate your client adapter again (approximately 30 to 60 seconds). You may also restart the client adapter or reboot your computer with the new SIM card to try again.
Error Message Please enter a PIN (1 to 8 characters).
Explanation When you were prompted for a PIN, you clicked the OK button before entering the PIN.
Recommended Action Enter the PIN required to access your SIM card. If you do not want to authenticate at this time or do not have your PIN available, click the Cancel button instead.
Error Message Please insert your SIM card and try again.
Explanation The system could not detect a SIM card in the smartcard reader.
Recommended Action Make sure that your SIM card is inserted into the reader properly. It should be inserted into the reader all the way and not into the empty space in the PCMCIA slot. Try removing and reinserting the card. You should feel it latch into place and notice a slight resistance when attempting to remove it.
Error Message SimOpenSession error.
Explanation When asked to retrieve your network username, the EAP-SIM supplicant was unable to establish a connection to the SIM card. This can occur if a SIM card is not inserted in the reader, the SIM card is not inserted properly, or the wrong SIM card is inserted.
Recommended Action Make sure that you are using a valid SIM card (that is, the SIM card provided to you for wireless network access, not a SIM card intended for mobile phone use). If that does not correct the error, make sure that your SIM card is inserted into the reader properly. It should be inserted into the reader all the way and not into the empty space in the PCMCIA slot. Try removing and reinserting the card. You should feel it latch into place and notice a slight resistance when attempting to remove it.
Error Message Time-out waiting for smartcard reader initialization.
Explanation When asked to perform an authentication, the EAP-SIM supplicant could not get the smartcard reader to initialize within a reasonable time (90 seconds for the first try and 5 minutes for subsequent tries). Most likely, the reader is not plugged in correctly, or the computer no longer recognizes it.
Note ![]() The eight-digit hexadecimal error code in the message may assist technical support in troubleshooting your problem.
The eight-digit hexadecimal error code in the message may assist technical support in troubleshooting your problem.
Recommended Action Follow these steps.
Step 1 ![]() Install a smartcard reader if you have not done so.
Install a smartcard reader if you have not done so.
Step 2 ![]() If a reader is installed, make sure that it is inserted completely into the PCMCIA slot (PCMCIA model) or that the connector cable is inserted properly into the serial or USB connector (serial/USB port model).
If a reader is installed, make sure that it is inserted completely into the PCMCIA slot (PCMCIA model) or that the connector cable is inserted properly into the serial or USB connector (serial/USB port model).
Step 3 ![]() Make sure that the system recognizes your reader. It should be listed under Smart card readers in Windows device manager. If your reader is not listed, eject and reinsert the reader (PCMCIA model) or disconnect and reconnect the cable (serial/USB port model).
Make sure that the system recognizes your reader. It should be listed under Smart card readers in Windows device manager. If your reader is not listed, eject and reinsert the reader (PCMCIA model) or disconnect and reconnect the cable (serial/USB port model).
Step 4 ![]() If the computer still does not recognize your reader, reboot the computer with the reader installed.
If the computer still does not recognize your reader, reboot the computer with the reader installed.
Error Message Wrong PIN entered (X tries left).
Explanation The SIM card could not validate the PIN you have entered. You must have entered the wrong PIN.
Recommended Action Make sure that you enter the correct PIN. If your PIN contains letters, enter them in the correct case as the PIN is case sensitive. Check that the Caps Lock key has not been pressed inadvertently. Also, make sure that you have inserted the correct SIM card.
Note ![]() Most SIM cards limit the number of times in a row that you can enter an incorrect PIN. The error message indicates how many attempts you have left. Entering the correct PIN resets the limit to its original value. However, if the number of retries is exhausted, the SIM card locks up and becomes useless.
Most SIM cards limit the number of times in a row that you can enter an incorrect PIN. The error message indicates how many attempts you have left. Entering the correct PIN resets the limit to its original value. However, if the number of retries is exhausted, the SIM card locks up and becomes useless.
 Feedback