ASA 8.X and later: Add or Modify an Access List through the ASDM GUI Configuration Example
Available Languages
Contents
Introduction
This document explains how to use Cisco Adaptive Security Device Manager (ASDM) in order to work with access control lists. This includes the creation of a new access list, how to edit an existing access list and other functionalities with the access lists.
Prerequisites
Requirements
There are no specific requirements for this document.
Components Used
The information in this document is based on these software and hardware versions:
-
Cisco Adaptive Security Appliance (ASA) with version 8.2.X
-
Cisco Adaptive Security Device Manager (ASDM) with version 6.3.X
The information in this document was created from the devices in a specific lab environment. All of the devices used in this document started with a cleared (default) configuration. If your network is live, make sure that you understand the potential impact of any command.
Conventions
Refer to the Cisco Technical Tips Conventions for more information on document conventions.
Background Information
Access lists are primarily used to control the traffic flow through the firewall. You can allow or deny specific types of traffic with access lists. Every access list contains a number of access list entries (ACEs) that control the traffic flow from a specific source to a specific destination. Normally, this access list is bound to an interface to notify the direction of the flow into which it should look. Access lists are mainly categorized into two broad types.
-
Inbound access lists
-
Outbound access lists
Inbound access lists apply to the traffic that enters that interface, and outbound access lists apply to the traffic that exits the interface. The inbound/outbound notation refers to the direction of the traffic in terms of that interface but not to the movement of traffic between higher and lower security interfaces.
For TCP and UDP connections, you do not need an access list to allow returning traffic because the security appliance allows all returning traffic for established bidirectional connections. For connectionless protocols such as ICMP, the security appliance establishes unidirectional sessions, so you either need access lists to apply access lists to the source and destination interfaces in order to allow ICMP in both directions, or you need to enable the ICMP inspection engine. The ICMP inspection engine treats ICMP sessions as bidirectional connections.
From the ASDM version 6.3.X, there are two types of access lists that you can configure.
-
Interface access rules
-
Global access rules
Note: Access rule refers to an individual access list entry (ACE).
Interface access rules are bound to any interface at the time of their creation. Without binding them to an interface, you can not create them. This differs from the Command Line example. With CLI, you first create the access list with the access list command, and then bind this access list to an interface with the access-group command. ASDM 6.3 and later, the access list is created and bound to an interface as a single task. This applies to the traffic flowing through that specific interface only.
Global access rules are not bound to any interface. They can be configured through the ACL Manager tab in the ASDM and are applied to the global ingress traffic. They are implemented when there is a match based on the source, the destination, and the protocol type. These rules are not replicated on each interface, so they save memory space.
When both these rules are to be implemented, interface access rules normally takes the precedence over the global access rules.
Configure
In this section, you are presented with the information to configure the features described in this document.
Network Diagram
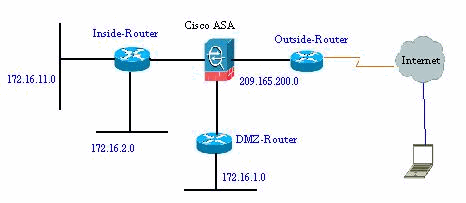
This document uses this network setup:
Add a New Access List
Complete these steps in order to create a new access list with ASDM:
-
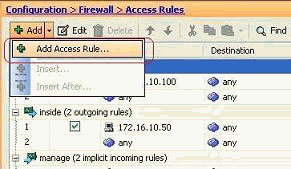
Choose Configuration > Firewall > Access Rules, and click the Add Access Rule button.
-
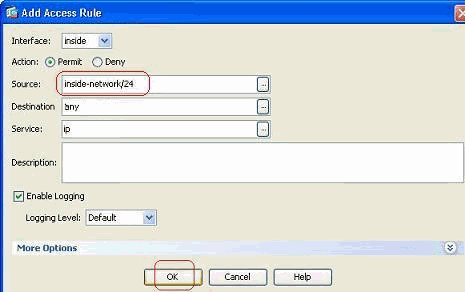
Choose the interface to which this access list has to bound, along with the action to be performed on the traffic i.e., permit/deny. Then click the Details button in order to select the source network.
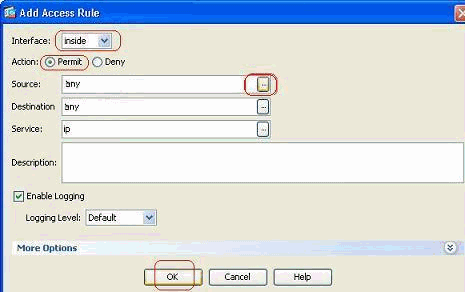
Note: Here is a brief explanation of the different fields that are shown in this window:
-
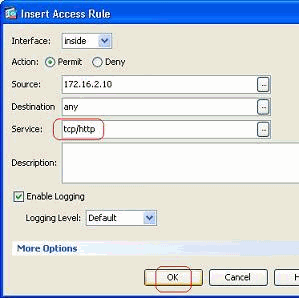
Interface—Determines the interface to which this access list is bound.
-
Action—Determines the action type of the new rule. Two options are available. Permit allows all matching traffic and Deny blocks all matching traffic.
-
Source—This field specifies the source of the traffic. This can be anything among a Single IP address, a network, an interface IP address of the firewall or a network object group. These can be selected with the Details button.
-
Destination—This field specifies the source of the traffic. This can be anything among a Single IP address, a network, an interface IP address of the firewall or a network object group. These can be selected with the Details button.
-
Service—This field determines the protocol or service of the traffic to which this access list is applied. You can also define a service-group that contains a set of different protocols.
-
-
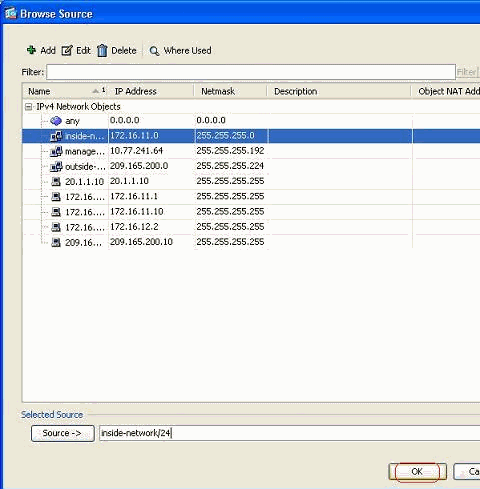
After you click the Details button, a new window that contains the existing Network Objects is displayed. Select the inside-network, and click OK.
-
You are returned to the Add Access Rule window. Type any in the Destination field. and click OK in order to complete the configuration of the access rule.
Add an access rule before an existing one:
Complete these steps in order to add an access rule just before an already existing access rule:
-
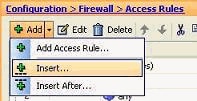
Select the existing access list entry, and click Insert from the Add drop-down menu
-
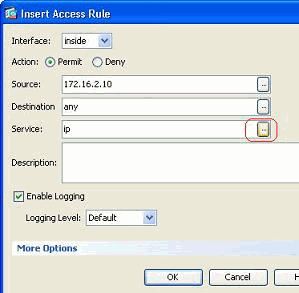
Choose the Source and Destination, and click the Details button of the Service field to choose the Protocol.
-
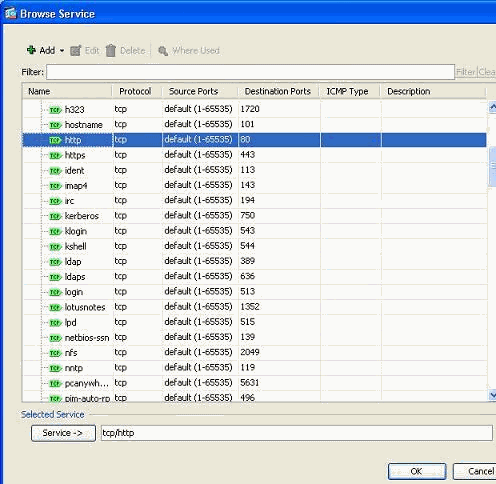
Choose HTTP the protocol, and click OK.
-
You are returned to the Insert Access Rule window. The Service field is filled with tcp/http as the selected protocol. Click OK in order to complete the configuration of the new access list entry.
You can now observe the new access rule shown just before the already existing entry for the Inside-Network.
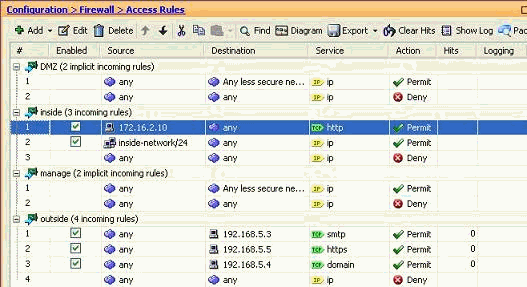
Note: The order of the access rules is very important. While processing each packet to filter, the ASA examines if the packet matches any of the access rule criterion in a sequential order and if a match happens, it implements the action of that access rule. When an access rule is matched, it does not proceed to further access rules and verify them again.
Add an Access Rule after an existing one:
Complete these steps in order to create an access rule just after an already existing access rule.
-
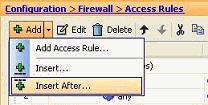
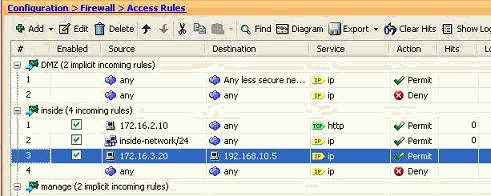
Select the access rule after which you need to have a new access rule, and choose Insert After from the Add drop-down menu.
-
Specify the Interface, Action, Source, Destination and Service fields, and click OK to complete the configuration this access rule.
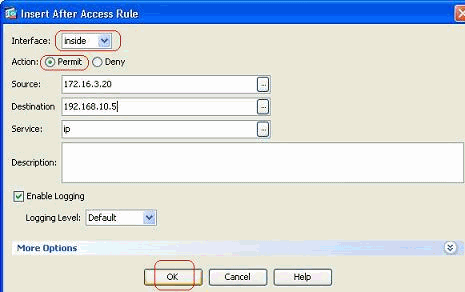
You can view that the newly configured access rule sits just after the already configured one.
Create a Standard Access List
Complete these steps in order to create a standard access list with the ASDM GUI.
-
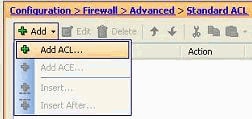
Choose Configuration > Firewall > Advanced > Standard ACL > Add, and click Add ACL.
-
Give a number in the range allowed for the standard access list, and click OK.

-
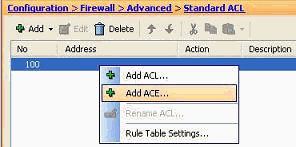
Right-click the access list, and choose Add ACE in order to add an access rule to this access list.
-
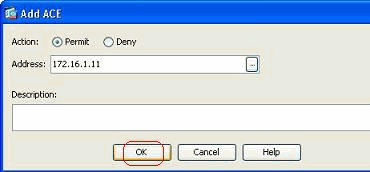
Select the Action, and specify the Source address. If required, specify the Description also. Click OK in order to complete the configuration of the access rule.
Create a Global Access Rule
Complete these steps in order to create an extended access list that contains global access rules.
-
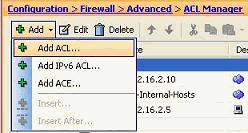
Choose Configuration > Firewall > Advanced > ACL Manager > Add, and click Add ACL button.
-
Specify a name for the access list, and click OK.

-
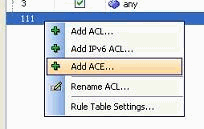
Right-click the access list, and choose Add ACE in order to add an access rule to this access list.
-
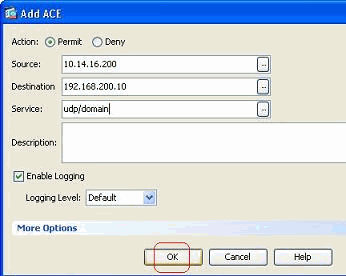
Complete the Action, Source, Destination, and Service fields, and click OK in order to complete the configuration of the global access rule.
You can now view the global access rule, as shown.

Edit an Existing Access List
This section discusses how to edit an existing access.
Edit the Protocol field to create a service group:
Complete these steps in order to create a new service-group.
-
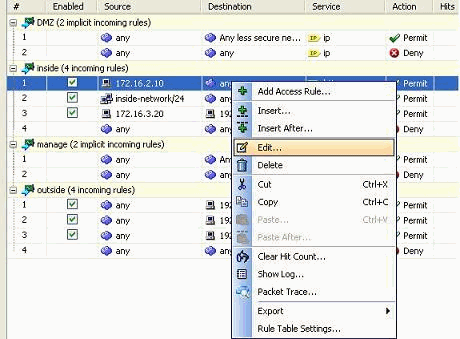
Right-click the access rule that needs to be modified, and choose Edit in order to modify that specific access rule.
-
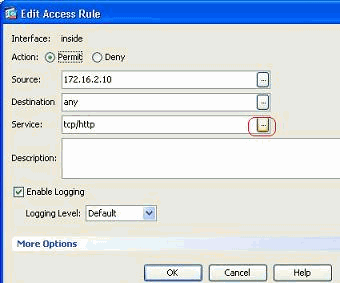
Click the Details button in order to modify the protocol associated with this access rule.
-
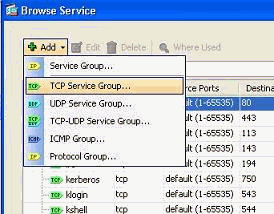
You can select any protocol other than HTTP if required. If there is only a single protocol to be selected, then there is no need to create the service group. It is useful to create a service group when there is a requirement to identify numerous non-adjacent protocols to be matched by this access rule.
Choose Add > TCP service group in order to create a new TCP service group.
Note: In the same way, you can also create a new UDP service group or ICMP group and etc.
-
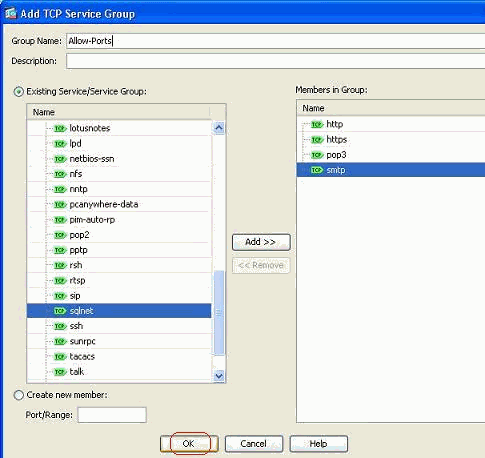
Specify a name for this service group, select the protocol on the left side menu, and click Add in order to move them to the Members in Group menu on the right side. Numerous protocols can be added as members of a service group based on the requirement. The protocols are added one by one. After all the members are added, click OK.
-
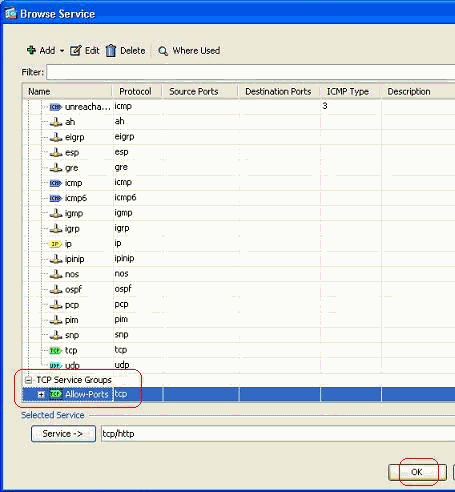
The newly created service group can be viewed under the tab TCP service groups. Click OK button to return to the Edit Access Rule window.
-
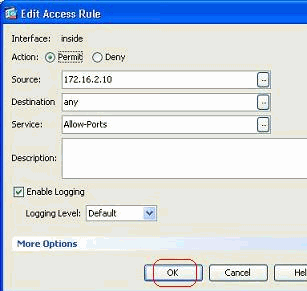
You can see that the Service field is populated with the newly created service group. Click OK in order to complete the edit.
-
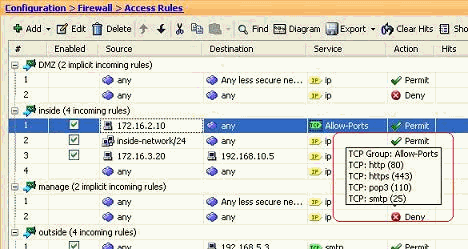
Hover your mouse over that specific service group in order to view all the associated protocols.
Edit the Source/Destination fields to create a Network object group:
Object groups are used to simplify the creation and maintenance of access lists. When you group like objects together, you can use the object group in a single ACE instead of having to enter an ACE for each object separately. Before you create the object group, you need to create the objects. In ASDM terminology, object is called network object and object group is called network object group.
Complete these steps:
-
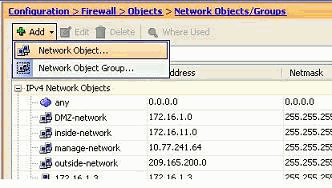
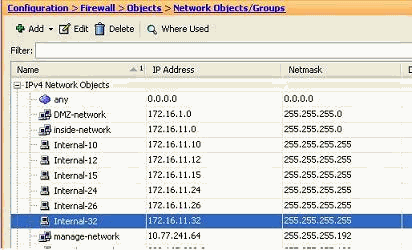
Choose Configuration > Firewall > Objects > Network Objects/Groups > Add, and click Network Object in order to create a new network object.
-
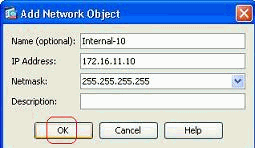
Fill in the Name, IP Address and Netmask fields, and click OK.
-
The newly created network object can be seen in the list of the objects. Click OK.
-
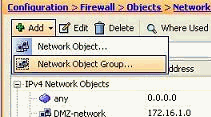
Choose Configuration > Firewall > Objects > Network Objects/Groups > Add, and click Network Object Group in order to create a new network object group.
-
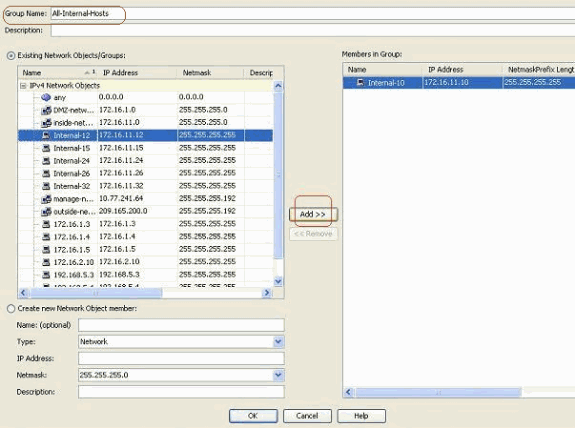
The available list of all network objects can be found on the left pane of the window. Select individual network objects, and click the Add button in order to make them members of the newly created network object group. Group Name must be specified in the field allocated for it.
-
Click OK after you add all the members in to group.
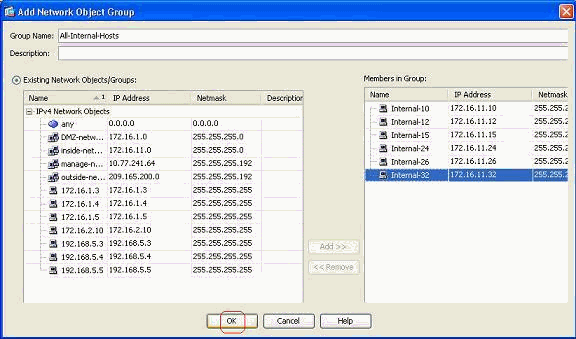
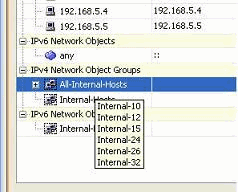
You can now view the network object group.
-
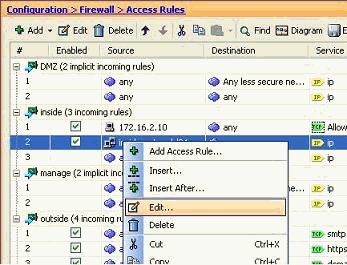
In order to modify any source/destination field of an existing access list with a network group object, right-click the specific access rule, and choose Edit.
-
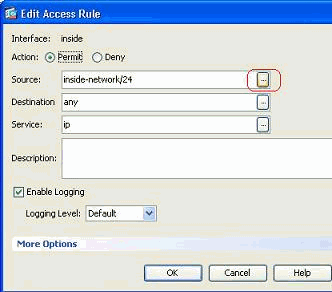
The Edit Access Rule window appears. Click on the Details button of the Source field in order to modify it.
-
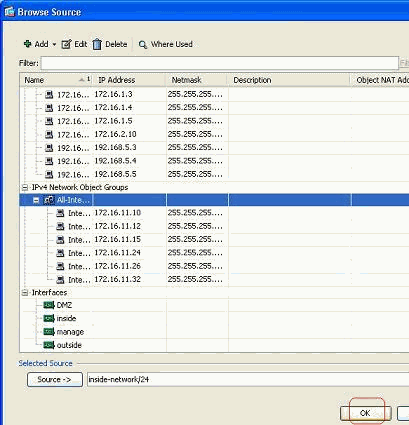
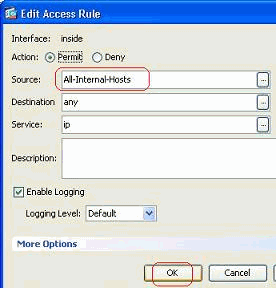
Select the All-Internal-Hosts network object group, and click OK button.
-
Click OK.
-
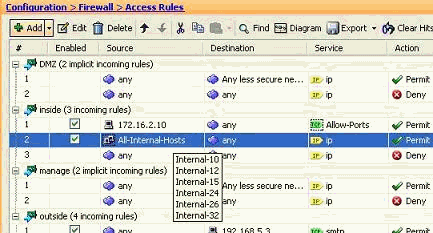
Hover your mouse over the Source field of the access rule in order to view the members of the group.
Edit the Source Port:
Complete these steps in order to modify the source port of an access rule.
-
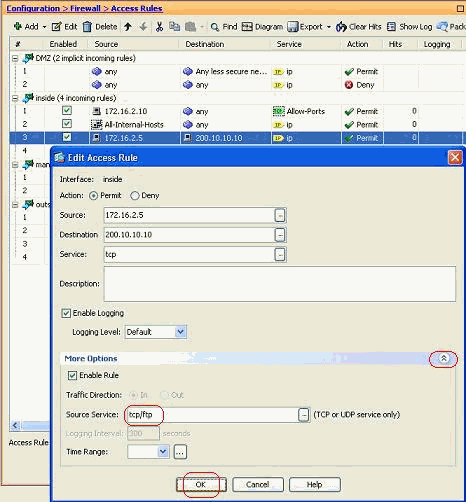
In order to modify the source port of an existing access rule, right-click it, and choose Edit.
The Edit Access Rule window appears.
-
Click the More Options drop-down button in order to modify the Source Service field, and click OK.
You can view the modified access rule, as shown.

Delete an Access List
Complete these steps in order to delete an access list:
-
Before you delete an existing access list, you need to delete the access list entries (the access rules). It is not possible to delete the access list unless you first delete all of the access rules.
Right-click the access rule to be deleted, and choose Delete.

-
Complete the same Delete operation on all the existing access rules, and then select the access list and choose Delete in order to delete it.
Export the Access Rule
ASDM access rules bind the access list with the respective interface while ACL Manager tracks all extended access lists. The access rules that are created with the ACL Manager do not bind to any interface. These access lists are generally used for the purpose of NAT-Exempt, VPN-Filter and similar other functions where there is no association with the interface. ACL Manager contains all the entries that you have in the Configuration > Firewall > Access Rules section. In addition, ACL Manager does also contain the global access rules that are not associated to any interface. ASDM is organized in such a way that you can export an access rule from any access list to another one with ease.
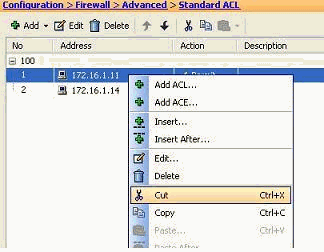
For example, if you need an access rule that is already a part of a global access rule to be associated with an interface, you do not need to configure that again. Instead, you can perform a Cut & Paste operation to achieve this.
-
Right-click the specified access rule, and choose Cut.
-
Select the required access list into which you need to insert this access rule. You can use Paste in the tool bar to insert the access rule.
Export the Access List Information
You can export the access list information to another file. Two formats are supported to export this information.
-
Comma Separated Value (CSV) format
-
HTML format
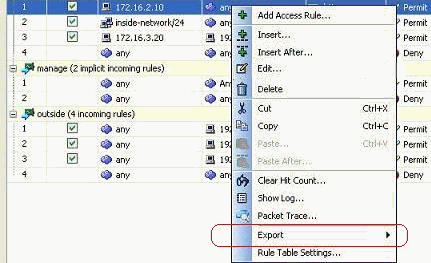
Right click any of the access rules, and choose Export in order to send the access list information to a file.
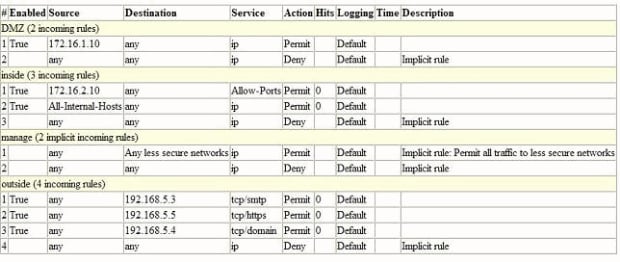
Here is the access list information shown in HTML format.
Verify
There is currently no verification procedure available for this configuration.
Troubleshoot
There is currently no specific troubleshooting information available for this configuration.
Related Information
Revision History
| Revision | Publish Date | Comments |
|---|---|---|
1.0 |
24-Mar-2011 |
Initial Release |
Contact Cisco
- Open a Support Case

- (Requires a Cisco Service Contract)


 Feedback