Implementing Authentication Proxy
Available Languages
Contents
Introduction
Authentication proxy (auth-proxy), available in Cisco IOS® Software Firewall version 12.0.5.T and later, is used to authenticate inbound or outbound users, or both. These users are normally blocked by an access list. However, with auth-proxy the users bring up a browser to go through the firewall and authenticate on a TACACS+ or RADIUS server. The server passes additional access list entries down to the router to allow the users through after authentication.
This document gives the user general tips for the implementation of auth-proxy, provides some Cisco Secure server profiles for auth proxy, and describes what the user sees when auth-proxy is in use.
Prerequisites
Requirements
There are no specific requirements for this document.
Components Used
This document is not restricted to specific software and hardware versions.
Conventions
For more information on document conventions, refer to the Cisco Technical Tips Conventions.
How to Implement Authentication Proxy
Complete these steps:
-
Make sure that traffic flows properly through the firewall before you configure auth-proxy.
-
For minimum disruption of the network during testing, modify the existing access list to deny access to one test client.
-
Make sure the one test client cannot get through the firewall and that the other hosts can get through.
-
Turn on debug with exec-timeout 0 0 under the console port or virtual type terminals (VTYs), while you add the auth-proxy commands and test.
Server Profiles
Our testing was done with Cisco Secure UNIX and Windows. If RADIUS is in use, the RADIUS server must support vendor-specific attributes (attribute 26). Specific server examples follow:
Cisco Secure UNIX (TACACS+)
# ./ViewProfile -p 9900 -u proxyonly
User Profile Information
user = proxyonly{
profile_id = 57
set server current-failed-logins = 1
profile_cycle = 2
password = clear "********"
service=auth-proxy {
set priv-lvl=15
set proxyacl#1="permit icmp any any"
set proxyacl#2="permit tcp any any"
set proxyacl#3="permit udp any any"
}
}
Cisco Secure Windows (TACACS+)
Follow this procedure.
-
Enter the username and password (Cisco Secure or Windows database).
-
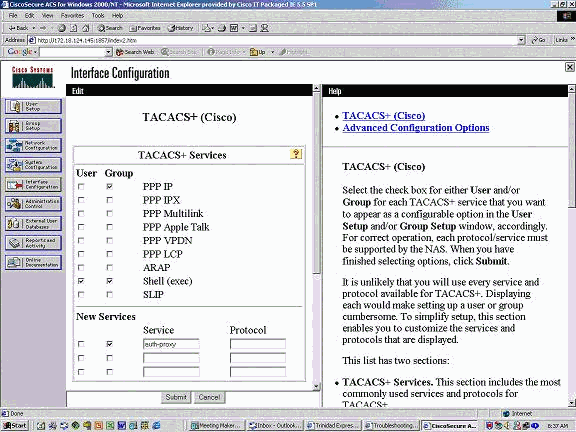
For Interface Configuration, select TACACS+.
-
Under New Services, select the Group option and type auth-proxy in the Service column. Leave the Protocol column blank.

-
Advanced - display window for each service - customized attributes.
-
In Group Settings, check auth-proxy and enter this information in the window:
priv-lvl=15
proxyacl#1=permit icmp any any
proxyacl#2=permit tcp any any
proxyacl#3=permit udp any any
Cisco Secure UNIX (RADIUS)
# ./ViewProfile -p 9900 -u proxy
User Profile Information
user = proxy{
profile_id = 58
profile_cycle = 1
radius=Cisco {
check_items= {
2="proxy"
}
reply_attributes= {
9,1="auth-proxy:priv-lvl=15"
9,1="auth-proxy:proxyacl#1=permit icmp any any"
9,1="auth-proxy:proxyacl#2=permit tcp any any"
9,1="auth-proxy:proxyacl#3=permit udp any any"
}
}

}
Cisco Secure Windows (RADIUS)
Follow this procedure.
-
Open Network Configuration. NAS should be Cisco RADIUS.
-
If Interface Configuration RADIUS is available, check VSA boxes.
-
In User Settings, enter the username/password.
-
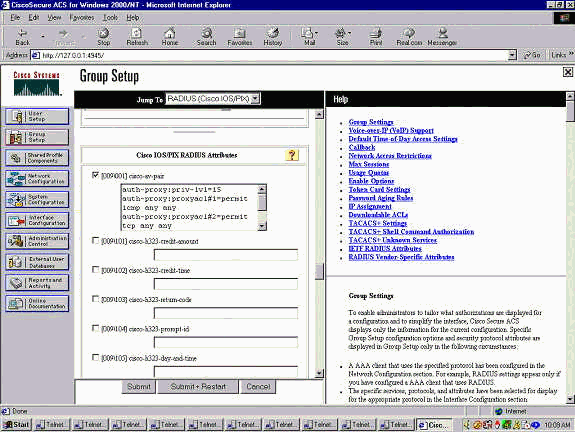
In Group Settings, select the option for [009/001] cisco-av-pair. In the text box underneath the selection, type this:
auth-proxy:priv-lvl=15
auth-proxy:proxyacl#1=permit icmp any any
auth-proxy:proxyacl#2=permit tcp any any
auth-proxy:proxyacl#3=permit udp any any
This window is an example of this step.

What the User Sees
The user attempts to browse something on the other side of the firewall.
A window displays with this message:
Cisco <hostname> Firewall
Authentication Proxy
Username:
Password:
If the username and password are good, the user sees:
Cisco Systems
Authentication Successful!
If authentication fails, the message is:
Cisco Systems
Authentication Failed!
Related Information
Contact Cisco
- Open a Support Case

- (Requires a Cisco Service Contract)


 Feedback