Konfigurieren des Datenverkehrs zum Zurückdrehen des AnyConnect VPN-Clients auf ASA 9.X
Download-Optionen
-
ePub (730.6 KB)
In verschiedenen Apps auf iPhone, iPad, Android, Sony Reader oder Windows Phone anzeigen
Inklusive Sprache
In dem Dokumentationssatz für dieses Produkt wird die Verwendung inklusiver Sprache angestrebt. Für die Zwecke dieses Dokumentationssatzes wird Sprache als „inklusiv“ verstanden, wenn sie keine Diskriminierung aufgrund von Alter, körperlicher und/oder geistiger Behinderung, Geschlechtszugehörigkeit und -identität, ethnischer Identität, sexueller Orientierung, sozioökonomischem Status und Intersektionalität impliziert. Dennoch können in der Dokumentation stilistische Abweichungen von diesem Bemühen auftreten, wenn Text verwendet wird, der in Benutzeroberflächen der Produktsoftware fest codiert ist, auf RFP-Dokumentation basiert oder von einem genannten Drittanbieterprodukt verwendet wird. Hier erfahren Sie mehr darüber, wie Cisco inklusive Sprache verwendet.
Informationen zu dieser Übersetzung
Cisco hat dieses Dokument maschinell übersetzen und von einem menschlichen Übersetzer editieren und korrigieren lassen, um unseren Benutzern auf der ganzen Welt Support-Inhalte in ihrer eigenen Sprache zu bieten. Bitte beachten Sie, dass selbst die beste maschinelle Übersetzung nicht so genau ist wie eine von einem professionellen Übersetzer angefertigte. Cisco Systems, Inc. übernimmt keine Haftung für die Richtigkeit dieser Übersetzungen und empfiehlt, immer das englische Originaldokument (siehe bereitgestellter Link) heranzuziehen.
Inhalt
Einleitung
In diesem Dokument wird die Einrichtung einer Cisco Adaptive Security Appliance (ASA) Version 9.x beschrieben, mit der der VPN-Datenverkehr umgekehrt werden kann.
Verwendete Komponenten
Die Informationen in diesem Dokument basierend auf folgenden Software- und Hardware-Versionen:
-
Cisco ASA 5500 Serie mit Software-Version 9.1(2)
-
Cisco AnyConnect SSL VPN Client-Version für Windows 3.1.05152
-
PC, auf dem ein unterstütztes Betriebssystem auf den unterstützten VPN-Plattformen der Cisco ASA-Serie ausgeführt wird.
-
Cisco Adaptive Security Device Manager (ASDM) Version 7.1(6)
Die Informationen in diesem Dokument beziehen sich auf Geräte in einer speziell eingerichteten Testumgebung. Alle Geräte, die in diesem Dokument benutzt wurden, begannen mit einer gelöschten (Nichterfüllungs) Konfiguration. Wenn Ihr Netzwerk in Betrieb ist, stellen Sie sicher, dass Sie die möglichen Auswirkungen aller Befehle kennen.
Voraussetzungen
Anforderungen
Laut Empfehlung von Cisco sollten die folgenden Anforderungen erfüllt sein, bevor Sie diese Konfiguration ausprobieren:
-
Auf der Hub-ASA Security Appliance muss das Release 9.x ausgeführt werden.
-
Cisco AnyConnect VPN Client 3.x
Hinweis: Laden Sie das AnyConnect VPN Client-Paket herunter (
anyconnect-win*.pkg) aus dem Cisco Software Download (nur registrierte Kunden). Kopieren Sie den AnyConnect VPN-Client in den Cisco ASA-Flash-Speicher, und laden Sie ihn auf die Computer der Remote-Benutzer herunter, um die SSL VPN-Verbindung mit der ASA herzustellen. Weitere Informationen finden Sie im Abschnitt AnyConnect VPN Client Connections im ASA-Konfigurationsleitfaden.
Hintergrundinformationen
Hinweis: Weisen Sie dem VPN Client einen völlig anderen Pool von IP-Adressen zu (z. B. 10.x.x.x, 172.16.x.x und 192.168.x.x), um eine Überlappung der IP-Adressen im Netzwerk zu vermeiden. Dieses IP-Adressenschema ist für die Fehlerbehebung in Ihrem Netzwerk hilfreich.
Haarnadel oder Kehre
Diese Funktion ist für VPN-Datenverkehr nützlich, der über eine Schnittstelle eingeht, dann aber über dieselbe Schnittstelle weitergeleitet wird.
Wenn Sie beispielsweise über ein Hub-and-Spoke-VPN-Netzwerk verfügen (bei dem die Sicherheits-Appliance der Hub und die Remote-VPN-Netzwerke Spokes sind), muss der Datenverkehr zuerst zur Sicherheits-Appliance fließen, damit eine Spoke mit einer anderen kommunizieren kann.
Geben Sie same-security-traffic , damit der Datenverkehr über dieselbe Schnittstelle ein- und ausgehen kann.
ciscoasa(config)#same-security-traffic permit intra-interface
Der Cisco AnyConnect VPN Client bietet sichere SSL-Verbindungen mit der Sicherheits-Appliance für Remote-Benutzer.
Ohne einen zuvor installierten Client geben Remote-Benutzer in ihren Browser die IP-Adresse einer Schnittstelle ein, die so konfiguriert ist, dass sie SSL VPN-Verbindungen akzeptiert.
Wenn die Sicherheits-Appliance nicht für die Umleitung konfiguriert ist http:// Anträge auf https://, müssen Benutzer die URL in das Formular eingeben https://
Nachdem die URL eingegeben wurde, stellt der Browser eine Verbindung zu dieser Schnittstelle her und zeigt den Anmeldebildschirm an.
Wenn der Benutzer die Anforderungen für die Anmeldung und Authentifizierung erfüllt und die Sicherheits-Appliance den Benutzer als den Client benötigend identifiziert, lädt sie den Client herunter, der mit dem Betriebssystem des Remote-Computers übereinstimmt.
Nach dem Download installiert und konfiguriert sich der Client selbst, stellt eine sichere SSL-Verbindung her und bleibt entweder erhalten oder deinstalliert sich selbst (dies hängt von der Konfiguration der Sicherheits-Appliance ab), wenn die Verbindung beendet wird.
Im Falle eines zuvor installierten Clients überprüft die Sicherheits-Appliance bei der Authentifizierung des Benutzers die Revision des Clients und aktualisiert den Client bei Bedarf.
Wenn der Client eine SSL-VPN-Verbindung mit der Sicherheits-Appliance aushandelt, stellt er eine Verbindung mit Transport Layer Security (TLS) her und verwendet auch Datagram Transport Layer Security (DTLS).
DTLS vermeidet Latenz- und Bandbreitenprobleme, die bei einigen SSL-Verbindungen auftreten, und verbessert die Leistung von Echtzeitanwendungen, die auf Paketverzögerungen reagieren.
Der AnyConnect-Client kann von der Sicherheits-Appliance heruntergeladen oder vom Systemadministrator manuell auf dem Remote-PC installiert werden.
Weitere Informationen zur manuellen Installation des Clients finden Sie im Cisco AnyConnect Secure Mobility Client Administratorhandbuch.
Die Sicherheits-Appliance lädt den Client basierend auf den Gruppenrichtlinien- oder Benutzernamensattributen des Benutzers herunter, der die Verbindung herstellt.
Sie können die Sicherheits-Appliance so konfigurieren, dass der Client automatisch heruntergeladen wird, oder Sie können sie so konfigurieren, dass der Remote-Benutzer gefragt wird, ob er den Client herunterladen möchte.
Im letzteren Fall können Sie die Sicherheits-Appliance so konfigurieren, dass sie den Client entweder nach einer Zeitüberschreitung herunterlädt oder die Anmeldeseite anzeigt, wenn der Benutzer nicht antwortet.
Hinweis: Für die in diesem Dokument verwendeten Beispiele wird IPv4 verwendet. Für IPv6-Datenverkehr mit umgekehrter Richtung gelten die gleichen Schritte, es werden jedoch die IPv6-Adressen anstelle von IPv4 verwendet.
Umkehrenden Remote-Zugriffsverkehr konfigurieren
In diesem Abschnitt erfahren Sie, wie Sie die in diesem Dokument beschriebenen Funktionen konfigurieren können.
Hinweis: Verwenden Sie die Befehlsreferenzen, um weitere Informationen zu den in diesem Abschnitt verwendeten Befehlen zu erhalten.
AnyConnect VPN Client für öffentliches Internet, VPN auf einem Stick – Konfigurationsbeispiel
Netzwerkdiagramm
In diesem Dokument wird die folgende Netzwerkeinrichtung verwendet:
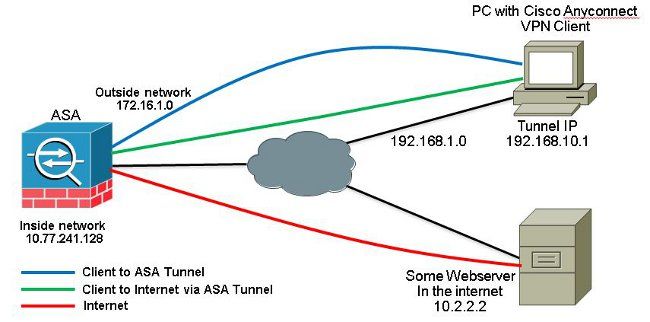
ASA Release 9.1(2)-Konfigurationen mit ASDM Release 7.1(6)
In diesem Dokument wird davon ausgegangen, dass die grundlegende Konfiguration, z. B. die Schnittstellenkonfiguration, bereits abgeschlossen ist und ordnungsgemäß funktioniert.
Hinweis: Weitere Informationen zur Konfiguration der ASA durch den ASDM finden Sie unter Configuring Management Access (Konfigurieren des Verwaltungszugriffs).
Hinweis: In Version 8.0(2) und höher unterstützt die ASA SSL VPN (WebVPN)-Sitzungen ohne Client und ASDM-Verwaltungssitzungen gleichzeitig auf Port 443 der externen Schnittstelle. In Versionen vor dem Release 8.0(2) können WebVPN und ASDM nicht auf derselben ASA-Schnittstelle aktiviert werden, es sei denn, Sie ändern die Portnummern. Weitere Informationen finden Sie unter ASDM and WebVPN Enabled on the Same Interface of the ASA (ASDM und WebVPN aktiviert auf derselben Schnittstelle der ASA).
Führen Sie die folgenden Schritte aus, um das SSL-VPN auf einem Stick in ASA zu konfigurieren:
- Auswählen
Configuration > Device Setup > Interfacesund überprüfen SieEnable traffic between two or more hosts connected to the same interfacedas Kontrollkästchen, damit SSL VPN-Datenverkehr über dieselbe Schnittstelle eingeht und diese verlässt. Klicken Sie aufApply.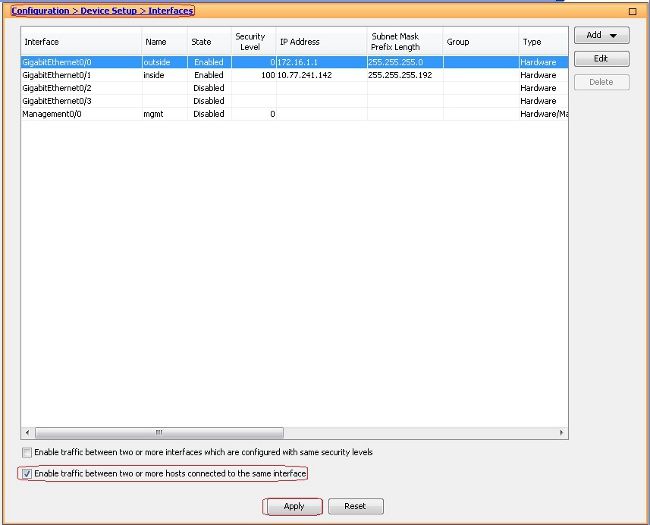
Gleichwertige CLI-Konfiguration:
ciscoasa(config)#same-security-traffic permit intra-interface
- Auswählen
Configuration > Remote Access VPN > Network (Client) Access > Address Assignment > Address Pools > Addum einen IP-Adresspool zu erstellen.vpnpool.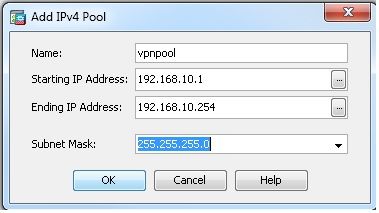
- Klicken Sie auf
Apply.Gleichwertige CLI-Konfiguration:
ciscoasa(config)#ip local pool vpnpool 192.168.10.1-192.168.10.254 mask 255.255.255.0
- Aktivieren Sie WebVPN.
- Auswählen
Configuration > Remote Access VPN > Network (Client) Access > SSL VPN Connection Profilesund unterAccess Interfaces, klicken Sie auf die KontrollkästchenAllow AccessundEnable DTLSfür die externe Schnittstelle. Überprüfen SieEnable Cisco AnyConnect VPN Client access on the interfaces selected in the table belowaktivieren, um SSL VPN auf der externen Schnittstelle zu aktivieren.
- Klicken Sie auf
Apply. - Auswählen
Configuration > Remote Access VPN > Network (Client) Access > Anyconnect Client Software > Addum das Cisco AnyConnect VPN-Client-Image aus dem Flash-Speicher der ASA hinzuzufügen.


Gleichwertige CLI-Konfiguration:
ciscoasa(config)#webvpn
ciscoasa(config-webvpn)#enable outside
ciscoasa(config-webvpn)#anyconnect image disk0:/anyconnect-win-3.1.05152-k9.pkg 1
ciscoasa(config-webvpn)#tunnel-group-list enable
ciscoasa(config-webvpn)#anyconnect enable
- Auswählen
- Konfigurieren Sie die Gruppenrichtlinie.
- Auswählen
Configuration > Remote Access VPN > Network (Client) Access > Group Policiesum eine interne Gruppenrichtlinie zu erstellen.clientgroup. ImGeneralWählen Sie auf der RegisterkarteSSL VPN Clientaktivieren, um das WebVPN als Tunnelprotokoll zu aktivieren.
- Im
Advanced > Split TunnelingRegisterkarte, auswählenTunnel All Networksaus der Dropdown-Liste "Policy" (Richtlinie) der Richtlinie aus, damit alle Pakete vom Remote-PC durch einen sicheren Tunnel geleitet werden.
Gleichwertige CLI-Konfiguration:
ciscoasa(config)#group-policy clientgroup internal
ciscoasa(config)#group-policyclientgroup attributes
ciscoasa(config-group-policy)#vpn-tunnel-protocol ssl-client
ciscoasa(config-group-policy)#split-tunnel-policy tunnelall
- Auswählen
- Auswählen
Configuration > Remote Access VPN > AAA/Local Users > Local Users > Addum ein neues Benutzerkonto zu erstellen.ssluser1. Klicken Sie aufOKund dannApply.
Gleichwertige CLI-Konfiguration:
ciscoasa(config)#username ssluser1 password asdmASA@
- Konfigurieren Sie die Tunnelgruppe.
- Auswählen
Configuration > Remote Access VPN > Network (Client) Access > Anyconnect Connection Profiles > Addum eine neue Tunnelgruppe zu erstellensslgroup. - Im
Basickönnen Sie die Konfigurationsliste wie folgt aufrufen:- Benennen Sie die Tunnelgruppe wie
sslgroup. - Unter
Client Address Assignment, wählen Sie den Adresspoolvpnpoolaus demClient Address Poolsaus. - Unter
Default Group Policy,wählen sie die gruppenrichtlinie ausclientgroupaus demGroup Policyaus.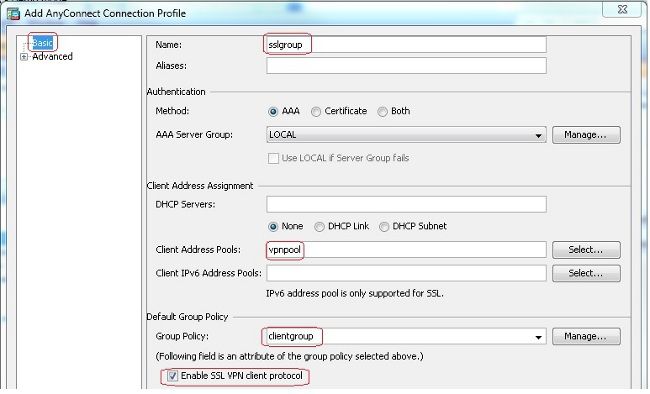
- Im
Advanced > Group Alias/Group URLRegisterkarte, geben Sie den Namen des Gruppenalias an alssslgroup_usersund klicke aufOK.Gleichwertige CLI-Konfiguration:
ciscoasa(config)#tunnel-group sslgroup type remote-access
ciscoasa(config)#tunnel-group sslgroup general-attributes
ciscoasa(config-tunnel-general)#address-pool vpnpool
ciscoasa(config-tunnel-general)#default-group-policy clientgroup
ciscoasa(config-tunnel-general)#exit
ciscoasa(config)#tunnel-group sslgroup webvpn-attributes
ciscoasa(config-tunnel-webvpn)#group-alias sslgroup_users enable
- Benennen Sie die Tunnelgruppe wie
- Auswählen
- Konfigurieren von NAT
- Auswählen
Configuration > Firewall > NAT Rules > Add "Network Object" NAT Rulesodass der Datenverkehr aus dem internen Netzwerk mit der externen IP-Adresse 172.16.1.1 umgewandelt werden kann.
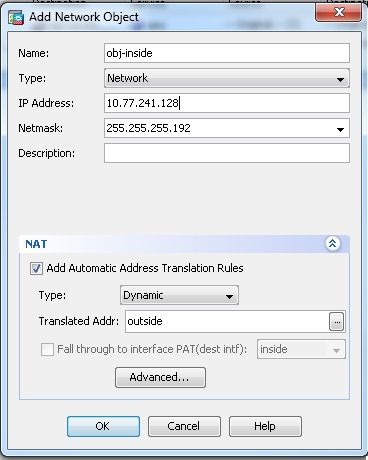
- Auswählen
Configuration > Firewall > NAT Rules > Add "Network Object" NAT Rulesodass der Datenverkehr, den der VPN-Datenverkehr aus dem externen Netzwerk generiert, mit der externen IP-Adresse 172.16.1.1 umgewandelt werden kann.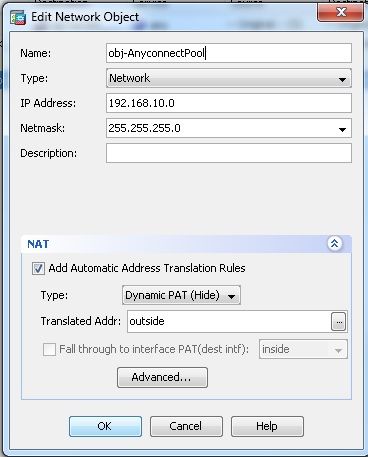
Gleichwertige CLI-Konfiguration:
ciscoasa(config)# object network obj-inside
ciscoasa(config-network-object)# subnet 10.77.241.128 255.255.255.192
ciscoasa(config-network-object)# nat (inside,outside) dynamic interface

ciscoasa(config)# object network obj-AnyconnectPool
ciscoasa(config-network-object)# subnet 192.168.10.0 255.255.255.0
ciscoasa(config-network-object)# nat (outside,outside) dynamic interface
- Auswählen
ASA Release 9.1(2)-Konfiguration in der CLI
ciscoasa(config)#show running-config
: Saved
:
ASA Version 9.1(2)
!
hostname ciscoasa
domain-name default.domain.invalid
enable password 8Ry2YjIyt7RRXU24 encrypted
names
!
interface GigabitEthernet0/0
 nameif outside
 security-level 0
 ip address 172.16.1.1 255.255.255.0
!
interface GigabitEthernet0/1
 nameif inside
 security-level 100
 ip address 10.77.241.142 255.255.255.192
!
interface Management0/0
 shutdown
 no nameif
 no security-level
 no ip address

!
passwd 2KFQnbNIdI.2KYOU encrypted
boot system disk0:/asa802-k8.bin
ftp mode passive
clock timezone IST 5 30
dns server-group DefaultDNS
 domain-name default.domain.invalid
same-security-traffic permit intra-interface

!--- Command that permits the SSL VPN traffic to enter and exit the same interface.

object network obj-AnyconnectPool
 subnet 192.168.10.0 255.255.255.0
object network obj-inside
 subnet 10.77.241.128 255.255.255.192

!--- Commands that define the network objects we will use later on the NAT section.

pager lines 24
logging enable
logging asdm informational
mtu inside 1500
mtu outside 1500
ip local pool vpnpool 192.168.10.1-192.168.10.254 mask 255.255.255.0


!--- The address pool for the Cisco AnyConnect SSL VPN Clients


no failover
icmp unreachable rate-limit 1 burst-size 1
asdm image disk0:/asdm-602.bin
no asdm history enable
arp timeout 14400

nat (inside,outside) source static obj-inside obj-inside destination static
 obj-AnyconnectPool obj-AnyconnectPool

!--- The Manual NAT that prevents the inside network from getting translated
 when going to the Anyconnect Pool.

object network obj-AnyconnectPool
 nat (outside,outside) dynamic interface
object network obj-inside
 nat (inside,outside) dynamic interface

!--- The Object NAT statements for Internet access used by inside users and
 Anyconnect Clients.
!--- Note: Uses an RFC 1918 range for lab setup.

route outside 0.0.0.0 0.0.0.0 172.16.1.2 1
timeout xlate 3:00:00
timeout conn 1:00:00 half-closed 0:10:00 udp 0:02:00 icmp 0:00:02
timeout sunrpc 0:10:00 h323 0:05:00 h225 1:00:00 mgcp 0:05:00 mgcp-pat 0:05:00
timeout sip 0:30:00 sip_media 0:02:00 sip-invite 0:03:00 sip-disconnect 0:02:00
timeout uauth 0:05:00 absolute
dynamic-access-policy-record DfltAccessPolicy
http server enable
http 0.0.0.0 0.0.0.0 inside
no snmp-server location
no snmp-server contact
snmp-server enable traps snmp authentication linkup linkdown coldstart
no crypto isakmp nat-traversal
telnet timeout 5
ssh timeout 5
console timeout 0
threat-detection basic-threat
threat-detection statistics access-list
!
class-map inspection_default
 match default-inspection-traffic
!
!
policy-map type inspect dns preset_dns_map
 parameters
  message-length maximum 512
policy-map global_policy
 class inspection_default
  inspect dns preset_dns_map
  inspect ftp
  inspect h323 h225
  inspect h323 ras
  inspect netbios
  inspect rsh
  inspect rtsp
  inspect skinny
  inspect esmtp
  inspect sqlnet
  inspect sunrpc
  inspect tftp
  inspect sip
  inspect xdmcp
!
service-policy global_policy global
webvpn
 enable outside


!--- Enable WebVPN on the outside interface


 anyconnect image disk0:/anyconnect-win-3.1.05152-k9.pkg 1


!--- Assign an order to the AnyConnect SSL VPN Client image


anyconnect enable


!--- Enable the security appliance to download SVC images to remote computers


tunnel-group-list enable


!--- Enable the display of the tunnel-group list on the WebVPN Login page


group-policy clientgroup internal


!--- Create an internal group policy "clientgroup"


group-policy clientgroup attributes
 vpn-tunnel-protocol ssl-client


!--- Specify SSL as a permitted VPN tunneling protocol


split-tunnel-policy tunnelall


!--- Encrypt all the traffic from the SSL VPN Clients.

username ssluser1 password ZRhW85jZqEaVd5P. encrypted


!--- Create a user account "ssluser1"


tunnel-group sslgroup type remote-access


!--- Create a tunnel group "sslgroup" with type as remote access


tunnel-group sslgroup general-attributes
 address-pool vpnpool


!--- Associate the address pool vpnpool created


 default-group-policy clientgroup


!--- Associate the group policy "clientgroup" created


tunnel-group sslgroup webvpn-attributes
 group-alias sslgroup_users enable


!--- Configure the group alias as sslgroup-users

prompt hostname context
Cryptochecksum:af3c4bfc4ffc07414c4dfbd29c5262a9
: end
ciscoasa(config)#
Zulassen der Kommunikation zwischen AnyConnect VPN Clients bei implementierter TunnelAll-Konfiguration
Netzwerkdiagramm
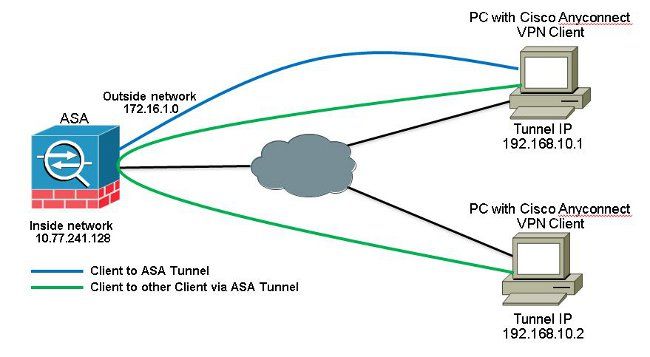
Wenn eine Kommunikation zwischen Anyconnect Clients erforderlich ist und die NAT für das öffentliche Internet auf einem Stick vorhanden ist, ist auch eine manuelle NAT erforderlich, um eine bidirektionale Kommunikation zu ermöglichen.
Dies ist ein häufiges Szenario, in dem Anyconnect-Clients Telefondienste nutzen und sich gegenseitig anrufen können müssen.
ASA Release 9.1(2)-Konfigurationen mit ASDM Release 7.1(6)
Auswählen Configuration > Firewall > NAT Rules > Add NAT Rule Before "Network Object" NAT Rules sodass der Datenverkehr vom externen Netzwerk (Anyconnect Pool), der für einen anderen Anyconnect Client aus dem gleichen Pool bestimmt ist, nicht mit der externen IP-Adresse 172.16.1.1 übersetzt wird.

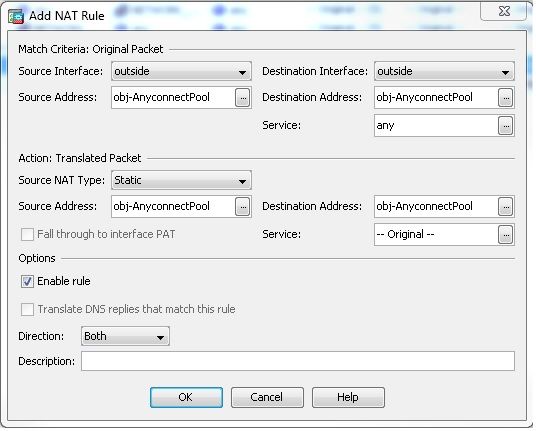
Gleichwertige CLI-Konfiguration:
nat (outside,outside) source static obj-AnyconnectPool obj-AnyconnectPool destination
 static obj-AnyconnectPool obj-AnyconnectPool
ASA Release 9.1(2)-Konfiguration in der CLI
ciscoasa(config)#show running-config
: Saved
:
ASA Version 9.1(2)
!
hostname ciscoasa
domain-name default.domain.invalid
enable password 8Ry2YjIyt7RRXU24 encrypted
names
!
interface GigabitEthernet0/0
 nameif outside
 security-level 0
 ip address 172.16.1.1 255.255.255.0
!
interface GigabitEthernet0/1
 nameif inside
 security-level 100
 ip address 10.77.241.142 255.255.255.192
!
interface Management0/0
 shutdown
 no nameif
 no security-level
 no ip address

!
passwd 2KFQnbNIdI.2KYOU encrypted
boot system disk0:/asa802-k8.bin
ftp mode passive
clock timezone IST 5 30
dns server-group DefaultDNS
 domain-name default.domain.invalid
same-security-traffic permit intra-interface

!--- Command that permits the SSL VPN traffic to enter and exit the same interface.

object network obj-AnyconnectPool
 subnet 192.168.10.0 255.255.255.0
object network obj-inside
 subnet 10.77.241.128 255.255.255.192

!--- Commands that define the network objects we will use later on the NAT section.

pager lines 24
logging enable
logging asdm informational
mtu inside 1500
mtu outside 1500
ip local pool vpnpool 192.168.10.1-192.168.10.254 mask 255.255.255.0


!--- The address pool for the Cisco AnyConnect SSL VPN Clients


no failover
icmp unreachable rate-limit 1 burst-size 1
asdm image disk0:/asdm-602.bin
no asdm history enable
arp timeout 14400

nat (inside,outside) source static obj-inside obj-inside destination static
 obj-AnyconnectPool obj-AnyconnectPool
nat (outside,outside) source static obj-AnyconnectPool obj-AnyconnectPool
 destination static obj-AnyconnectPool obj-AnyconnectPool

!--- The Manual NAT statements used so that traffic from the inside network
 destined to the Anyconnect Pool and traffic from the Anyconnect Pool destined
 to another Client within the same pool does not get translated.

object network obj-AnyconnectPool
 nat (outside,outside) dynamic interface
object network obj-inside
 nat (inside,outside) dynamic interface

!--- The Object NAT statements for Internet access used by inside users and
 Anyconnect Clients.
!--- Note: Uses an RFC 1918 range for lab setup.

route outside 0.0.0.0 0.0.0.0 172.16.1.2 1
timeout xlate 3:00:00
timeout conn 1:00:00 half-closed 0:10:00 udp 0:02:00 icmp 0:00:02
timeout sunrpc 0:10:00 h323 0:05:00 h225 1:00:00 mgcp 0:05:00 mgcp-pat 0:05:00
timeout sip 0:30:00 sip_media 0:02:00 sip-invite 0:03:00 sip-disconnect 0:02:00
timeout uauth 0:05:00 absolute
dynamic-access-policy-record DfltAccessPolicy
http server enable
http 0.0.0.0 0.0.0.0 inside
no snmp-server location
no snmp-server contact
snmp-server enable traps snmp authentication linkup linkdown coldstart
no crypto isakmp nat-traversal
telnet timeout 5
ssh timeout 5
console timeout 0
threat-detection basic-threat
threat-detection statistics access-list
!
class-map inspection_default
 match default-inspection-traffic
!
!
policy-map type inspect dns preset_dns_map
 parameters
  message-length maximum 512
policy-map global_policy
 class inspection_default
  inspect dns preset_dns_map
  inspect ftp
  inspect h323 h225
  inspect h323 ras
  inspect netbios
  inspect rsh
  inspect rtsp
  inspect skinny
  inspect esmtp
  inspect sqlnet
  inspect sunrpc
  inspect tftp
  inspect sip
  inspect xdmcp
!
service-policy global_policy global
webvpn
 enable outside


!--- Enable WebVPN on the outside interface


 anyconnect image disk0:/anyconnect-win-3.1.05152-k9.pkg 1


!--- Assign an order to the AnyConnect SSL VPN Client image


anyconnect enable


!--- Enable the security appliance to download SVC images to remote computers


tunnel-group-list enable


!--- Enable the display of the tunnel-group list on the WebVPN Login page


group-policy clientgroup internal


!--- Create an internal group policy "clientgroup"


group-policy clientgroup attributes
 vpn-tunnel-protocol ssl-client


!--- Specify SSL as a permitted VPN tunneling protocol


split-tunnel-policy tunnelall


!--- Encrypt all the traffic from the SSL VPN Clients.

username ssluser1 password ZRhW85jZqEaVd5P. encrypted


!--- Create a user account "ssluser1"


tunnel-group sslgroup type remote-access


!--- Create a tunnel group "sslgroup" with type as remote access


tunnel-group sslgroup general-attributes
 address-pool vpnpool


!--- Associate the address pool vpnpool created


 default-group-policy clientgroup


!--- Associate the group policy "clientgroup" created


tunnel-group sslgroup webvpn-attributes
 group-alias sslgroup_users enable


!--- Configure the group alias as sslgroup-users

prompt hostname context
Cryptochecksum:af3c4bfc4ffc07414c4dfbd29c5262a9
: end
ciscoasa(config)#
Zulassen der Kommunikation zwischen AnyConnect-VPN-Clients mit Split-Tunnel
Netzwerkdiagramm
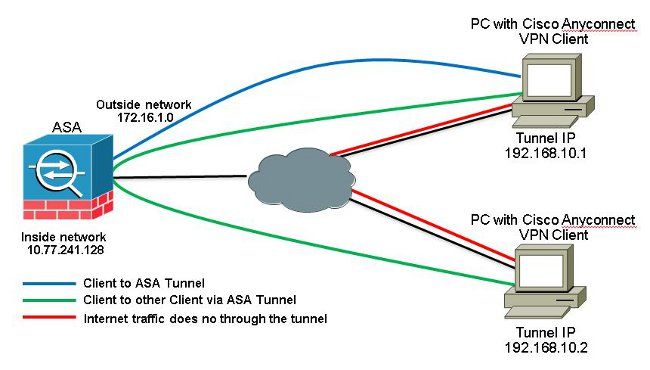
Wenn die Kommunikation zwischen Anyconnect-Clients erforderlich ist und Split-Tunnel verwendet wird, ist keine manuelle NAT erforderlich, um eine bidirektionale Kommunikation zu ermöglichen, es sei denn, es gibt eine NAT-Regel, die sich auf diesen konfigurierten Datenverkehr auswirkt.
Der Anyconnect-VPN-Pool muss jedoch in der Split-Tunnel-ACL enthalten sein.
Dies ist ein häufiges Szenario, in dem Anyconnect-Clients Telefondienste nutzen und sich gegenseitig anrufen können müssen.
ASA Release 9.1(2)-Konfigurationen mit ASDM Release 7.1(6)
- Auswählen
Configuration > Remote Access VPN > Network (Client) Access > Address Assignment> Address Pools > Addum einen IP-Adresspool zu erstellen.vpnpool.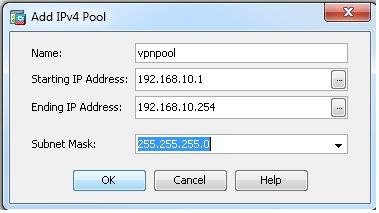
- Klicken Sie auf
Apply.Gleichwertige CLI-Konfiguration:
ciscoasa(config)#ip local pool vpnpool 192.168.10.1-192.168.10.254 mask 255.255.255.0
- Aktivieren Sie WebVPN.
- Auswählen
Configuration > Remote Access VPN > Network (Client) Access > SSL VPN Connection Profilesund unterAccess Interfaces, klicken Sie auf die KontrollkästchenAllow AccessundEnable DTLSfür die externe Schnittstelle. Überprüfen Sie außerdem dieEnable Cisco AnyConnect VPN Client access on the interfaces selected in the table belowaktivieren, um SSL VPN auf der externen Schnittstelle zu aktivieren.
- Klicken Sie auf
Apply. - Auswählen
Configuration > Remote Access VPN > Network (Client) Access > Anyconnect Client Software > Addum das Cisco AnyConnect VPN-Client-Image aus dem Flash-Speicher der ASA hinzuzufügen.


Gleichwertige CLI-Konfiguration:
ciscoasa(config)#webvpn
ciscoasa(config-webvpn)#enable outside
ciscoasa(config-webvpn)#anyconnect image disk0:/anyconnect-win-3.1.05152-k9.pkg 1
ciscoasa(config-webvpn)#tunnel-group-list enable
ciscoasa(config-webvpn)#anyconnect enable
- Auswählen
- Konfigurieren Sie die Gruppenrichtlinie.
- Auswählen
Configuration > Remote Access VPN > Network (Client) Access > Group Policiesum eine interne Gruppenrichtlinie zu erstellen.clientgroup. ImGeneralWählen Sie auf der RegisterkarteSSL VPN Clientaktivieren, um WebVPN als zulässiges Tunnelprotokoll zu aktivieren.
- Im
Advanced > Split TunnelingRegisterkarte, auswählenTunnel Network List Belowaus der Dropdown-Liste Policy (Richtlinie) aus, damit alle Pakete vom Remote-PC durch einen sicheren Tunnel geleitet werden.
Gleichwertige CLI-Konfiguration:
ciscoasa(config)#access-list SPLIt-ACL standard permit 10.77.241.0 255.255.255.0
ciscoasa(config)#access-list SPLIt-ACL standard permit 192.168.10.0 255.255.255.0

ciscoasa(config)#group-policy clientgroup internal
ciscoasa(config)#group-policy clientgroup attributes
ciscoasa(config-group-policy)#vpn-tunnel-protocol ssl-client
ciscoasa(config-group-policy)#split-tunnel-policy tunnelspecified
ciscoasa(config-group-policy)#split-tunnel-network-list SPLIt-ACL
- Auswählen
- Auswählen
Configuration > Remote Access VPN > AAA/Local Users > Local Users > Addum ein neues Benutzerkonto zu erstellen.ssluser1. Klicken Sie aufOKund dannApply.
Gleichwertige CLI-Konfiguration:
ciscoasa(config)#username ssluser1 password asdmASA@
- Konfigurieren Sie die Tunnelgruppe.
- Auswählen
Configuration > Remote Access VPN > Network (Client) Access > Anyconnect Connection Profiles > Addum eine neue Tunnelgruppe zu erstellensslgroup. - Im
Basickönnen Sie die Konfigurationsliste wie folgt aufrufen:- Benennen Sie die Tunnelgruppe wie
sslgroup. - Unter
Client Address Assignment, wählen Sie den Adresspoolvpnpoolaus demClient Address Poolsaus. - Unter
Default Group Policy,wählen sie die gruppenrichtlinie ausclientgroupaus demGroup Policyaus.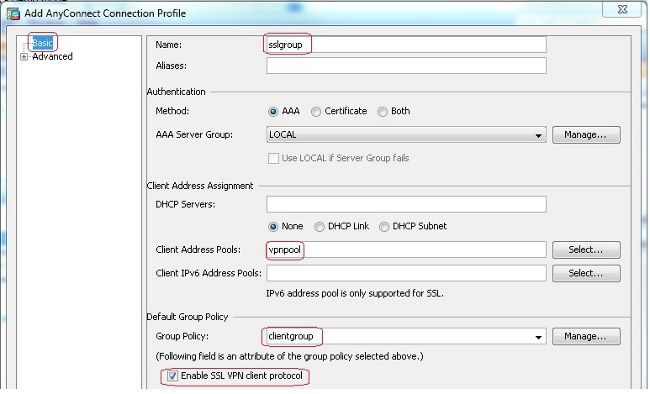
- Im
Advanced > Group Alias/Group URLRegisterkarte, geben Sie den Namen des Gruppenalias an alssslgroup_usersund klicke aufOK.Gleichwertige CLI-Konfiguration:
ciscoasa(config)#tunnel-group sslgroup type remote-access
ciscoasa(config)#tunnel-group sslgroup general-attributes
ciscoasa(config-tunnel-general)#address-pool vpnpool
ciscoasa(config-tunnel-general)#default-group-policy clientgroup
ciscoasa(config-tunnel-general)#exit
ciscoasa(config)#tunnel-group sslgroup webvpn-attributes
ciscoasa(config-tunnel-webvpn)#group-alias sslgroup_users enable
- Benennen Sie die Tunnelgruppe wie
- Auswählen
ASA Release 9.1(2)-Konfiguration in der CLI
ciscoasa(config)#show running-config
: Saved
:
ASA Version 9.1(2)
!
hostname ciscoasa
domain-name default.domain.invalid
enable password 8Ry2YjIyt7RRXU24 encrypted
names
!
interface GigabitEthernet0/0
 nameif outside
 security-level 0
 ip address 172.16.1.1 255.255.255.0
!
interface GigabitEthernet0/1
 nameif inside
 security-level 100
 ip address 10.77.241.142 255.255.255.192
!
interface Management0/0
 shutdown
 no nameif
 no security-level
 no ip address

!
passwd 2KFQnbNIdI.2KYOU encrypted
boot system disk0:/asa802-k8.bin
ftp mode passive
clock timezone IST 5 30
dns server-group DefaultDNS
 domain-name default.domain.invalid
same-security-traffic permit intra-interface

!--- Command that permits the SSL VPN traffic to enter and exit the same interface.

object network obj-inside
 subnet 10.77.241.128 255.255.255.192

!--- Commands that define the network objects we will use later on the NAT section.

access-list SPLIt-ACL standard permit 10.77.241.0 255.255.255.0
access-list SPLIt-ACL standard permit 192.168.10.0 255.255.255.0

!--- Standard Split-Tunnel ACL that determines the networks that should travel the
 Anyconnect tunnel.

pager lines 24
logging enable
logging asdm informational
mtu inside 1500
mtu outside 1500
ip local pool vpnpool 192.168.10.1-192.168.10.254 mask 255.255.255.0

!--- The address pool for the Cisco AnyConnect SSL VPN Clients

no failover
icmp unreachable rate-limit 1 burst-size 1
asdm image disk0:/asdm-602.bin
no asdm history enable
arp timeout 14400

nat (inside,outside) source static obj-inside obj-inside destination static
 obj-AnyconnectPool obj-AnyconnectPool

!--- The Manual NAT that prevents the inside network from getting translated when
 going to the Anyconnect Pool

object network obj-inside
 nat (inside,outside) dynamic interface

!--- The Object NAT statements for Internet access used by inside users.
!--- Note: Uses an RFC 1918 range for lab setup.

route outside 0.0.0.0 0.0.0.0 172.16.1.2 1
timeout xlate 3:00:00
timeout conn 1:00:00 half-closed 0:10:00 udp 0:02:00 icmp 0:00:02
timeout sunrpc 0:10:00 h323 0:05:00 h225 1:00:00 mgcp 0:05:00 mgcp-pat 0:05:00
timeout sip 0:30:00 sip_media 0:02:00 sip-invite 0:03:00 sip-disconnect 0:02:00
timeout uauth 0:05:00 absolute
dynamic-access-policy-record DfltAccessPolicy
http server enable
http 0.0.0.0 0.0.0.0 inside
no snmp-server location
no snmp-server contact
snmp-server enable traps snmp authentication linkup linkdown coldstart
no crypto isakmp nat-traversal
telnet timeout 5
ssh timeout 5
console timeout 0
threat-detection basic-threat
threat-detection statistics access-list
!
class-map inspection_default
 match default-inspection-traffic
!
!
policy-map type inspect dns preset_dns_map
 parameters
  message-length maximum 512
policy-map global_policy
 class inspection_default
  inspect dns preset_dns_map
  inspect ftp
  inspect h323 h225
  inspect h323 ras
  inspect netbios
  inspect rsh
  inspect rtsp
  inspect skinny
  inspect esmtp
  inspect sqlnet
  inspect sunrpc
  inspect tftp
  inspect sip
  inspect xdmcp
!
service-policy global_policy global
webvpn
 enable outside


!--- Enable WebVPN on the outside interface


 anyconnect image disk0:/anyconnect-win-3.1.05152-k9.pkg 1


!--- Assign an order to the AnyConnect SSL VPN Client image


anyconnect enable


!--- Enable the security appliance to download SVC images to remote computers


tunnel-group-list enable


!--- Enable the display of the tunnel-group list on the WebVPN Login page


group-policy clientgroup internal


!--- Create an internal group policy "clientgroup"


group-policy clientgroup attributes
 vpn-tunnel-protocol ssl-client


!--- Specify SSL as a permitted VPN tunneling protocol


split-tunnel-policy tunnelspecified


!--- Encrypt  only traffic specified on the split-tunnel ACL coming from the SSL
 VPN Clients.


split-tunnel-network-list value SPLIt-ACL


!--- Defines the previosly configured ACL to the split-tunnel policy.

username ssluser1 password ZRhW85jZqEaVd5P. encrypted


!--- Create a user account "ssluser1"


tunnel-group sslgroup type remote-access


!--- Create a tunnel group "sslgroup" with type as remote access


tunnel-group sslgroup general-attributes
 address-pool vpnpool


!--- Associate the address pool vpnpool created


 default-group-policy clientgroup


!--- Associate the group policy "clientgroup" created


tunnel-group sslgroup webvpn-attributes
 group-alias sslgroup_users enable


!--- Configure the group alias as sslgroup-users

prompt hostname context
Cryptochecksum:af3c4bfc4ffc07414c4dfbd29c5262a9
: end
ciscoasa(config)#
Überprüfung
Nutzen Sie diesen Abschnitt, um zu überprüfen, ob Ihre Konfiguration ordnungsgemäß funktioniert.
-
show vpn-sessiondb svc- Zeigt die Informationen über die aktuellen SSL-Verbindungen an.ciscoasa#show vpn-sessiondb anyconnect
Session Type: SVC
Username : ssluser1 Index : 12
Assigned IP : 192.168.10.1 Public IP : 192.168.1.1
Protocol : Clientless SSL-Tunnel DTLS-Tunnel
Encryption : RC4 AES128 Hashing : SHA1
Bytes Tx : 194118 Bytes Rx : 197448
Group Policy : clientgroup Tunnel Group : sslgroup
Login Time : 17:12:23 IST Mon Mar 24 2008
Duration : 0h:12m:00s
NAC Result : Unknown
VLAN Mapping : N/A VLAN : none -
show webvpn group-alias- Zeigt den konfigurierten Alias für verschiedene Gruppen an.ciscoasa#show webvpn group-alias
Tunnel Group: sslgroup Group Alias: sslgroup_users enabled - Wählen Sie im ASDM
Monitoring > VPN > VPN Statistics > Sessionsum die aktuellen Sitzungen in der ASA zu kennen.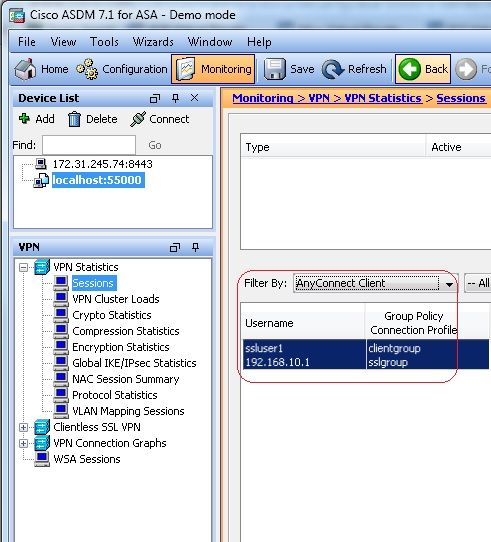
Fehlerbehebung
Dieser Abschnitt enthält Informationen zur Fehlerbehebung bei Ihrer Konfiguration.
-
vpn-sessiondb logoff name- Befehl zum Abmelden der SSL VPN-Sitzung für den jeweiligen Benutzernamen.ciscoasa#vpn-sessiondb logoff name ssluser1
Do you want to logoff the VPN session(s)? [confirm] Y
INFO: Number of sessions with name "ssluser1" logged off : 1
ciscoasa#Called vpn_remove_uauth: success!
webvpn_svc_np_tear_down: no ACL
webvpn_svc_np_tear_down: no IPv6 ACL
np_svc_destroy_session(0xB000)Ebenso können Sie die
vpn-sessiondb logoff anyconnectum alle AnyConnect-Sitzungen zu beenden. -
debug webvpn anyconnect <1-255>- Stellt die Echtzeit-WebVPN-Ereignisse bereit, um die Sitzung einzurichten.Ciscoasa#debug webvpn anyconnect 7
CSTP state = HEADER_PROCESSING
http_parse_cstp_method()
...input: 'CONNECT /CSCOSSLC/tunnel HTTP/1.1'
webvpn_cstp_parse_request_field()
...input: 'Host: 10.198.16.132'
Processing CSTP header line: 'Host: 10.198.16.132'
webvpn_cstp_parse_request_field()
...input: 'User-Agent: Cisco AnyConnect VPN Agent for Windows 3.1.05152'
Processing CSTP header line: 'User-Agent: Cisco AnyConnect VPN Agent for Windows
3.1.05152'
Setting user-agent to: 'Cisco AnyConnect VPN Agent for Windows 3.1.05152'
webvpn_cstp_parse_request_field()
...input: 'Cookie: webvpn=146E70@20480@567F@50A0DFF04AFC2411E0DD4F681D330922F4B21F60'
Processing CSTP header line: 'Cookie: webvpn=
146E70@20480@567F@50A0DFF04AFC2411E0DD4F681D330922F4B21F60'
Found WebVPN cookie: 'webvpn=146E70@20480@567F@50A0DFF04AFC2411E0DD4F681D330922F4B21F60'
WebVPN Cookie: 'webvpn=146E70@20480@567F@50A0DFF04AFC2411E0DD4F681D330922F4B21F60'
webvpn_cstp_parse_request_field()
...input: 'X-CSTP-Version: 1'
Processing CSTP header line: 'X-CSTP-Version: 1'
Setting version to '1'
webvpn_cstp_parse_request_field()
...input: 'X-CSTP-Hostname: WCRSJOW7Pnbc038'
Processing CSTP header line: 'X-CSTP-Hostname: WCRSJOW7Pnbc038'
Setting hostname to: 'WCRSJOW7Pnbc038'
webvpn_cstp_parse_request_field()
...input: 'X-CSTP-MTU: 1280'
Processing CSTP header line: 'X-CSTP-MTU: 1280'
webvpn_cstp_parse_request_field()
...input: 'X-CSTP-Address-Type: IPv6,IPv4'
Processing CSTP header line: 'X-CSTP-Address-Type: IPv6,IPv4'
webvpn_cstp_parse_request_field()
webvpn_cstp_parse_request_field()
...input: 'X-CSTP-Base-MTU: 1300'
Processing CSTP header line: 'X-CSTP-Base-MTU: 1300'
webvpn_cstp_parse_request_field()
webvpn_cstp_parse_request_field()
...input: 'X-CSTP-Full-IPv6-Capability: true'
Processing CSTP header line: 'X-CSTP-Full-IPv6-Capability: true'
webvpn_cstp_parse_request_field()
...input: 'X-DTLS-Master-Secret: F1810A764A0646376F7D254202A0A602CF075972F91EAD1
9BB6BE387BB8C6F893BFB49886D47F9A4BE2EA2A030BF620D'
Processing CSTP header line: 'X-DTLS-Master-Secret: F1810A764A0646376F7D254202A0
A602CF075972F91EAD19BB6BE387BB8C6F893BFB49886D47F9A4BE2EA2A030BF620D'
webvpn_cstp_parse_request_field()
...input: 'X-DTLS-CipherSuite: AES256-SHA:AES128-SHA:DES-CBC3-SHA:DES-CBC-SHA'
Processing CSTP header line: 'X-DTLS-CipherSuite: AES256-SHA:AES128-SHA:DES-CBC3
-SHA:DES-CBC-SHA'
webvpn_cstp_parse_request_field()
...input: 'X-DTLS-Accept-Encoding: lzs'
Processing CSTL header line: 'X-DTLS-Accept-Encoding: lzs'
webvpn_cstp_parse_request_field()
...input: 'X-DTLS-Header-Pad-Length: 0'
webvpn_cstp_parse_request_field()
...input: 'X-CSTP-Accept-Encoding: lzs,deflate'
Processing CSTP header line: 'X-CSTP-Accept-Encoding: lzs,deflate'
webvpn_cstp_parse_request_field()
...input: 'X-CSTP-Protocol: Copyright (c) 2004 Cisco Systems, Inc.'
Processing CSTP header line: 'X-CSTP-Protocol: Copyright (c) 2004 Cisco Systems, Inc.'
Validating address: 0.0.0.0
CSTP state = WAIT_FOR_ADDRESS
webvpn_cstp_accept_address: 192.168.10.1/255.255.255.0
webvpn_cstp_accept_ipv6_address: No IPv6 Address
CSTP state = HAVE_ADDRESS
SVC: Sent gratuitous ARP for 192.168.10.1.
SVC: NP setup
np_svc_create_session(0x5000, 0xa930a180, TRUE)
webvpn_svc_np_setup
SVC ACL Name: NULL
SVC ACL ID: -1
vpn_put_uauth success for ip 192.168.10.1!
No SVC ACL
Iphdr=20 base-mtu=1300 def-mtu=1500 conf-mtu=1406
tcp-mss = 1260
path-mtu = 1260(mss)
mtu = 1260(path-mtu) - 0(opts) - 5(ssl) - 8(cstp) = 1247
tls-mtu = 1247(mtu) - 20(mac) = 1227
DTLS Block size = 16
mtu = 1300(base-mtu) - 20(ip) - 8(udp) - 13(dtlshdr) - 16(dtlsiv) = 1243
mod-mtu = 1243(mtu) & 0xfff0(complement) = 1232
dtls-mtu = 1232(mod-mtu) - 1(cdtp) - 20(mac) - 1(pad) = 1210
computed tls-mtu=1227 dtls-mtu=1210 conf-mtu=1406
DTLS enabled for intf=2 (outside)
tls-mtu=1227 dtls-mtu=1210
SVC: adding to sessmgmt
Unable to initiate NAC, NAC might not be enabled or invalid policy
CSTP state = CONNECTED
webvpn_rx_data_cstp
webvpn_rx_data_cstp: got internal message
Unable to initiate NAC, NAC might not be enabled or invalid policy -
Wählen Sie im ASDM
Monitoring > Logging > Real-time Log Viewer > Viewum die Ereignisse in Echtzeit zu sehen. Dieses Beispiel zeigt die Sitzungsinformationen zwischen AnyConnect 192.168.10.1 und Telnet Server 10.2.2.2 im Internet über ASA 172.16.1.1.
Zugehörige Informationen
Revisionsverlauf
| Überarbeitung | Veröffentlichungsdatum | Kommentare |
|---|---|---|
2.0 |
11-Sep-2023 |
Rezertifizierung |
1.0 |
20-Jun-2014 |
Erstveröffentlichung |
Beiträge von Cisco Ingenieuren
- Gustavo MedinaCisco TAC Engineer
- Atri BasuCisco TAC Engineer
- Everett DukeCisco TAC Engineer
Cisco kontaktieren
- Eine Supportanfrage öffnen

- (Erfordert einen Cisco Servicevertrag)
 Feedback