Deploy Kasten K10 on Cisco Intersight Kubernetes Service for Container Backup (White Paper)
Available Languages
Bias-Free Language
The documentation set for this product strives to use bias-free language. For the purposes of this documentation set, bias-free is defined as language that does not imply discrimination based on age, disability, gender, racial identity, ethnic identity, sexual orientation, socioeconomic status, and intersectionality. Exceptions may be present in the documentation due to language that is hardcoded in the user interfaces of the product software, language used based on RFP documentation, or language that is used by a referenced third-party product. Learn more about how Cisco is using Inclusive Language.
This document provides step-by-step procedures for deploying the Kasten K10 container backup software, by Veeam, on a Cisco Intersight™ Kubernetes Service tenant cluster.
A recent survey showed that from 2018 to 2019, the use of containers in development, testing, and production environments grew rapidly. Most notably, the use of containers in production environments increased significantly. In addition, container-based use is growing rapidly at scale. As organizations are trusting their production workloads to containers, they also are using more containers.
However, as Kubernetes has matured as a viable platform during the past years of rapid adoption, the complexity of installing it and operating it over time at the enterprise level has increased. A critical part of container operation in production is a working backup and restore procedure. Traditional backup methodologies such as agent-based backups for bare-metal installations, and snapshot-based backups for virtual machines, do not work for containerized workloads. In a containerized environment, two areas need to be protected:
● Control plane
● Customer data
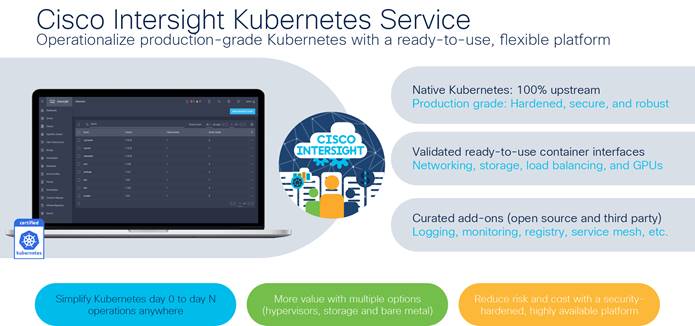
Cisco Intersight Kubernetes Service overview
Cisco Intersight Kubernetes Service (Figure 1) manages the control plane from a central point and includes life-cycle management. This feature eliminates the need for you to protect the control plane of your Kubernetes Service container deployment. However, you do need to back up the customer data used by your containerized applications and use cases.
One option for protecting containerized workloads on Kubernetes Service tenant clusters deployed on-premises is Kasten K10 container backup software. The software is installed as a containerized application within the Kubernetes Service tenant cluster and can discover all deployed namespaces and pods without complex configuration steps.
About Kasten K10
Kasten is an independent Kubernetes business unit within Veeam and the award-winning Kubernetes backup and disaster-recovery leader. Kasten helps enterprises overcome day-2 data management challenges to run applications on Kubernetes confidently. Kasten K10, a data management platform built specifically for Kubernetes, provides enterprise operations teams an easy-to-use, scalable, and secure system for backup and restore processes, disaster recovery, and application mobility with outstanding operational simplicity.
The following items need to be preconfigured before you begin the setup and configuration of a Cisco Intersight Kubernetes Service tenant cluster:
● Linux host that has the kubectl client binary installed that has access to the Internet to download the Kasten K10 software and that has access to the Kubernetes Service tenant cluster
● Cisco Intersight account with a Kubernetes Service license subscription to deploy Kubernetes tenant clusters
● Amazon Simple Storage Service (S3) compatible storage used as a backup target
Create a Kubernetes cluster on the Cisco Intersight Kubernetes Service platform
Use the procedure described in this section to create a Kubernetes cluster on the Kubernetes Service control plane.
Perform initial login
Log in to the Cisco Intersight platform with the necessary credentials to create a Kubernetes Service cluster (Figure 2).
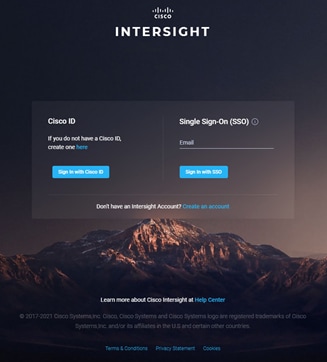
Cisco Intersight log-in screen
Create a cluster
Follow these steps to create a cluster:
1. In Cisco Intersight, go to Profiles > Kubernetes Cluster Profiles and click Create Kubernetes Cluster Profile in the top-right corner (Figure 3).
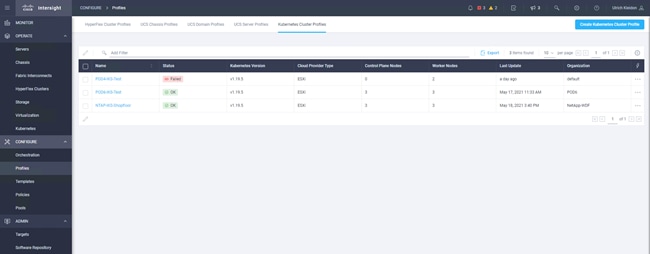
Cisco Intersight Kubernetes Service profiles
2. Click through the profile-creation workflow and deploy it.
Download the kubeconfig file for access to the cluster using kubectl
Follow these steps to download the kubeconfig file to access the cluster:
1. Select the Kubernetes cluster and click the three dots (…) at the right end of the line. From the drop-down menu, choose Download Kubeconfig (Figure 4).
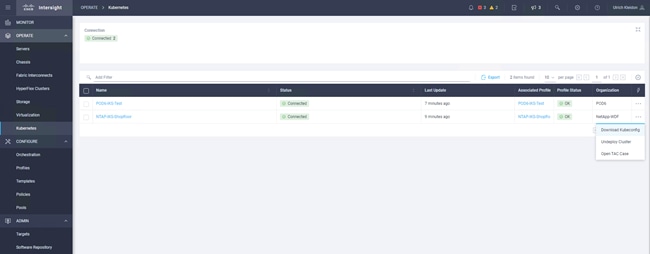
Deployed Cisco Intersight Kubernetes Service tenant cluster
2. Copy the downloaded kubeconfig file to your Linux admin workstation and then export it as the KUBECONFIG system variable. To verify a successful connection, run the kubectl get nodes command.
ubuntu@Ubuntu-jump:~$ export KUBECONFIG=NTAP-IKS-Shopfloor-kubeconfig.yml
ubuntu@Ubuntu-jump:~$ kubectl get nodes
NAME STATUS ROLES AGE VERSION
ntap-iks-shopfloor-controlpl-04e5423fdc Ready master 113m v1.19.5
ntap-iks-shopfloor-controlpl-86d1f383da Ready master 112m v1.19.5
ntap-iks-shopfloor-controlpl-b9344c79f3 Ready master 112m v1.19.5
ntap-iks-shopfloor-sf2-worker-3052beb375 Ready <none> 112m v1.19.5
ntap-iks-shopfloor-sf2-worker-5459c960b6 Ready <none> 112m v1.19.5
ntap-iks-shopfloor-sf2-worker-60086452cd Ready <none> 112m v1.19.5
Install the Kasten K10 software
This section presents the installation procedure for the Kasten K10 software as described in the Kasten K10 documentation.
Qualify the Kubernetes cluster
Follow these steps to qualify the cluster:
1. Verify the version, permissions, and network connectivity for the installation.
ubuntu@Ubuntu-jump:~$ kubectl version
Client Version: version.Info{Major:"1", Minor:"20", GitVersion:"v1.20.0", GitCommit:"af46c47ce925f4c4ad5cc8d1fca46c7b77d13b38", GitTreeState:"clean", BuildDate:"2020-12-08T17:59:43Z", GoVersion:"go1.15.5", Compiler:"gc", Platform:"linux/amd64"}
Server Version: version.Info{Major:"1", Minor:"19", GitVersion:"v1.19.5", GitCommit:"e338cf2c6d297aa603b50ad3a301f761b4173aa6", GitTreeState:"clean", BuildDate:"2020-12-09T11:10:32Z", GoVersion:"go1.15.2", Compiler:"gc", Platform:"linux/amd64"}
ubuntu@Ubuntu-jump:~$
ubuntu@Ubuntu-jump:~$ # Are you a Kubernetes cluster administrator?
ubuntu@Ubuntu-jump:~$ kubectl auth can-i '*' '*' --all-namespaces
yes
ubuntu@Ubuntu-jump:~$
2. Validate a pod that uses an image from Docker Hub and can reach your S3-compatible storage system over the pod network.
ubuntu@Ubuntu-jump:~$ kubectl run -i --tty ping --image=busybox --restart=Never --rm -- ping 172.29.6.88
If you don't see a command prompt, try pressing enter.
64 bytes from 172.29.8.88: seq=1 ttl=62 time=0.312 ms
64 bytes from 172.29.8.88: seq=2 ttl=62 time=0.188 ms
64 bytes from 172.29.8.88: seq=3 ttl=62 time=0.301 ms
64 bytes from 172.29.8.88: seq=4 ttl=62 time=0.191 ms
^C
--- 172.29.8.88 ping statistics ---
5 packets transmitted, 5 packets received, 0% packet loss
round-trip min/avg/max = 0.188/0.263/0.325 ms
pod "ping" deleted
Configure Kasten K10 prerequisites
Follow these steps to configure the prerequisites for the K10 installation:
1. Add the Kasten helm repository and run the Kasten K10 Primer validation script.
The version used for this document is Release 21.04.0.
iksadmin@ntap-iks-shopfloor-controlpl-04e5423fdc:~$ helm repo add kasten https://charts.kasten.io/
"kasten" has been added to your repositories
iksadmin@ntap-iks-shopfloor-controlpl-04e5423fdc:~$ curl https://docs.kasten.io/tools/k10_primer.sh | bash
% Total % Received % Xferd Average Speed Time Time Current
Dload Upload Total Spent Left Speed
100 6072 100 6072 0 0 47811 0 --:--:-- --:--:-- --:--:-- 47811
Namespace option not provided, using default namespace
Checking for tools
--> Found kubectl
--> Found helm
Checking if the Kasten Helm repo is present
--> The Kasten Helm repo was found
Checking for required Helm version (>= v3.0.0)
--> No Tiller needed with Helm v3.3.4
K10Primer image
--> Using Image (gcr.io/kasten-images/k10tools:4.0.2) to run test
Checking access to the Kubernetes context admin@NTAP-IKS-Shopfloor
--> Able to access the default Kubernetes namespace
Running K10Primer job in cluster with command-
./k10tools primer
serviceaccount/k10-primer created
clusterrolebinding.rbac.authorization.k8s.io/k10-primer created
job.batch/k10primer created
Waiting for pod k10primer-jjmt8 to be ready - ContainerCreating
Waiting for pod k10primer-jjmt8 to be ready - ContainerCreating
Pod Ready!
Kubernetes Version Check:
Valid kubernetes version (v1.19.5) - OK
RBAC Check:
Kubernetes RBAC is enabled - OK
Aggregated Layer Check:
The Kubernetes Aggregated Layer is enabled - OK
W0520 17:36:23.354914 6 warnings.go:70] storage.k8s.io/v1beta1 CSIDriver is deprecated in v1.19+, unavailable in v1.22+; use storage.k8s.io/v1 CSIDriver
CSI Capabilities Check:
VolumeSnapshot CRD-based APIs are not installed - Error
W0520 17:36:23.607964 6 warnings.go:70] storage.k8s.io/v1beta1 CSIDriver is deprecated in v1.19+, unavailable in v1.22+; use storage.k8s.io/v1 CSIDriver
W0520 17:36:23.611974 6 warnings.go:70] storage.k8s.io/v1beta1 CSIDriver is deprecated in v1.19+, unavailable in v1.22+; use storage.k8s.io/v1 CSIDriver
W0520 17:36:23.614213 6 warnings.go:70] storage.k8s.io/v1beta1 CSIDriver is deprecated in v1.19+, unavailable in v1.22+; use storage.k8s.io/v1 CSIDriver
Validating Provisioners:
csi.trident.netapp.io:
Is a CSI Provisioner - OK
VolumeSnapshot CRD-based APIs are not installed - Error
Storage Classes:
basic-csi
Valid Storage Class - OK
csi.vsphere.vmware.com:
Storage Classes:
standard
K10 supports the vSphere CSI driver natively. Creation of a K10 infrastucture profile is required.
Valid Storage Class - OK
Validate Generic Volume Snapshot:
Pod Created successfully - OK
GVS Backup command executed successfully - OK
Pod deleted successfully - OK
serviceaccount "k10-primer" deleted
clusterrolebinding.rbac.authorization.k8s.io "k10-primer" deleted
job.batch "k10primer" deleted
2. Create a namespace for Kasten K10.
iksadmin@ntap-iks-shopfloor-controlpl-04e5423fdc:~$ kubectl create namespace kasten-io
Create a service account in the new namespace
iksadmin@ntap-iks-shopfloor-controlpl-04e5423fdc:~$ 221036.11_salesforce-Lookbook-benefits_v1.pdf
serviceaccount/k10-sa created
Grand cluster-admin role to the new service account
iksadmin@ntap-iks-shopfloor-controlpl-04e5423fdc:~$ kubectl create clusterrolebinding k10-sa-rb \
--clusterrole cluster-admin \
--serviceaccount=kasten-io:k10-sa
clusterrolebinding.rbac.authorization.k8s.io/k10-sa-rb created
iksadmin@ntap-iks-shopfloor-controlpl-04e5423fdc:~$
3. Install the Kasten software with the new service account and bound network access to the Cisco Intersight Kubernetes Service ingress load balancer.
iksadmin@ntap-iks-shopfloor-controlpl-04e5423fdc:~$ helm install k10 kasten/k10 --namespace=kasten-io \
--set rbac.create=false \
--set serviceAccount.create=false \
--set serviceAccount.name=k10-sa \
--set auth.tokenAuth.enabled=true \
--set ingress.create=true \
--set ingress.class=nginx
NAME: k10
LAST DEPLOYED: Thu May 20 17:57:30 2021
NAMESPACE: kasten-io
STATUS: deployed
REVISION: 1
TEST SUITE: None
NOTES:
Thank you for installing Kasten’s K10 Data Management Platform!
Documentation can be found at https://docs.kasten.io/.
How to access the K10 dashboard:
You are using the system's default ingress controller. Please ask your
administrator for instructions on how to access the cluster.
WebUI location: https://Your ingress endpoint/k10
The K10 dashboard is not exposed externally. To establish a connection to it use the following `kubectl` command:
`kubectl --namespace kasten-io port-forward service/gateway 8080:8000`
The Kasten dashboard will be available at: `http://127.0.0.1:8080/k10/#/`
iksadmin@ntap-iks-shopfloor-controlpl-04e5423fdc:~$
iksadmin@ntap-iks-shopfloor-controlpl-04e5423fdc:~$ kubectl get pods --namespace kasten-io
NAME READY STATUS RESTARTS AGE
aggregatedapis-svc-7d98c87b44-gwcj4 1/1 Running 0 48s
auth-svc-778c5c9759-z6cs7 1/1 Running 0 49s
catalog-svc-6f78f7c66d-wqxzf 2/2 Running 0 48s
config-svc-8498987c8f-shbsq 1/1 Running 0 48s
crypto-svc-9d69847c5-nqpg9 1/1 Running 0 48s
dashboardbff-svc-564bc77c8f-fmtbv 1/1 Running 0 49s
executor-svc-9dd8cdcfd-4zmr9 2/2 Running 0 49s
executor-svc-9dd8cdcfd-hbkdb 2/2 Running 0 49s
executor-svc-9dd8cdcfd-sw8f9 2/2 Running 0 49s
frontend-svc-f6f95c4bf-xnchc 1/1 Running 0 48s
gateway-6bdbcc4597-mssns 1/1 Running 0 49s
jobs-svc-7bd7bffdb5-flmdr 1/1 Running 0 48s
kanister-svc-57d9964bc8-xc6qx 1/1 Running 0 48s
logging-svc-58c4cbfbf6-mq99v 1/1 Running 0 48s
metering-svc-568dfdcfb5-c9qgh 1/1 Running 0 48s
prometheus-server-78b94b85fb-gkcbn 1/2 Running 0 49s
state-svc-6b4c777d5c-ht5hh 1/1 Running 0 48s
iksadmin@ntap-iks-shopfloor-controlpl-04e5423fdc:~$
Now configure K10.
1. To access the Kasten user interface, the access secret is required. Please run the following commands to get the secret.
iksadmin@ntap-iks-shopfloor-controlpl-04e5423fdc:~$ sa_secret=$(kubectl get serviceaccount k10-sa -o jsonpath="{.secrets[0].name}" --namespace kasten-io)
iksadmin@ntap-iks-shopfloor-controlpl-04e5423fdc:~$
iksadmin@ntap-iks-shopfloor-controlpl-04e5423fdc:~$ kubectl get secret $sa_secret --namespace kasten-io -ojsonpath="{.data.token}{'\n'}" | base64 --decode
eyJhbGciOiJSUzI1NiIsImtpZCI6ImNickpVTkJEWmE3aWV3d0x0VnlRY3pidzdfVk1la1JjTTVQNW9HQmxRblUifQ.eyJpc3MiOiJrdWJlcm5ldGVzL3NlcnZpY2VhY2NvdW50Iiwia3ViZXJuZXRlcy5pby9zZXJ2aWNlYWNjb3VudC9uYW1lc3BhY2UiOiJrYXN0ZW4taW8iLCJrdWJlcm5ldGVzLmlvL3NlcnZpY2VhY2NvdW50L3NlY3JldC5uYW1lIjoiazEwLXNhLXRva2VuLWpyZnRoIiwia3ViZXJuZXRlcy5pby9zZXJ2aWNlYWNjb3VudC9zZXJ2aWNlLWFjY291bnQubmFtZSI6ImsxMC1zYSIsImt1YmVybmV0ZXMuaW8vc2VydmljZWFjY291bnQvc2VydmljZS1hY2NvdW50LnVpZCI6IjBkZTI4MTI3LTc1NWMtNGQ0ZS1iOWVkLTUxYTU0M2ZlMzk2NCIsInN1YiI6InN5c3RlbTpzZXJ2aWNlYWNjb3VudDprYXN0ZW4taW86azEwLXNhIn0.IPb_iMakR0p2iJRQl_U92PLYetZwfyGfSNVB5qGYw8JuNFIIuXgfjbMotN0wzkkqF7554YryB5CBQpGyaQ4_F4hWTqBsq0jt30caW-vR_8XL6R6FTBy8W0Lzz5tw0Ejg56iMbzfDjTreIwnRv_nJva27ZedkXZTS8zgZYiunqQEv100bXqueM2d_Sr1Z6GhkzYvPyjBehhCxZ0_tMYyjNT75whLFKbvPGbayilYRN8qSuhIGjC7O20DmYYy5Jd2cQGka304wGG38S9f9k0XUct3-W_NcU5Ig0F7OPhLH6Bx4xbWhPpMF8qeRm1iPZMuS40vlKD_oH-FTfq7QMkDoHg
iksadmin@ntap-iks-shopfloor-controlpl-04e5423fdc:~$
2. Enter the following command to display the external IP address of the load balancer deployed by Cisco Intersight Kubernetes Service:
iksadmin@ntap-iks-shopfloor-controlpl-04e5423fdc:~$ kubectl get svc essential-nginx-ingress-ingress-nginx-controller -n iks -o jsus.loadBalancer.ingress[0].ip}'
172.29.34.109 iksadmin@ntap-iks-shopfloor-controlpl-04e5423fdc:~$
3. Open the URL to the Kasten user interface and copy the token to sign in (Figure 5).
https://<loadbalancer ip>/k10/#/

Kasten K10: Login screen
4. On the dashboard screen, click the user icon at the top right and verify that your account has unrestricted permissions (Figure 6).

Kasten K10: Initial dashboard view
Create a new location profile
The location profile represents the backup target: in the example here, a local S3-compatible storage. Three pieces of information are required to configure an S3 target: the S3 endpoint URL, the access key, and the secret key (Figure 7).
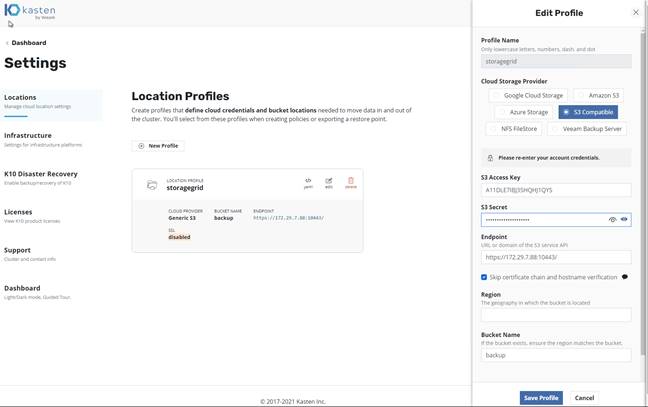
Kasten K10: Creating a location profile
Create a new VMware vSphere K10 infrastructure profile
The Cisco Intersight Kubernetes Service with Kasten K10 solution is based on VMware vSphere. Therefore, you must configure an infrastructure profile for vSphere in K10 to allow snapshot management (Figure 8). To configure vSphere, you need the following information: the IP address of the fully qualified domain name (FQDN) of the vCenter server, the vSphere user name with sufficient cluster access, and the user password.
The recommended approach is to create a dedicated user account for K10.
1. To authorize a dedicated user account for K10, create a role with the following privileges:
◦ Allocate space
◦ Browse datastore
◦ Low-level file operations
◦ Disable methods
◦ Enable methods
◦ Licenses
● Virtual machine snapshot management privileges
◦ Create snapshot
◦ Remove snapshot
◦ Revert to snapshot
2. Assign this role to the dedicated K10 user account on the following objects:
● The root vCenter object
● The data center objects (propagate down each subtree to reach the datastore and virtual machine objects)

Adding Kasten K10 infrastructure profiles
Configure backup policy
Kasten K10 automatically discovers all namespaces, applications, secrets, and other configurations in the Kubernetes Service cluster and displays them under Applications.
Example: Configure backup policy for Cisco Intersight Kubernetes Service management namespaces
Here we will create a backup policy for the Kubernetes Service system.
1. On the Applications tile, click the Unmanaged option (Figure 9).

Kasten K10: Dashboard view
2. On the iks tile, click Create a Policy (Figure 10).

Kasten K10: Applications menu view
3. Enter a name for the new policy and specify the backup frequency based on your needs. Then scroll down to select namespaces and destinations (Figure 11).
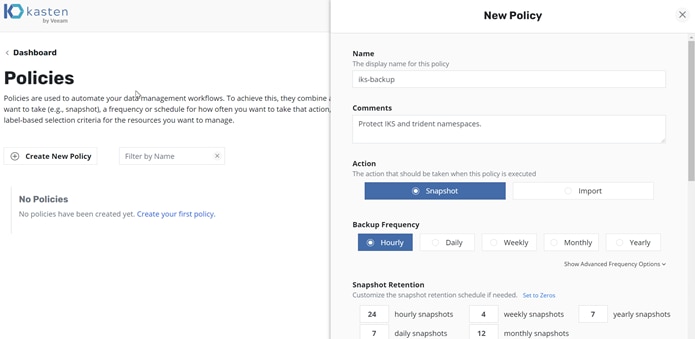
Kasten K10: New policy creation frequency selection
4. Add trident to the applications protected by this policy (Figure 12).

Kasten K10: New policy creation application selection
5. Select the created location profile as the backup destination and click Create Policy (Figure 13).
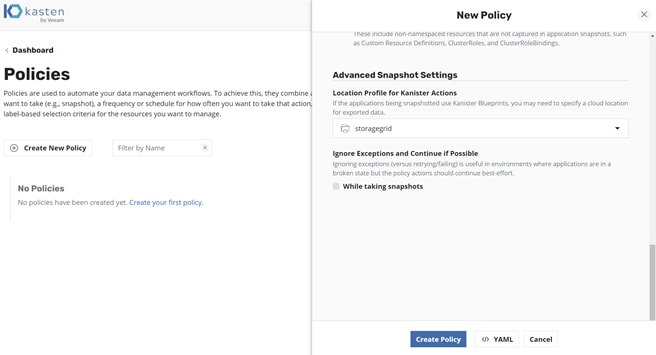
Kasten K10: New policy creation location profile selection
6. On the iks-backup tile, click “run once” (Figure 14).

Kasten K10: Policies view
7. Click Run Policy (Figure 15).

Kasten K10: Run Now dialog box
8. Go back to the dashboard to monitor the backup progress. The only unmanaged application is now the default namespace in which no services are running (Figures 16 and 17).

Kasten K10: Dashboard with backup progress

Kasten K10: Backup actions detailed view
Kasten K10 is simple to deploy and well-suited for protecting customer containers, policies, and persistent data from a Cisco Intersight Kubernetes Service tenant cluster destined for S3 storage on-premises and in the cloud.
For additional information, see the following resources:
● https://docs.kasten.io/latest/index.html