Introduction
This document describes the basics of Cisco Connected Mobile Experiences (CMX) and how to configure it.
Prerequisites
This document talks about how to enable high availability, add Wireless LAN Controller (WLC) and perform some tests that help verify High Availability (HA) configuration with failover/failback.
Requirements
Cisco recommends that you have knowledge of these topics:
Note: HA has no unique requirements for the wireless LAN controllers.
Components Used
The information in this document is based on these software and hardware versions:
The information in this document was created from the devices in a specific lab environment. All of the devices used in this document started with a cleared (default) configuration. If your network is live, ensure that you understand the potential impact of any command.
Architecture
The central component of a HA system is the health monitor. It configures, manages and monitors the HA setup. The principal mode in order to maintain vigil is through heartbeats between the primary and secondary. The health monitor is responsible to set up databases (DBs) and file replication and in turn, monitor the application. CMX under HA paradigm can be defined as Primary or Secondary. The communication with the outside world (Network Mobility Services Protocol (NMSP) and API calls from third-party endpoints and Prime Infrastructure (PI)) happens via a virtual IP address. So, when the primary fails and secondary takes over, virtual IP is switched transparently.
The design provides for a User Interface (UI) in order to configure and monitor the HA pairs. Alarms are generated for CMX and outside of CMX.
The DBs are considered the core of the system that must always be replicated in real-time without the loss of data. The application data that is outside the DB is critical but not needed to be synced in real-time and will not result in a loss of functionality.
Network Infrastructure
The primary and secondary must be reachable between each system. Both primary and secondary must be on the same subnet. This is required so the virtual IP address used can be switched to either system. Any entity such as wireless LAN controllers reachable from the primary must also be reachable from the secondary. For the secondary synchronization and failover to work correctly, the network infrastructure must allow these port traffic to flow between the primary and secondary. The CMX uses VRRP to check keepalive from both CMX units in High Availability, ensuring no restrictions between the in High Availability pair, as the Gateway must be reachable to establish CMX reachability.
The ports will be opened on CMX but the firewalls on CMX will only allow the other peer systems to send traffic on these ports.
|
Ports
|
Description
|
|
6378, 6379, 6380, 6381, 6382, 6383, 6385, 16378, 16379, 16380, 16381, 16382, 16383, 16385
|
Redis
|
|
7000, 7001, 9042
|
Cassandra database
|
|
5432
|
Postgres database
|
|
4242
|
High availability REST and web service
|
|
22
|
SSH port and used to synchronize files between servers
|
Virtual IP
With the HA system in place, after a failover, users must be redirected to the new CMX instance that runs on the secondary. In order to maintain the failover transparent from network connectivity point of view, the concept of Virtual IP (VIP) will be used. When both the primary and secondary are in the same subnet, a VIP address mapping will be used. In this setup, external systems are exposed to a VIP. This VIP is mapped to the real IP of the running primary CMX. When failover happens, VIP is remapped to the address of the secondary CMX. All this happens automatically without any human intervention.
It is not mandatory to use a virtual IP. In fact, if you are doing CMX Layer 3 High Availability (that is having the two servers in different subnets), you cannot use a virtual IP. The virtual IP provides a unique IP for the IT admin (or Prime Infrastructure/ Cisco DNA center) to manage CMX regardless of a failover or failback. The WLCs, however, has a NMSP tunnel only towards the currently active CMX physical IP address.
Step 1. Web Interface Installation
Primary Installation:
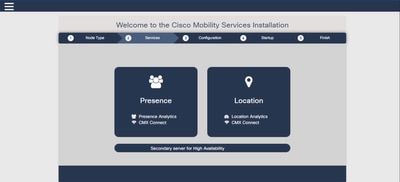
Install CMX normally with login in https://cmx_ip_address:1984/. In the web installer, select the node type of Presence or Location. This type of installation does not require to specify the node type as primary. This is considered a stand-alone server which can run as a primary as shown in the image.
Secondary Installation:
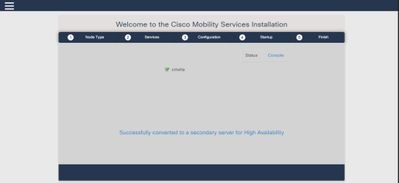
Install CMX (https://cmx_ip_address:1984/) as normal until the node type needs to be selected in the web installer. A third option is provided for secondary. If you select this option, the system gets configured as a secondary and provide a link to the CMX High Availability Admin interface.
The CMX High Availability Admin web interface runs on CMX port 4242 and can be accessed: https://cmx_ip_address:4242/. Login to the HA web interface with the use of the userid cmxadmin and the password configured the cmxadmin userid at the time of the installation. After you log in, the user interface has status and configuration information. The role is shown as secondary for the system.
Step 2. Enable HA
HA can now be enabled once the primary and secondary servers have been prepared. HA can be enabled in CMX web interface or the CMX command line. These are the options required to setup HA:
- Secondary IP Address
- Secondary Password: Password for the cmxadmin account on the secondary server
- VIP Address: VIP address to be used by the active server
- Failover Type: Auto failover will allow CMX to automatically failover to the secondary server when a serious issue is detected. Manual failover will require the user to initiate the failover from the web interface or command line. The failure will be reported to the user via notifications but no action is taken for manual failover
- Notification Email Address: Email address to send notifications about HA information or issues. The email settings used for HA are the same as CMX. This field is required even though you do not have an email server configured. Feel free to enter a dummy email address and click "enable" if you do not intend to use email notifications.
Configure HA Web:
In CMX, navigate to the System Tab and click the Settings icon. This will display a modal dialogue with a variety of settings in CMX. Select the HA option in order to display the options required to enable HA. Notification Email Address you can supply where you like to receive notifications.
Click the Enable button when all the options are provided to start to enable HA.
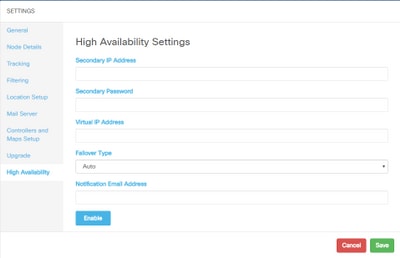
CMX will verify HA settings and start to enable HA between Primary and Secondary. The webUI will return when the configuration has started successfully.
Verify that the settings were correct and that synchronization is taking place by checking the presence of a "High availability" table in the settings page of CMX. If there are no such table and that, when you go back to the HA settings section, all configuration fields are empty, the informations were wrong or incorrect.
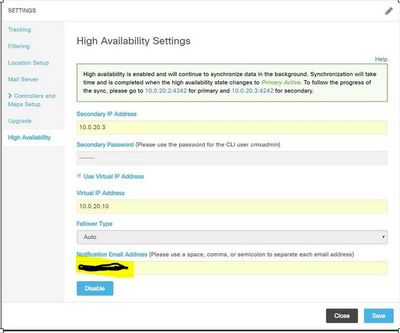
However, HA has not completed being enabled. The initial synchronization of all the data between the primary and secondary server can take a significant amount of time to complete. The user interface will indicate the state as Primary Syncing while the synchronization is being done.
When the synchronization has completed successfully the server on the primary will enter the state Primary Active.
When completed, an information alert will be generated in CMX. In addition, an email alert will be sent that indicates that the system is active and syncing properly.
Enable High Availability CLI (for reference):

Step 3. Add Cisco WLC to CMX
You can add Cisco WLCs with the use of the CLI or the CMX user interface, or with the use of the Prime Infrastructure. For this lab, you can add directly with the use of CMX WebUI.
The controller configuration does not work unless the NMSP connection is correct. However, even though the controller can be added successfully, but the connection maybe does not work.
Navigate to Primary CMX server https://cmx_ip_address/. Click on System Tab > Settings Icon > Left Menu.

After you add Cisco WLCs, you must verify if the controller status is up and running.
In order to validate the controller status with the use of user interface, you need to navigate to the System tab. The controller list is displayed in the tab and the new controller must appear in green.
Step 4. Failover
The failover process involves the transfer of operations to the secondary CMX in case the primary goes down. A failover can occur automatically when CMX detects an issue with the primary server. A failover can be done manually by a user in the web user interface or the command line. The progress of the failover can be monitored based on the current state of each system.
The failover process can be initiated manually by the user. The failover can be done in the CMX High Availability web interface or the CMX command line.
Manual Failover Web:
Login to the CMX HA web interface on primary or secondary (https://server_ip:4242). The monitor page has a button labelled Failover if the servers are actively syncing. On the rightmost top enable auto-refresh.
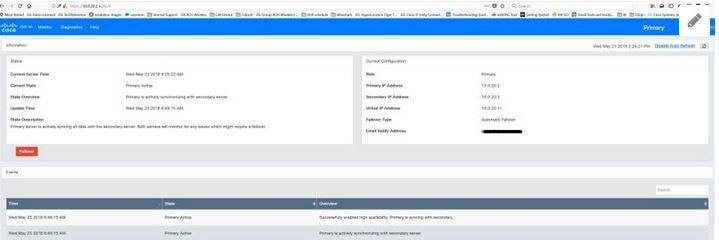
Manual Failover CLI (for reference):

Step 5. Failback
To run CMX on the secondary must be considered as a temporary situation until the root cause of the primary failure has been identified. Once the primary box is restored (or a new box is provided), failback process must be initiated. The other option is to convert the system to a primary and replace or convert the other system to a secondary server. In either case, a server must be made available as soon as possible since HA is no longer syncing to a secondary server.
The failback process must be manually done by the user. The failback can be done in the CMX HA web interface or the CMX command line.
Manual Failback Web:
Login to the CMX HA web interface on primary or secondary (https://server_ip:4242). The monitor page will have a button labelled Failback if both the servers indicate that a failover is active.

Manual Failback GUI:

Step 6. Upgrade / Disable HA
In CMX’s current format you have to disable HA in order to perform an upgrade. In order to disable HA from the command line, run cmxha config disable from the primary CMX

If you forget to break HA before an upgrade, the upgrade script will remind you. You will have to upgrade the secondary CMX server separately before reforming HA.
How to safely reload CMX HA pair
Execute the next steps to reload the CMX HA pair:
- Power off secondary CMX
- Reboot Primary CMX
- Verify primary CMX is up and running
- Power on secondary CMX
- Verify HA status: cmxha info
Verify
There is currently no verification procedure available for this configuration.
Troubleshoot
This section provides information you can use in order to troubleshoot your configuration.
HA has online help for the feature. The help is complete for and does provide an overview and further details on the feature. It can be accessed here: https://cmx_ip_address:4242/help
Command Reference for CMX HA: https://www.cisco.com/c/en/us/td/docs/wireless/mse/10-3/cmx_command/cmxcli103/cmxcli10-3_chapter_010.pdf
Bundle files to check from the tar log:
- cmx-hafile-sync
- cmx-haweb-service
- cmx-haserver


 Feedback