Introduction
This document describes the process that is used in order to perform a complete Application Centric Infrastructure (ACI) fabric cluster replacement.
Background Information
The example that is described in this document involves an operational fabric on which all of the Application Policy Infrastructure Controllers (APICs) have failed. It is assumed that you have exported a configuration file that holds all of the policies and configurations from the previous APICs.
Caution: If you did not export a configuration file, then your configurations will be lost after the cluster replacement.
Before you proceed with the replacement procedure, ensure that you have a server that is accessible to the new APICs in order to import your configuration file. Additionally, ensure that you obtain this information from the current APIC configuration, which is needed for the new APICs:
- Fabric name
- Node name
- Tunnel End Point (TEP) address space
- VLAN ID
- Out Of Band (OOB) address details
- Cluster size
- Type of speed/duplex mode
If you do not remember the previous fabric name or any of the other values when you run the setup script for your new APICs, you can console into one of your switches and enter the Acidiag avread command in order to retrieve this information:

Note: Some information is not available due to the cluster failure.
Cluster Replacement Procedure
Complete these steps in order to replace the complete cluster:
- Configure one of the new APICs:
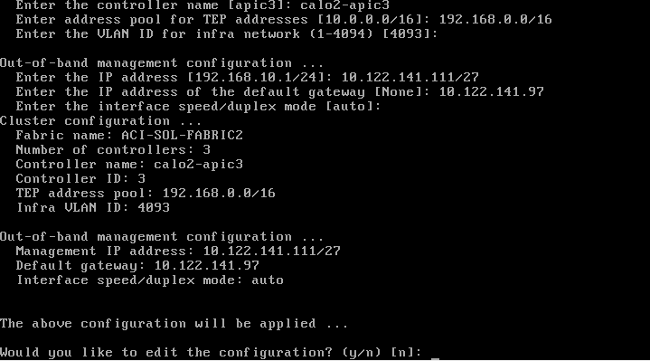
- Console into the Cisco Integrated Management Controller (CIMC) of one of the APICs that you replaced and launch the Kernel-based Virtual Machine (KVM). The setup script should automatically load once the APIC is powered on.
- Use the same fabric name, node name, TEP address space, VLAN ID, OOB address details, cluster size, and type of speed/duplex mode that was previously configured on the failed APICs. Here is an example:
- Import the latest configuration file that was saved on the server:
- Choose ADMIN > IMPORT/EXPORT in the GUI header.
- Click the Remote Locations tab in the IMPORT/EXPORT sidebar (on the left-hand side of the screen).
- From the Actions drop-down list, choose Create Remote Location:

- Configure a remote location that includes the host name (or IP address) of the server that contains the latest configuration file.
Note: You can use any protocol in order to transfer your configuration file, but if you choose to use FTP, you must add a contract in order to allow FTP traffic to your fabric.
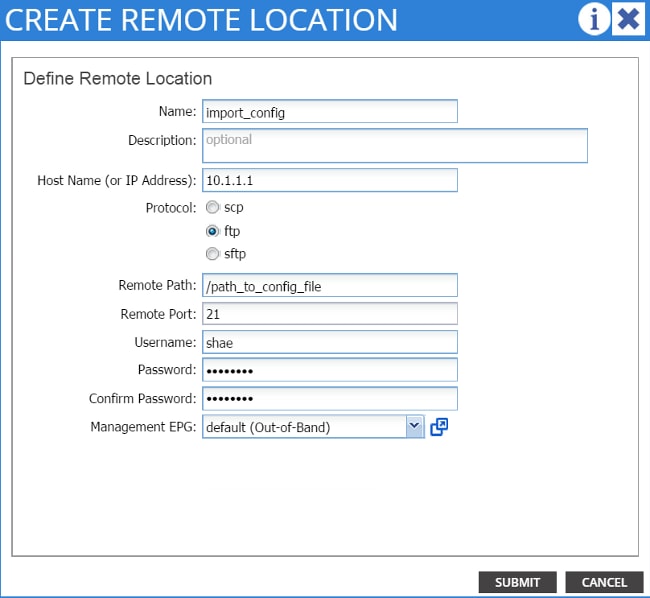
Note: The remote path should be the directory path in which the configuration file resides.
- Create an Import policy:
- Choose Import Policies > Configurations from the sidebar of the Import/Export tab.
- Click Actions (on the right-hand side of the screen).
- Click Create Configuration Import Policy:

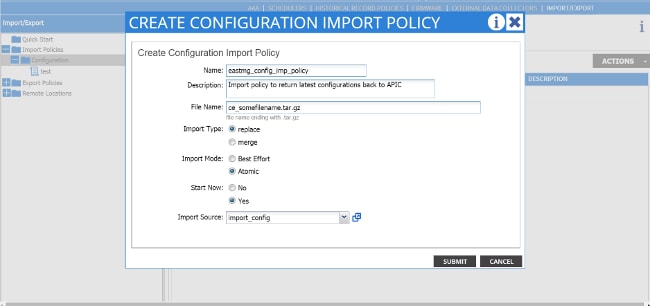
- Import your configuration file via the remote location that you configured, and ensure that:
- The file name field matches the file name on the server, which is ce_somefilename.tar.gz in this example.
- The replace radio button is selected in the Import Type field.
- The Atomic radio button is selected in the Import Mode field.
- The Yes radio button is selected in the Start Now field.
- The Import Source is the remote location that you previously configured.
Here is an example:
- Your old configurations should now appear on the APIC. Use the APIC GUI in order to verify that all of your old configurations are populated in your new APIC.
- Configure the leaf and spine switches:
- Log in via Secure Shell (SSH) to the leaf switch that is connected to the APIC you just configured. The OOB address should still be configured on the switch. If the OOB address does not work, then console into the switch.
- Navigate to the bootflash directory (cd bootflash). This is the directory in which your ACI image file should appear.
- Enter a dir command in order to locate the ACI image that is used in the fabric.
- Once you locate the image file, enter the setup-clean-config.sh < the aci image you located> command, followed by the reload command.
These commands reimage the leaf switch that is connected to one of the APICs that you just replaced. The policies that you configured on your APIC are pushed to the leaf switch that you just reimaged:

- After the leaf switch completes the reload, it should be added back into the fabric automatically (if the leaf switch was previously a part of the fabric). In order to verify this, click Fabric membership in the sidebar of the APIC GUI to which you pushed the configuration file:
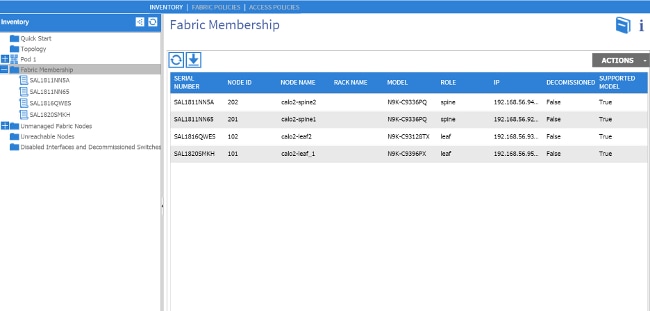
Tip: If the leaf switch does not automatically join the fabric, refer to the Cisco APIC Troubleshooting Guide in order to troubleshoot the fabric discovery issue.
- Repeat Step 4 for each leaf and spine switch in the fabric.
- After you successfully join every leaf and spine switch in the fabric, you must configure the other APICs:
- Repeat the process that is described in Step 1 for each APIC. The APICs should then join the fabric.
- In order to verify that the APICs have joined the fabric, use the GUI of the APIC that you initially configured, and click Controllers in the sidebar of the Controllers sub-header:
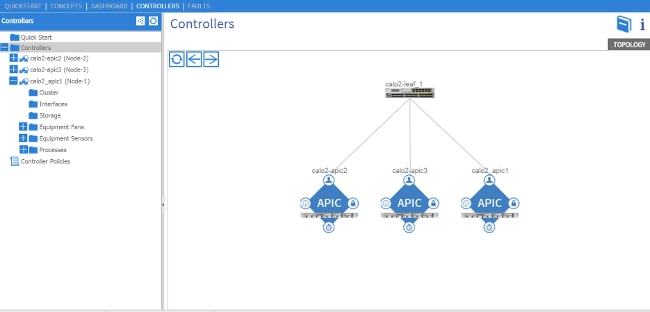
If all of your APICs have successfully joined the fabric, then the configurations that you uploaded on your first APIC are pushed to the other APICs, and the fabric should be fully operational.
Note: Any replaced APICs MUST be installed with the correct version of APIC software as the remaining Cluster members. Failure to do so does not allow that APIC to rejoin the cluster properly.
