Introduction
This document describes the configuration of Custom SSL and Self-signed SSL Certificates.
Prerequisites
Requirements
Cisco recommends that you have knowledge of these topics:
- Digital signatures and digital certificates
- Certificate issuance process by Certificate Authority (CA) organization
Components Used
The information in this document is based on these software and hardware versions:
- Application Policy Infrastructure Controller (APIC)
- Browser
- ACI running 5.2 (8e)
The information in this document was created from the devices in a specific lab environment. All of the devices used in this document started with a cleared (default) configuration. If your network is live, ensure that you understand the potential impact of any command.
Configure
After the device is initialized, it uses the self-signed certificate as the SSL certificate for HTTPS. The self-signed certificate is valid for 1000 days.
By default, the device automatically renews and generates a new self-signed certificate one month prior to the expiration of the self-signed certificate.
Configurations
The device uses a self-signed certificate. When accessing the APIC GUI, the browser prompts that the certificate is not trustworthy. In order to solve this problem, this document uses a trusted CA authority in order to sign the certificate.

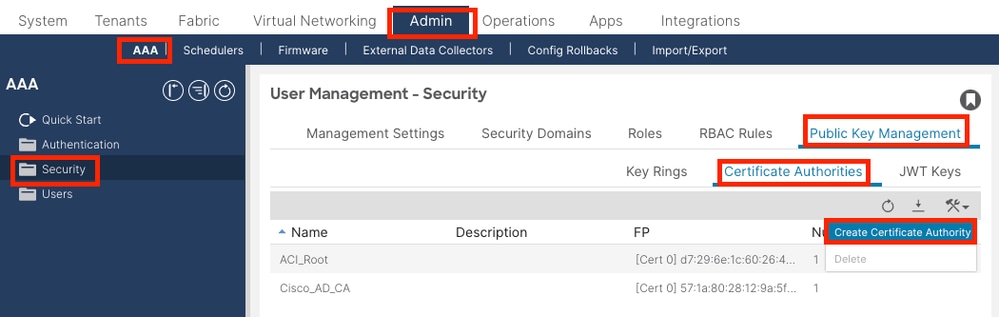
Step 1. Import the CA Authority Root Certificate or Intermediate Certificate

Note: If you are using the CA root certificate for signing directly, you can just import the CA root certificate. But if you are using an intermediate certificate for signing, you must import the complete certificate chain, that is: the root certificate and the less trusted intermediate certificates.
On the menu bar, navigate to Admin > AAA > Security > Public Key Management > Certificate Authorities.
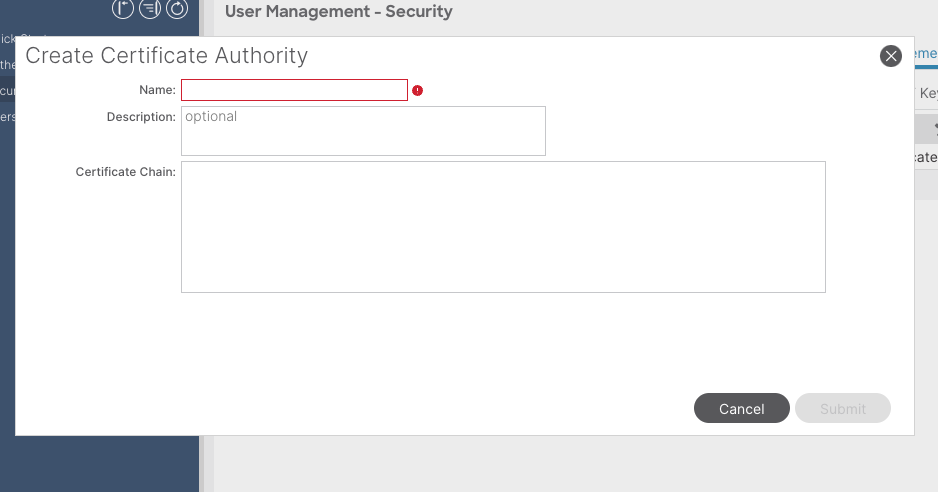
Name: Required.
Formulate the content according to your naming rules. It can contain _, but it cannot contain special English characters, such as:
, . ; ' " : | + * / = ` ~ ! @ # $ % ^ & ( ) and space characters.
Description: Optional.
Certification Chain: Required.
Fill in the trusted CA root certificate and CA intermediate certificate.
Note: Each certificate must conform to a fixed format.
-----BEGIN CERTIFICATE-----
INTER-CA-2 CERTIFICATE CONTENT HERE
-----END CERTIFICATE-----
-----BEGIN CERTIFICATE-----
INTER-CA-1 CERTIFICATE CONTENT HERE
-----END CERTIFICATE-----
-----BEGIN CERTIFICATE-----
ROOT-CA CERTIFICATE CONTENT HERE
-----END CERTIFICATE-----
Click the Submit button.
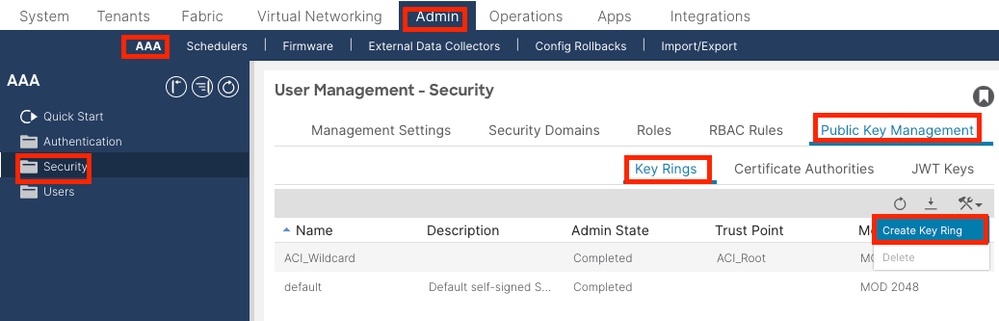
Step 2. Create Key Ring
On the menu bar, navigate to Admin > AAA > Security > Public Key Management > Key Rings.
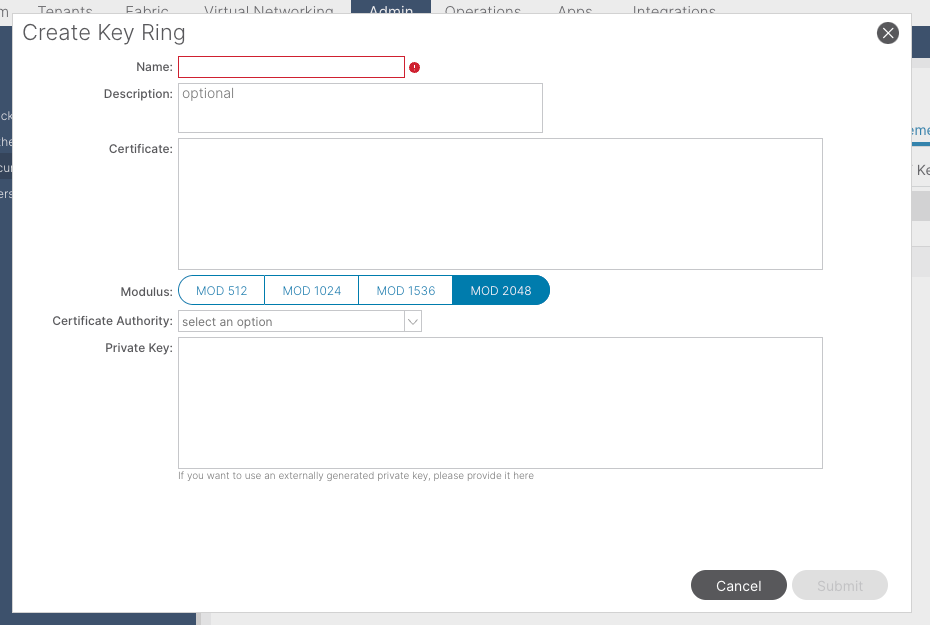
Name:Required (enter a name).
Certificate:do not add any content if you generate a Certificate Signing Request (CSR) using the Cisco APIC through the key ring. Alternatively, add the signed certificate content if you already have one that was signed by the CA from the previous steps by generating a private key and CSR outside of the Cisco APIC.
Modulus: Required (click the radio button for the desired key strength).
Certificate Authority: Required. From the drop-down list, choose the certificate authority that you created earlier.
Private Key:do not add any content if you generate a CSR using theCisco APICthrough the key ring. Alternatively, add the private key used to generate the CSR for the signed certificate that you entered.
Note: If you do not want to use the system-generated private key and CSR and use a custom private key and certificate, you only need to fill in four items: Name, Certificate, Certificate Authority, and Private Key. After submitting you only need to perform the last step, Step 5.
Click the Submit button.
Step 3. Generate Private Key and CSR
On the menu bar, navigate to Admin > AAA > Security > Public Key Management > Key Rings.
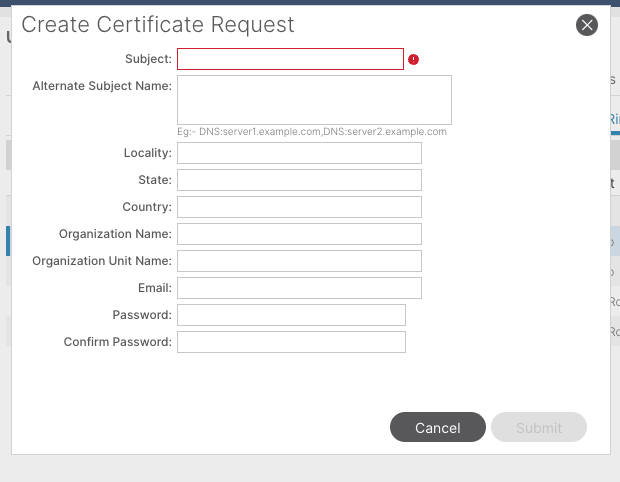
Subject: Required. Enter the common name (CN) of the CSR.
You can enter the fully qualified domain name (FQDN) of the Cisco APICs using a wildcard, but in a modern certificate, it is generally recommended that you enter an identifiable name of the certificate and enter the FQDN of all Cisco APICs in the Alternate Subject Name field (also known as the SAN – Subject Alternative Name) because many modern browsers expect the FQDN in the SAN field.
Alternate Subject Name: Required. Enter the FQDN of allCisco APICs, such as DNS:apic1.example.com,DNS:apic2.example.com,DNS:apic3.example.com or DNS:*example.com.
Alternatively, if you want SAN to match an IP address, enter the IP addresses of Cisco APICs with the format: IP:192.168.1.1.
Note: You can use Domain Name Server (DNS) names, IPv4 addresses, or a mixture of both in this field. IPv6 addresses are not supported.
Fill in the remaining fields according to the requirements of the CA organization you are applying in order to issue the certificate.
Click the Submit button.
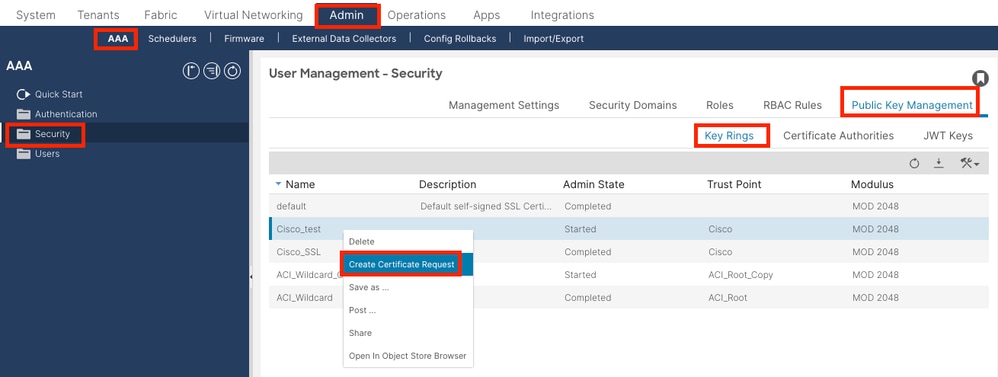
Step 4. Get the CSR and Send it to the CA Organization
On the menu bar, navigate to Admin > AAA > Security > Public Key Management > Key Rings.
Double-click your create Key Ring name and find the Request option. The content in the Request is the CSR.
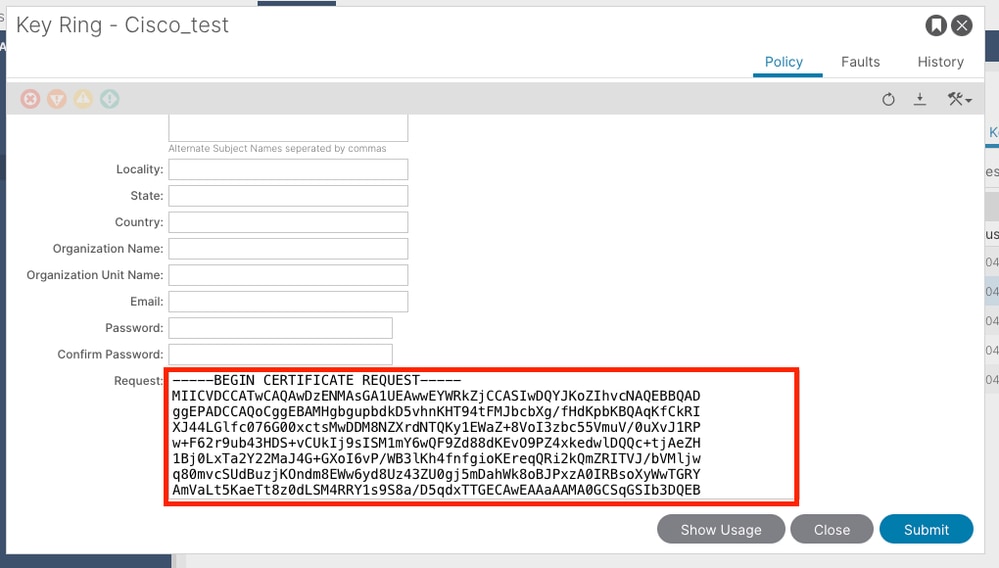
Copy all the contents of the request and send it to your CA.
The CA uses its private key in order to perform signature verification on your CSR.
After obtaining the signed certificate from the CA, it copies the certificate to the Certificate.
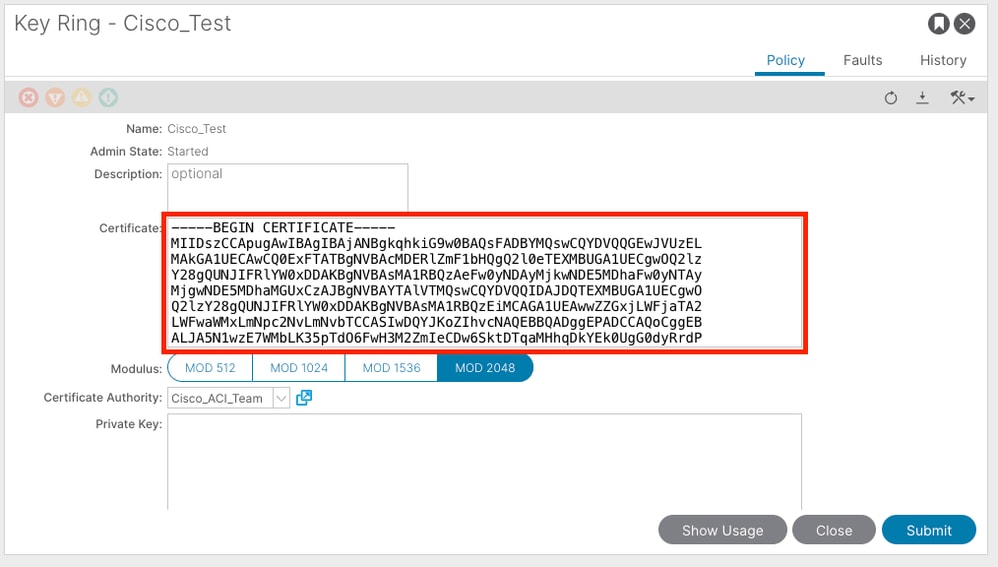
Note: Each certificate must conform to a fixed format.
-----BEGIN CERTIFICATE-----
CERTIFICATE CONTENT HERE
-----END CERTIFICATE-----
Click the Submit button.
Step 5. Update the Signing Certificate on the Web
On the menu bar, navigate to Fabric > Fabric Policies > Policies > Pod > Management Access > Default.
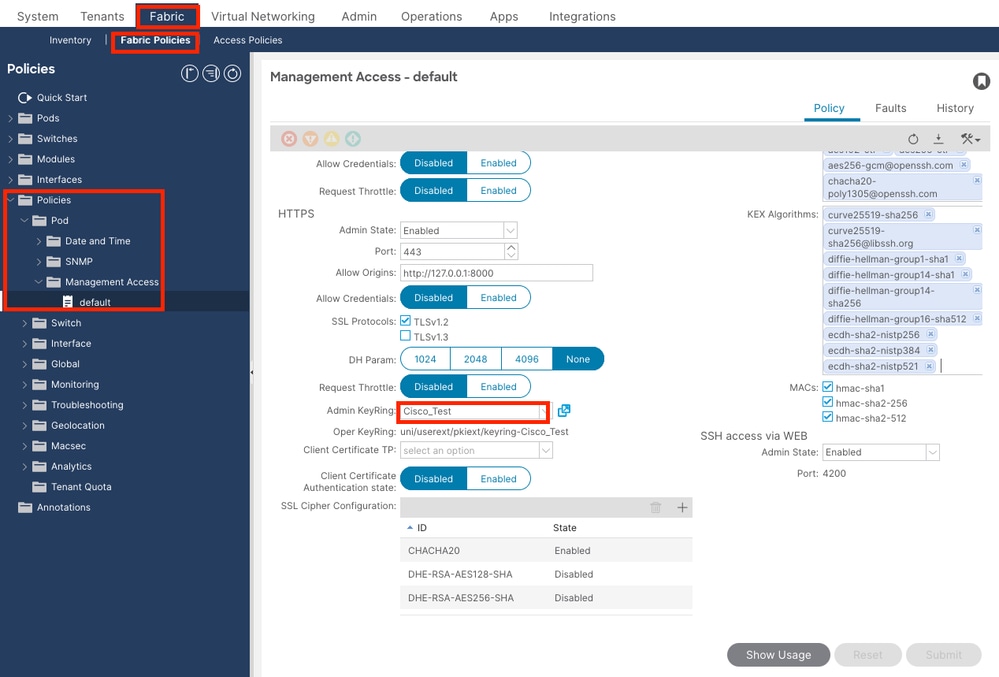
in the Admin KeyRing drop-down list, choose the desired KeyRing.
Click the Submit button.
After clicking submit, an error occurs due to certificate reasons. Refresh with the new certificate.
Verify
After accessing the APIC GUI, APIC uses the CA-signed certificate to communicate. View the certificate information in the browser in order to verify it.

Note: The methods of viewing HTTPS certificates in different browsers are not exactly the same. For specific methods, refer to the user guide of your browser.
Troubleshoot
If the browser still prompts that the APIC GUI is untrusted, verify in the browser whether the certificate of the GUI is consistent with the one submitted in the Keyring.
You need to trust the CA root certificate that issued the certificate on your computer or browser.
Note: The Google Chrome browser must verify the SAN of the certificate in order to trust this certificate.
In APICs that use self-signed certificates, certificate expiration warnings can appear in rare cases.
Find the certificate in Keyring, use the certificate parsing tool in order to parse the certificate, and compare it with the certificate used in the browser.
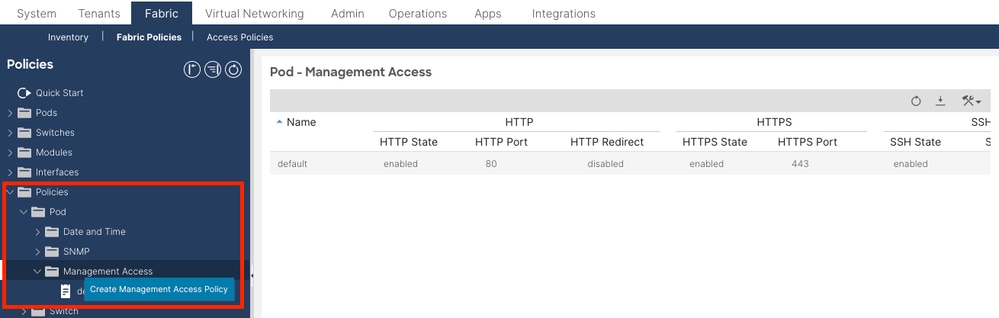
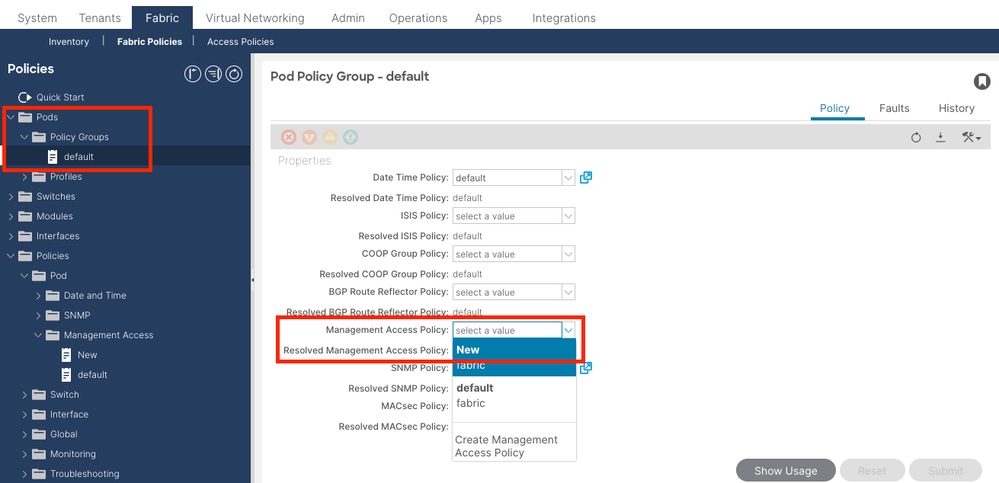
If the certificate in the keyring is renewed, create a new Management Access Policy and apply it.
If the certificate in Keyring is not automatically renewed, contact Cisco TAC for more assistance.
Related Information
 Feedback