Steps to Re-Image APIC controller via HTTP server
Available Languages
Download Options
Bias-Free Language
The documentation set for this product strives to use bias-free language. For the purposes of this documentation set, bias-free is defined as language that does not imply discrimination based on age, disability, gender, racial identity, ethnic identity, sexual orientation, socioeconomic status, and intersectionality. Exceptions may be present in the documentation due to language that is hardcoded in the user interfaces of the product software, language used based on RFP documentation, or language that is used by a referenced third-party product. Learn more about how Cisco is using Inclusive Language.
Contents
Introduction
This document describes how to re-image APIC with the help of HTTP server.
Problem
In the event of an APIC cluster breakdown or Hardware migration from L2/M2 to L4/M4, individual APIC devices can require re-imaging to restore functionality. This procedure outlines a streamlined approach to re-image APICs one by one using an HTTP server facilitating faster cluster recovery with minimal disruption.
Repeat the process sequentially for each APIC device requiring re-imaging. Once all APICs are re-imaged, restore cluster configuration as needed and conduct thorough testing to validate functionality.
This concise procedure enables efficient APIC recovery, allowing administrators to address cluster breakdowns promptly and restore network operations effectively.
Pre Requisites
- CIMC must be configured with OOB IP address.
- Check APIC Release notes, and confirm to which APIC software image you need to re-image.
- Obtain Software image from software.cisco.com
- Confirm that the MD5 Checksum of the image, matches the one published on Cisco.com
- Upload the APIC image on HTTP server.
Solution
To re-image the APIC using an HTTP server, Following steps are needed.
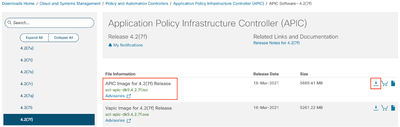
Step 1.First, you need to download the firmware from the Cisco Website.
Open software.cisco.com/download.
Step 2.Enter APIC and select the appropriate version for ACI here, In this 4.2(7f) is selected.
For Example:
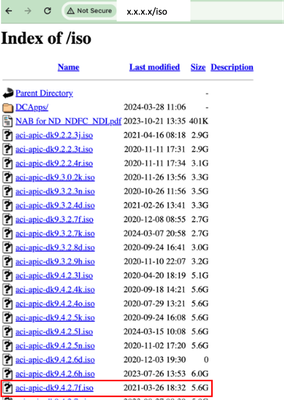
Step 3. Copy the APIC software .iso image to the HTTP server
Example:- http://x.x.x.x/iso/
Step 4. SSH/console to Cisco Integrated Management Controller
-
From a terminal window, log in to the CIMC console
# ssh admin@cimc_ip
Where cimc_ip is the CIMC IP address. For example:
# ssh admin@x.x.x.x
admin@x.x.x.x's password:
system#
-
Change the scope to virtual media:
system# scope vmedia
system /vmedia #
-
Map the .iso image to the HTTP server
system /vmedia # map-www volume_name http://http_server_ip_and_path iso_file_name
Where:
- volume_name is the name of the volume.
- http_server_ip_and_path is the IP address of the HTTP server and the path to the .iso file location.
- iso_filename is the name of the .iso file.
Note : There is space between the http_server_ip_and_path and the iso_filename
For example:
system /vmedia # map-www apic http://x.x.x.x/iso/ aci-apic-dk9.4.2.7f.iso
Server username: admin
Server password:
Confirm password:
Note: /* If no authentication required here, just press Enter
-
Check the mapping status:
system /vmedia # show mappings detail
The Map-Status must be shown as OK.
For Example:
system /vmedia # show mappings detail
Volume apic:
    Map-Status: OK
    Drive-Type: CD
    Remote-Share: http://x.x.x.x/iso/

    Remote-File: aci-apic-dk9.4.2.7f.iso
    Mount-Type: www
    Mount-Options: noauto,username=admin,password=********3
    system /vmedia #
-
Connect to SOL to monitor the installation process:
system /vmedia # connect host
CISCO Serial Over LAN:
Press Ctrl+x to Exit the session
Step 5. Power Cycle From the KVM console of CIMC GUI
Choose Power > Power Cycle System (cold boot) to power cycle the controller

From the SOL console: Watch the screen during the boot process and prepare to press F6 at the appropriate moment to enter the boot selection menu.
For example:
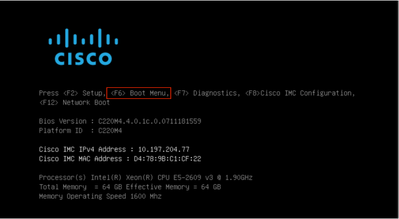
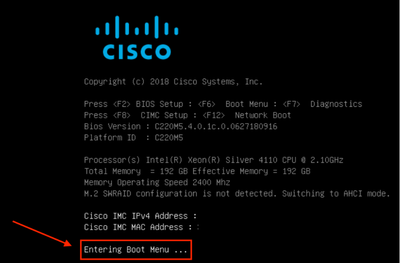
After Pressing the F6
Note: If you miss your opportunity and were not able to press F6 at the appropriate moment, go back to Step 5 to power cycle the controller and repeat the process until you are able to press F6 to enter the boot selection menu.
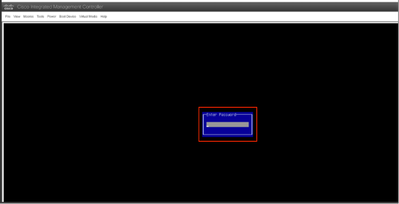
You can also have to enter the BIOS password. The default password is password
At the boot selection menu, select the Cisco CIMC-Mapped vDVD1.22 option as the one-time boot device.

Step 6. Go Back to CIMC CLI and monitor the out-put of “Connect Host”.
Monitor the CIMC cli , when get the message "To speed up the install, enter iso url in next ten minutes" then the enter http server URL with APIC image.
++ grep /run/install/repo
++ cut -f 1 -d ' '
++ tr -d '[:digit:]'
+ usbdevice=/dev/sr
+ mkdir /mnt/usbdata
+ mount /dev/sr2 /mnt/usbdata
mount: special device /dev/sr2 does not exist
+ true
+ '[' -f /mnt/usbdata/ifabric.iso ']'
+ mountpoint -q /mnt/usbdata
+ true
+ echo 'INFO: found second partition on install media but did not find ifabric.iso. '
INFO: found second partition on install media but did not find ifabric.iso.
+ echo 'Continuing on to ISO URL prompt.'
Continuing on to ISO URL prompt.
+ '[' 0 -eq 0 ']'
+ read_iso_url
+ true,,
+ echo 'To speed up the install, enter iso url in next ten minutes: '      << Enter the http server URL with apic image  >>
To speed up the install, enter iso url in next ten minutes:
+ read -t 600 -p '? ' url
?
http://x.x.x.x/iso/aci-apic-dk9.4.2.7f.iso 5:program-log      << Enter the http server details  >>
[anaconda] 1:main* 2:shell  3:log  4:storage-lo> Switch tab: Alt+Tab | Help: F1
Note: There is no space between the http_server_ip_and_path and the iso_filename.
Step 7: After Entering the HTTP url , boot process will continue.
Note: If you choose static option, you will be asked to enter the interface name, management IP address and gateway.
+ '[' 0 -eq 0 ']'
+ read_iso_url
+ true
+ echo 'To speed up the install, enter iso url in next ten minutes: '
To speed up the install, enter iso url in next ten minutes:
+ read -t 600 -p '? ' url
?
[ahttp://x.x.x.x/iso/aci-apic-dk9.4.2.7f.iso 5:program-log
++ awk -F '/|:' '{print $4}'
+ urlip=x.x.x.x
+ '[' -z http://x.x.x.x/iso/aci-apic-dk9.4.2.7f.iso ']'
+ '[' -z x.x.x.x ']'
+ break
+ '[' -n http://x.x.x.x/iso/aci-apic-dk9.4.2.7f.iso ']'
+ set +e
+ configured=0
+ '[' 0 -eq 0 ']'
+ echo 'Configuring network interface'
Configuring network interface
+ echo 'type static, dhcp, bash for a shell to configure networking, or url to re-enter the url: '
>>
<< Type static and configure the APIC OOB IP address with it’s gateway>>
type static, dhcp, bash for a shell to configure networking, or url to re-enter the url:
+ read -p '? ' ntype
? static.   << Enter the static  to configure the networking >>
[anaconda] 1:main* 2:shell  3:log  4:storage-lo> Switch tab: Alt+Tab | Help: F1
Note: After typing the static it will list down the CIMC interface, select the correct interface. if you selected the wrong interface then the packet loss will be 100% then after three fail attempts of ping , it will again ask to select the correct interface until packet loss is 0 if you are not aware about interface select the all interface one by one.
For Example:
+ case $ntype in
+ configure_static
+ echo 'Available interfaces'
Available interfaces
+ ls -l /sys/class/net
total 0
lrwxrwxrwx. 1 root root 0 May  3 07:08 enp11s0 -> ../../devices/pci0000:00/0000:00:03.0/0000:06:00.0/0000:07:01.0/0000:09:00.0/0000:0a:00.0/0000:0b:00.0/net/enp11s0
lrwxrwxrwx. 1 root root 0 May  3 07:08 enp12s0 -> ../../devices/pci0000:00/0000:00:03.0/0000:06:00.0/0000:07:01.0/0000:09:00.0/0000:0a:01.0/0000:0c:00.0/net/enp12s0
lrwxrwxrwx. 1 root root 0 May  3 07:08 enp1s0f0 -> ../../devices/pci0000:00/0000:00:01.0/0000:01:00.0/net/enp1s0f0
lrwxrwxrwx. 1 root root 0 May  3 07:08 enp1s0f1 -> ../../devices/pci0000:00/0000:00:01.0/0000:01:00.1/net/enp1s0f1
lrwxrwxrwx. 1 root root 0 May  3 07:08 lo -> ../../devices/virtual/net/lo
+ read -p 'Interface to configure: ' interface
Interface to configure: enp1s0f0     <<  select the correct interface   >>
[anaconda] 1:main* 2:shell  3:log  4:storage-lo>
Step 8: Correct interface check
After Entering the interface it will try to ping http server and if selected interface is correct then packet loss must be 0% and start fetching the image from http server.
For Example: After Entering the correct interface with 0% Packet loss.
+ read -p 'Interface to configure: ' interface
Interface to configure:  enp1s0f0
+ read -p 'address: ' addr
address: x.x.x.x/24
+ read -p 'gateway: ' gw
gateway: x.x.x.x
+ ip addr add x.x.x.x/24 dev enp1s0f0
+ ip link set enp1s0f0 up
+ ip route add default via x.x.x.x
++ seq 1 2
+ for count in '$(seq 1 2)'
+ ping -c 1 x.x.x.x
PING x.x.x.x (x.x.x.x) 56(84) bytes of data.
64 bytes from x.x.x.x: icmp_seq=1 ttl=64 time=55.0 ms
--- x.x.x.x ping statistics ---
1 packets transmitted, 1 received, 0% packet loss, time 0ms
rtt min/avg/max/mdev = 55.056/55.056/55.056/0.000 ms
+ configured=1
+ break
+ '[' 1 -eq 0 ']'
+ echo 'Fetching http://x.x.x.x/iso/aci-apic-dk9.4.2.7f.iso'

Fetching http://x.x.x.x/iso/aci-apic-dk9.4.2.7f.iso >> started fetching the apic image from HTTP server
+ wget -o /dev/null -O /tmp/cdrom.iso http://x.x.x.x/iso/aci-apic-dk9.4.2.7f.iso
If you selected the wrong interface then the packet loss will be 100% then after three fail attempts of ping it will again ask to select the correct interface.
For Example: After Entering the wrong interface with 100% Packet loss
+ read -p 'Interface to configure: ' interface
Interface to configure: enp11s0
+ read -p 'address: ' addr
address: x.x.x.x/24
+ read -p 'gateway: ' gw
gateway: x.x.x.x
+ ip addr add x.x.x.x/24 dev enp11s0
+ ip link set enp11s0 up
+ ip route add default via x.x.x.x
++ seq 1 2
+ for count in '$(seq 1 2)'
+ ping -c 1 x.x.x.x
PING x.x.x.x (x.x.x.x) 56(84) bytes of data.
From x.x.x.x icmp_seq=1 Destination Host Unreachable

--- x.x.x.x ping statistics ---
1 packets transmitted, 0 received, +1 errors, 100% packet loss, time 0ms

+ sleep 20
+ for count in '$(seq 1 2)'
+ ping -c 1 x.x.x.x
PING x.x.x.x (x.x.x.x) 56(84) bytes of data.
From x.x.x.x icmp_seq=1 Destination Host Unreachable

--- x.x.x.x ping statistics ---
1 packets transmitted, 0 received, +1 errors, 100% packet loss, time 0ms

+ sleep 20
+ '[' 0 -eq 0 ']'
+ echo 'Configuring network interface'
Configuring network interface
+ echo 'type static, dhcp, bash for a shell to configure networking, or url to re-enter the url: ' <<Asking again to select the interface after selecting the type i,e static >>
type static, dhcp, bash for a shell to configure networking, or url to re-enter the url:
+ read -p '? ' ntype
?
Keep Monitor the CIMC CLI and wait for approx. 40-50 Min , you will get following output on cli.
[anaconda] 1:main* 2:shell  3:log  4:storage-lo> Switch tab: Alt+Tab | Help: F1
[  OK  ] Started Show Plymouth Power Off Screen.
[  OK  ] Stopped Availability of block devices.
         Stopping Logout off all iSCSI sessions on shutdown...
         Stopping LVM2 metadata daemon...
[  OK  ] Stopped LVM2 metadata daemon.
[  OK  ] Stopped Logout off all iSCSI sessions on shutdown.
[  OK  ] Stopped target Network.
[  OK  ] Stopped Remount Root and Kernel File Systems.
         Stopping Remount Root and Kernel File Systems...
[  OK  ] Started Restore /run/initramfs.
[  OK  ] Reached target Shutdown.
dracut Warning: Killing all remaining processes
Powering off.
reboot: Power down
Step 9: Exit SOL after PowerOff
Wait until you see the message poweroff in the SOL console, then exit from SOL by pressing Ctrl and x (Ctrl+x) and login to CIMC again and change the scope again.
(i) Change the scope to virtual media again:
system# scope vmedia
system /vmedia #
 (ii) Unmap the .iso image that you mapped in 2.c:
 system /vmedia # unmap volume_name
 At the Save mapping prompt, enter yes if you want to save the mapping or no if you do not want to save the mapping. For example:
 system /vmedia # unmap apic
 Save mapping? Enther 'yes' or 'no' to confirm (CTRL-C to cancel) → yes
 system /vmedia #
 (iii) Connect back to SOL again:
       system /vmedia #  connect host
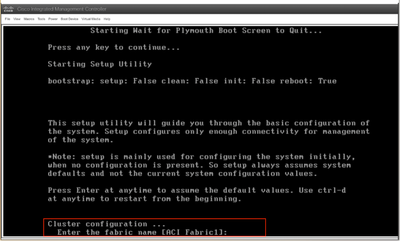
Step 10: Initial Config
From the KVM console: Choose Power > Power on System to power on the controller and Lunch KVM , it will ask for APIC Initial configuration
Revision History
| Revision | Publish Date | Comments |
|---|---|---|
1.0 |
03-Jun-2024 |
Initial Release |
Contributed by Cisco Engineers
- Shivam TripathiTAC
 Feedback
Contact Cisco
- Open a Support Case

- (Requires a Cisco Service Contract)