Introduction
This document describes how to import the atomic adapters/Adapters as atomic workflow.
Background Information
As per this document - https://docs.cloudcenter.cisco.com/display/ACTIONORCHESTRATOR/Action+Orchestrator+5.0.0
Support is supposed to provide customers with access/information about the Atomic Adapters or adapters as atomic workflows. Those include Azure, Vmware, Kubernetes, DNAC, UCSD, etc
How to Import Atomic Adapters/Adapters as Atomic Workflow?
This is the procedure to import the Atomic Adapters. In order to see a recording of this, click here.
Play recording
Password: 7NqHgvXV
Note: You must be on AO version 5.0.1 or later due to changes in import/export folders.
- Navigate to this git site: https://github.com/cisco/ActionOrchestratorContent
- If you do not have a git user account you need to create one.
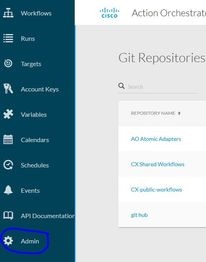
- Open Action Orchestrator and navigate to the Admin page and then click on Git Repositories link, as shown in the image.

- Click on NEW GIT REPOSITORY.
- Give the repo a display name.
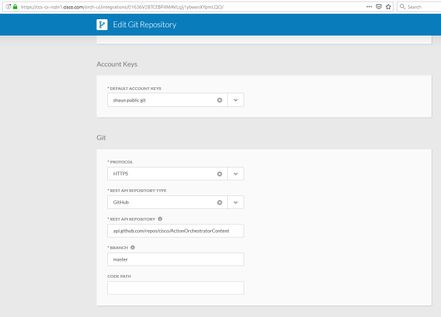
- Under Default Account Keys, click on NEW and choose Git Password-Based Credentials.
- Give the Account Key a display name and then put in the git user and password created in step #2 (if already exists you do not need to create one).
- For protocol, click on HTTPS.
- For REST API REPO TYPE, select GITHUB.
- In the REST API REPO input put in api.github.com/repos/cisco/ActionOrchestratorContent.
- Leave branch as main.
- You will need to put in a code-path depending on what you wish to use. If you wish to get the Atomic Adapters(like ACI, UCSD, Kubernetes, etc) you must put the code path as /atomic-actions. If you want to get the workflow examples you must put the code path as /workflow-examples. If you want both you will need to create 2 separate git connections.

- Click Submit to create the repo connection.
- Next import the atomic adapters.
- Click the Workflow area.
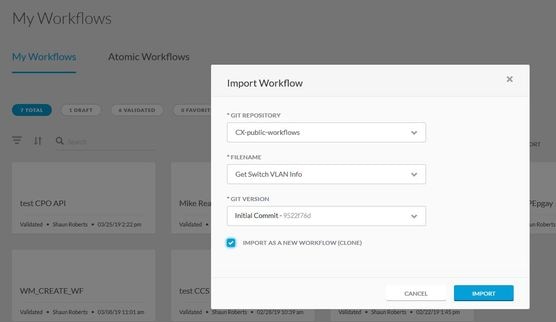
- Click IMPORT.
- Select the GIT REPO just created.
- Then select the appropriate FILENAME (atomic adapter) to import and select the version wanted.
- Check the box which says IMPORT AS NEW WORKFLOW(CLONE).
- Click on IMPORT.

- The workflow imports and then is available for use in the toolbox under Activities.
Note: The workflow is imported under the ATOMIC WORKFLOW heading in the Workflow area.


 Feedback