Configure Sensu and other Actions to Register Clients
Available Languages
Download Options
Bias-Free Language
The documentation set for this product strives to use bias-free language. For the purposes of this documentation set, bias-free is defined as language that does not imply discrimination based on age, disability, gender, racial identity, ethnic identity, sexual orientation, socioeconomic status, and intersectionality. Exceptions may be present in the documentation due to language that is hardcoded in the user interfaces of the product software, language used based on RFP documentation, or language that is used by a referenced third-party product. Learn more about how Cisco is using Inclusive Language.
Contents
Introduction
This document describes how to configure a Sensu server and other actions on CloudCenter to add or remove worker Virtual Machines (VMs) from the server.
Prerequisites
Requirements
Cisco recommends that you have knowledge of these topics:
- CloudCenter Actions
- Sensu
Components Used
This document is not restricted to specific software and hardware versions.
The information in this document was created from the devices in a specific lab environment. All of the devices used in this document started with a cleared (default) configuration. If your network is live, make sure that you understand the potential impact of any command.
Background Information
Sensu is a program designed to monitor various aspects of a machine. It can be incorporated into CloudCenter to provide increased monitoring ability to any deployed VM's. This walkthrough is designed to be an example that shows how you can integrate Sensu with CloudCenter with the use of actions.
Configure
This is designed to run on a CentOS 7 VM that has direct access to the internet. If you need to connect to a proxy, perform that configuration before you proceed.
Open these ports for incoming and outgoing: 3000, 3030, 4567, 5671, 5672, 6379.
Ensure that the Sensu server has a static IP address.
Note: All that is inside the Code Blocks is designed to be copied and pasted into the terminal.
Install Epel Repository
sudo yum -y install epel-release
Install Erlang
sudo yum -y install erlang
Install Redis, RabbitMQ, and Configure RabbitMQ
sudo rpm --import http://www.rabbitmq.com/rabbitmq-signing-key-public.asc
sudo rpm -Uvh http://www.rabbitmq.com/releases/rabbitmq-server/v3.4.1/rabbitmq-server-3.4.1-1.noarch.rpm
sudo rabbitmq-plugins enable rabbitmq_management
sudo yum -y install redis
sudo chkconfig redis on
sudo service redis start
sudo chkconfig rabbitmq-server on
sudo /etc/init.d/rabbitmq-server start
sudo rabbitmqctl add_vhost /sensu
sudo rabbitmqctl add_user sensu secret
sudo rabbitmqctl set_permissions -p /sensu sensu ".*" ".*" ".*"
Register Sensu Repository
echo '[sensu]
name=sensu-main
baseurl=http://repositories.sensuapp.org/yum/el/7/x86_64/
gpgcheck=0
enabled=1' |sudo tee /etc/yum.repos.d/sensu.repo
Install and Configure Sensu
sudo yum -y install sensu
sudo rm -f /etc/sensu/config.json.example

echo '{
    "api": {
        "host": "localhost",
        "bind": "0.0.0.0",
        "port": 4567
    }
}' |sudo tee /etc/sensu/conf.d/api.json

echo '{
    "client": {
        "name": "sensu-server",
        "address": "127.0.0.1",
        "environment": "sensu",
        "subscriptions": [ "linux"],
        "keepalive":
        {
            "handler": "mailer",
            "thresholds": {
                "warning": 250,
                "critical": 300
            }
        },
        "socket": {
            "bind": "127.0.0.1",
            "port": 3030
        }
    }
}' |sudo tee /etc/sensu/conf.d/client.json

echo '{
    "rabbitmq": {
        "host": "127.0.0.1",
        "port": 5672,
        "vhost": "/sensu",
        "user": "sensu",
        "password": "secret"
    }
}' |sudo tee /etc/sensu/conf.d/rabbitmq.json

echo '{
    "redis": {
        "host": "127.0.0.1",
        "port": 6379
    }
}' |sudo tee /etc/sensu/conf.d/redis.json

echo '{
    "transport": {
        "name": "rabbitmq",
        "reconnect_on_error": true
    }
}' |sudo tee /etc/sensu/conf.d/transport.json
Enable Sensu Services
sudo chkconfig sensu-server on
sudo chkconfig sensu-client on
sudo chkconfig sensu-api on
sudo service sensu-server start
sudo service sensu-client start
sudo service sensu-api start
Install and Configure Uchiwa
sudo yum -y install uchiwa
echo '{
    "sensu": [
        {
            "name": "sensu",
            "host": "localhost",
            "port": 4567,
            "timeout": 10
        }
    ],
    "uchiwa": {
        "host": "0.0.0.0",
        "port": 3000,
        "refresh": 10
    }
}' |sudo tee /etc/sensu/uchiwa.json

sudo chown uchiwa:uchiwa /etc/sensu/uchiwa.json
sudo chmod 664 /etc/sensu/uchiwa.json
sudo chkconfig uchiwa on
sudo service uchiwa start
Verify if the Server Runs
Navigate to IPAddress: 3000/#/events
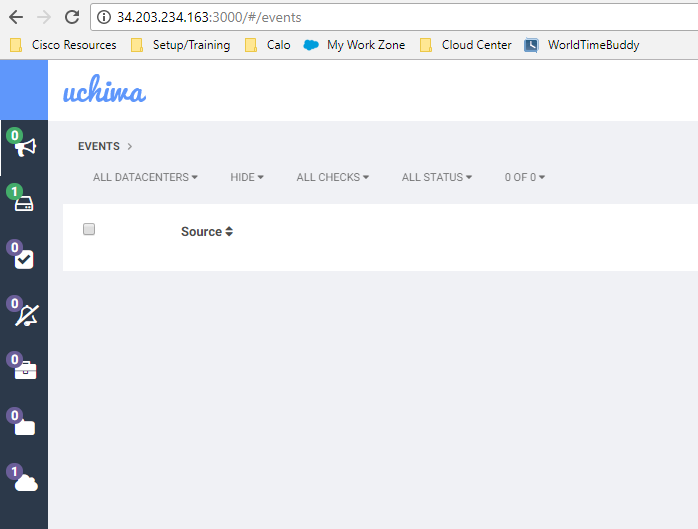
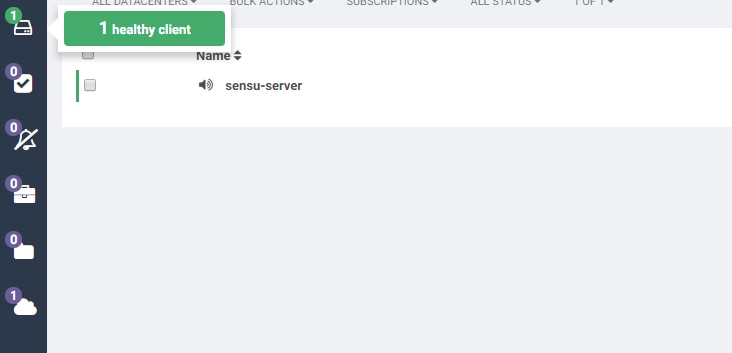
At this point, you should have one client called Sensu-server.
Configure Checks
echo '{
    "checks": {
        "check-cpu-linux": {
            "handlers": ["mailer"],
            "command": "/opt/sensu/embedded/bin/check-cpu.rb -w 80 -c 90 ",
            "interval": 60,
            "occurrences": 5,
            "subscribers": [ "linux" ]
        }
    }
}' |sudo tee /etc/sensu/conf.d/check_cpu_linux.json

echo '{
    "checks": {
        "check-disk-usage-linux": {
            "handlers": ["mailer"],
            "type": "metric",
            "command": "/opt/sensu/embedded/bin/check-disk-usage.rb",
            "interval": 60,
            "occurrences": 5,
            "subscribers": [ "linux" ]
        }
    }
}' |sudo tee /etc/sensu/conf.d/check_disk_usage_linux.json

echo '{
    "checks": {
        "check_memory_linux": {
            "handlers": ["mailer"],
            "command": "/opt/sensu/embedded/bin/check-memory-percent.rb -w 80 -c 90 ",
            "interval": 60,
            "occurrences": 5,
            "refresh": 1800,
            "subscribers": [ "linux" ]
        }
    }
}' |sudo tee /etc/sensu/conf.d/check_memory_linux.json

sudo sensu-install -p cpu-checks
sudo sensu-install -p disk-checks
sudo sensu-install -p memory-checks
Restart Sensu
sudo service sensu-client restart && sudo service sensu-server restart && sudo service sensu-api restart
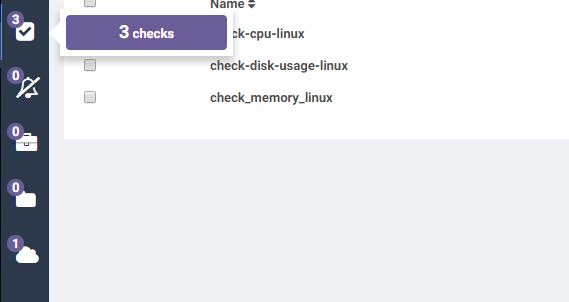
After a minute, you should have three checks listed.
If you click on the Sensu-server client, you see detailed information from the three checks for that device.
Update Action Scripts
- Download Sensu.zip.
- Unzip file.
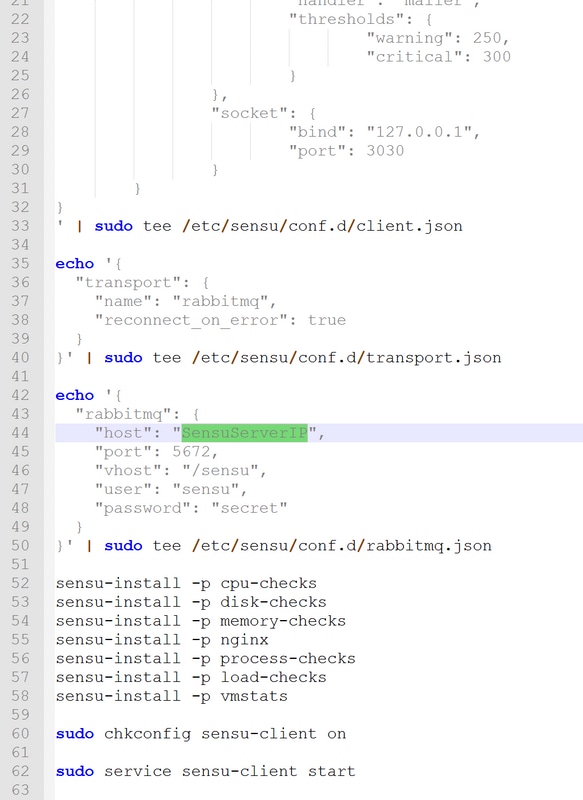
- Edit sensuinstall.sh.
- Change the line host to"SensuServerIP" to have the IP address of the Sensu Server.
5. Edit sensuuninstall.sh.
6. Change the line curl -s -i -X DELETE http://SensuServerIP:4567/clients/$cliqrNodeHostname to have the IP address of the Sensu Server.

7. Zip the modified files back into Sensu.zip.
8. Upload to a repository that the CloudCenter Manager (CCM) has configured.
Create Sensu Actions
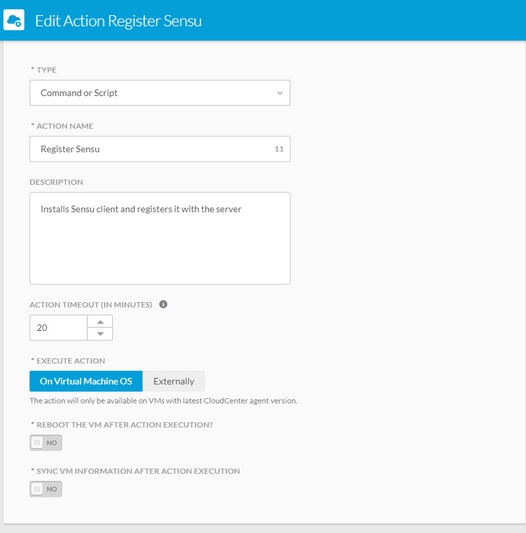
Navigate to Actions Library and select New Action.

Type: Command or Script
Action Name: Register Sensu
Description: Installs Sensu client and registers it with the server
Execute Action: On Virtual Machine OS
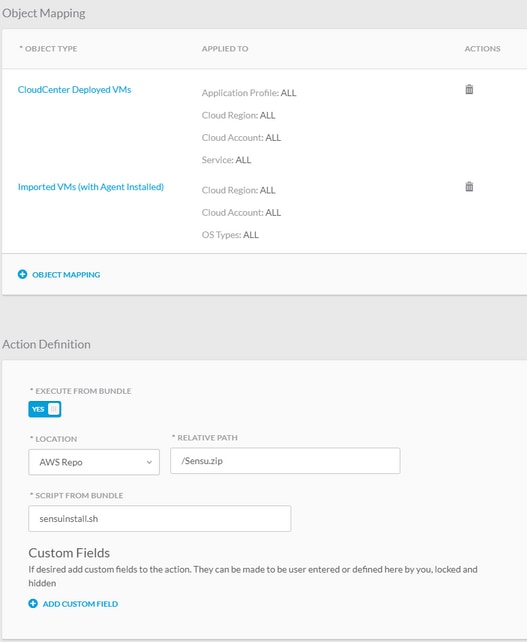
Object Mapping:
Resource Type: CloudCenter Deployed VMs
Application Profile: All
Cloud Region: All
Cloud Account: All
Service All
Resource Type: Imported VMs (with Agent Installed)
Cloud Region: All
Cloud Account: All
OS Types: All
Action Definition:
Execute From Bundle: Yes
Location: The repo you uploaded it to, and the path to the Sensu.zip file
Script From Bundle: sensuinstall.sh
Save action and create another new action
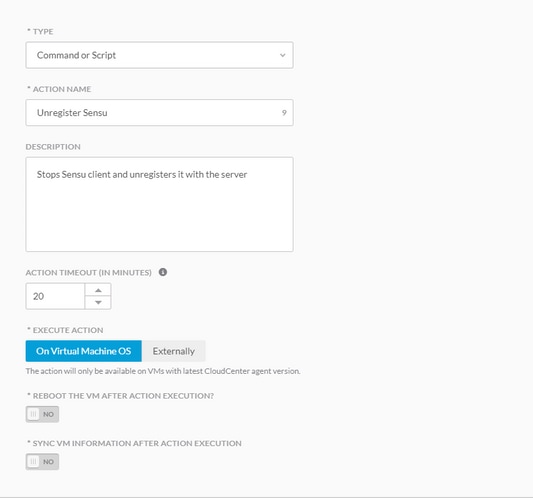
Type: Command or Script
Action Name: Unregister Sensu
Description: Stops Sensu client and unregisters it with the server
Execute Action: On Virtual Machine OS
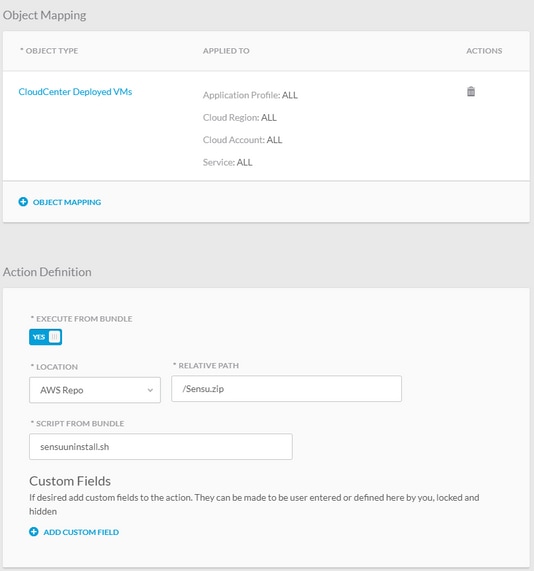
Object Mapping:
Resource Type: CloudCenter Deployed VMs
Application Profile: All
Cloud Region: All
Cloud Account: All
Service All
Resource Type: Imported VMs (with Agent Installed)
Cloud Region: All
Cloud Account: All
OS Types: All
Action Definition:
Execute From Bundle: Yes
Location: The repo you uploaded it to, and the path to the Sensu.zip file
Script From Bundle: sensuuninstall.sh
Save Action
You can now use these actions on any deployed VM to register it to your Sensu server and unregister. Note that unregister does not uninstall the Sensu client, it just stops the service and removes it from the server's database (DB).
Related Information
Contributed by Cisco Engineers
- Jesse LafuentiCisco TAC Engineer
Contact Cisco
- Open a Support Case

- (Requires a Cisco Service Contract)
 Feedback