Introduction
This document describes how to configure and claim a standalone C-Series server in Cisco Intersight after the motherboard has been replaced.
Prerequisites
Requirements
Cisco recommends that you have knowledge of these topics:
- Cisco Integrated Management Controller (CIMC)
- Cisco Intersight
- Cisco C-Series Servers
Components Used
The information in this document is based on these software and hardware versions:
- Cisco C240-M5 4.1(3d)
- Cisco Intersight Software as a Service (SaaS)
The information in this document was created from the devices in a specific lab environment. All of the devices used in this document started with a cleared (default) configuration. If your network is live, ensure that you understand the potential impact of any command.
Related Products
This document can also be used with these hardware and software versions:
- C-Series M4 3.0(4) and later
- C-Series M5 3.1 and later
- C-Series M6 4.2 and later
- S-Series M5 4.0(4e) and later
Note: For a comprehensive list of supported hardware and software, reference these links: Intersight Supported PIDs and Intersight Supported Systems.
Background Information
- The most common use case for this document is when a C-Series was claimed to Cisco Intersight and the motherboard is replaced by Return Material Authorization (RMA). Anytime an RMA occurs the original server needs to be unclaimed and the new server needs to be claimed in Cisco Intersight.
- This document assumes the original C-Series server was claimed successfully before the motherboard RMA, and there are no configuration or network issues that would contribute to a failed claim process.
- You can unclaim targets directly from the Cisco Intersight Portal or from the Device Connector of the endpoint itself, it is recommended to unclaim targets from Cisco Intersight Portal.
- If a target is directly unclaimed from its Device Connector and not the Intersight Portal, it shows the target within Cisco Intersight as unclaimed. The endpoint also needs to be manually unclaimed from Cisco Intersight.
- The original C-Series server likely displays status as Not Connected in Cisco Intersight. This can vary based on the reason why the motherboard needs replacement.
Problem: New RMA Server Is Not Claimed in Intersight and Original Failed Server is Claimed
If a standalone C-Series server has been claimed in Cisco Intersight the server Serial Number (SN) becomes paired with Cisco Intersight. If the claimed server requires a motherboard replacement due to a failure or any other reason, the original server needs to be unclaimed and the new server needs to be claimed in Cisco Intersight. The C-Series SN changes with the motherboard RMA.
Solution
Unclaim the C-Series server from Cisco Intersight that needs replacement. Configure the new servers CIMC, and Device Connector, and Claim the new server to Cisco Intersight.
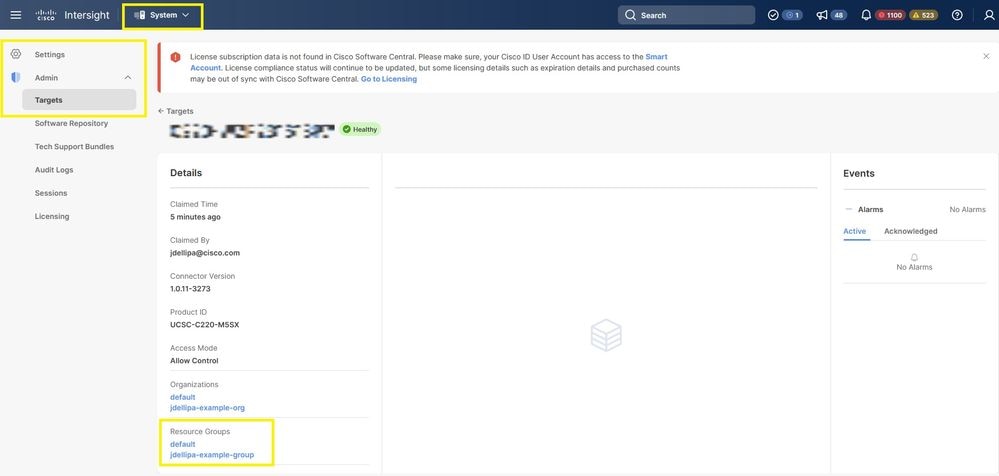
Step 1. If you have any Resource Groups defined follow this step, if not, proceed to Step 1.1. Launch Cisco Intersight and click System > Settings > Admin > Targets and locate your server that needs replacement. Make a note of any Resource Groups that are non-default, as shown in this image.
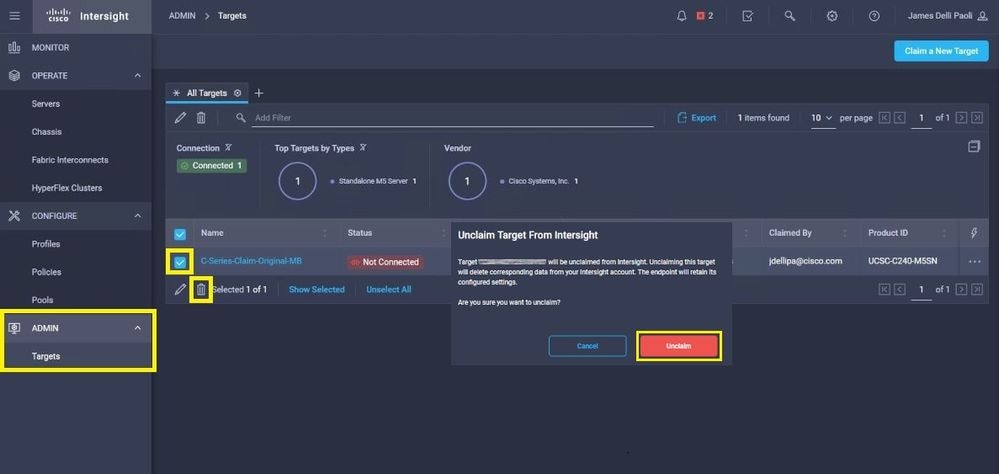
Step 1.1. Navigate to Admin > Targets. Select the box for the target(s) that are to be replaced and unclaimed and click the Trash Can Icon > Unclaim as shown in this image.
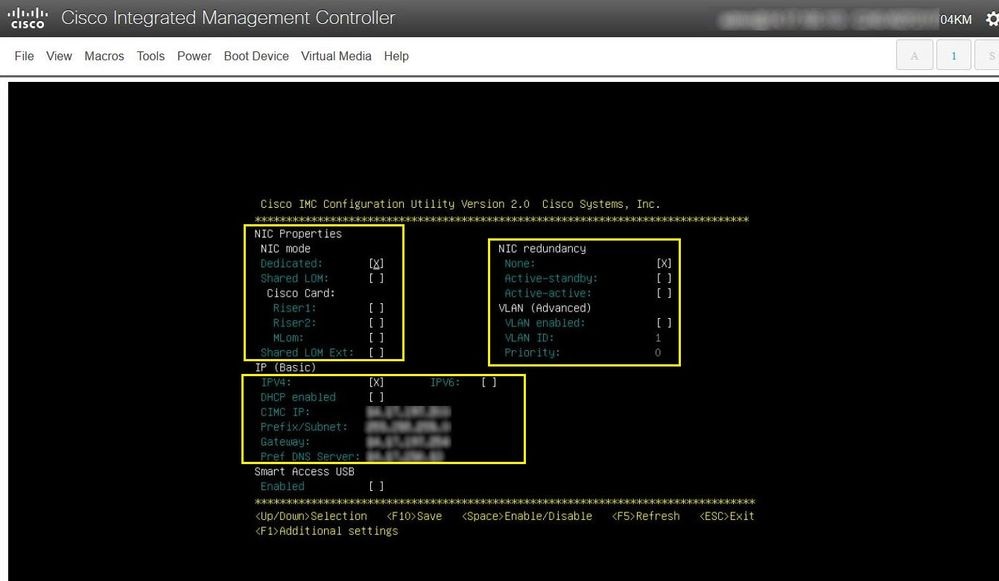
Step 2. Connect a Keyboard Video Monitor (KVM) to the newly replaced server (skip this step if CIMC has already been configured). At the Cisco splash screen on bootup select F8 to configure CIMC. Configure the appropriate Network Interface Card (NIC) Properties for your environment and press F10 to Save. Insert physical cables to the server and its connected device based on the NIC Properties used for management.
Note: Step 2. illustrates and describes a local setup of the CIMC with a connected KVM directly to a C240-M5. The initial CIMC setup can also be done remotely with DHCP. Please reference the proper Installation Guide for your server model and choose which Initial CIMC Setup is best for you.
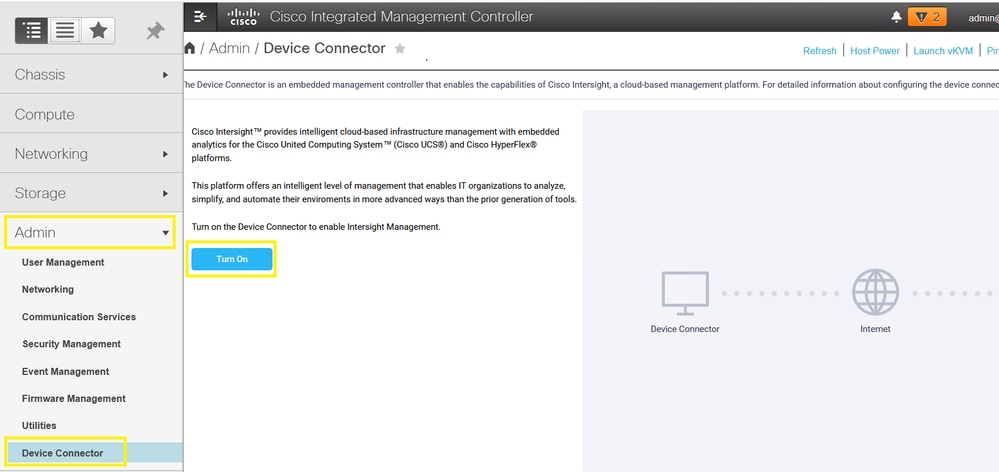
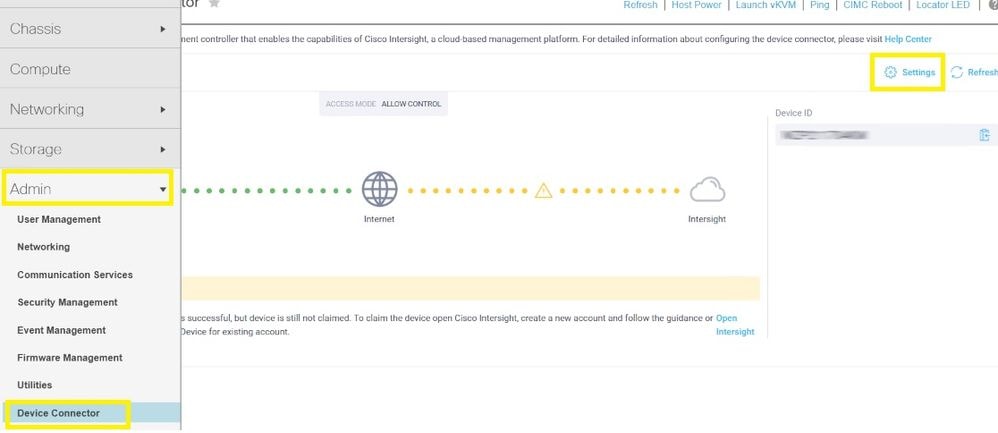
Step 3. Launch CIMC Graphical User Interface (GUI) and navigate to Admin > Device Connector. If Device Connector is disabled, choose Turn On. Once it is enabled select Settings.
Tip: In the CIMC GUI navigate to Chassis > Summary and compare the Firmware Version to confirm the minimum firmware requirements are met to be claimed by Cisco Intersight. Use this link to verify the minimum requirements for your specific server model: Intersight Supported Systems. If the firmware does not meet the minimum requirements to be claimed, run a Host Upgrade Utility (HUU) on the server, see here: Cisco Host Upgrade Utility Process.
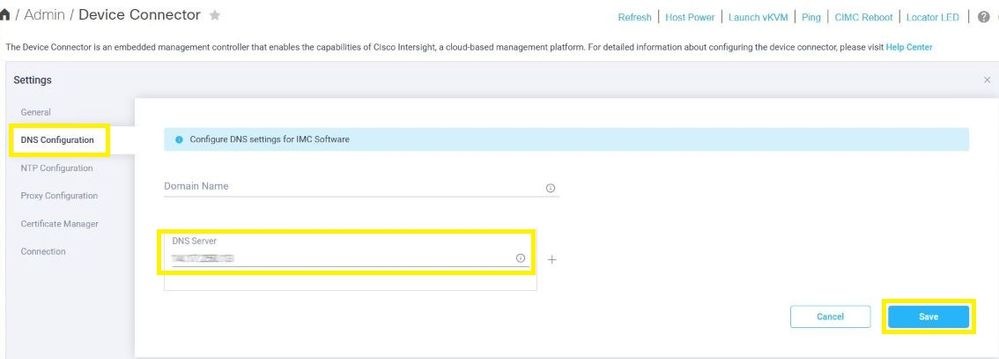
Step 3.1. Navigate to Admin > Device Connector > Settings > DNS Configuration and configure the appropriate DNS Server and select Save as shown in this image.
Step 3.2. Navigate to Admin > Device Connector > Settings > NTP Configuration. Configure the NTP Server address per the environment and select Save as shown in this image.

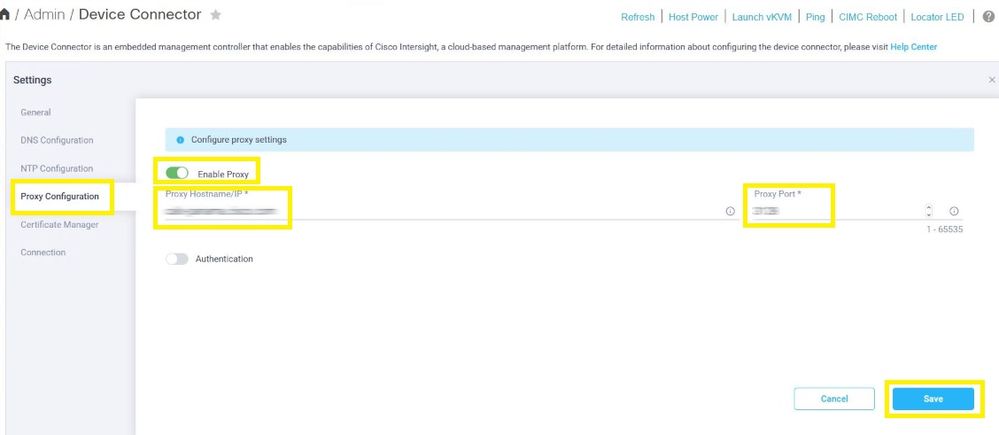
Step 3.3. Optionally configure a proxy if necessary to reach Cisco Intersight. Navigate to Admin > Device Connector > Settings > Proxy Configuration > Enable Proxy. Configure the Proxy Hostname/IP and the Proxy Port and select Save.
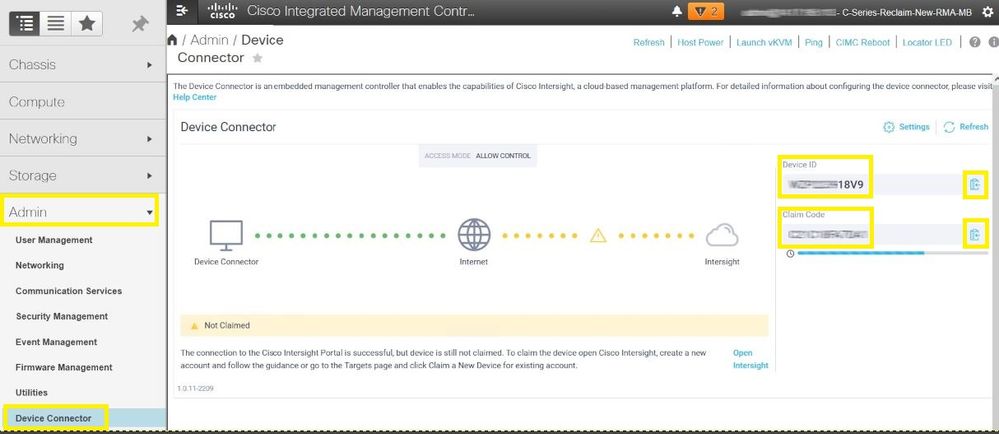
Step 4. Select Admin > Device Connector and copy the Device ID and Claim Code. Copy both to a notepad or text file for later use.
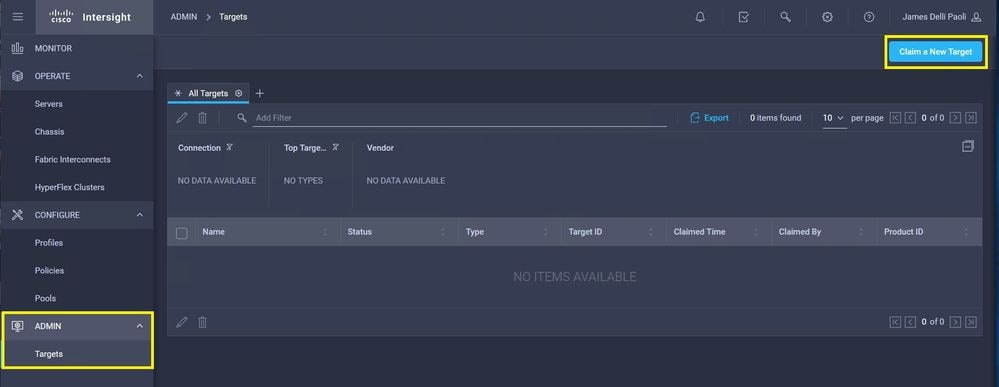
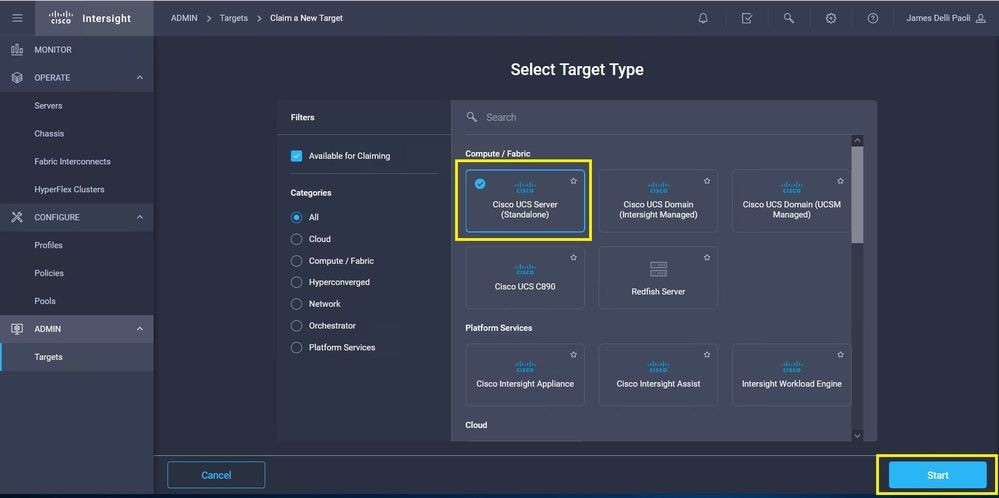
Step 5. Launch Cisco Intersight and navigate to Admin > Targets > Claim a New Target > Cisco UCS Server (Standalone) > Start. Enter the Device ID and Claim Code that was copied from the CIMC GUI, select any Resource Groups that apply and choose Claim.
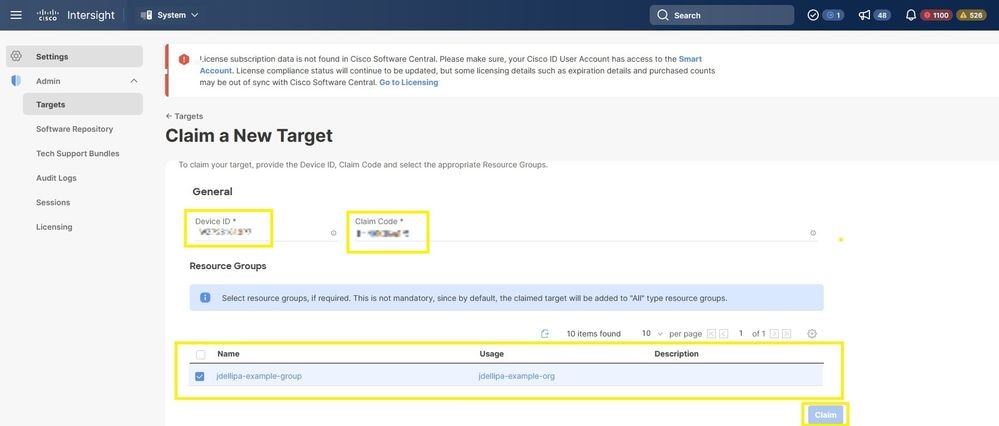
Note: Resource groups are not mandatory, by default, claimed targets will be grouped into the All resource group. If the replaced server was not previously part of any Resource Group, disregard the selection and choose Claim.
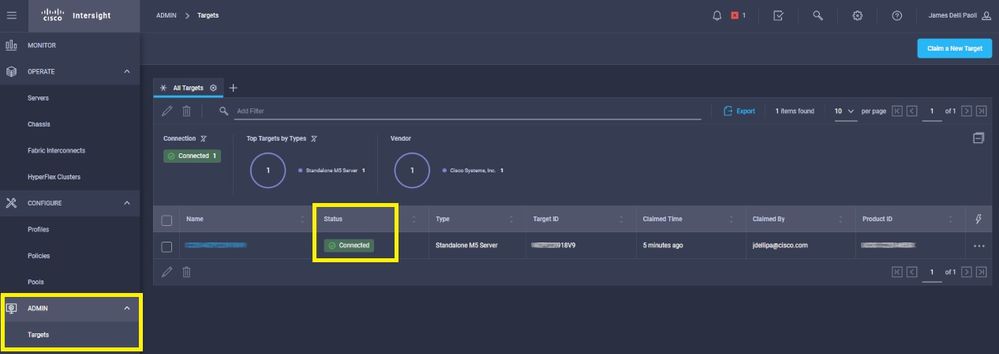
Step 6. Navigate to Admin > Targets. A successful claim shows the Status > Connected, as shown in this image.
Basic Verification for Device Claim Issues
Note: For a comprehensive list of Error Conditions and Remediations refer to this link: Device Connector Error Conditions and Remediation Steps.
|
Device Connector Connection Status Descriptions
|
Device Connector Connection Status Explanations
|
Possible Remediations
|
|
Claimed
|
The connection to the Cisco Intersight platform is successful and you have claimed the connection.
|
N/A
|
|
Not Claimed
|
The connection to the Cisco Intersight platform is successful, but not the endpoint is yet to be claimed.
|
You can claim an unclaimed connection through Cisco Intersight.
|
|
Administratively Disabled
|
Indicates that the Intersight management/Device Connector has been disabled on the endpoint.
|
Enable the Device Connector on the endpoint.
|
|
DNS Misconfigured
|
DNS has been configured incorrectly in CIMC or not configured at all.
|
Indicates none of the DNS name servers configured on the system are reachable. Please verify you have entered valid IP addresses for the DNS name servers.
|
|
Intersight DNS Resolve Error
|
DNS is configured but unable to resolve the DNS name of Intersight.
|
Check this link to see if Intersight is undergoing maintenance: Intersight Status. If Intersight is operational this likely indicates that the DNS name of the Intersight service is not resolved.
|
|
UCS Connect Network Error
|
Indicates the invalid network configurations.
|
Check and confirm: MTU is correct from end-to-end, Port 443 and 80 are allowed, Firewall allows all physical and virtual IPs, DNS and NTP are configured on the endpoint.
|
|
Certificate Validation Error
|
The endpoint refuses to establish a connection to the Cisco Intersight platform because the certificate presented by the Cisco Intersight platform is invalid.
|
Expired or not yet valid certificate: Verify NTP is properly configured and device time is synchronized with Coordinated Universal Time. Verify DNS is properly configured. If a transparent web proxy is in use verify the certificate has not expired.
The certificate name presented by the web server does not match the DNS name of Intersight service: Verify DNS is properly configured. Contact your web proxy administrator to verify the transparent web proxy is configured correctly. Specifically, the name of the certificate presented by the web proxy must match the DNS name of the Intersight service (svc.intersight.com).
The certificate has been issued by an untrusted Certificate Authority (CA): Verify DNS is properly configured. Contact your web administrator or infosec to verify the transparent web proxy is configured correctly. Specifically, the name of the certificate presented by the web proxy must match the DNS name of the Intersight service.
|
Cisco Intersight General Network Connectivity Requirements
- A network connection to the Intersight platform is established from the Device Connector in the endpoint
- Check if a firewall is introduced between the managed target and Intersight, or if the rules for a current firewall have changed. This could cause end-to-end connection issues between the endpoint and Cisco Intersight. If the rules are changed, ensure that the changed rules permit traffic through the firewall.
- If you use an HTTP proxy to route traffic out of your premises, and if you have made changes to the HTTP proxy server configuration, ensure that you change the device connector configuration to reflect the changes. This is required because Intersight does not automatically detect HTTP proxy servers.
- Configure DNS and resolve the DNS name. The Device Connector must be able to send DNS requests to a DNS server and resolve DNS records. The Device Connector must be able to resolve svc.intersight.com to an IP address.
- Configure NTP and validate that the device time is properly synchronized with a time server.
Note: For a comprehensive list of Intersight Connectivity Requirements reference Intersight Network Connectivity Requirements.
Related Information


 Feedback