Introduction
This document describes how to check Cisco Prime Access Registrar's (CPAR) health before and after the execution of a maintenance window.
This procedure applies for an Openstack environment using NEWTON version where ESC does not manage CPAR and it is installed directly on the VM deployed on Openstack.
Background Information
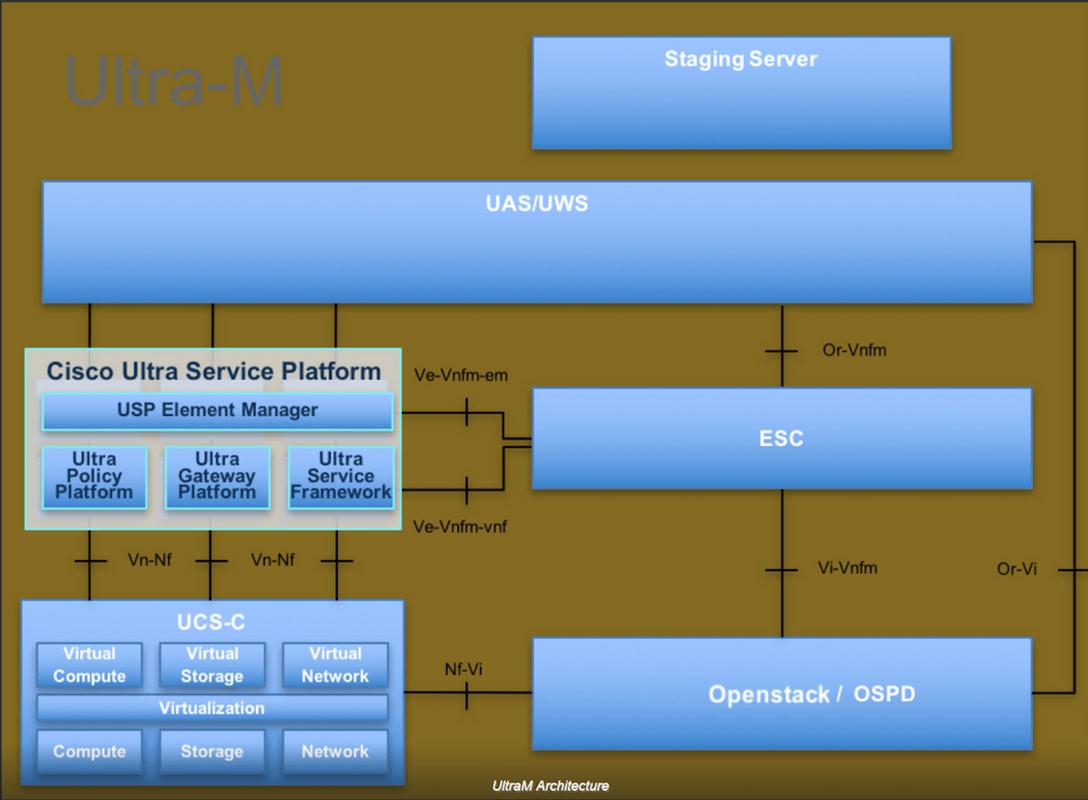
Ultra-M is a pre-packaged and validated virtualized mobile packet core solution that is designed in order to simplify the deployment of VNFs. OpenStack is the Virtualized Infrastructure Manager (VIM) for Ultra-M and consists of these node types:
- Compute
- Object Storage Disk - Compute (OSD - Compute)
- Controller
- OpenStack Platform - Director (OSPD)
The high-level architecture of Ultra-M and the components involved are shown in this image:

This document is intended for Cisco personnel who are familiar with Cisco Ultra-M platform and it details the steps required to be carried out at OpenStack and Redhat OS.
Note: Ultra M 5.1.x release is considered in order to define the procedures in this document.
Network Impact
There is no interruption or interference with network or CPAR services.
Alarms
This procedure does not trigger any alarms.
Health Check
Connect to the Server through Secure Shell (SSH).
Run all these steps before and after the activity.
Step 1. Execute the command /opt/CSCOar/bin/arstatus at OS level.
[root@aaa04 ~]# /opt/CSCOar/bin/arstatus
Cisco Prime AR RADIUS server running       (pid: 24834)
Cisco Prime AR Server Agent running        (pid: 24821)
Cisco Prime AR MCD lock manager running    (pid: 24824)
Cisco Prime AR MCD server running          (pid: 24833)
Cisco Prime AR GUI running                 (pid: 24836)
SNMP Master Agent running                (pid: 24835)
[root@wscaaa04 ~]#
Step 2. Execute the command /opt/CSCOar/bin/aregcmd at OS level and enter the admin credentials. Verify that CPAr Health is 10 out of 10 and the exit CPAR CLI.
[root@aaa02 logs]# /opt/CSCOar/bin/aregcmd
Cisco Prime Access Registrar 7.3.0.1 Configuration Utility
Copyright (C) 1995-2017 by Cisco Systems, Inc.  All rights reserved.
Cluster:
User: admin
Passphrase:
Logging in to localhost

[ //localhost ]
    LicenseInfo = PAR-NG-TPS 7.2(100TPS:)
                  PAR-ADD-TPS 7.2(2000TPS:)
                  PAR-RDDR-TRX 7.2()
                  PAR-HSS 7.2()
    Radius/
    Administrators/

Server 'Radius' is Running, its health is 10 out of 10

--> exit
Step 3. Execute the command netstat | grep diameter and verify that all DRA connections are established.
The output mentioned below is for an environment where Diameter links are expected. If fewer links are displayed, this represents a disconnection from the DRA that needs to be analyzed.
[root@aa02 logs]# netstat | grep diameter
tcp         0            0 aaa02.aaa.epc.:77 mp1.dra01.d:diameter ESTABLISHED
tcp         0            0 aaa02.aaa.epc.:36 tsa6.dra01:diameter ESTABLISHED
tcp         0            0 aaa02.aaa.epc.:47 mp2.dra01.d:diameter ESTABLISHED
tcp         0            0 aaa02.aaa.epc.:07 tsa5.dra01:diameter ESTABLISHED
tcp         0            0 aaa02.aaa.epc.:08 np2.dra01.d:diameter ESTABLISHED
Step 4. Check that the TPS log shows requests being processed by CPAR. The values highlighted in bold represent the TPS and those are the ones we need to pay attention to.
The value of TPS should not exceed 1500.
[root@aaa04 ~]# tail -f /opt/CSCOar/logs/tps-11-21-2017.csv
11-21-2017,23:57:35,263,0
11-21-2017,23:57:50,237,0
11-21-2017,23:58:05,237,0
11-21-2017,23:58:20,257,0
11-21-2017,23:58:35,254,0
11-21-2017,23:58:50,248,0
11-21-2017,23:59:05,272,0
11-21-2017,23:59:20,243,0
11-21-2017,23:59:35,244,0
11-21-2017,23:59:50,233,0
Step 5. Look for any error or alarm messages in name_radius_1_log.
[root@aaa02 logs]# grep -E "error|alarm" name_radius_1_log
Step 6. This is the command to verify the amount of memory that the CPAR process uses.
top | grep radius

[root@aaa02 ~]# top | grep radius
27008 root      20   0 20.228g 2.413g  11408 S 128.3  7.7   1165:41 radius
This highlighted value should be lower than: 7Gb, which is the maximum allowed at application level.
Step 7. This is the command to verify the disk utilization:
df -h

[root@aaa02 ~]# df -h
Filesystem                                          Size  Used Avail Use% Mounted on
/dev/mapper/vg_arucsvm51-lv_root    26G   21G  4.1G  84% /
tmpfs                                                  1.9G  268K  1.9G   1% /dev/shm
/dev/sda1                                            485M   37M  424M   8% /boot
/dev/mapper/vg_arucsvm51-lv_home 23G  4.3G   17G  21% /home
This overall value should be lower than: 80%, if it’s more than 80% identify the unnecessary files and clean it up.
Step 8. Verify that there is no core file generated.
Core file is generated in the event of application crash when CPAR is unable to handle an exception and its generated in these two location.
[root@aaa02 ~]# cd /cisco-ar/
[root@aaa02 ~]# cd /cisco-ar/bin
There shouldn’t be any core files located in the above two location, if found raise a Cisco TAC case in order to identify the root cause of such exception and attach the core files for debugging.


 Feedback