CPAR AAA VM Deployment
Available Languages
Download Options
Bias-Free Language
The documentation set for this product strives to use bias-free language. For the purposes of this documentation set, bias-free is defined as language that does not imply discrimination based on age, disability, gender, racial identity, ethnic identity, sexual orientation, socioeconomic status, and intersectionality. Exceptions may be present in the documentation due to language that is hardcoded in the user interfaces of the product software, language used based on RFP documentation, or language that is used by a referenced third-party product. Learn more about how Cisco is using Inclusive Language.
Contents
Introduction
This document describes Cisco Prime Access Registrars (CPAR’s) Authentication, Authorization, and Accounting (AAA) VM Deployment. This procedure applies for an OpenStack environment with the use of NEWTON version where ESC does not manage CPAR and CPAR is installed directly on the Virtual Machine (VM) deployed on OpenStack.
Contributed by Karthikeyan Dachanamoorthy, Cisco Advanced Services.
Background Information
Ultra-M is a pre-packaged and validated virtualized mobile packet core solution that is designed in order to simplify the deployment of VNFs. OpenStack is the Virtualized Infrastructure Manager (VIM) for Ultra-M and consists of these node types:
- Compute
- Object Storage Disk - Compute (OSD - Compute)
- Controller
- OpenStack Platform - Director (OSPD)
The high-level architecture of Ultra-M and the components involved are depicted in this image:
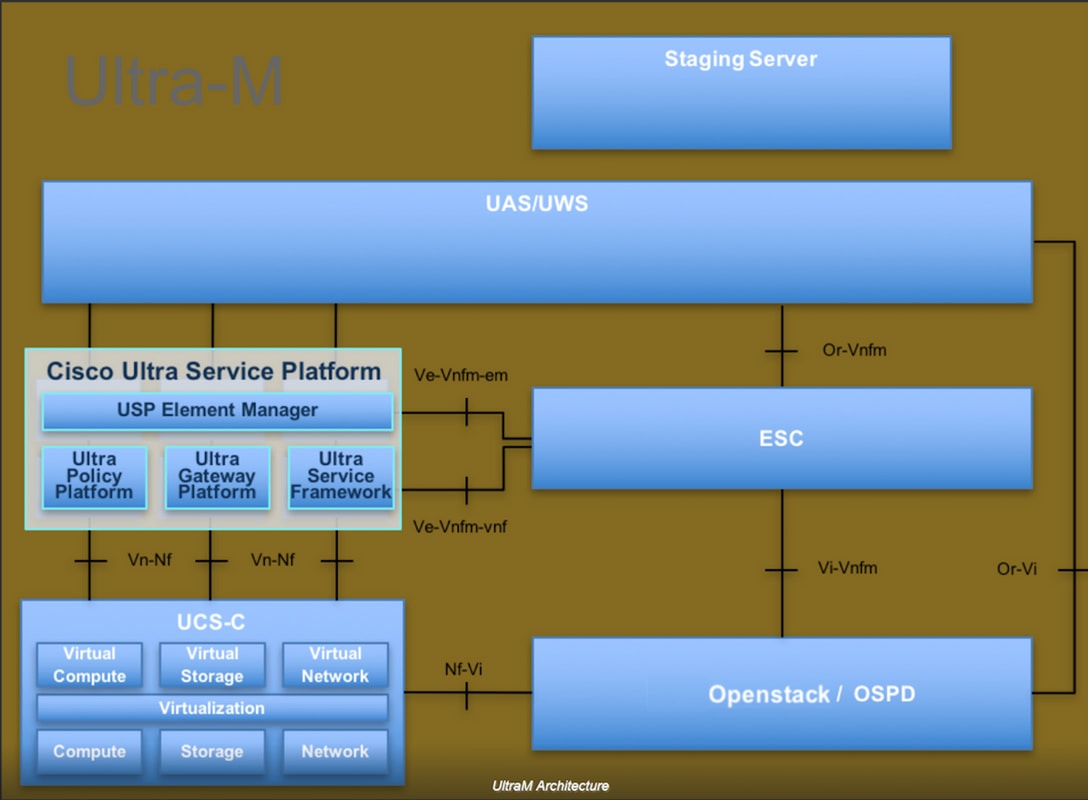
This document is intended for Cisco personnel who are familiar with Cisco Ultra-M platform and it details the steps required to be carried out at OpenStack and Redhat OS.
Note: Ultra M 5.1.x release is considered in order to define the procedures in this document.
CPAR VM Instance Deployment Procedure
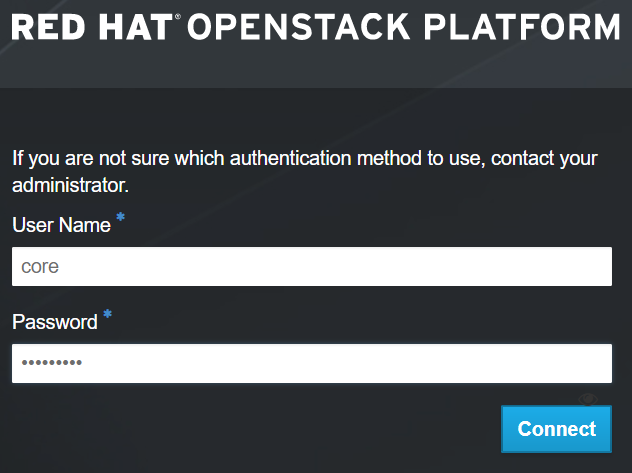
Login to the Horizon Interface.
Ensure that these are attained before you start with the VM Instance Deployment Procedure.
- Secure Shell (SSH) connectivity to the VM or Server
- Update the hostname and the same hostname should be there in /etc/hosts
- The list includes the RPM required in order to install CPAR GUI

Step 1. Open any Internet Browser and a corresponding IP address from the Horizon Interface.
Step 2. Enter the proper user credentials and click the Connect button.
Upload RHEL Image to Horizon
Step 1. Navigate to Content Repository and download the file named rhel-image. This is a customized QCOW2 Red Hat image for CPAR AAA project.
Step 2. Go back to the Horizon tab and follow the route Admin > Images as shown in the image.

Step 3. Click on the Create Image button. Fill in the files labelled as Image Name and Image Description, select the QCOW2 file that was previously downloaded on Step 1. by clicking Browse at File section, and select QCOW2-QUEMU Emulator option at Format section.
Then click on Create Image as shown in the image.

Create a New Flavor
Flavors represent the resource template used in the architecture of each instance.
Step 1. In the Horizon top menu, navigate to Admin > Flavors as shown in the image.

Figure 4 Horizon Flavors section.
Step 2. Click on the Create Flavor button.
Step 3. In the Create Flavor window, fill in the corresponding resource information. This is the configuration used for CPAR Flavor:
vCPUs 36

RAM (MB) 32768

Root Disk (GB) 150

Ephemeral Disk (GB) 0

Swap Disk (MB) 29696

RX/TX Factor 1
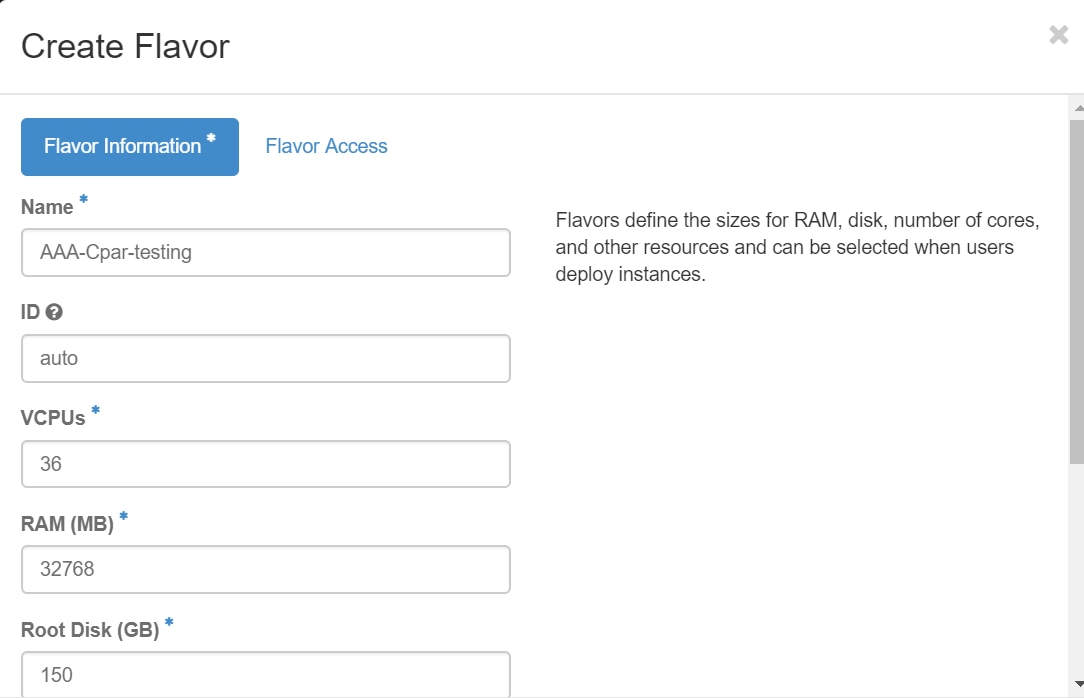

Step 4. On the same window, click on Flavor Access and select the project where this Flavor configuration is going to be used (i.e. Core).
Step 5. Click on Create Flavor.
Create a Host Aggregate/Availability Zone
Step 1. In the Horizon top menu, navigate to Admin > Host Aggregates as shown in the image.

Step 2. Click on the Create Host Aggregate button.
Step 3. In the label Host Aggregate Information* fill in the Name and Availability Zone fields with the corresponding information. For the production environment, this information is currently used as shown in the image:
- Name: aaa
- Availability Zone: AZ-aaa
 Step 4. Click on Manage Hosts within Aggregate tab and click on the button + for the hosts that are required to be added to the new availability zone.

Step 5. Finally, click on Create Host Aggregate Button.
Launch a New Instance
Step 1. In the Horizon top menu, navigate to Project > Instances as shown in the image.

Step 2. Click on Launch Instance button.
Step 3. In the Details tab enter a proper Instance Name for the new virtual machine, select the corresponding Availability Zone (i.e. AZ-aaa), and set Count to 1 as shown in the image.
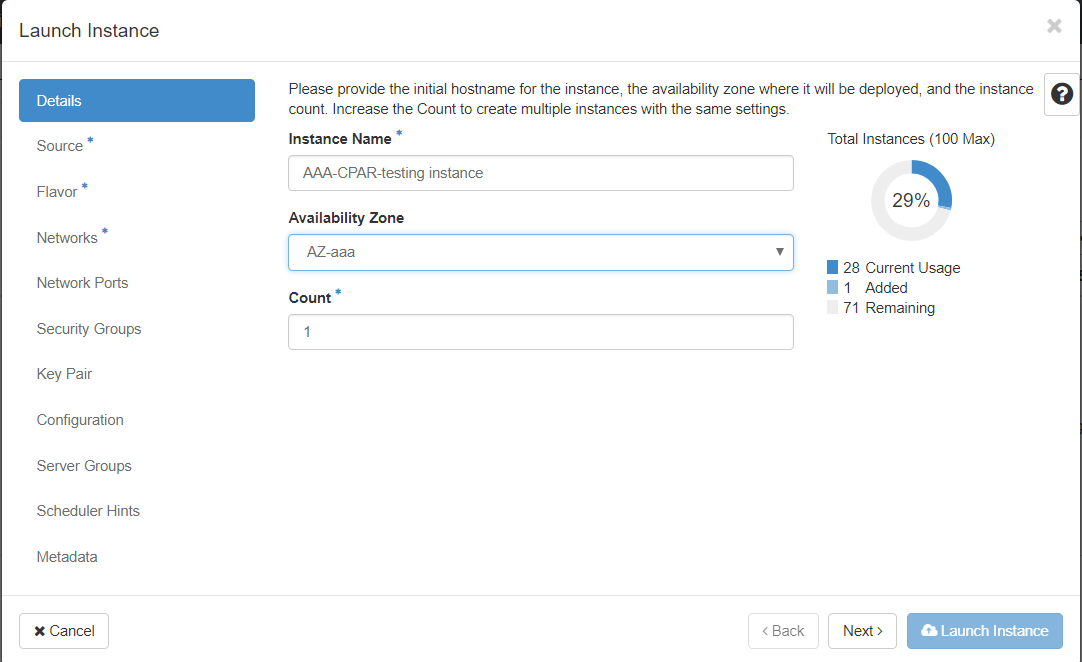
Step 4. Click on the Source tab, then select and execute one of these procedures:
1. Launch an instance based on a RHEL image.
Set the configuration parameters as follows:
- Select Boot Source: Image
- Create New Volume: No
- Select the corresponding image from the Available menu (i.e. redhat-image)


2. Launch an instance based on a Snapshot.
Set the configuration parameters as follows:
- Select Boot Source: Instance Snapshot
- Create New Volume: No
- Select the corresponding snapshot from the Available menu (i.e. aaa09-snapshot-June292017)


Step 5. Click on the Flavor tab and select the Flavor created in the section Create a New Flavor.

Step 6. Click on Networks tab and select the corresponding networks which are going to be used for each Ethernet interface of the new instance/VM. This setup is currently being used for the Production environment:
- eth0 = tb1-mgmt
- eth1 = diameter-routable1
- eth2 = radius-routable1
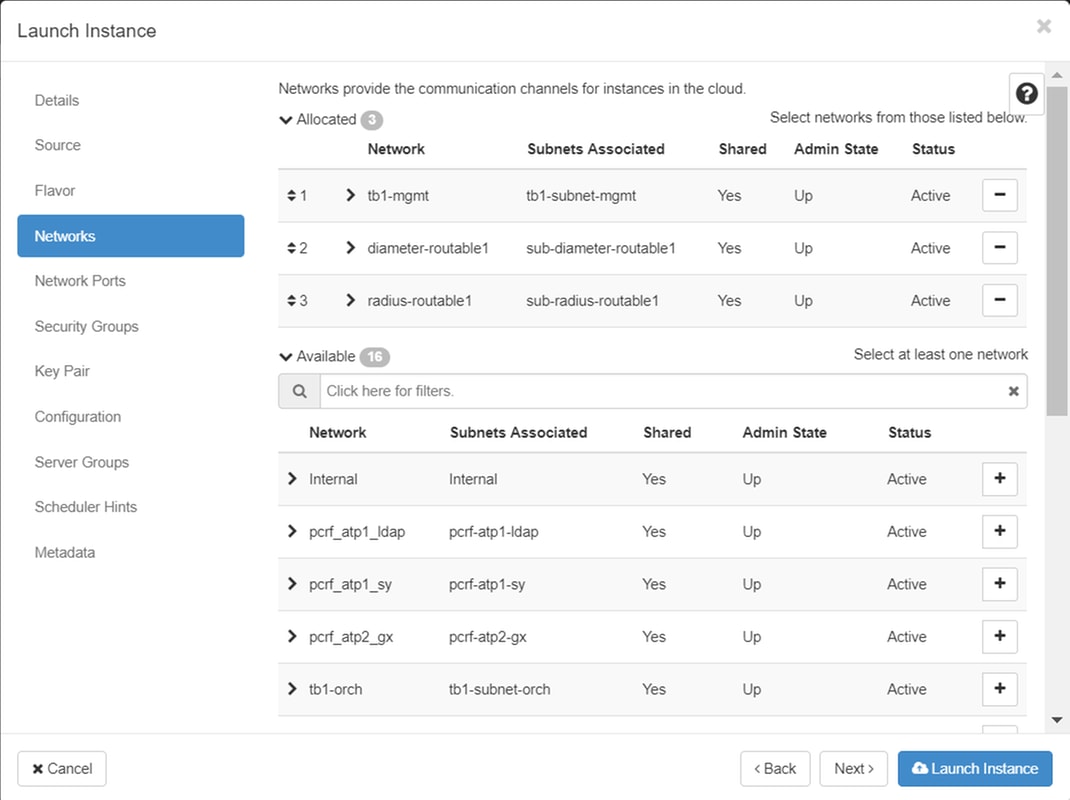
Step 7. Finally, click on the Launch Instance button in order to start the deployment of the new instance.
Create and Assign a Floating IP Address
A floating IP address is a routable address, which means that it is reachable from the outside of Ultra M/OpenStack architecture, and is able to communicate with other nodes from the network.
Step 1. In the Horizon top menu, navigate to Admin > Floating IPs.
Step 2. Click on the button Allocate IP to Project.
Step 3. In the Allocate Floating IP window, select the Pool from which the new floating IP belongs, the Project where it is going to be assigned, and the new Floating IP Address itself.
For example:

Step 4. Click on Allocate Floating IP button.
Step 5. In the Horizon top menu, navigate to Project > Instances.
Step 6. In the Action column, click on the arrow that points down in the Create Snapshot button, a menu should be displayed. Select Associate Floating IP option.
Step 7. Select the corresponding floating IP address intended to be used in the IP Address field, and choose the corresponding management interface (eth0) from the new instance where this floating IP is going to be assigned in the Port to be associated as shown in the image.

Step 8. Finally, click on the Associate button.
Enable SSH
Step 1. In the Horizon top menu, navigate to Project > Instances.
Step 2. Click on the name of the instance/VM that was created in section Launch a new instance.
Step 3. Click on the Console tab. This will display the command line interface of the VM.
Step 4. Once the CLI is displayed, enter the proper login credentials:
Username: xxxxx
Password: xxxxx

Step 5. In the CLI, enter the command vi /etc/ssh/sshd_config in orderto edit SSH configuration.
Step 6. Once the SSH configuration file is open, press I in orderto edit the file. Then look for the section showed here and change the first line from PasswordAuthentication no to PasswordAuthentication yes.

Step 7. Press ESC and enter :wq! in orderto save sshd_config file changes.
Step 8. Execute the command service sshd restart.

Step 9. In order to test SSH configuration changes have been correctly applied, open any SSH client and try to establish a remote secure connection with the floating IP assigned to the instance (i.e. 10.145.0.249) and the user root.

Establish a SSH Session
Open a SSH session with the use of the IP address of the corresponding VM/server where the application will be installed.

Upload CPAR Software and License(s)
Step 1. Download the corresponding CPAR version installation script (CSCOar-x.x.x.x-lnx26_64-install.sh) from the Cisco Software platform: https://software.cisco.com/download/release.html?mdfid=286309432&flowid=&softwareid=284671441&release=7.2.2.3&relind=AVAILABLE&rellifecycle=&reltype=latest

Step 2. Upload CSCOar-x.x.x.x-lnx26_64-install.sh file to the new VM/Server at /tmp directory.
Step 3. Upload the corresponding license(s) file(s) to the new VM/Server at /tmp directory.

Upload RHEL/CentOS Image
Upload the corresponding RHEL or CentOS .iso file to the VM/server/tmp directory.

Create Yum Repository
Yum is a Linux’s tool, which assists the user to install new RPMs with all their dependencies. This tool is used at the time of the installation of CPAR mandatory RPMs and at the time of the kernel upgrade procedure.
Step 1. Navigate to directory /mnt with the use of the command cd/mnt and create a new directory named disk1 and execute the command mkdir disk1.
Step 2. Navigate to /tmp directory with the use of the command cd /tmp where the RHEL or CentOS .iso file have been previously uploaded and follow the steps as mentioned in section 3.3.
Step 3. Mount the RHEL/CentOS image in the directory which was created on Step 1. with the use of the command mount –o loop <name of the iso file> /mnt/disk1.
Step 4. In /tmp,create a new directory named repo with the use of the command mkdir repo. Then, change this directory’s permissions and execute the command chmod –R o-w+r repo.
Step 5. Navigate to the Packages directory of the RHEL/CentOS image (mounted on Step 3.) with the use of the command cd /mnt/disk1. Copy all Packages directory files to /tmp/repo with the use of the command cp –v * /tmp/repo.
Step 6. Go back to the repo directory and execute cd /tmp/repo and use these commands:
rpm -Uhvdeltarpm-3.6-3.el7.x86_64.rpm

rpm-Uvh python-deltarpm-3.6-3.el7.x86_64.rpm

rpm -Uvh createrepo-0.9.9-26.el7.noarch.rpm
These commands install the three required RPMs in order to install and use Yum. The version of the RPMs mentioned previously might be different and it depends on the RHEL/CentOS version. If any of these RPMs is not included in the /Packages directory, refer to the https://rpmfind.net website where it can be downloaded from.
Step 7. Create a new RPM repository with the command createrepo /tmp/repo.
Step 8. Navigate to directory /etc/yum.repos.d/ with the use of the command cd /etc/yum.repos.d/. Create a new file named myrepo.repo which contains this with the command vi myrepo.repo:
[local]

name=MyRepo

baseurl=file:///tmp/repo

enabled=1

gpgcheck=0
Press I in order to enable insert mode. In order to save and close press ESC key and then enter “:wq!” and press Enter.
Install CPAR Required RPMs
Step 1. Navigate to /tmp/repo directory with the command cd /tmp/repo.
Step 2. Install CPAR required RPMs and execute these commands:
yum install bc-1.06.95-13.el7.x86_64.rpm

yum install jre-7u80-linux-x64.rpm

yum install sharutils-4.13.3-8.el7.x86_64.rpm

yum install unzip-6.0-16.el7.x86_64.rpm
Note: The version of the RPMs might be different and it depends on the RHEL/CentOS version. If any of these RPMs is not included in the /Packages directory, refer to the https://rpmfind.net website where it can be downloaded. In order to download Java SE 1.7 RPM, refer to http://www.oracle.com/technetwork/java/javase/downloads/java-archive-downloads-javase7-521261.html and download jre-7u80-linux-x64.rpm.
Kernel Upgrade to 3.10.0-693.1.1.el7 Version
Step 1. Navigate to /tmp/repo directory with the use of the command cd /tmp/repo.
Step 2. Install kernel-3.10.0-514.el7.x86_64 RPM and execute the command yum install kernel-3.10.0-693.1.1.el7.x86_64.rpm.
Step 3. Reboot the VM/Server with the use of the command reboot.
Step 4. Once the machine starts again, verify that the kernel version was updated and execute the command uname –r. The output should be 3.10.0-693.1.1.el7.x86_64.
Set-Up the Network Parameters
Modify the Hostname
Step 1. Open in writing mode the file /etc/hosts and execute the command vi /etc/hosts.
Step 2. Press I in order to enable insert mode and write the corresponding host network information and follow this format:
<Diameter interface IP> <Host’s FQDN> <VM/Server’s hostname>
For example: 10.178.7.37 aaa07.aaa.epc.mnc30.mcc10.3gppnetwork.org aaa07
Step 3. Save changes and close the file pressing the ESC key and then writing “:wq!” and pressing Enter.
Step 4. Execute the command hostnamectl set-hostname <Host’s FQDN>. For example: hostnamectl set-hostname aaa.epc.mnc.mcc.3gppnetwork.org.
Step 5. Restart network service with the use of the command service network restart.
Step 6. Verify that the hostname changes were applied and execute the commands: hostname –a, hostname –f, which should display VM/Server’s hostname and its FQDN.
Step 7. Open /etc/cloud/cloud_config with the command vi /etc/cloud/cloud_config and insert a “#” in front of line “- update hostname”. This is to prevent the hostname changes after a reboot. The file should look like this:

Set-Up the Network Interfaces
Step 1. Navigate to directory /etc/sysconfig/network-scripts with the use of cd /etc/sysconfig/network-scripts.
Step 2. Open ifcfg-eth0 with the command vi ifcfg-eth0. This is the management interface; its configuration should look like this.
DEVICE="eth0"

BOOTPROTO="dhcp"

ONBOOT="yes"

TYPE="Ethernet"

USERCTL="yes"

PEERDNS="yes"

IPV6INIT="no"

PERSISTENT_DHCLIENT="1"
Perform any required modification, then save and close the file pressing ESC key and entering: wq!.
Step 3. Create eth1 network configuration file with the command vi ifcfg-eth1. This is the diameter interface. Access to insert mode by pressing I and enter this configuration.
DEVICE="eth1"

BOOTPROTO="none"

ONBOOT="yes"

TYPE="Ethernet"

USERCTL="yes"

PEERDNS="yes"

IPV6INIT="no"

IPADDR= <eth1 IP>

PREFIX=28

PERSISTENT_DHCLIENT="1"
Modify <eth1 IP> for the corresponding diameter’s IP for this instance. Once everything is in place, save and close the file.
Step 4. Create eth2 network configuration file with the commandvi ifcfg-eth2. This is the radius interface. Enter to insert mode pressing I and enter this configuration:
DEVICE="eth2"

BOOTPROTO="none"

ONBOOT="yes"

TYPE="Ethernet"

USERCTL="yes"

PEERDNS="yes"

IPV6INIT="no"

IPADDR= <eth2 IP>

PREFIX=28

PERSISTENT_DHCLIENT="1"
Modify <eth2 IP> for the corresponding radius’ IP for this instance. Once everything is in place, save and close the file.
Step 5. Restart network service with the use of the command service network restart. Verify that the network configuration changes were applied with the use of the command ifconfig. Each network interfaces should have an IP according to its network configuration file (ifcfg-ethx). If eth1 or eth2 do not boot automatically, execute the command ifup ethx.
Install CPAR
Step 1. Navigate to /tmp directory by executing the command cd /tmp.
Step 2. Change permissions for ./CSCOar-x.x.x.x.-lnx26_64-install.sh file with the command chmod 775 ./CSCOar-x.x.x.x.-lnx26_64-install.sh.
Step 3. Start the installation script with the use of the command ./CSCOar-x.x.x.x.-lnx26_64-install.sh.

Step 4. For the question Where do you want to install <CSCOar>? [/opt/CSCOar] [?,q], press Enter to select the default location (/opt/CSCOar/).
Step 5. After the question Where are the FLEXlm license files located? [] [?,q] provide the location of the license(s) which should be /tmp.
Step 6. For question Where is the J2RE installed? [] [?,q] enter the directory where Java is installed. For example: /usr/java/jre1.8.0_144/.
Verify this is the corresponding Java version for the current CPAR version.
Step 7. Skip Oracle input by pressing Enter since Oracle is not used in this deployment.
Step 8. Skip SIGTRAN-M3UA functionality step by pressing Enter. This feature is not required for this deployment.
Step 9. For question Do you want CPAR to be run as non-root user? [n]: [y,n,?,q] press Enter in order to use the default answer which is n.
Step 10. For question Do you want to install the example configuration now? [n]: [y,n,?,q] press Enter in order to use the default answer which is n.
Step 11. Wait for CPAR installation process in order to finish, and then verify that all the CPAR processes are running. Navigate to directory /opt/CSCOar/bin and execute the command ./arstatus. The output should look like this:

Configure SNMP
Set CPAR SNMP
Step 1. Open the file snmpd.conf with the command /cisco-ar/ucd-snmp/share/snmp/snmpd.conf in orderto include the required SNMP community, trap community and trap receiver IP address: Insert the line trap2sink xxx.xxx.xxx.xxx cparaaasnmp 162.
Step 2. Execute the command cd /opt/CSCOar/bin and login to CPAR CLI with the use of the command ./aregcmd and enter admin credentials.
Step 3. Move to /Radius/Advanced/SNMP and issue the command set MasterAgentEnabled TRUE. Save the changes with the use of the command save and quit CPAR CLI issuing exit.

Step 4. Verify that the CPAR OID’s are available by with the command snmpwalk -v2c -c public 127.0.0.1 .1.

If the OS does not recognize the snmpwalk command, navigate to /tmp/repo and execute yum install net-snmp-libs-5.5-49.el6.x86_64.rpm.
Set OS SNMP
Step 1. Edit the file /etc/sysconfig/snmpd in orderto specify port 50161 for the OS SNMP listener, otherwise, default port 161 is used which is currently used by the CPAR SNMP agent.

Step 2. Restart the SNMP service with the command service snmpd restart.

Step 3. Validate that the OS OIDs are able to be queried by issuing the command snmpwalk -v2c -c public 127.0.0.1:50161.1.

Configure NTP
Step 1. Verify that the NTP RPMs are already installed, execute the command rpm –qa | grep ntp. The output should look like this image.

If the RPMs are not installed, navigate to /tmp/repo directory with the use of cd /tmp/repo and execute the commands:
yum install ntp-4.2.6p5-25.el7.centos.x86_64

yum install ntpdate-4.2.6p5-25.el7.centos.x86:64
Step 2. Open /etc/ntp.conf file with the command vi /etc/ntp.conf and add the corresponding IPs of the NTP servers for this VM/Server.
Step 3. Close the ntp.conf file and restart the ntpd service with the command service ntpd restart.
Step 4. Verify that the VM/Server is now attached to the NTP servers by issuingwith the command ntpq –p.
CPAR Configuration Backup/Restore Procedure (Optional)
Note: This section should only be executed if an existing CPAR configuration is going to be replicated in this new VM/Server. This procedure only works for scenarios where the same CPAR version is used in both source and destination instances.
Obtain the CPAR Configuration Backup File from an Existing CPAR Instance
Step 1. Open a new SSH session with the corresponding VM where the backup file will be obtained with the use of root credentials.
Step 2. Navigate to directory /opt/CSCOar/bin with the use of the command cd /opt/CSCOar/bin.
Step 3. Stop CPAR services and execute the command ./arserver stop in order to do so.
Step 4. Verify that the CPAR service was stopped with the use of the command ./arstatus, and look for the message Cisco Prime Access Registrar Server Agent not running.
Step 5. In order to create a new backup, execute the command ./mcdadmin -e /tmp/config.txt. When asked, enter CPAR administrator credentials.
Step 6. Navigate to directory /tmp with the use of the command cd /tmp. The file named config.txt is the backup of this CPAR instance configuration.
Step 7. Upload config.txt file to the new VM/Server where the backup is going to be restored. Use the command scp config.txt root@<new VM/Server IP>:/tmp.
Step 8. Go back to the directory /opt/CSCOar/bin with the use of the command cd /opt/CSCOar/bin and bring CPAR up again with the command ./arserver start.
Restore CPAR Configuration Backup File in the New VM/Server
Step 1. In the new VM/Server, navigate to directory /tmp with the use of the command cd/tmp and verify there is config.txt file which was uploaded in Step 7. of section Obtaining the CPAR configuration backup file from an existing CPAR instance. If the file is not there, refer to that section and verify that the scp command was well-executed.
Step 2. Navigate to the directory /opt/CSCOar/bin with the use of the command cd /opt/CSCOar/bin and turn off CPAR service by executing ./arserver stop command.
Step 3. In order to restore the backup, execute the command ./mcdadmin –coi /tmp/config.txt.
Step 4. Turn on the CPAR service again by issuing the command ./arserver start.
Step 5. Finally, check the CPAR status with the use of the command ./arstatus. The output should look like this.

Revision History
| Revision | Publish Date | Comments |
|---|---|---|
1.0 |
28-Aug-2018 |
Initial Release |
Contributed by Cisco Engineers
- Karthikeyan DachanamoorthyCisco Advance Services
Contact Cisco
- Open a Support Case

- (Requires a Cisco Service Contract)
 Feedback