Tidal Enterprise Orchestrator: SAP System Copy Add-On Installation Guide
Available Languages
Introduction
This document describes how to install the SAP System Copy add-on.
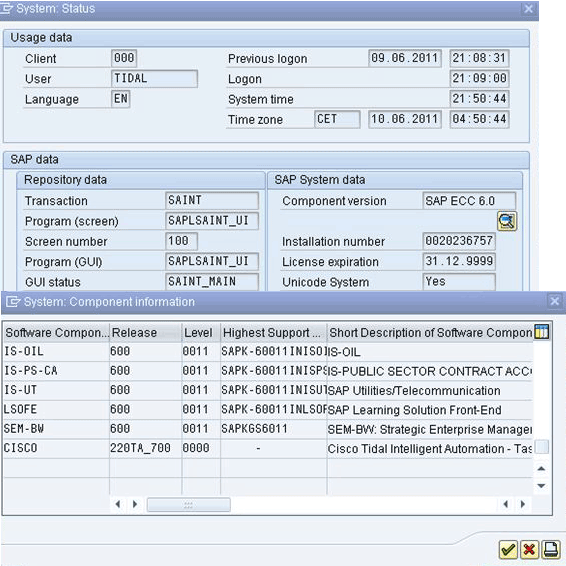
The System Copy for SAP automation pack contains RFC calls that require the Cisco add-on for SAP to be installed on the SAP Target System. The Cisco software add-on must be available on all SAP systems where these RFCs will be used. In order to verify, choose System > Status, and review the software component versions for the CISCO add-on.
Prerequisites
Components Used
The information in this document is based on Tidal Enterprise Orchestrator 2.1 or later, SAP, and SAP System Copy Content for Tidal Enterprise Orchestrator.
The information in this document was created from the devices in a specific lab environment. All of the devices used in this document started with a cleared (default) configuration. If your network is live, make sure that you understand the potential impact of any command.
Conventions
Refer to Cisco Technical Tips Conventions for more information on document conventions.
Procedure
Complete these steps in order to install the SAP add-on:
-
Navigate to the location in which the ABAP Transport data was extracted during the TEO installation. The default location is: C:\Documents and Settings\user\My Documents\Cisco\Tidal Enterprise Orchestrator\Extracted Data\ABAP Transports\SAP System Copy
-
Copy the SAP add-on package files (.pat) to this location on the SAP Server (EPS inbox of target SAP System): usr\sap\trans\EPS\in
-
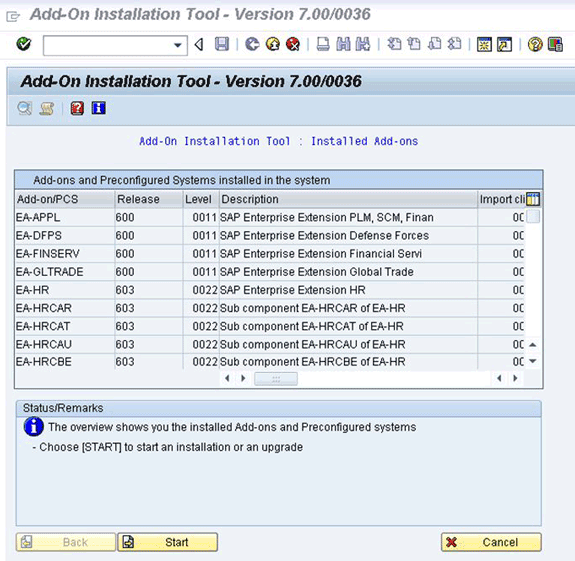
Log in to client 000 of the SAP system using an administator account (*NOT* DDIC or SAP*), and run the transaction code SAINT.
-
Click the Start button in order to begin the import process, and then follow the steps as directed by the SAP import wizard.

The add-on for Cisco should appear. If it does not appear, then either the file is not in the EPS inbox folder or the login client is not 000.
-
Select the row that displays CISCO, and click Continue.
There are no target support packages necessary, but (if directed to do so) provide these in the next screen.
-
Click Continue.
-
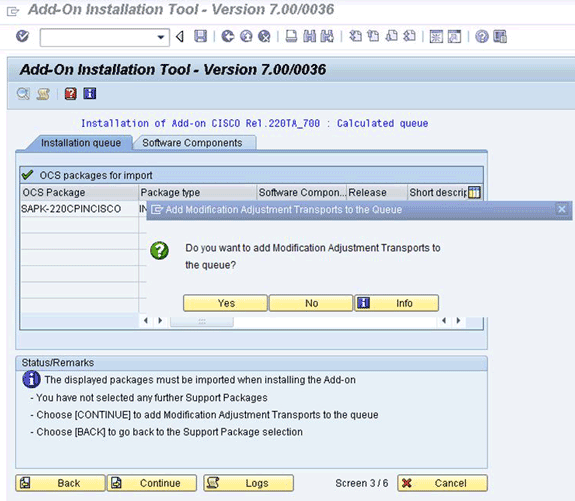
Review the package, and then click Continue.
-
Click No to proceed (since there are no modification adjustments necessary).

-
Review the information, and adjust the Start Options if neccesary.
-
Click Continue in order to proceed with the installation. This step might take up to 5 minutes in dialog mode.
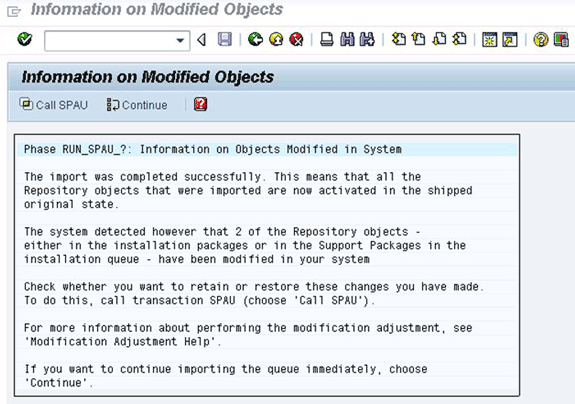
If a previous transport only version of the Cisco Software is present on the SAP Target system, you might see this window:

-
Call transaction code SAPU, and select reset to original for any /CISCO/ namespace objects. This step overwrites the existing Cisco software.
-
If you use SPAU, run it in a separate window, and then return back to the Add-On Installation screen.
Note: In order to run SPAU, the system modification setting for the /CISCO/ namespace must be set to modifiable via SAP Transaction SE03.
-
Click Continue in order to continue the installation.
Installation is complete when you see the approriate message in the Status/Remarks box.
-
Choose System > Status, and click the Component version icon (magnifying glass) in order to verify the installation.
In the SAP transaction SE80, packages that begin with /CISCO/*, such as /CISCO/TEO, should exist.

Related Information
Contact Cisco
- Open a Support Case

- (Requires a Cisco Service Contract)
 Feedback