Configure Cisco Headset 5xx Series
Available Languages
Download Options
Bias-Free Language
The documentation set for this product strives to use bias-free language. For the purposes of this documentation set, bias-free is defined as language that does not imply discrimination based on age, disability, gender, racial identity, ethnic identity, sexual orientation, socioeconomic status, and intersectionality. Exceptions may be present in the documentation due to language that is hardcoded in the user interfaces of the product software, language used based on RFP documentation, or language that is used by a referenced third-party product. Learn more about how Cisco is using Inclusive Language.
Introduction
This document describes the steps to configure the Cisco headset 500 series. In Cisco Unified Communications Manager version 12.5(1)SU1, you are able to provide headset administration, inventory and configuration management.
Prerequisites
Requirements
Cisco recommends that you have knowledge of these topics:
- Cisco Unified Communications Manager (CUCM)
- Cisco phones
- Headsets
Components Used
The information in this document is based on these software versions:
- CUCM: 12.5(1)SU1 (12.5.1.11900-146)
- Phone: CP-8861 (sip88xx.12-5-1SR3-74)
- Headset: 520 (Firmware 15-18-15), 532 (Firmware 15-18-15), 561 (Firmware 1-5-1-15), 562 (Firmware 1-5-1-15)
The information in this document was created from the devices in a specific lab environment. All the devices used in this document started with a cleared (default) configuration. If your network is live, make sure that you understand the potential impact of any command.
Background Information
Cisco headsets 500 series offer a professional range of wired and wireless headsets optimized for Cisco IP phones and soft clients. Administrators can manage headsets, control the firmware, customize the settings, and much more when you use the Cisco headsets with Cisco Unified Communications Manager.
In order to use the headsets with Cisco phones there are some minimum requirements as shown in the table:
| Headset Model |
Connectors |
7800/8800 Support Non-USB |
7800/8800 Support USB |
7800/8800 Phone Firmware |
Jabber Version |
DX70/80 |
|
521/522 |
USB & 3.5mm |
N/A |
8851, 8861, and 8865 |
12.1(1) |
12.5 |
CE9.3 |
|
531/532 |
USB & RJ-9 |
7821, 7841, 7861, 8811, 8841, 8845 |
8851, 8861, 8865 |
12.1(1) |
12.5 |
CE9.3 |
|
561/562 |
USB & Y-cable |
7821, 7841, 7861, 8811, 8841, 8845 |
8851, 8861, 8865 |
12.5 |
12.5 |
CE9.3 |
Note: If you use an RJ-9 or Y-cable (RJ9 + RJ11) cable there is no minimum requirement. Jabber 12.0 supports headset; 12.5 adds software upgrades; 12.6 supports configuration management.
Note: For multiplatform Cisco Phones compatibility please visit the release notes. 6800 MPP series: Accessory Support for Phone 6800 Series
All CUCM versions are supported, however the Cisco headset service and headset inventory are only available on CM 12.5 SU1.
Advanced capabilities are available only in the latest version of software. You can find more information of the compatibility in the Headset Datasheet.
Legacy Cisco phones, third-party apps, and third-party devices can work with the Cisco 500 headset series, but they have not been tested and are not supported.
Headset 500 Series
Cisco headsets offer different options to provide a comfortable experience. The options include several types of headset, bases, and connectors.
Headsets 5XX series types
- Wired: The headset has a wired connection to the connected device (headset 521, 522, 531 and 532)
- Wireless: The headset has a wireless connection to the connected device. There are primarily two types of wireless connections, Bluetooth and Digital Enhanced Cordless Telecommunications (DECT) for headset 561 and 562
- Single ear– Headset with one ear cup. Sometimes called “mono” headset (headset 521, 531 and 561)
- Dual ear– Headset with two ear cups. Sometimes called “binaural”, “stereo”, or “duo” headset (headset 522, 532 and 562)
The headset models and connectors are as shown in the table.
|
Models in Series |
521/522 |
531/532 |
 561/562 (Single base) 561/562 (Single base) |

561/562 (Multi base) |
|
Type |
Wired |
Wired with Quick Disconnect (QD) |
Wireless |
Wireless |
|
Simultaneous connections |
1 |
1 |
1 |
3* |
|
Connectors |
3.5mm and |
QD to RJ9 (for phones) |
USB-A and RJ9/RJ11 |
2 USB-A and RJ9/RJ11 |
Note: *DECT Multi base supports 1 Bluetooth Device + 2 Wired Devices (2 USB or 1 USB + 1 RJ9/RJ11).
Cisco Headset 500 series offer type of connectors such as 3.5 mm, USB, QD, standard base and Multibase in order to use the headset with phones, mobiles or computers. It depends on your requirements.
3.5mm to USB adapter

- Standard 3.5-mm jacks to connect the headset on laptops, tablets, and mobile phones
- The hand-held controller connects 3.5 mm headset to USB and provides easy access to key call control capabilities, it includes answer, end call, hold/resume (for multiple calls), mute, volume up, and volume down
QD to RJ9 (for phones) or QD to USB Adapter

- QD to USB. Provides easy access to key call control capabilities
- QD to RJ9. RJ9 Provides the broadest range of Cisco IP phone connectivity
Standard base

- The newest in DECT technology provides freedom to roam up to 300+ feet (100 meters) from the base with crystal clear audio
- AES-128 encryption ensures secured communication
- The headset automatically answers calls when undocked. The headset ends calls when docked
- The standard base comes with a USB-A cable for USB connectivity and an RJ9/11 Y cable for Cisco IP phone connectivity
Multibase
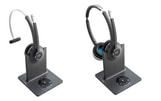
- All features listed in the Standard base station
- Can have connections to multiple physical and Bluetooth sources
- The headset can answer calls from any source with a single press of a button. The Multibase station automatically selects the source with the incoming call
- The Multibase station comes with two USB-A cables for USB connectivity and an RJ9/11 Y cable for Cisco IP phone connectivity
Connectivity with Devices
The connectivity to the devices depends on the phone model, adapter type and headset in use. The connectivity with devices is as shown in the table.
|
Connectivity to phone model |
78xx |
8811/ |
8851/ |
PC/Mac/laptop with Jabber or Webex |
DX70/80 |
|
USB Cable |
N/A |
N/A |
Yes |
Yes |
Yes |
|
Y-cable |
Yes |
Yes |
Yes |
N/A |
N/A |
Communications Manager 12.5 SU(1)
CUCM provides reports based on headset model, connection status, firmware releases, connections, and more.
CUCM controls headset settings, it includes wireless power range, wideband/narrow band settings, firmware version, Bluetooth on/off, and more (along with templates to help guide administrators).
CUCM call records (CMRs) are enhanced with additional metrics from headsets, such as RSSI (wireless signal strength), frame errors, connection drop reason, beacon moves, audio settings, DECT bandwidth, and more.
The CUCM user interface and the Real Time Management Tool (RTMT) are able to trigger log collection, it includes the problem report tool (PRT) without any user involvement.
CUCM can push new firmware to headsets with the use of Jabber and IP phones, without the need for extra headset management software or licenses. With CUCM 12.5, administrators are able to control firmware versions from a configuration template.
Automatic firmware upgrades are available when Cisco Unified Communications Manager is used.
Note: The latest in headset management capabilities requires Unified Communications Manager 12.5 SU1 and Cisco IP Phone firmware 12.5 or Cisco Jabber 12.6.
Configure
In order to configure your Cisco headset in Cisco Unified Communications Manager (12.5 SU1) follow these steps:
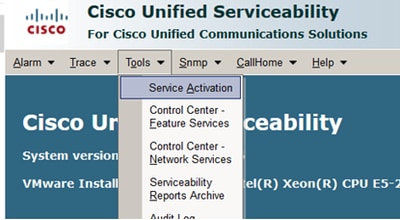
Step 1. As shown in the image, activate the Cisco headset service, navigate to Cisco Unified Serviceability > Tools > Service activation.
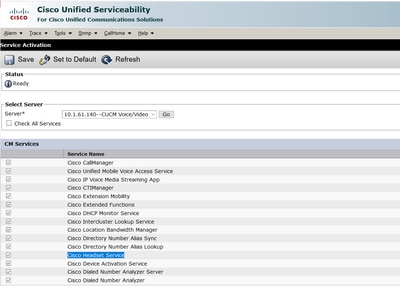
Step 2. In order to activate the headset service, select the server, enable the Cisco Headset Service checkbox and click on Save.
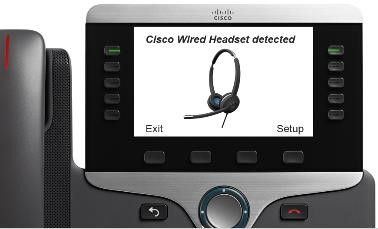
Step 3. Once the service is started, connect the headset to the phone. The phone reports a headset detected as shown in the image.
Step 4. In order to configure the headset settings select Setup. You can have access to the menu as shown in the image.
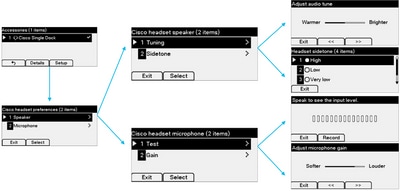
Tip: You can access the setup menu manually. For 88XX and 78XX series navigate to Settings > Accessories > Setup.
In order to test and adjust the microphone gain, you can use the Record/Playback capability and the Tune Audio option to customize the sound.
If CUCM has a newer version of firmware than the headset the phone can upgrade the headset firmware automatically as shown in the image.
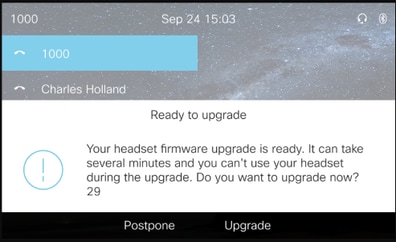
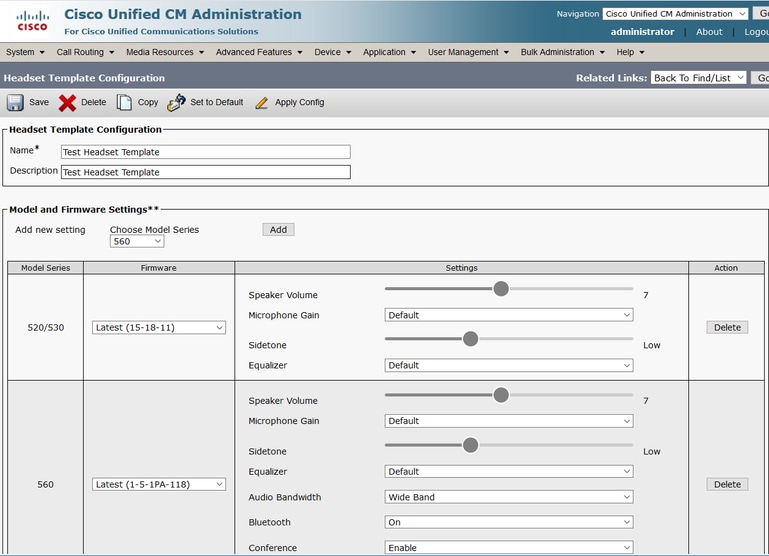
The control of settings and firmware upgrades can be done remotely to ensure company policies. CUCM administrators can view the default template, create custom templates and apply them to user groups.
Step 5. In order to customize the firmware version on the headset, you can use the headset template. Navigate to CM Administration > Device > Headset > Headset Template, select one from the list, click on Copy and configure the model and firmware settings as shown in the image.
Step 6. In order to associate the user profiles with the headset template, select the user profile and use the up and down arrows to move it from the available profiles to the assigned profiles as shown in the image.

Step 7. In order to save the changes click on Save, then click on Apply Config.
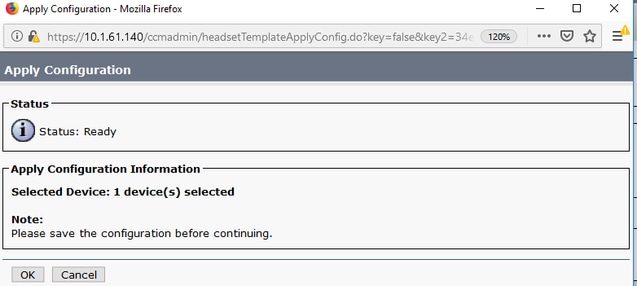
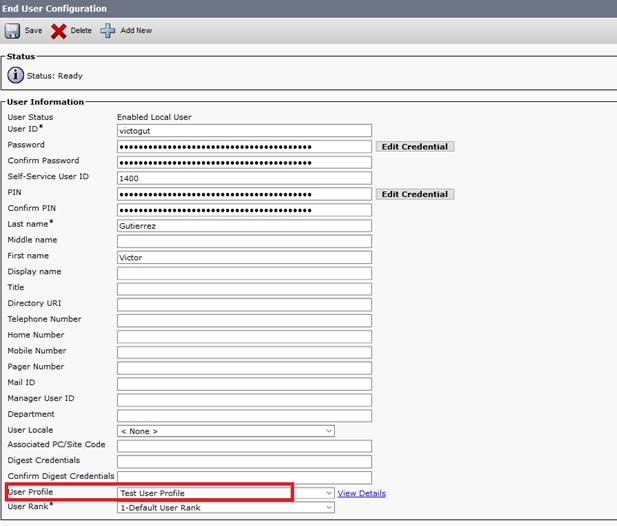
The user profile must be associated with the end user, and the MAC of the device must be added under controlled devices. If the user profile is not associated with the end user or the device is not associated with the end user, you see 0 devices when you apply the configuration.
Step 8. In order to review the end user association, navigate to CM Admin > User Management > End user. Select the end user, configure the user profile and click on Save as shown in the image.
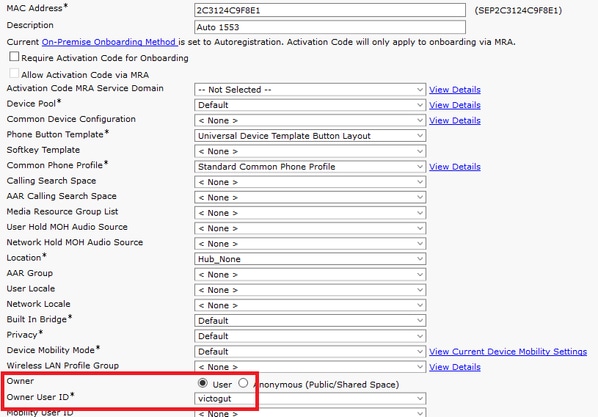
Step 9. In order to associate the end user with the device, navigate to CM Admin > Device > Phone and select the phone. Enable the User checkbox and select the User ID as shown in the image. Click on Save and then on Apply config.
Step 10. In order to check the status of the upgrade, navigate to the phone web page (web access enabled required). In the device information section, you see the headset model, version and status as shown in the image.

In some phone models (such as 88XX), you see the download icon on the phone screen as shown in the image.

Step 11. You can confirm that the upgrade/downgrade is completed if you receive the successful status on the phone web page as shown in the image.

Note: If the upgrade does not start automatically, unplug and plug the headset from the phone to force it.
Firmware upgrades are placed by the CUCM admin on the TFTP server. Headset upgrades the next time it connects to a Cisco IP phone (via USB or Y cable) or a laptop that runs Jabber 12.5+. The headset firmware can be pushed to the headset from CUCM via a COP file.
Note: If you do not have access to the Cisco Unified Communications Manager, you can use the online tool to upgrade your Cisco Headset (560 Series only) :Headset Upgrade Tool
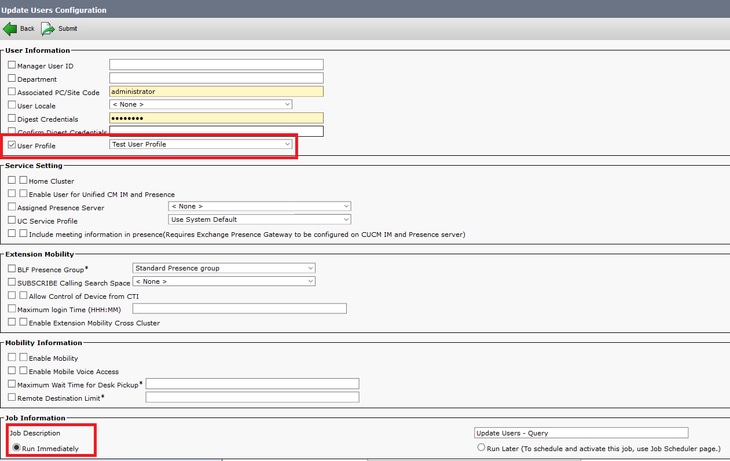
Step 12. In order to apply the same user profile to multiple end users you can use the Bulk Administration Tool (BAT). Navigate to CM Admin > Bulk Administration > Users > Update Users > Query and apply a filter criteria. Click on Find and then on Next.
In the update users configuration window, enable the User Profile checkbox and select the user profile. Select Run immediately and click on Submit as shown in the image.
Headset Connectivity
In order to connect your headset to the phone, you can use the USB, Y cable or Bluetooth. You can confirm the port used to connect the headset on the phone web page. If the headset is connected through the AUX port you can get the status as shown in the image.

Tip: It is possible to upgrade the headset firmware with the Y cable if you connect the Aux port only.
In order to use the Y cable with 78XX and 88XX phones, it is required to enable Wireless Headset Hookswitch Control parameter in Call Manager.
Navigate to CM Admin > Device > Phone and select the phone. In the phone configuration page, look for Headset hookswitch control and from the drop-down list select Enabled. Click on Save, and then click on Apply config.

Note: The parameter “Wireless Headset Hookswitch Control” was removed In CUCM 12.5.1 SU2 and later to give the end-users more flexibility in headset administration. You can enable the Wireless Headset Hookswitch Control directly on the phone Applications > Admin Settings > Aux Port> Connect e-hook headset to be able to use the Aux port for the headset. Keep in mind that you require Cisco IP Phone Firmware Release 12.7(1) or later, and Admin settings enabled in the phone configuration page.
The Y-cable must be plugged into both the headset port and the AUX port on the phone as shown in the image.
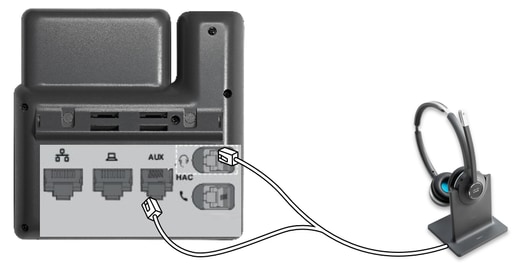
RJ is a common telephony connector, used with IP Phones to connect an analog headset or handset. Cisco 531 and 532 offer RJ connection or USB. Cisco IP phones use RJ9 for the headset port, and RJ11 for the auxiliary port. This last port is used to send the signal to answer a call, end call, etc.
In order to pair your base with a Bluetooth device press twice in your headset. In your destination device settings, select your headset. The headset base is shown as Cisco Headset followed by the last three digits of your headset serial number. In order to unpair and forget paired Bluetooth device Hold
  for 4 seconds.
In order to pair a headset with a Dock station, dock the headset into the base. If the headset is connected to a different base, the base and headset re-pairs. Once paired, the white LED of headset changes from blinking to breathing. When the dock or headset is out of range, the white LEDs blink.
Verify
In order to confirm the headset details, navigate to CM Admin > Devices > Headset and select Headset Inventory as shown in the image.
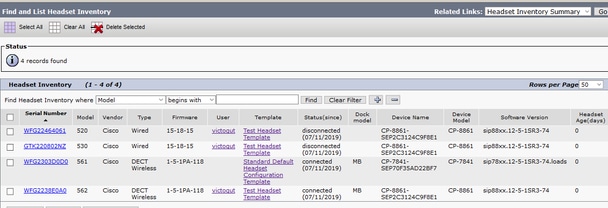
Note: Headset inventory or serviceability is supported for synergy lite phone models in 12.5.1 SU1 (88xx, 78xx phones).
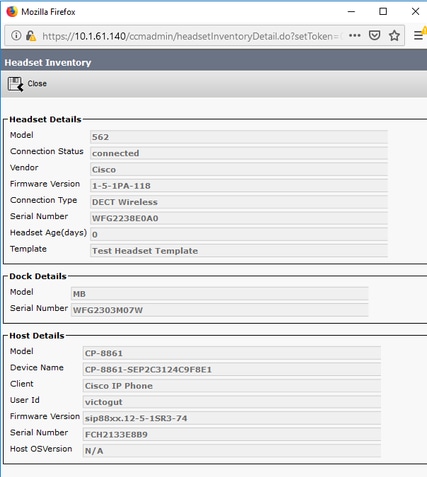
In order to get more details of the headset, click on the serial number of the headset in the headset inventory as shown in the image.
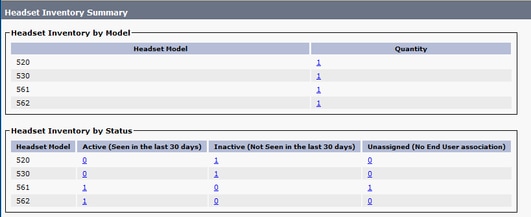
In order to obtain a headset inventory summary, navigate to CM Admin > Devices > Headset and select Headset Inventory Summary. You can get details such as the number of headset per model and the current status as shown in the image.
Troubleshoot
Refer to the Troubleshoot Guide to solve some common issues.
Related Information
Visit the Quick Reference Guide in order to get more information on how to use your Cisco Headset.
Visit the Series Accessories Guide for Cisco Unified Communications Manager to get more details on the headset compatibility and configuration.
Visit Cisco IP Phone 8800 supported accessories for more information on the headset compatibility with the 8800 series phone.
Revision History
| Revision | Publish Date | Comments |
|---|---|---|
1.0 |
20-Mar-2020 |
Initial Release |
Contributed by Cisco Engineers
- Victor Gutierrez Luna
Contact Cisco
- Open a Support Case

- (Requires a Cisco Service Contract)


 Feedback