Introduction
This document describes how to install certificate using Certificate Authority Proxy Function (CAPF) for IX5000/IX5200 immersive endpoints from Cisco Unified Communications Manager (CUCM).
Prerequisites
Requirements
Cisco recommends that you have knowledge of these topics:
- Working Knowledge of IX systems (Immersive collaboration systems)
- Knowledge of CUCM (Cisco Unified Communications Manager)
Components Used
The information in this document is based on these components:
The information in this document was created from the devices in a specific lab environment. All of the devices used in this document started with a cleared (default) configuration. If your network is live, ensure that you understand the potential impact of any command.
Background Information
When the Cisco TelePresence IX system receives an authentication challenge from an Authenticator, the unit responds either with the Manufacturing Installed Certificate (MIC) or the Locally Significant Certificate (LSC).
If both the MIC and LSC are installed, the system uses the LSC to authenticate. If the LSC is not installed, in that case Cisco TelePresence IX unit uses the MIC, as the MIC is built into the system by the manufacturer.
In order to authenticate the Cisco TelePresence IX system using the LSC, you must install it on your system manually by using the Certificate Authority Proxy Function (CAPF) in Unified CM.
Configure
This section provides the needed configurational steps.
Step 1. Log in to CUCM Administration interface.
Step 2. Add the security Profile to the Cisco TelePresence IX System by completing the next steps:
- Select Device > Phone
- Select Findto find the existing Cisco TelePresence IX system which you want to configure
- Scroll down to the Protocol Specific Information box and locate the Device Security drop-down list
- In the Device Security Profile drop-down list, select the Secure security profile
- Scroll down to the Certification Authority Proxy Function (CAPF) Information box and change these settings
- For Certificate Operation select Install/Upgrade
- For Authentication Mode select By Authentication String
Thisimage provides an example of the Certification Authority Proxy Function (CAPF) Information box:
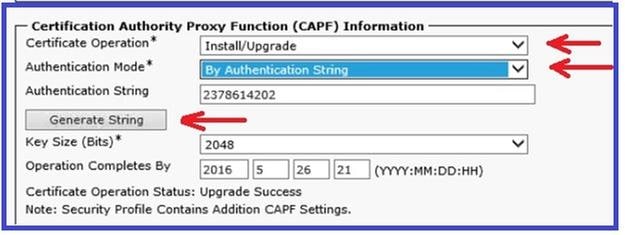
6. Select Generate String to generate a unique string.
Take a note of the string that was generated, as you have to use this string further.
Step 3. SelectSave and then Apply Config to save your settings.
Step 4. Log in to the IX5000/IX5200 administration interface.
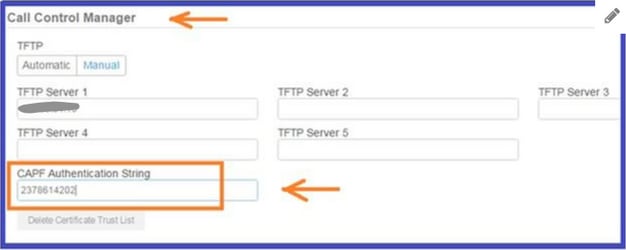
- SelectConfiguration > Call Control Manager
- In the CAPF Authentication String field, enter the authentication string that was generated from CUCM in the previous step
- SelectApply and the IX5000/IX5200 reboots
Thisimage provides an example of a the IX Call Control Manager interface:
Verify
Use this section in order to confirm that your configuration works properly.
Once the IX5000/IX5200 system is up and running, and after successfully completed CAPF process, log into the IX5000/IX5200 administration interface.
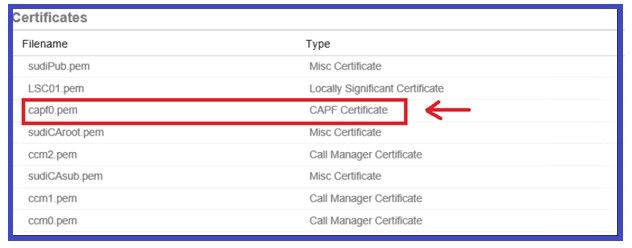
Step 1. SelectConfiguration > Certificates
Step 2. The CAPF certificate is seen in the certificate list with filename capf0.pem
This image provides an example of a the Certificates list of an IX5000/IX5200 system:
Troubleshoot
This section provides information you can use in order to troubleshoot your configuration.
If the CAPF process is unsucesful, the CAPF certificate is not seen in the certificate list (shown on the previous image). Use the next steps to troubleshoot such scenario:
Step 1. Log in to the IX5000/IX5200 Command Line Interface (CLI). Run the command show security authstring.
If this command returns the same string which was generated by the CUCM earlier, this confirms that authentication has been done, however the IX5000/IX5200 is unable to download the certificate.
Step 2. Log in to the IX5000/IX5200 administration interface:
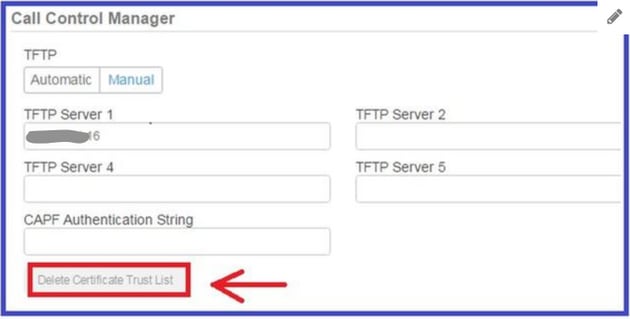
- SelectConfiguration > Call Control Manager
- Select the button Delete Certificate Trust List
- Select Apply and the IX5000/IX5200 reboots
Thisimage provides an example of a the IX Call Control Manager interface:
If the the CAPF certificate is still not seen in the Certificate list, then factory reset the device using the steps provided in Step 3.
Step 3. Log in to the IX5000/IX5200 administration interface:
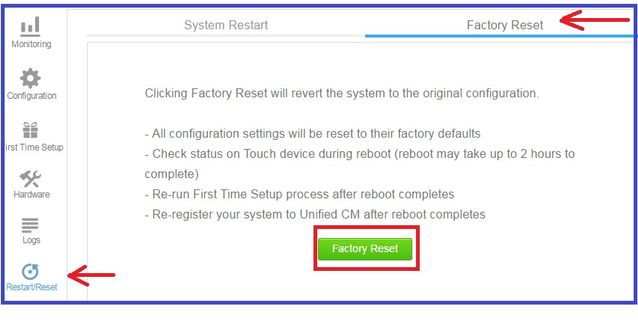
- Select Restart/Reset > Factory Reset
- SelectFactory Reset
This image provides an example of how to perform factory reset on IX5000/IX5200 system:
Related Information