TMS Server Migration Procedures
Available Languages
Contents
Introduction
This document describes the procedures that are used in order to migrate a Cisco TelePresence Management Suite (TMS) database application from one server to another, with the option to move the location of the Structured Query Language (SQL) database.
Prerequisites
Requirements
Cisco recommends that you have knowledge of these topics:
- Microsoft SQL Server
- Cisco TMS
Components Used
The information in this document is based on these software versions:
- TMS Versions 12, 13, and 14
- TMSPE Version 1.0
- Microsoft SQL Server Versions 2005 and 2008
The information in this document was created from the devices in a specific lab environment. All of the devices used in this document started with a cleared (default) configuration. If your network is live, make sure that you understand the potential impact of any command.
Migrate the TMS
This section describes the processes that are used in order to migrate the TMS.
Preparation
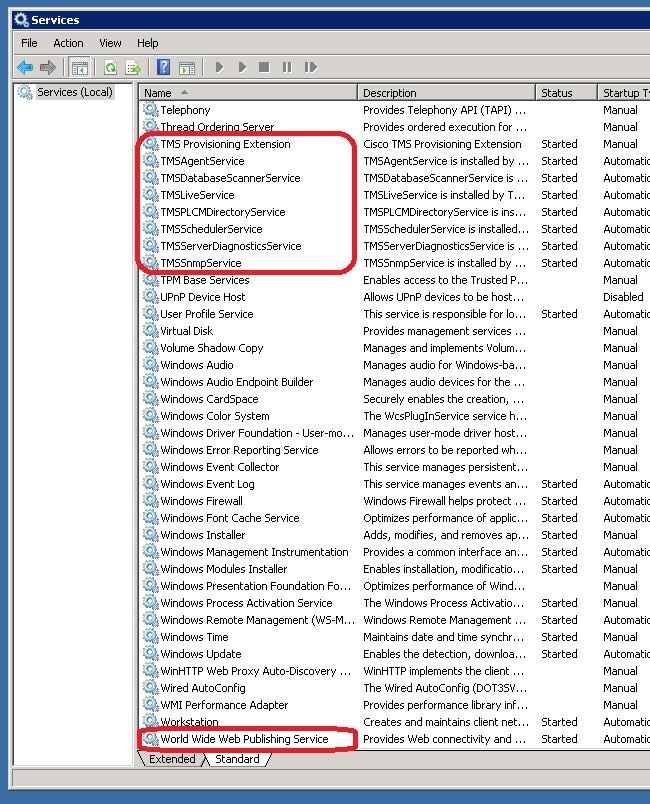
Shut down all TMS Microsoft Windows services:
- TMS Agent Service
- TMS Database Scanner Service
- TMS Live Service
- TMS PLCM Directory Service
- TMS Scheduler Service
- TMS Server Diagnostics Service
- TMS Simple Network Management Protocol (SNMP) Service
If you use TMS Provisioning Extension (tmspe), then shut it down also.
Back Up the SQL Database
There are two methods that are used in order to back up and restore the SQL database. The CLI is available on all systems that have SQL installed, but SQL Management Studio can be downloaded from Microsoft and used, if desired.
Use of the SQL CLI
If the SQL database currently resides on the same server as the TMS server application and you plan to move the database to a new server, either the new Microsoft Windows server that hosts TMS or a separate SQL instance, then the database must be backed up and restored to the new location.
The commands that are described in this section are entered within the command prompt on the current TMS server that hosts the SQL Express instance with the tmsng database. These commands are written in order to allow SQL server access via the currently logged on Microsoft Windows user. In order to use SQL login credentials, replace -E with -U <username> -P <password> and replace the username and password with the SQL credentials and system admin rights.
TMS Database
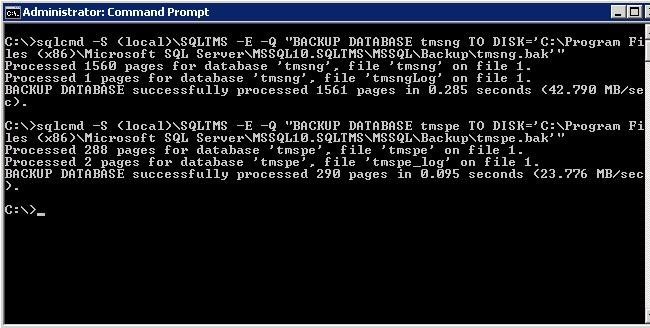
In order to back up the tmsng SQL database with the CLI, enter this command:
sqlcmd -S (local)\SQLTMS -E -Q "BACKUP DATABASE tmsng TO DISK='<path>\tmsng.bak'
When this command is used, replace <path> with the location to which you would like to save the backup. This location must have adequate space for the backup, and the SQL service must have access to it.
TMSPE Database (when TMSPE is used)
If you use tmspe, then enter this command in order to back up the tmspe SQL database from the CLI:
sqlcmd -S (local)\SQLTMS -E -Q "BACKUP DATABASE tmspe TO DISK='<path>\tmspe.bak'
Copy Files to the New Server
Copy the backup file(s) to the new SQL server location. This can either be a separate SQL server or the new TMS server location that runs SQL Server Express.
SQL Management Studio
This section describes the back up process when the SQL Management Studio is used.
TMS Database
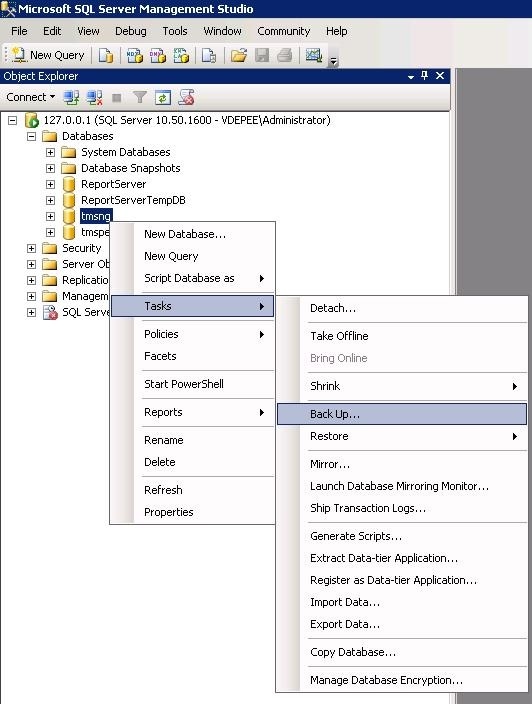
On the current SQL server, open SQL Management Studio and navigate to the tmsng database. Right-click the database and navigate to Tasks > Back Up...:
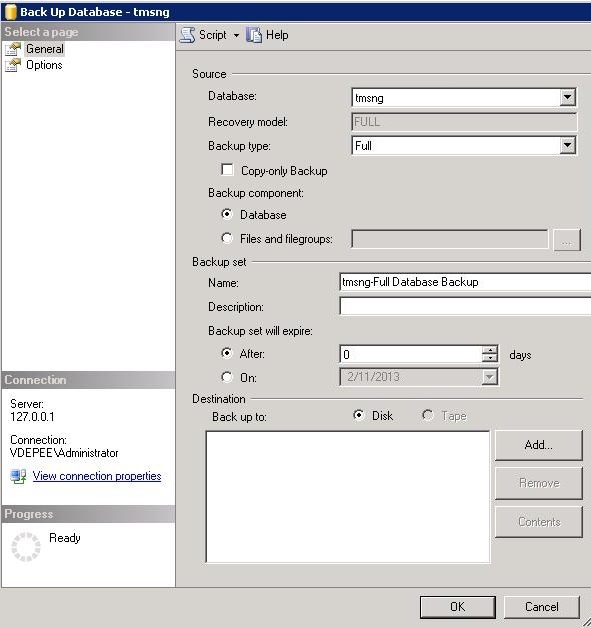
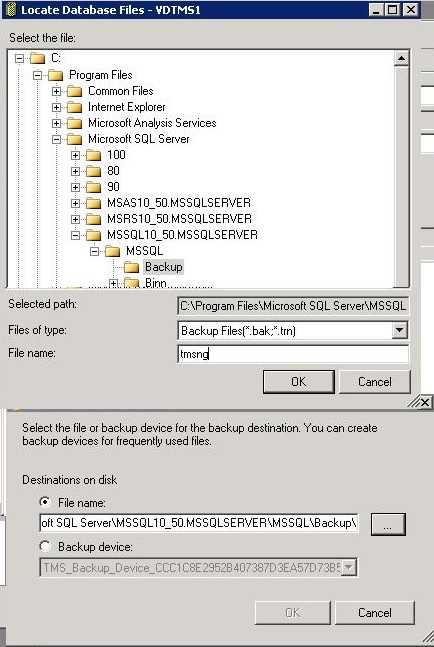
In the backup prompt page, ensure that the settings are similar to those shown. There might be a default destination specified. If you would like to use this location in order to store the backup, click OK and the backup is sent to the specified location. If there is no destination location specified, click Add, click ..., and enter a file name of tmsng. Then, click OK for all three screens, and the database backup should occur.
TMSPE Database (when TMSPE is used)
If you use tmspe, then complete the aforementioned steps, but right-click the tmspe database instead of the tmsng database. Name this backup tmspe.bak.
Copy Files to the New Server
Copy the backup file(s) to the new SQL server location. This can either be a separate SQL server, or the new TMS server location that runs SQL Server Express.
TMS Legacy Agents
If you use TMS legacy agents, on the old TMS server, open Windows Explorer and navigate to %OPENDS_HOME% > db > userRoot.
Here is an example:
C: > Program Files > TANDBERG > TMS > provisioning > OpenDS-2.0 > db > userRoot
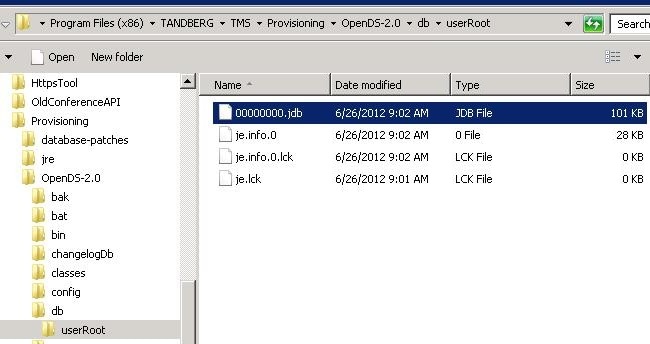
Copy the *.jdb file to a temporary location on the new TMS server.
Migration from TMS Versions 14 or Later
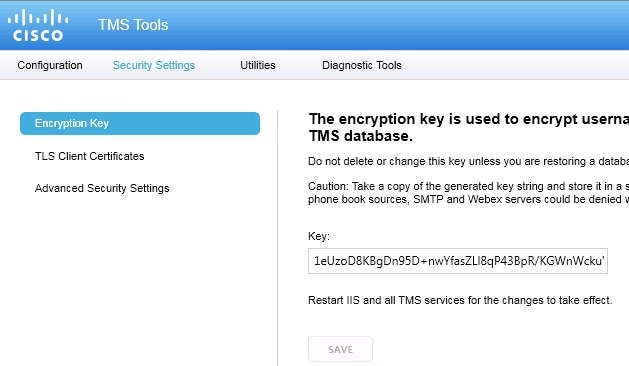
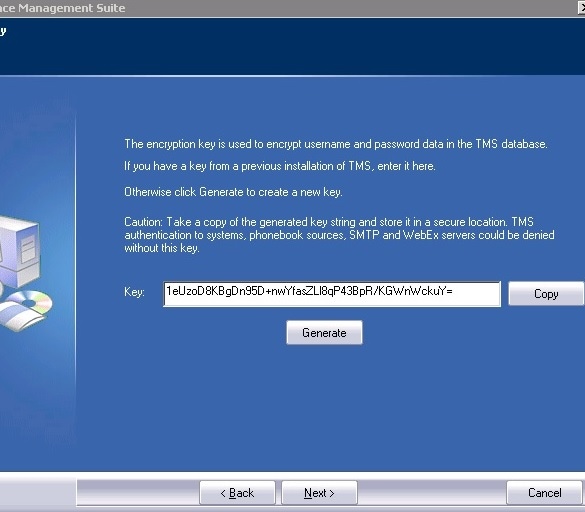
If the TMS runs Version 14 or later, there is an encryption key that is used in order to securely store credentials in the tmsng database. This key must be copied from the old server to the new server. In order to collect this from the old server, open the TMS Tools and select Encryption Key. Then, copy the key.
Save the Local Files
The TMS might contain end-user customized files. These locations should be checked. If there are customized files in these locations, ensure that you save these files and copy them to the new TMS server location after it is reinstalled.
These directories are the the default paths:
- C: > Program Files > TANDBERG > TMS > wwwTMS > Data > CiscoSettings
- C: > Program Files > TANDBERG > TMS > wwwTMS > Data > CompanyLogo
- C: > Program Files > TANDBERG > TMS > wwwTMS > Data > ExternalSourceFiles
- C: > Program Files > TANDBERG > TMS > wwwTMS > Data > Image
- C: > Program Files > TANDBERG > TMS > wwwTMS > Data > Language
- C: > Program Files > TANDBERG > TMS > wwwTMS > Data > Logo
- C: > Program Files > TANDBERG > TMS > wwwTMS > Data > Map
- C: > Program Files > TANDBERG > TMS > wwwTMS > Data > MGCSettings
- C: > Program Files > TANDBERG > TMS > wwwTMS > Data > Software
- C: > Program Files > TANDBERG > TMS > wwwTMS > Data > Sound
- C: > Program Files > TANDBERG > TMS > wwwTMS > Public > Data > SOFTWARE
Restore the SQL Database
There are two methods that are used in order to back up and restore the SQL database. The CLI is available on all systems that have SQL installed, but SQL Management Studio can be downloaded from Microsoft and used, if desired.
SQL CLI Usage
This section describes the use of the SQL CLI.
TMS Database
If you intend to use SQL Express on the new TMS server in order to house the database, install the TMS and then uninstall it. This allows you to create the SQL Express instance that is required in order to restore the database. During the install, you do not need to include the release key and option keys, as this data is overwritten when the database is restored from backup. If you use a separate SQL server, you do not need to install and uninstall the TMS.
On the server that runs either SQL Server or SQL Server Express, enter the commands described in this section in order to restore the SQL database. These commands are written in order to allow SQL server access via the currently logged on Microsoft Windows user.
In order to use the SQL login credentials, replace -E with -U <username> -P <password> and replace the username and password with the SQL credentials and system admin rights. You must also make these replacements:
- Replace the servername with the hostname of the SQL server.
- Replace the instancename with the SQL service instance name.
- Replace the <pathofbackup> variable with the location of the backup (.bak) file.
- Replace the <pathofdbfiles> variable with the location that you wish to store the database MDF file (tmsng_data.mdf) and the location you wish to store the database LDF file (tmsng_log.ldf).
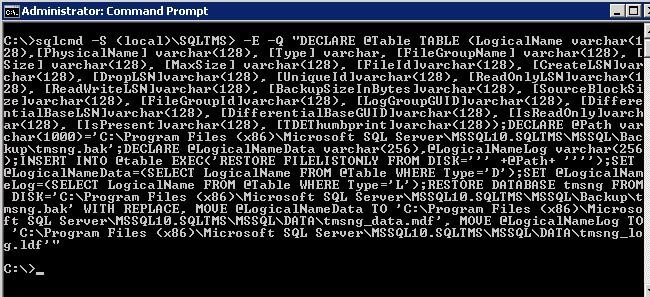
If you must restore the database to SQL Version 2005, enter this command:
sqlcmd -S <servername\instancename> -E -Q "DECLARE @Table TABLE (LogicalName
 varchar(128),[PhysicalName] varchar(128), [Type] varchar, [FileGroupName]
 varchar(128), [Size] varchar(128), [MaxSize] varchar(128), [FileId]varchar
 (128), [CreateLSN]varchar(128), [DropLSN]varchar(128), [UniqueId]varchar
 (128), [ReadOnlyLSN]varchar(128), [ReadWriteLSN]varchar(128),
 [BackupSizeInBytes]varchar(128), [SourceBlockSize]varchar(128), [FileGroupId]
 varchar(128), [LogGroupGUID]varchar(128), [DifferentialBaseLSN]varchar(128),
 [DifferentialBaseGUID]varchar(128), [IsReadOnly]varchar(128), [IsPresent]
 varchar(128));DECLARE @Path varchar(1000);SET @Path='<pathofbackup>\tmsng.bak'
 ;DECLARE @LogicalNameData varchar(256),@LogicalNameLog varchar(256);INSERT
 INTO @table EXEC('RESTORE FILELISTONLY FROM DISK=''' +@Path+ '''');SET
 @LogicalNameData=(SELECT LogicalName FROM @Table WHERE Type='D');SET
 @LogicalNameLog=(SELECT LogicalName FROM @Table WHERE Type='L');RESTORE
 DATABASE tmsng FROM DISK='<pathofbackup>\tmsng.bak' WITH REPLACE, MOVE
 @LogicalNameData TO '<pathofdbfiles>\tmsng_data.mdf', MOVE @LogicalNameLog
 TO '<pathofdbfiles>\tmsng_log.ldf'"
If you must restore the database to SQL Version 2008, enter this command:
sqlcmd -S <servername\instancename> -E -Q "DECLARE @Table TABLE (LogicalName
 varchar(128),[PhysicalName] varchar(128), [Type] varchar, [FileGroupName]
 varchar(128), [Size] varchar(128), [MaxSize] varchar(128), [FileId]varchar
 (128), [CreateLSN]varchar(128), [DropLSN]varchar(128), [UniqueId]varchar
 (128), [ReadOnlyLSN]varchar(128), [ReadWriteLSN]varchar(128),
 [BackupSizeInBytes]varchar(128), [SourceBlockSize]varchar(128), [FileGroupId]
 varchar(128), [LogGroupGUID]varchar(128), [DifferentialBaseLSN]varchar(128),
 [DifferentialBaseGUID]varchar(128), [IsReadOnly]varchar(128), [IsPresent]
 varchar(128), [TDEThumbprint]varchar(128));DECLARE @Path varchar(1000);SET
 @Path='<pathofbackup>\tmsng.bak';DECLARE @LogicalNameData varchar(256),
 @LogicalNameLog varchar(256);INSERT INTO @table EXEC('RESTORE FILELISTONLY
 FROM DISK=''' +@Path+ '''');SET @LogicalNameData=(SELECT LogicalName FROM
 @Table WHERE Type='D');SET @LogicalNameLog=(SELECT LogicalName FROM @Table
 WHERE Type='L');RESTORE DATABASE tmsng FROM DISK='<pathofbackup>\tmsng.bak'
 WITH REPLACE, MOVE @LogicalNameData TO '<pathofdbfiles>\tmsng_data.mdf',
 MOVE @LogicalNameLog TO '<pathofdbfiles>\tmsng_log.ldf'"
TMSPE Database (when TMSPE is used)
In order to restore the tmspe SQL database to SQL Version 2005, enter this command into the CLI:
sqlcmd -S <servername\instancename> -E -Q "DECLARE @Table TABLE (LogicalName
 varchar(128),[PhysicalName] varchar(128), [Type] varchar, [FileGroupName]
 varchar(128), [Size] varchar(128), [MaxSize] varchar(128), [FileId]varchar
 (128), [CreateLSN]varchar(128), [DropLSN]varchar(128), [UniqueId]varchar
 (128), [ReadOnlyLSN]varchar(128), [ReadWriteLSN]varchar(128),
 [BackupSizeInBytes]varchar(128), [SourceBlockSize]varchar(128), [FileGroupId]
 varchar(128), [LogGroupGUID]varchar(128), [DifferentialBaseLSN]varchar(128),
 [DifferentialBaseGUID]varchar(128), [IsReadOnly]varchar(128), [IsPresent]
 varchar(128));DECLARE @Path varchar(1000);SET @Path='<pathofbackup>\tmspe.bak'
 ;DECLARE @LogicalNameData varchar(256),@LogicalNameLog varchar(256);INSERT
 INTO @table EXEC('RESTORE FILELISTONLY FROM DISK=''' +@Path+ '''');SET
 @LogicalNameData=(SELECT LogicalName FROM @Table WHERE Type='D');SET
 @LogicalNameLog=(SELECT LogicalName FROM @Table WHERE Type='L');RESTORE
 DATABASE tmspe FROM DISK='<pathofbackup>\tmspe.bak' WITH REPLACE, MOVE
 @LogicalNameData TO '<pathofdbfiles>\tmspe_data.mdf', MOVE @LogicalNameLog
 TO '<pathofdbfiles>\tmspe_log.ldf'"
In order to restore the tmspe SQL database to SQL Version 2008, enter this command into the CLI:
sqlcmd -S <servername\instancename> -E -Q "DECLARE @Table TABLE (LogicalName
 varchar(128),[PhysicalName] varchar(128), [Type] varchar, [FileGroupName]
 varchar(128), [Size] varchar(128), [MaxSize] varchar(128), [FileId]varchar
 (128), [CreateLSN]varchar(128), [DropLSN]varchar(128), [UniqueId]varchar
 (128), [ReadOnlyLSN]varchar(128), [ReadWriteLSN]varchar(128),
 [BackupSizeInBytes]varchar(128), [SourceBlockSize]varchar(128),
 [FileGroupId]varchar(128), [LogGroupGUID]varchar(128), [DifferentialBaseLSN]
 varchar(128), [DifferentialBaseGUID]varchar(128), [IsReadOnly]varchar(128),
 [IsPresent]varchar(128), [TDEThumbprint]varchar(128));DECLARE @Path varchar
 (1000);SET @Path='<pathofbackup>\tmspe.bak';DECLARE @LogicalNameData varchar
 (256),@LogicalNameLog varchar(256);INSERT INTO @table EXEC('RESTORE
 FILELISTONLY FROM DISK=''' +@Path+ '''');SET @LogicalNameData=(SELECT
 LogicalName FROM @Table WHERE Type='D');SET @LogicalNameLog=(SELECT
 LogicalName FROM @Table WHERE Type='L');RESTORE DATABASE tmspe FROM DISK=
 '<pathofbackup>\tmspe.bak' WITH REPLACE, MOVE @LogicalNameData TO
 '<pathofdbfiles>\tmspe_data.mdf', MOVE @LogicalNameLog TO
 '<pathofdbfiles>\tmspe_log.ldf'"
SQL Management Studio Usage
This section describes the use of the SQL Management Studio.
TMS Database
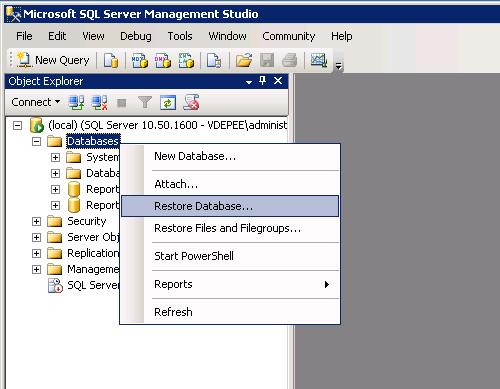
Open the SQL Management Studio on the new SQL server. Right-click Databases and select Restore Database:
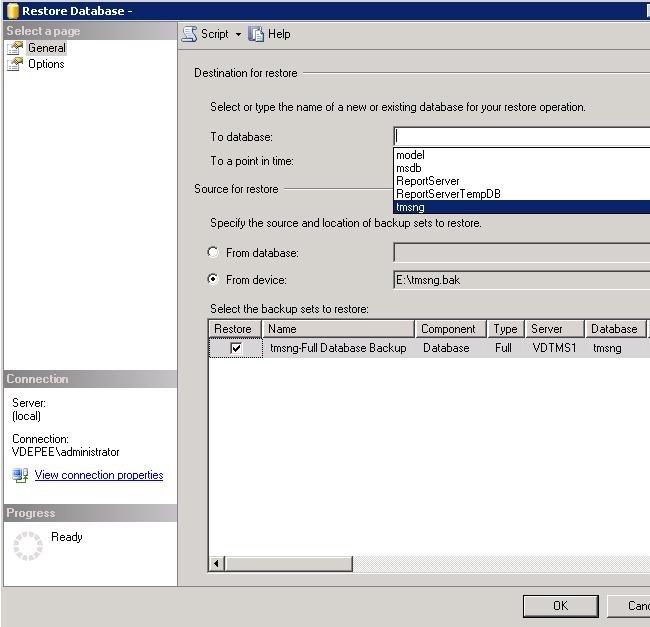
In the Source for restore field, click the From device: radio buttonand enter the location of the tmsng.bak file. In the Select the backup sets to restore: field, check the tmsng-Full Database Backup checkbox. In the To database: field, select tmsng and click OK. This should restore the tmsng database.
TMSPE Database (when TMSPE is used)
The process that is used in order to restore the tmspe database is the same as that used in order to restore the tmsng database, but you select the tmspe backup file instead of the tmsng backup file, and select the tmspe database instead of the tmsng database.
Post Database Restoration Actions
After you restore the database, complete these steps:
- Reinstall the TMS on the new server in order to host the TMS server application.
- Select custom install in order to point to the new SQL server location.
Migrations from TMS Versions 14 and Later
During the installation process, enter the encryption key that is copied from the original TMS server.
TMSPE Usage
If you use TMSPE, reinstall the TMSPE on the TMS server and indicate the new database location.
TMS Legacy Agents Usage
If you use TMS legacy agents, then complete these steps:
- Stop the TMS Agents Microsoft Windows service. This also stops the OpenDS Windows Service.
- Browse to %OPENDS_HOME% > db > userRoot. Here is an example: C: > Program Files > TANDBERG > TMS > provisioning > OpenDS-2.0 > db > userRoot.
- Delete all of the files that exist in the folder.
- Move the .jdb files that are copied from the old TMS server into the folder.
- Start the TMSAgentService Microsoft Windows Service.
TMS Tools Utility Usage
If the host name of the TMS server changes and you use local user accounts (user accounts that exist on the server that hosts the TMS server application - not Active Directory (AD) accounts), you must run the TMS Tools utility in order to modify the data within the database to ensure that you can log in:
- Navigate to TMS Tools > Utilities > Change Users Domain.
- Enter the old domain name: <old TMS server host name>.
- Enter the new domain name: <new TMS server host name>.
Post Installation
In order to access the TMS portal with a user account that has Site Administrator rights in TMS, complete these steps:
- Navigate to Administrative Tools > Configuration > General Settings.
- Ensure that the value for the Software FTP Directory is accurate for the new server installation. This value might be wrong if you installed the TMS with a different drive letter on the new server (when compared to the old server), or if you switched from a 32-bit to a 64-bit version of the Microsoft Windows Server Operating System (OS).
- Navigate to Administrative Tools > Configuration > Network Settings.
- Check the values for these fields:
- General Network Settings > URL Where Software Packages Can Be Downloaded
- Advanced Network Settings for Systems on Internal LAN > TMS Server IPv4 Address
- Advanced Network Settings for Systems on Internal LAN > TMS Server IPv6 Address
- Advanced Network Settings for Systems on Internal LAN > TMS Server Fully Qualified Host Name
- Advanced Network Settings for Systems on Public Internet/Behind Firewall > TMS Server Address (Fully Qualified Host Name or IPv4 Address)
- General Network Settings > URL Where Software Packages Can Be Downloaded
TMS Legacy Agents Usage
If you use TMS legacy agents, complete these steps:
- Navigate to Administrative Tools > Configuration > TMS Agent Settings.
- In the Global > Settings section, enter a password for the LDAP Configuration Password and LDAP Replication Password. This ensures that the passwords are synced with the data storage location.
- Ensure that the value for the TMS Agent Backup > Backup Directory is accurate for the new server installation. This value might be wrong if you installed the TMS with a different drive letter on the new server (when compared to the old server), or if you switched from a 32-bit to a 64-bit version of the Microsoft Windows Server OS.
Delete the Old Server
Near the bottom of the page, in the TMS Servers section, you might observe multiple TMS servers. If so, complete these steps in order to delete the old server:
- Click the machine name and select Delete.
- For the new machine, verify that the Network Address is correct (the FQDN and the IP address). If the Network Address is not correct, then complete these steps:
- Click Edit (located to the right).
- Enter the correct FQDN address for the new TMS server, and click Update.
- Near the top of the page, enter a new LDAP Configuration Password and LDAP Replication Password in the Global > Settings section.
- Click Save near the bottom of the page.
- Click Edit (located to the right).
Run the TMS Agent Diagnostics
Navigate to Administrative Tools > TMS Agent Diagnostics and run the TMS Agent Diagnostics on the Local TMS Agent.
Enable TMS Agent Replication to the VCS
Here are some important notes to keep in mind when you enable the TMS agent replication to the VCS:
- If you use tmspe, you must reinstall it and indicate the current location of the tmspe database.
- If you use Analytics Extensions and they were installed on the old TMS server, you must reinstall them on the new server.
- If you use a TMS Extension for Microsoft Exchange, use its configuration tool in order to indicate the new location of the TMS server.
- If replication fails due to Domain Name System (DNS) lookups, ensure that the FQDN that is configured near the bottom of the TMSAgent settings page of the TMS (typically the FQDN of the TMS, as configured in Microsoft Windows) is resolvable to the IP address of the TMS when the VCS performs a lookup of this FQDN. Reverse lookups must also be present.
Related Information
Revision History
| Revision | Publish Date | Comments |
|---|---|---|
1.0 |
21-Jul-2014 |
Initial Release |
Contact Cisco
- Open a Support Case

- (Requires a Cisco Service Contract)
 Feedback