Introduction
This document describes the SIP Client app which enables an IP camera to transmit and receive audio to and from an external SIP client device like Cisco Unified Communications Manage. The IP camera plays audio that it receives on external speakers that are connected to it. The IP camera transmits audio through its internal or external microphone.
Prerequisites
Requirement
Cisco Recommends that you have knowledge of these topics:
- VSM 7.6 and later, camera app SIPClient_V2.X.cpk 2.2v or 2.8v, Camera Models 2830, 2835, 3520, 3520, 3535, 6000P, 6020, 6030, 6400, 6400E, 6500PD, 6930, 7030, 7030E, 7530PD, 7070, 3050, CUCM, IP Phone, IPICS 4.7 and later.
- Hardware connection on camera to connect external mic and external speakers.
- CUCM, IP Phone
- IPICS 4.7 or Later
Components Used
The information in this document is based on VSM 7.8 with latest camera firmware 2.8 version
The information in this document was created from the devices in a specific lab environment. All of the devices used in this document started with a cleared (default) configuration. If your network is live, make sure that you understand the potential impact of any procedure.
Procedure to Install the Camera App
Step 1. Login to VSOM.
Step 2. Navigate to System Setting > Camera App.
Step 3. Click in Add, as shown in the image:

Step 4. Browse the SIPClient App from local PC (Eg. SIPClient_V2.X.cpk)
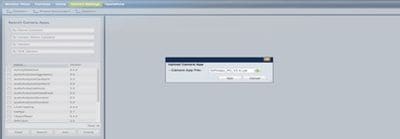
Camera Apps are available on cisco.com. Click in this link, select the required Camera model and then the Software Type IP Camera Application and Utilities. Download the required App.
( https://software.cisco.com/download/navigator.html?mdfid=282090226&flowid=50644 )
Now, Camera Apps needs to be enabled on the Camera Template to be managed by VSOM
Step 5. Navigate to Cameras > Template > Camera Template, as shown in the image:
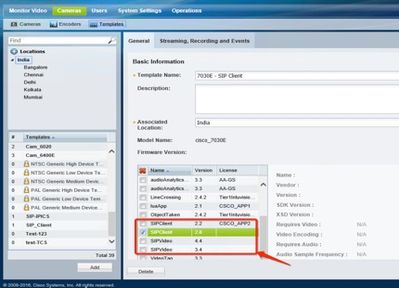
Step 6. Select SIPClient App.
Step 7. Click Save.
Step 8. Navigate to System Setting > Camera App, select the SIPClient App and click in Install, as shown in the image:
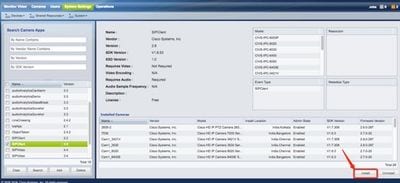
Step 9. Check the Camera app not installed to list the camera which does not have the SIP client APP.
Step 10. Now, select the Model of the camera on which APPS needs to be Installed (multiple cameras can be selected) and click OK.
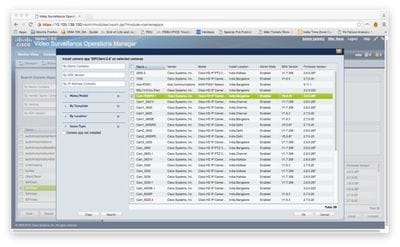
Now, VSOM pushes the configuration and App data to the camera, Apps are installed on the camera depending on the camera compatibility and Firmware version.
This completes the Installation of Camera Apps on Camera.
Configuring Cisco CUCM for use with the SIP Client App
Procedure to Configure the CUCM with Camera App
From this configuration, SIPClient App can be used to stream audio from camera to IP Phone or vice-versa.
Step 1. Login to Camera Web Gui
Step 2. Navigate to Setup > Application Manager > App Setup.
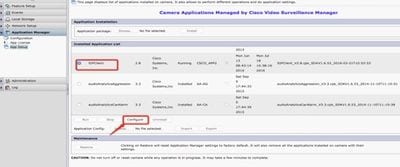
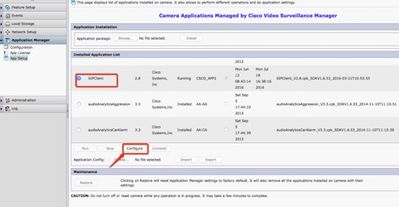
Step 3. Select SIPClient and click Configure, as shown in the image:
Step 4. As shown in the image, enter appropriate values in the SIPClient App Configuration page.
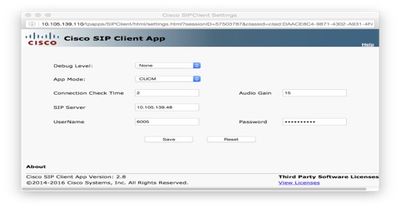
- App mode – CUCM
- SIP Server – CUCM IP address
- User Name – End Username and Password from CUCM, created below under Step – 15
Step 5. Login to CUCM
Note: Adding a camera to Cisco Unified Communications Manager enables that application to support the camera. When you add a camera, you add the device as a phone. You must add each camera that will run the SIP Client / SIP Video app.
Step 6. Navigate to Device > Phone, Add New
Step 7. From Phone Type, Select Third-Part SIP Device (Advanced).
Step 8. Device Information area, enter the MAC address of the IP camera.
Step 9. Select Default for Device Pool, Phone Button Template select Third-party SIP Device (Advanced)
Step 10. In the Common Phone Profile, select Standard Common Phone profile
Step 11. In the Protocol Specific Information, Device Security Profile select the Third-party SIP Device Advanced.
Step 12. Check the Media Transmission Point Required.
Step 13. Rest all Default settings.
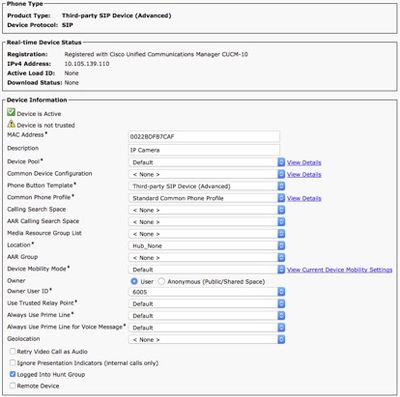
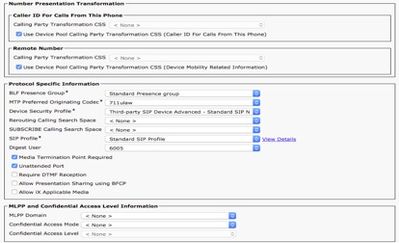
Step 14. Adding End User.
Note: Adding end user to Cisco Unified Communications Manager and associating and end user with a camera allows cameras that run the SIP Client app to register with Cisco Unified Communications Manager. Cisco recommends that you create one end user and associate that end user with each camera.
Step 15. Navigate to User Management à End User > Add New.
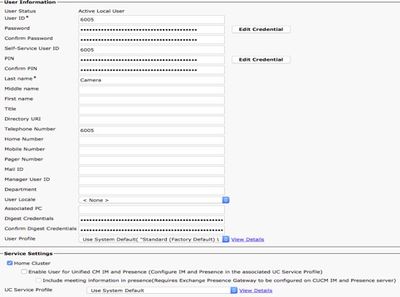
Add User ID and Password (this User data should be used on the Camera App)
Step 16. Add User ID, Password, Last Name
Step 17. In the Device Information, click in Device Association. Select the Camera MAC and Save Selected/Changes, then MAC address should be viewable on controlled Devices.
Step 18. Click in Save.
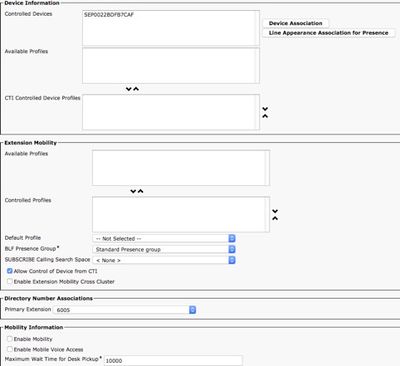
Step 19. Navigate to Device > Phone > Camera MAC address.
Step 20. In the Device Information, navigate to Owner > User.
Step 21. In the Device Information, click in Owner User ID, Select USER ID (created from Step 15).
Step 22. Save & Apply Config. (Reset the configuration if required. Confirm if the camera is registered to CUCM).
Step 23. Start/Stop camera app to initialize the Camera App again to initiate SIP to CUCM.
Step 24. Dial 6005 from IP Phone, Audio/Video Streaming will begin from Camera to SIP End device (IP Phone).
Configuring Cisco IPICS for use with the SIP Client App
Procedure to Configure Channel, Radio, and VTG on IPICS
This Session help to configure the Channel, Radio, and VTG on IPICS Server so that UMS server uses these configurations to establish SIP from Camera apps to RADIO, VTG, IDC etc.. vise-versa.
Step 1. Login to IPICS Administration Page.
Step 2. Server a Configuration. Click Radios.
Step 3. Click Add. Select Add Tone Controlled Radio.
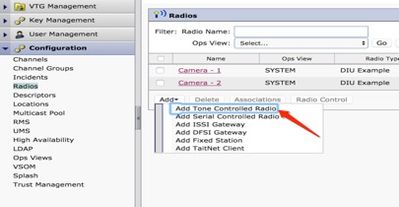
Step 4. Enter the details.
Note: Multicast Address should be an address which is not part of Multicast Pool.
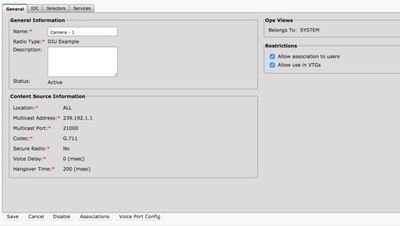
Step 5. Click on Associations. Select the users needs to be part of this Channel.

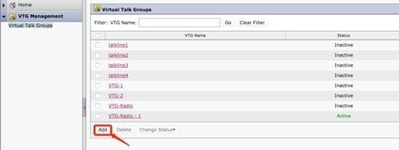
Step 6. Server a VTG Management, Click Add and enter the VTG Information, as shown in the image:
Step 7. As shown in the image, select the Participants.
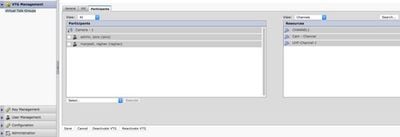
Step 8. Select Participants. Drag and drop the Channel, Users and Radio to communicate each other.
Step 9. Click Save and Activate / Reactive VTG.
Step 10. Login to IDC – IPICS Dispatch Console and Start or listen Broadcast from IP Camera.
Procedure to Configure the Camera App with IPICS (UMS)
Step 1. Login to Camera Web Gui.
Step 2. Navigate to Setup à Application Manager à App Setup.
Step 3. Select SIPClient and click Configure.
Step 4. Enter appropriate values in the SIPClient App Configuration page.
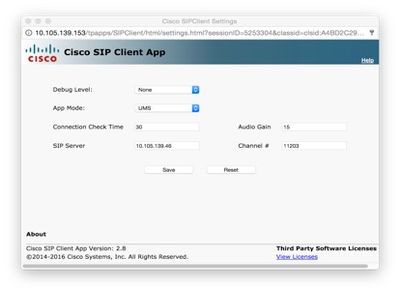
Note: In the above configuration, SIPClient App is used to stream audio from camera to UMS Server like Channels, Radios & VTG etc.
Step 5. Select App mode: UMS.
Step 6. Enter the UMS IP address in SIP Server.
Step 7. Channel #, Enter the number of the active channel to which to connect, preceded by 1.
To determine the channel number, go to http://<UMS_ip_address>:8080/ums-sipua/live
For example, if the channel number is 340, enter 1340.
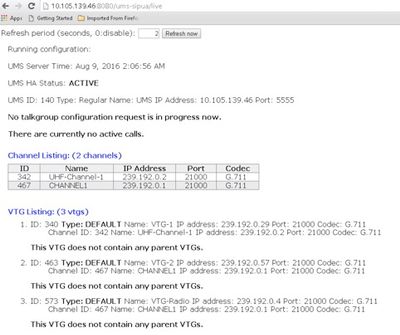
Step 8. Connection Check Time: Enter a time interval in seconds at which the IP camera periodically contacts the UMS to ensure that a live connection is in place.
Step 10. Click Save.
Step 9. Refresh the page, http://<UMS_IP_Address>:8080/ums-sipua/live
Now, refer to Call Listing, Cam (camera) with IP address had joined the Multicast network via UMS server. This help in troubleshooting no. of user joined session via SIP to Multicast network. This Link will also list of No. of channels available with Configured UMS server with their ID and Names.
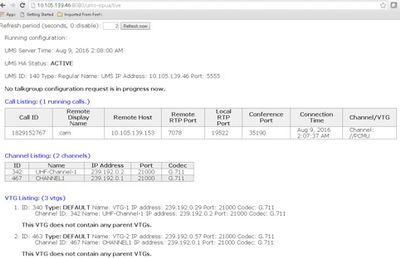
This Link also has the list of VTG available with configured with Multicast address with their IP address and codec used. Channel ID can be used by Camera App to join this session using SIP protocol. Note the Channel ID and Enter the number of the active channel to which to connect, preceded by 1 in the Camera APP configuration page.
For example, if the channel number is 340, enter 1340.
Troubleshoot
How to Export Logs from Camera
Step 1. Login to Camera web gui.
Step 2. Navigate to Setup à Administration à Maintenance à Camera logs. Click Export logs.
Download to local PC
Logs to Refer while Camera APPS Troubleshooting
SIPClient.log- This log shows the SIPClient Configuration file status and latest config file update status. This log also helps in reviewing the SIPDeamon status of a camera.
Alerts.log- This logs all the events on the camera, it is useful to debug the past issue which is in the reference to the events on the logs.
Appmgr.log-This log has all the app related entries and also app status logs.
Appmgrtrace.log- This logs info about how the apps are managed and license information.
SIPClient_verbose.log- When Camera App is enabled with the debug, it lets you to enable the logging, which causes the system to write app-related information to a log file. The log file is named SIPClient_verbose.log and is stored in the /var/log folder on the IP camera. These logs give the complete transaction details of Camera App, Communication between CUCM or UMS to a Camera app.
Troubleshooting Steps and Commands from Camera CLI
- A camera APP configuration file is available on /usr/apps/appmgr/appMgrConfig.xml this configuration file helps to understand what are the apps managed by the camera and which VSOM is managing these APPS.
- SIPClient can be stopped and started using these commands:
/usr/apps/SIPClient/stop.sh
/usr/apps/SIPClient/start.sh
- /usr/apps/SIPClient/html/configparams.xml this file holds the running config of the camera app choose to run.
- /usr/apps/SIPClient/config.info this file holds the apps version Ex.. SIPClient 1.0, SIPClinet 2.8
Sample Log of SIP Initiation between Camera APP and UMS device - SIPClient_verbose.log
SIP/2.0 200 OK
To: <sip:1340@10.105.139.46>;tag=93137073_cb693726_17697c56-2493-499e-a6e9-1e666c08d2d9
Via: SIP/2.0/UDP 10.105.139.153:5060;branch=z9hG4bK.eAHhbIzxR;rport=5060;received=10.105.139.153
CSeq: 20 INVITE
Call-ID: zmRWy0EhEL
From: <sip:cam@10.105.139.153>;tag=UiNDXn5Ot
Contact: <sip:10.105.139.46:5060>
Allow: INVITE,REGISTER,OPTIONS,MESSAGE
Supported: timer
Session-Expires: 180;refresher=uas
UMS-Stream-ID: 1857
Content-Type: application/sdp
Content-Length: 224
v=0
o=ums-sipua-1.0 1441 1 IN IP4 10.105.139.46
s=ums-sipua-1.0
c=IN IP4 10.105.139.46
t=0 0
m=audio 20228 RTP/AVP 0 101
a=rtpmap:0 PCMU/8000
a=rtpmap:101 telephone-event/8000
a=fmtp:101 0-15
a=sendrecv
a=X-nat:4
2016-08-09 08:42:09:887 ortp-message-channel [0xadcb0] [491] bytes parsed
2016-08-09 08:42:09:888 ortp-message-channel [0xadcb0] read [224] bytes of body from [10.105.139.46:5060]
2016-08-09 08:42:09:889 ortp-message-Found transaction matching response.
2016-08-09 08:42:09:889 ortp-message-Dialog [0x96be0]: now updated by transaction [0x9adb8].
2016-08-09 08:42:09:892 ortp-message-Dialog retransmitting last ack automatically
2016-08-09 08:42:09:897 ortp-message-channel [0xadcb0]: message sent to [UDP://10.105.139.46:5060], size: [295] bytes
ACK sip:10.105.139.46:5060 SIP/2.0
Via: SIP/2.0/UDP 10.105.139.153:5060;branch=z9hG4bK.Mu9Ytdoze;rport
From: <sip:cam@10.105.139.153>;tag=UiNDXn5Ot
To: <sip:1340@10.105.139.46>;tag=93137073_cb693726_17697c56-2493-499e-a6e9-1e666c08d2d9
CSeq: 20 ACK
Call-ID: zmRWy0EhEL
Max-Forwards: 70
NOW DATA is sent after SIP is established.
2016-08-09 08:42:09:898 ortp-message-[0x8cf40] is a 200 ok retransmition on dialog [0x96be0], skiping
2016-08-09 08:42:09:898 ortp-message-Garbage collecting unowned object of type belle_sip_hop_t
2016-08-09 08:42:09:899 ortp-message-Bandwidth usage for call [0x9e380]:
RTP audio=[d= 0.0,u= 39.5], video=[d= 0.0,u= 0.0] kbits/sec
RTCP audio=[d= 0.0,u= 0.0], video=[d= 0.0,u= 0.0] kbits/sec
2016-08-09 08:42:09:904 ortp-message-Thread processing load: audio=18.861635 video=0.000000


 Feedback