Initial Install of ECE 400-Agent HA Configuration
Available Languages
Download Options
Bias-Free Language
The documentation set for this product strives to use bias-free language. For the purposes of this documentation set, bias-free is defined as language that does not imply discrimination based on age, disability, gender, racial identity, ethnic identity, sexual orientation, socioeconomic status, and intersectionality. Exceptions may be present in the documentation due to language that is hardcoded in the user interfaces of the product software, language used based on RFP documentation, or language that is used by a referenced third-party product. Learn more about how Cisco is using Inclusive Language.
Contents
Introduction
This document describes the initial installation of Enterprise Chat and Email (ECE) 400-agent High Availability (HA).
Prerequisites
Requirements
Cisco recommends that you have knowledge of these topics:
- Enterprise Chat and Email (ECE) 12.X
- Windows Server 2016
- SQL Server Enterprise edition 2016
Components Used
The information in this document is based on these software versions:
- ECE 12.5(1)
- SQL Server 2016 Enterprise Edition
- Windows 2016
The information in this document was created from the devices in a specific lab environment. All of the devices used in this document started with a cleared (default) configuration. If your network is live, ensure that you understand the potential impact of any command.
Background
Enterprise Chat and Email 12.0 and later now support full, high-availability installation for both the 400-Agent and 1500-Agent deployments. The 1500-Agent deployment requires a total of 30 Virtual Machines (VMs) when installed in an HA configuration. Once the File Server and SQL Server Installation and configuration is done, the remainder of the install, follows the same order and steps as the 1500-Agent non-HA deployment did previously. The 400-Agent deployment only requires 4 total servers, but due to the shared nature of the collocated server, the installation requires careful deployment to ensure success. Almost all of the most critical steps are done prior to the actual installation of ECE. This article goes through what is required to do the full install from start to end.
Terminology
Throughout this document, these terms are used.
- Windows Server Failover Cluster (WSFC) – This Microsoft Windows Server feature allows multiple physical servers to provide resiliency for the others. When you have multiple servers in a cluster, this does not remove functions or capabilities from any server that is not currently the primary node, it simply provides a way for the servers to know the status of the others. Each server can own one or more roles at any one time.
- AlwaysOn Availability Groups (AG) – This is a Microsoft SQL Server redundancy feature which gives a high level of protection to databases while minimizing the time required to move from one side or node to the other. Unlike the older, and now deprecated, Failover Cluster Instance, all SQL Server nodes in an Availability Group can be fully operational at all times and have a full copy of the database. When Microsoft SQL Server is deployed on Windows Servers, the Availability Group requires a Windows Server Failover Cluster to operate.
There are several key terms related to AGs that you may see in this document.
- Instance – An instance an independent SQL Server with its own executables and databases. A single physical server can host multiple instances of SQL Server.
- Replica – A replica is a distinct instance in an AG. There are two types of replicas in an AG.
- Primary Replica – The Primary Replica, or just Primary, allows both read and write operations on the databases in the AG. There can only be one Primary replica in an AG. The primary replica is also the only replica that allows most database backup operations.
- Secondary Replica – All other nodes in the AG are referred to as Secondary Replicas or Secondaries. A Readable Secondary is a Secondary Replica that allows read operations against the databases but not write operations. Readable Secondaries allow a specific type of database backup called a copy-only backup. If a normal backup is attempted on a Secondary, an error message as follow is shown, "This BACKUP or RESTORE command is not supported on a database mirror or secondary replica."
- Listener – A Listener is a component of the Availability Group. Whichever node is Primary owns the Listener. A Listener has at least one IP and port. If the nodes of the Availability Group are separated across different subnets, then the Listener must have valid IPs in each subnet to ensure availability. The Listener shows up as a Computer object in Active Directory.
- Availability Database – An Availability Database is any database on a SQL Instance that has been joined to the AG. An Instance can also have databases which are not members of an Availability Group. These databases are normal SQL databases as far as read/write operations are concerned. When an instance is the Primary Replica, you may use the Listener name to access any local databases or resources, however when that server is no longer the Primary, access to the database must be done by use of the server name.
- SQL Server Integration Services (SSIS) – SSIS is a feature included with Microsoft SQL Server that allows for data clean-up, transformation, manipulation, and other data tasks at run-time. SSIS Packages allows developers to extract data from many data sources, then use scripts to load that data into one or more databases. ECE uses this functionality to copy data from the Active database into the Reports database on a regular basis.
- Distributed File System (DFS) – This add-on feature for Microsoft Windows Server allows multiple SMB file shares to be presented as a single entity. It also allows for the automatic synchronization and replication of files across servers.
There are two components that make up DFS.- DFS Namespaces – A Namespace is a logical view of a share. One or more servers may host the files in the namespace, but the all access to the files is done by use of the network path to the namespace.
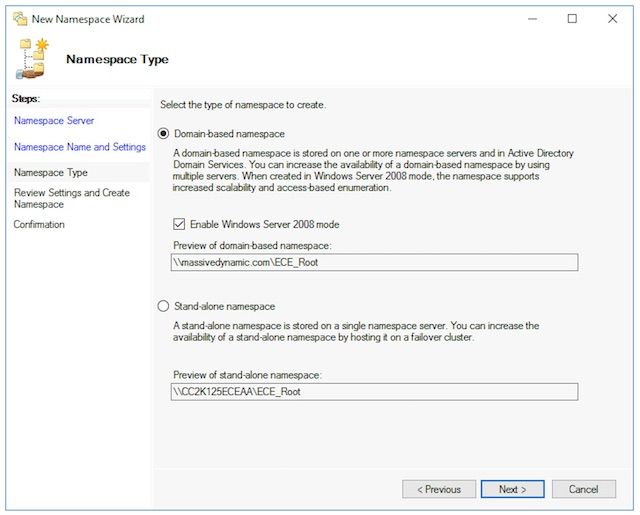
There are two types of namespaces.- Domain-based namespace – A Domain namepace is accessed through the UNC path in the format, \\<domain>\<DFSRoot>. This type of Namespace gives the highest availability and is an object in the Active Directory tree. This is the only Namespace that ECE supports.
- Standalone namespace – A Standalone namespace is accessed through the UNC path in the format, \\<servername>\<DFSRoot>. While replication can be used to keep multiple servers in sync and ensure that they contain the same files, if the server that is the host of the namespace goes down, then the namespace becomes unavailable. ECE does not support Standalone namespaces.
- DFS Replication – A DFS Replication group is a way to keep files across multiple physical servers in sync.
- Namespace server – A namespace server hosts a namespace. Each namespace server contains a local path folder that contains the DFS root folders.
- Namepsace local path – A directory that exists on each Namespace server. This directory must be separate from the directory which is shared into the namespace.
- Namespace root – This is the start point of the namespace. In a domain-based namespace, the root is the identifier that is immediately after the domain name. Each namespace root is represented by a physical folder that exists in the Namespace local path.
- Folder – Folders are used in one of two ways in the namespace.
- A folder with no Folder target is used to organize data into logical views. ECE does not use this type of folder.
- A folder with one or more Folder targets is used to present data to the user of the namespace. When a user or application navigates to this folder, DFS transparently redirects them to the mapped folder target.
- Folder Targets – A folder target is UNC path to a shared folder that contains the actual content. In ECE, the Folder targets are the ECE Shared directories which host the content that the File server role is responsible for.
- DFS Namespaces – A Namespace is a logical view of a share. One or more servers may host the files in the namespace, but the all access to the files is done by use of the network path to the namespace.
- Service Principal Name – This is often abbreviated as SPN. You may hear this referred to as spin. The Service Principal Name is the unique identifier of a service instance. In ECE, when Windows Integrated Authentication is used to access the databases – as is required in an HA deployment, the SPN allows the SQL Server Service account to perform a proxy authentication to Active Directory on behalf of another account. When an ECE Service accesses the database, it does so through the ECE Service account. This account is then passed through to Active Directory for authentication and authorization.
Example Layout
Throughout this document, a lab system is used for screenshots and example commands. This gives the details of the Active Directory domain, Usernames, and Machine names and IP addresses. The specific configuration items may be repeated later on in the document, closer to where they are used.
Active Directory
- Fully qualified domain name: massivedynamic.com
- Pre-Windows 2000 domain: MASSIVE
User Accounts
| Description | Account Name |
| SQL Server Service account | SQLServerSvc |
| ECE Service Account | ECESvc |
Virtual Machines and Logical Resources
| Identifier | Name/Value | IP Addresses | Description | ECE Roles |
| VM-1A | CC2K125ECEAA | 14.10.162.168 | Side-A collocated server | File Server (DFS Node 1), Database (Availability Group Replica), Messaging, Services, Application |
| VM-2A | CC2K125ECEWA | 14.10.162.169 | Side-A web server | Web Server |
| VM-1B | CC2K125ECEAB | 14.10.172.168 | Side-B collocated server | File Server (DFS Node 2), Database (Availability Group Replica), Messaging, Services, Application |
| VM-2B | CC2K125ECEWB | 14.10.172.169 | Side-B web server | Web Server |
| WSFC-CNO | CC2K125ECEFOC | 14.10.162.170 14.10.172.170 |
CNO for WSFC | |
| Listener | CC2K125ECEDB | 14.10.162.161 14.10.172.171 |
SQL AG Listener Name | |
| Listener Port | 1433 | N/A | SQL AG Listener Port | |
| ECE-VIP | ECE | 14.10.162.96 | Virtual IP for ECE on Loadbalancer |
Drive Letters and Contents
| Drive Letter | Size | Usage | Notes |
| C | 80 GB | Windows OS, SQL Executables | SQL Server not present on Web server |
| D | N/A | DVD Mount Point | |
| E | 50GB | ECE Application and SSIS folder | Drive not present on Web server |
| F | 300GB | SQL Database files and SQL Backups | Drive not present on Web server |
File and Directory Objects
This lists the file and directory objects that are referenced throughout the documentation. While the specific directory names are not mandatory, it is best to keep a common structure across all servers.
| Identifier | Path | Description | Notes |
| Shared Directory | E:\ECEFile | Directory on collocated servers that is the Folder target in the DFS Namespace. | Does not exist on web server. |
| ECE Home Directory | E:\ECE | Directory on all servers that ECE uses at run-time for application execution, temporary files, and logs. | On web server only, ECE Home directory is on the C: drive. |
| SSIS Directory | E:\ssis_data | Directory on collocated servers where SSIS templates are stored and used as a temporary directory by the SSIS packages. | |
| SQL Install | C:\Program Files\Microsoft SQL Server | Directory on collocated servers where Microsoft SQL Server is installed. | All system DBs, including TempDB and the SSISDB should remain on the C: drive with SQL executables. |
| SQL Data Directory | F:\MSSQL\Data | Directory on collocated server where the 3 ECE databases are installed. | |
| SQL Backup Directory | F:\MSSQL\Backups | Directory on collocated servers used for database backups. | |
| DFS Share | \\massivedynamic.com\ECE_Root\ECE | Domain based DFS Namespace used for shared ECE files. | |
| DFS Root | ECE_Root | The root portion of the DFS Namespace. | |
| DFS Folder | ECE | The folder that is shared in the DFS Root. | |
| DFS Local path | C:\DFSRoots | Folder on collocated servers where the DFS Root folder is stored. |
System Preparation
This must be done before you start the steps in the main body of this document.
Download and Deploy the OVA Template
You need 2 VMs on each side, 1 web server and 1 collocated server. The OVA template identifies these VMs as follows.
Web Server
- Label: Web Server
- Details: (12.5 v1.0 OVA used, check current OVA for your version to validate exact details)
2 vCPU with 2200 Mhz
2GB RAM
80 GB disk
Collocated Server
- Label: All Servers except Web Server
- Details: (12.5 v1.0 OVA used, check current OVA for your version to validate exact details)
4 vCPU with 4000 Mhz
20 GB RAM (20 GB reservation)
Disks:
80 GB disk – OS and SQL Executables
50 GB disk – ECE Application
300 GB disk – Databases
Install Windows Server on All 4 Servers
(As of 12.5, Windows 2016 must be used, check the current documentation prior to install)
Format the 50 GB and 300 GB Disks on the Two Collocated Servers
Install SQL Server on the Two Collocated Servers
(As of 12.5, SQL Server 2016 Enterprise Edition must be used, check the current documentation prior to install)
The same SQL Server Instance name must be used on both servers. There is no requirement that a specific instance name be used or that the default instance be used. The example in this document uses the default instance.
Caution: It is critical that SQL Server Enterprise Edition be used. ECE requires all three databases to be in the same SQL Server instance or Availability Group. While SQL Server Standard does support AlwaysOn Availability Groups, it only supports a single database in each. If the incorrect version of SQL Server is installed, installation of ECE may appear to succeed, but you will be unable to join all three databases to the Availability Group. Prior to installation of ECE, if you find that the edition of SQL Server installed is incorrect, you can use the SQL Server installation ISO and select the option to upgrade a current installation of SQL Server .
Preinstallation Steps
Step 1. Add Required Windows Features
Before you start any configuration, you need to add two Roles & Features to both collocated servers.
Repeat these steps on both collocated servers.
- From the Server Manager, select Manage, then Add Roles and Features.
- Select Next until you reach the Server Roles page.
- Scroll down to File and Storage Services, then select to expand. Select File and iSCSI Services, then select to expand.
- In the list, find and place a check-box beside both DFS Namespaces and DFS Replication as shown in the image.
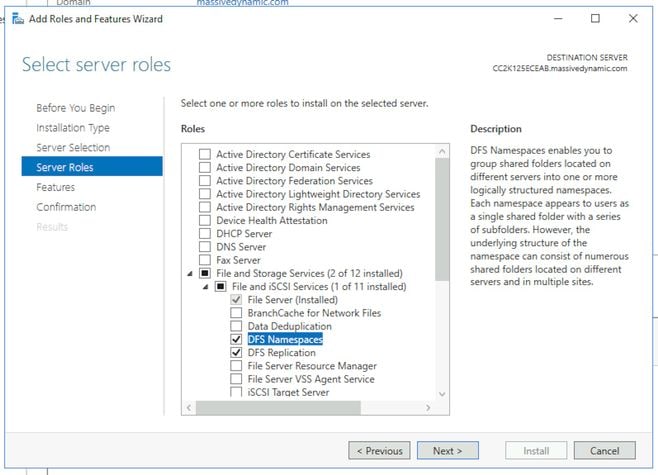
- You may receive a pop-up box that states additional tools are required, select the Add Features button to accept this.
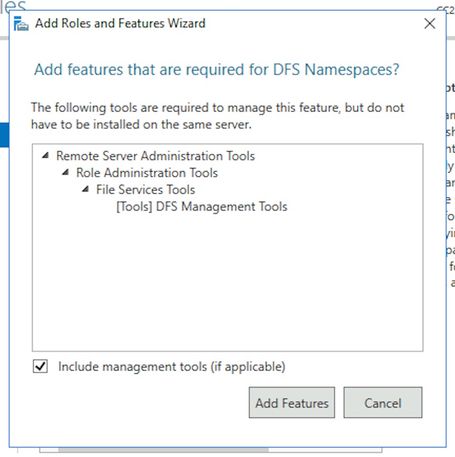
- Select Next to go on to the Features page.
- Find the Failover Clustering in this list and place a check-box beside of it.
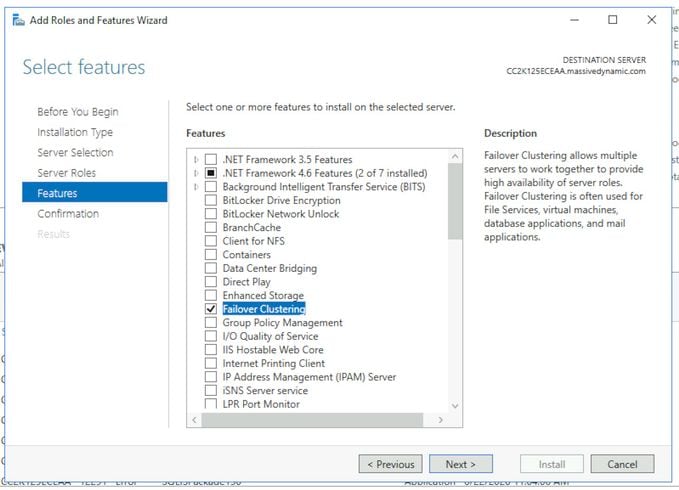
- If you receive a pop-up that states additional tools are required, select the Add Features button to accept this.
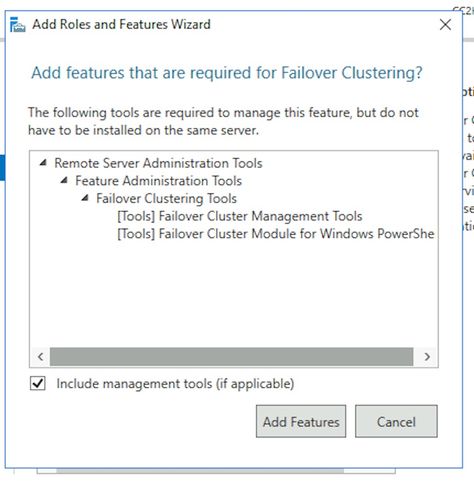
- Select Next, then check the box beside Restart the destination server automatically if required, and select Finish.
- Monitor install until it is complete. Allow server to restart if necessary.
Step 2. Prepare Active Directory
Before you start the configuration of the Windows Server Failover Cluster and SQL Availability Group Cluster, there are several configuration items that need to be performed in Active Directory with an account that has Domain Admin rights.
Warning: It is critical that these steps are followed very carefully as failure to do these results in the in failure two clusters to work.
-
Create required Service Accounts
You need to create two User Accounts in Active Directory to be used as Service Accounts. These accounts only need to be a member of Domain Users group, but must be configured so that their password either does not expire or has a very long expiration time. If you need to change the password for these accounts once the system is in operation, you require a full outage of ECE.
This document does not cover or show the specific steps to create these as it is a matter of preference for where the accounts physically reside in the Active Directory tree, the object names, and other configuration items.
As a reminder, these two accounts are used throughout the rest of this document.
SQL Server Service Account – SqlServerSvc
ECE Service Account – ECESvc -
Prestage the Cluster Name Object (CNO)
You need to create a CNO in Active Directory for use by the WSFC. When all of the preinstallation steps have been completed, Active Directory contains two CNOs.
- The first CNO is the name of the WSFC. You create this manually in the steps that follow. This name is needed to perform the inital setup of WSFC and then later, to connect the WSFC management console to the cluster.
- The second CNO is the name of the SQL Server AG Cluster. This is automatically created by the Availability Group Wizard. ECE uses this name for all database communications. In addition, you use this name when you use SQL Server Management Studo to perform most database related tasks. Of the two names, the second is the most important and is used in day-to-day operations and troubleshooting.
Note: Both of these names are limited to 15 characters as they are NetBIOS names.
As a reminder, this document uses these CNOs:
CC2K125ECEFOC – CNO for the WSFC Failover Cluster
CC2K125ECEDB – CNO for the SQL Server Availability Group cluster
- In Active Directory Users and Computers, expand the domain, then create a new Organizational Unit to hold the CNOs.
- Create the WSFC CNO as follows.
- In the new OU, right-click and select New, then select Computer.
- Type the name for the computer object, then select OK.
- As a best practice, right-click the computer object that you just created and select Properties. Select the Object tab, check the box marked, Protect object from accidental deletion, then select OK.
- Finally, right-click the computer object and select Disable Account.
- Select Yes to confirm.
Note: The computer account must be disabled so that the cluster creation process can confirm that it is not currently in use by a computer or cluster.
-
Grant User Permissions
You need to grant permissions to control the CNO to the user account that you use when you run the WSFC wizard.- In Active Directory Users and Computers, select the View menu, then ensure that Advanced Features has a check beside it. If this is not selected, select it, then expand the Active Directory tree again.
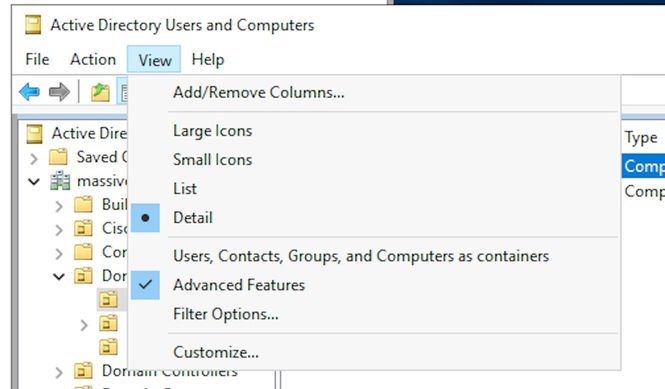
- Assign permissions to the CNO as follows.
- Right-click the CNO, then select Properties.
- Select the Security tab, then select Add.
- Type in the name of the user account, or a group of which the user is a member, then select OK.
- Select the user or group that you just added, then in the bottom section, select the Allow check-box next to Full Control.
- Select OK.
- In Active Directory Users and Computers, select the View menu, then ensure that Advanced Features has a check beside it. If this is not selected, select it, then expand the Active Directory tree again.
-
Grant CNO Permissions
In order for failover to work properly, the CNO must be able to control the computer objects in the OU. This allows the WSFC CNO to create the SQL Server CNO through the wizard.- In Active Directory Users and Computers, select the View menu, then ensure that Advanced Features has a check beside it. If this is not selected, selected it and then expand the Active Directory tree again.
- Right-click the OU that you created and select Properties.
- Select the Security tab, then select the Advanced button.
- In the Advanced Security Settings dialog box, select Add.
- Select Select a principal.
- In the Select User, Computer, Service Account or Group box, select the Object Types... button. Check the box beside Computers, then select OK.
- Type in the CNO name, then select OK. You see a warning that you are about to add a disabled object, select OK as this is expected.
- Ensure that the Type is Allow and that the Applies to: is set for, This object and all descendant objects.
- In the Permissions list, find Create Computer objects and Delete Computer objects, and check the box beside of each.
- Select OK.
-
Register SPN
Because ECE HA install requires the use of Windows Authentication to access the SQL Server, it is mandatory to register the SPN in Active Directory. This step does not require the SQL Server AG to be configured. Only the SQL Server Agent account must be configured.Note: You must to be a member of Domain Admins in order to perform these tasks.
Before you begin, please have this information available.
Description Example Value Listener Host Name CC2K125ECEDB Listener Fully Qualified Name CC2K125ECEDB.massivedynamic.com Listener Port 1433 Instance Name MSSQLSERVER (Default/blank) SQL Service Account MASSIVE\SqlServerSvc
- From any server which is currently on the domain, and while logged in as a member of the Domain Admins group, open a Command Prompt as Administrator.
- Run these commands. Update each them to match your environment.
In the setspn command, the :MSSQLSERVER is the SQL Instance name you chose. If you .setspn -A MSSQLSvc/CC2K125ECEDB.massivedynamic.com:1433 MASSIVE\SqlServerSvc
setspn -A MSSQLSvc/CC2K125ECEDB.massivedynamic.com:MSSQLSERVER MASSIVE\SqlServerSvc
setspn -A MSSQLSvc/CC2K125ECEDB:1433 MASSIVE\SqlServerSvc
setspn -A MSSQLSvc/CC2K125ECEDB:MSSQLSERVER MASSIVE\SqlServerSvc - Run this command to ensure that the SPN registration was successful.
setspn -Q MSSQLSvc/CC2K125ECEDB*
You should see output similar to this.Checking domain DC=massivedynamic,DC=com
CN=SQL Server Service,OU=Service Accounts,OU=Special Accounts,DC=massivedynamic,DC=com
MSSQLSvc/CC2K125ECEDB:MSSQLSERVER
MSSQLSvc/CC2K125ECEDB:1433
MSSQLSvc/CC2K125ECEDB.massivedynamic.com:MSSQLSERVER
MSSQLSvc/CC2K125ECEDB.massivedynamic.com:1433
MSSQLSvc/CC2K125ECEAB:MSSQLSERVER
MSSQLSvc/CC2K125ECEAB:1433
MSSQLSvc/CC2K125ECEAB.massivedynamic.com:MSSQLSERVER
MSSQLSvc/CC2K125ECEAA.massivedynamic.com:1433
MSSQLSvc/CC2K125ECEAA:MSSQLSERVER
MSSQLSvc/CC2K125ECEAA:1433
MSSQLSvc/CC2K125ECEAA.massivedynamic.com:MSSQLSERVER
Existing SPN found! - Validate configuration of SQL Service Account.
- Open Active Directory Users and Computers from either a domain controller or a machine with the Active Directory Management Tools installed.
- Navigate to the SQL Service Account in the tree, right-click the account and select Properties.
- Select the Account tab, then in the Account options: box, scroll through and ensure that these options NOT are selected.
- Account is sensitive and cannot be delegated
- Do not require Kerberos preauthentication
- Select the Delegation tab and ensure that the Trust this user for delegation to any service (Kerberos only) IS selected.
Note: If you do not see the Delegation tab, then either the setspn -A commands have not been run or the Domain Controller you are on does not contain an up-to-date copy of the configuration. Either connect to a Global Catalog Domain Controller, wait until domain replication completes, or return to steps 5.2 and 5.3 to validate that the setspn -A commands were run correctly.
- Validate configuration of Servers
- In Active Directory Users and Computers, navigate to the computer account for each collocated server.
- Right-click and select Properties, then select the Delegation tab.
- Ensure that the Trust this computer for delegation to any service (Kerberos only)is selected.
- After you make any required changes, select OK.
Step 3. Create Required Directories
Unlike the standalone installation of ECE, you need to create a directory to use for the File server role. This directory, known as the File Server Directory or Shared directory, is used in the DFS Namespace and Replication group. This directory MUST be separate from the ECE Home Directory.
As a reminder, in this document, ECE is installed on the E: drive.
These directories are created in this section.
Shared directory – E:\ECEFile
SSIS directory – E:\ssis_data
SQL backup directory – F:\MSSQL\Backups
SQL data directory – F:\MSSQL\Data
Perform these steps on both collocated servers.
-
Create the shared directory
- On the E drive, create a new directory named ECEFile.
- Right-click the directory and select Properties, then select the Sharing tab.
- Select the Advanced Sharing... button.
- Check the Share this folder box, then select the Permissions button.
- In the Permissions for ECEFile box, select the Add... button. In the Select Users, Computers, Service Accounts, or Groups box, enter the name of the service account you created to run the ECE service, select Check Names, then select OK.
- Ensure that the account you just added is selected in the list, then check the box in the Allow column beside Full Control. Select OK to return to the Advanced Sharing properties box.
- Select OK, then OK again.
-
Create the SSIS directory
- On the E drive, create a new directory named ssis_data.
- Right-click the directory and select Properties, then select the Security tab.
- Select the Edit button, then in the Permissions for ssis_data box that pops-up, select the Add... button.
- In the Select Users, Computers, Service Accounts, or Groups box, type the name of the service account you created to run the SQL Server service, select Check Names, then select OK. Note, if you did not create an account to run the SQL Server, then type the name of the service account created for the ECE Service.
- Check the box in the Allow column beside Modify. This automatically grants Write permission, but scroll down to ensure that there is not a check-box in the Deny column for any of the permissions fields.
- Select OK, then OK again.
-
Create the SQL Server data and backup directories
- On the F: drive, create a new folder named MSSQL.
- Inside of the MSSQL folder, create two other folders, Backup and Data.
Step 4. Configure Distributed File System
As described in the terminology section, DFS must be configured as a Domain Namespace and must also have a Replication Group to synchronize the two servers. The DFS feature was added to each collocated server in the previous steps. Next, configure both the Namespace and Replication Group.
Unlike most previous steps, you only need to complete this on one of the two servers. Once setup, either server can manage DFS by use of the management snap-in.
Tip: It is generally easier to troubleshoot if you use the side-A server for all setup tasks.
-
Create the Namespace
- From the Server Manager, select Tools then DFS Management.
- In the DFS Management snap-in, select the Namespaces node, then in the Actions pane at the right, choose New Namespace.
- Type the name of the side-A, collocated ECE server in the Server name box in the New Namespace Wizard box, then select Next >.
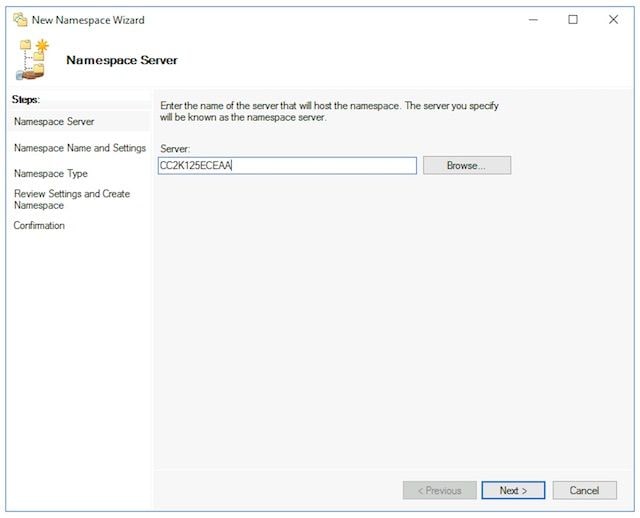
- On the Namespace Name and Settings page, type the Namespace root name in the Name field of the next screen. In this document, the Namespace name is, ECE_Root.
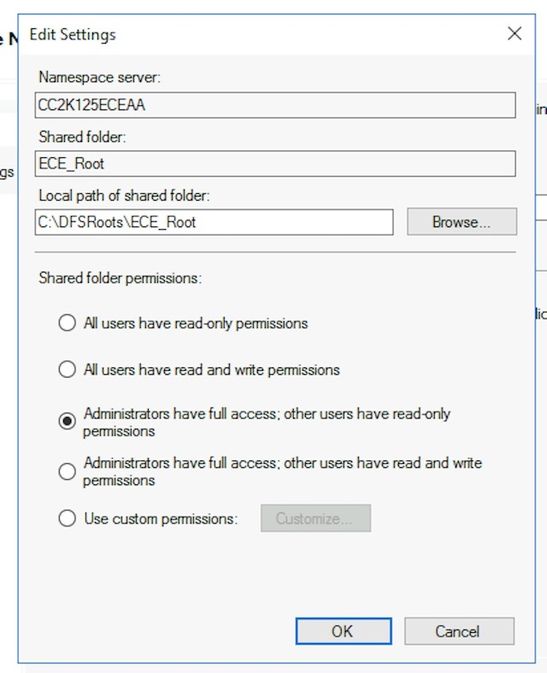
- Select the Edit Settings... button.
- In the Edit Settings pane, select the Administrators have full access; other users have read-only permissions option, then select OK. Select Next > to continue to the next page.
- On the Namespace Type page, ensure that the Domain-based namespace option is selected. Leave the Enable Windows Server 2008 mode option checked, then select Next > to continue to the next page.
- On the Review Settings and Create Namespace page, note the Namespace Name, this is the UNC path where you access the share. There is also a local path listed similar to, C:\DFSRoots\, the local path of namespace shared folder is NOT the same as the physical location where the DFS files are located. After the namespace is created, The local path contains a pointer folder to the shared folder location. The files are physically stored in the shared folder location.
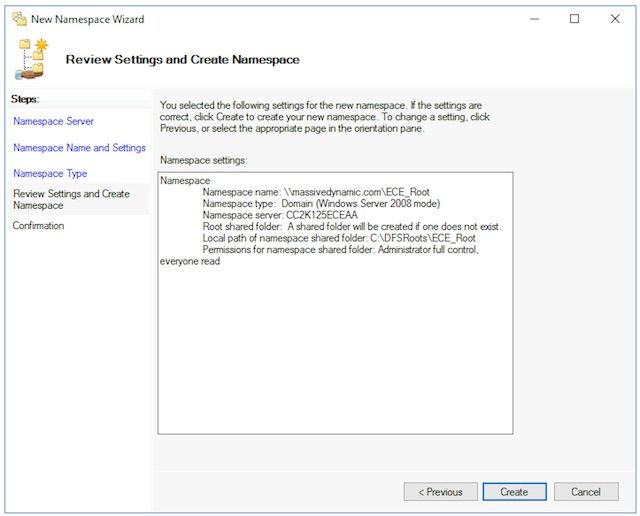
- Check the Confirmation page to ensure that the Task shows Success and that there were no Errors. Select Close to return to the DFS Management pane.
-
Add the Namespace Server
- In the DFS Management snap-in, expand, DFS Management > Namespaces, then select the Namespace that you created.
- In the Actions pane at the right, choose Add Namespace Server....
- In the Add Namespace Server box, type the name of the side-B collocated server in the Namespace server: box.
- Select the Edit Settings button, then select the Administrators have full access; other users have read-only permissions option, then select OK to add the side-B server.
- Select the Namespace Servers tab and check that both servers are listed.
-
Add Folder and Folder Targets and Configure Replication
- In the DFS Management snap-in, expand, DFS Management > Namespaces, then select the Namespace that you created.
- In the Actions pane at the right, choose New Folder...
- In the New Folder box, type a name for the share in the Name: box. When you install ECE, this is the folder name in the DFS Root. In this document, the folder name is, ECE.
- Select the Add... button under the Folder targets box.
- In the Path to folder target: box, type the UNC path to the side-A server and share created in step 3. In this document, this is \\CC2K125ECEAA\ECEFile.
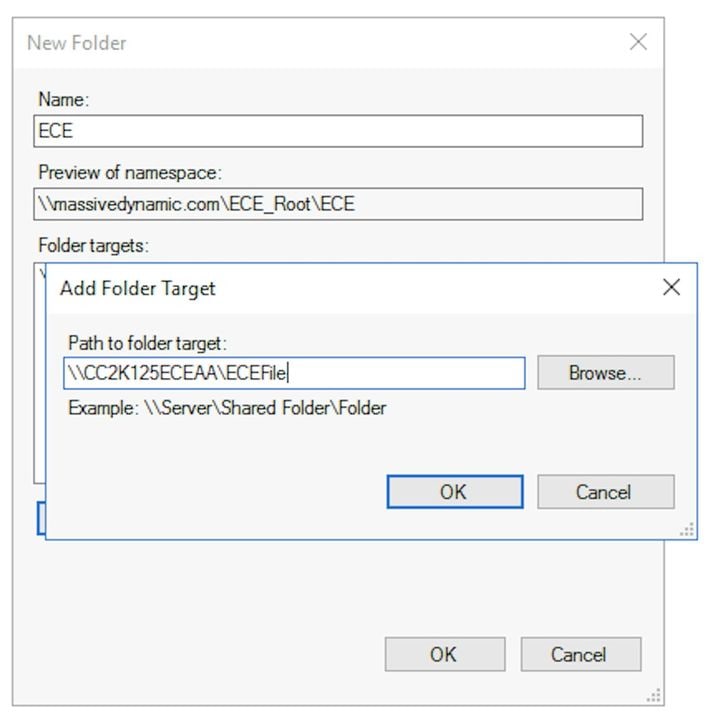
- Select OK to add the first target.
- Select the Add... button once again and add the side-B server and share created. In this document, this is \\CC2K125ECEAB\ECEFile.
- Select OK to add the second target.
- Back in the New Folder box, and after you add the Folder target to each ECE server, select OK to complete the New Folder dialog.
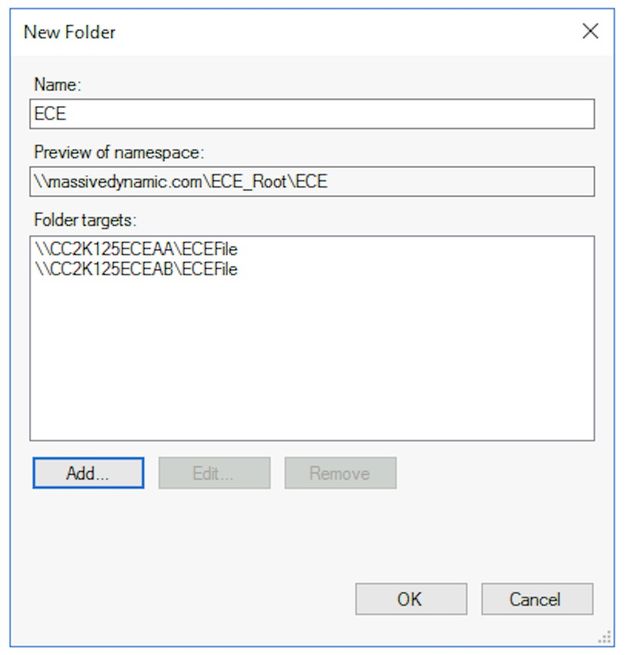
- When prompted to setup Replication, select Yes.
- In the Replicate Folder Wizard, select Next > through the first two screens.
- At the Primary Member page, select either server. If there are already files in the two directories which have the same name, whichever server is chosen as primary is considered authoritative. For an initial install, this is not an issue as there must not be any files or folders in the ECE File share. After you choose the primary server, select Next >.
- In the Topology Selection pane, ensure that the Full mesh option is chosen, then select Next >.
- In the Replication Group Schedule and Bandwidth pane, select the Replicate continuously using the specified bandwidth option and leave the Bandwidth selection as Full. Select Next >.
- Review the final page, then choose the Create button.
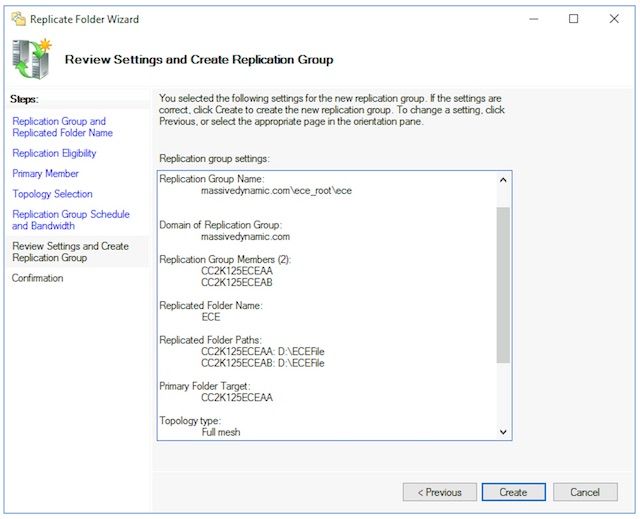
- On the Confirmation page, ensure that all Tasks show Success and that there are no Errors shown.
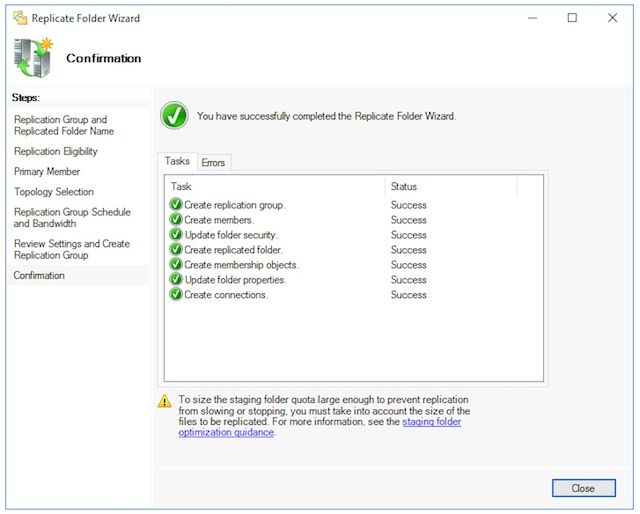
- Select Close to return to the DFS Management pane. You may see an information box with the title, Replication Delay. Select OK to close this as this simply warns you that replication is not available until all servers in the group have the configuration. For the the initial setup in most environments, this should be very fast. In larger Active Directory domains, there may be a delay before this is complete.
-
Configure Staging folder Quota
This topic to be updated at a later time. -
Test the DFS Namespace and Replication Group
- Open the Windows File Explorer on the side-A collocated server.
- Navigate to the Shared Directory. In this document, this is E:\ECEFile.
- Open Notepad and create a new text file with the content, 'Side A Creation'. Save this as E:\ECEFile\ReplTest.txt, then close Notepad.
- Switch to the side-B collocated server and open Windows File Explorer.
- Navigate to the Shared Directory and confirm that you see the ReplTest.txt file. If you do not see this immediately, wait a minute or two for Replication to synchronize.
- Open the file on side B and add a new line with the content, 'Side B Update', then Save the file.
- Switch back to the side-A server and open the file once more to confirm that you now see both lines.
- While still on the side-A collocated server, type the full UNC path to the DFS share into the location bar in Windows File Explorer. Example: \\massivedynamic.com\ECE_Root\ECE.
- Verify that you see the ReplTest.txt folder.
- Create a new folder named, DFSTest. Move the ReplTest.txt file into this folder.
- In Windows File Explorer navigate to the local Shared Directory and validate that you see the DFSTest directory and that the ReplTest.txt file has been moved correctly.
- Finally, switch back to the side-B server and validate that the new directory is present and the file has been moved.
Step 5. Configure Windows Server Failover Cluster
These steps need to be done from only one server.
Warning: It is imperitive that you complete the steps in Prepare Active Directory before you start this section. Failure to do so may result in a cluster which is either not setup or is only partially setup.
-
Initial Cluster Setup
- From Server Manager, select Tools then Failover Cluster Manager.
- In the Failover Cluster Manager snap-in, choose Create Cluster... in the Actions pane on the right.
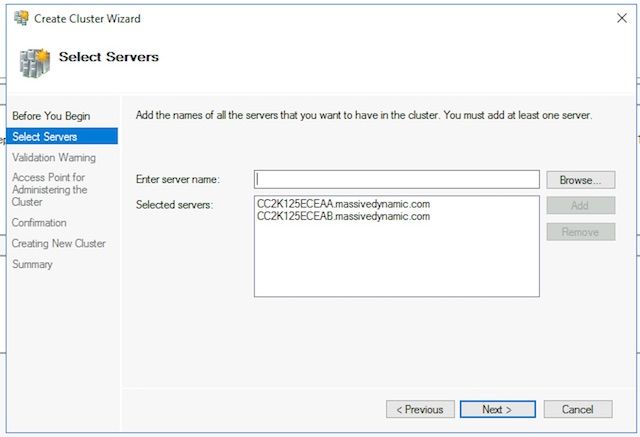
- Select Next > on the Before You Begin page, then in the Select Servers page, add both of the collocated servers. Ensure that the validation check succeeds and that you see both servers listed by fully qualified name in the Selected servers: box, then select Next > to continue to the next page.
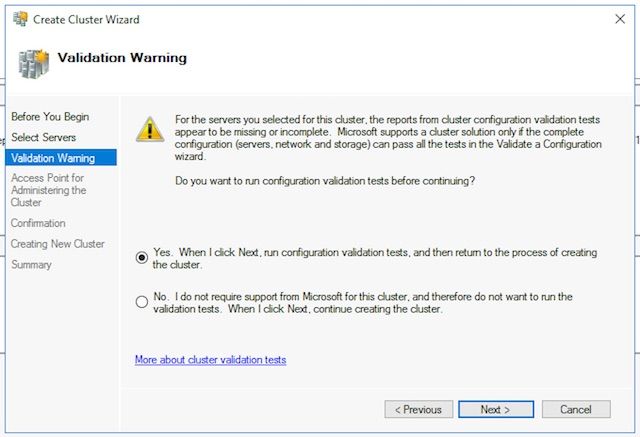
- On the Validation Warning page, leave the option selected as Yes. When I click Next, run configuration validation tests, and then return to the process of creating the cluster, then select Next >.
- On the Validate a Configuration Wizard, select Next >.
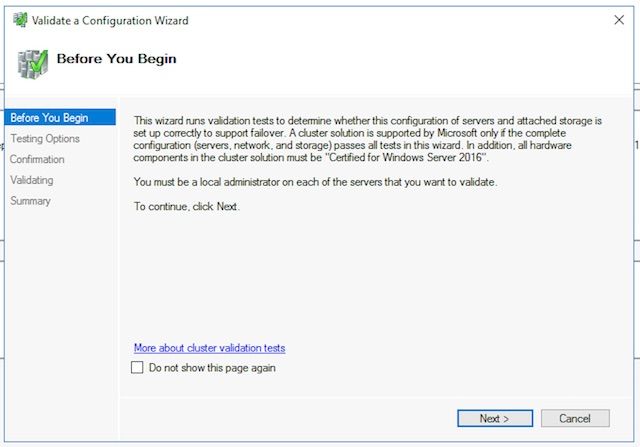
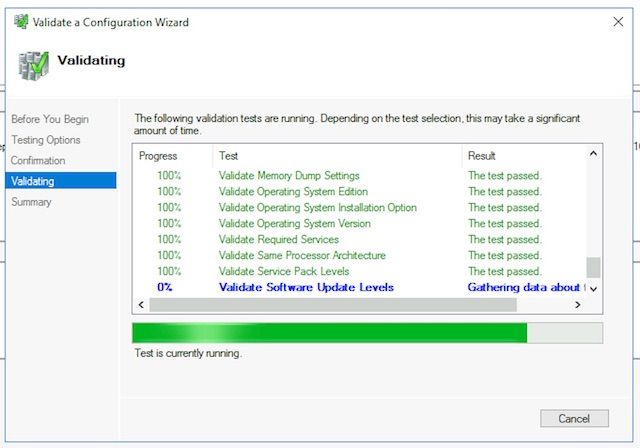
- Select Next > through the Wizard and allow the tests to proceed. You can see the example validation in the image.
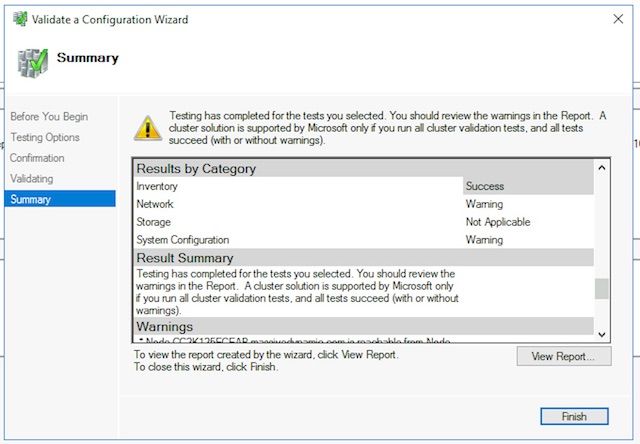
- After all tests complete, select View Report... to show the report in a browser. You should not have any failures. The Network category may show the status of Warning with the message that the nodes are only accessible by one network interface. You can safely ignore these. If you see any warnings about software update levels, ensure that you apply the same patches to both servers. You can see an example summary screen with the Network warning and a System Configuration warning in the image. The System Configuration warning in this example is because one server did not have a Windows Defender Update which the other did. Select Finish after you review the report.
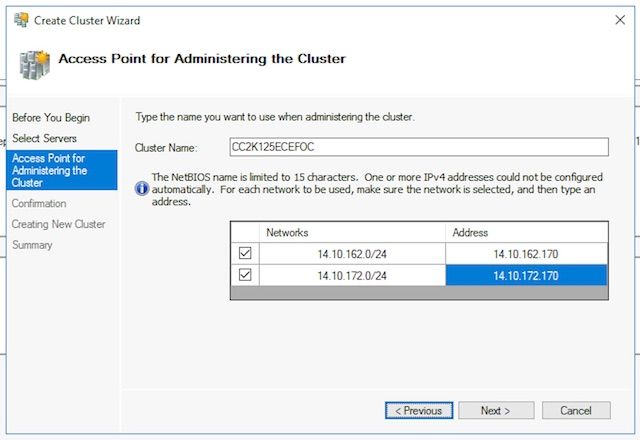
- Select Next > to reach the Access Point for Administering the Cluster pane. Use this information to complete this page, then select Next > once complete.
- Cluster Name – This must be the CNO configured for the Failover Cluster. This must NOT be the name that you defined for use by ECE to access the database.
- Address field of Networks box – This is the IP address that your cluster uses. If your collocated servers are in two different subnets, you need an IP address in each subnet. When the cluster switches the owner node, then the WSFC updates DDNS to reflect the correct IP. This ensures that the name is always accessible.
Note: You are only be able to change the host portion of the Address field.
- On the Confirmation page. Ensure that Add all eligible storage to the cluster is checked, then select Next >.
Note: The cluster is created immediately after you select Next >.
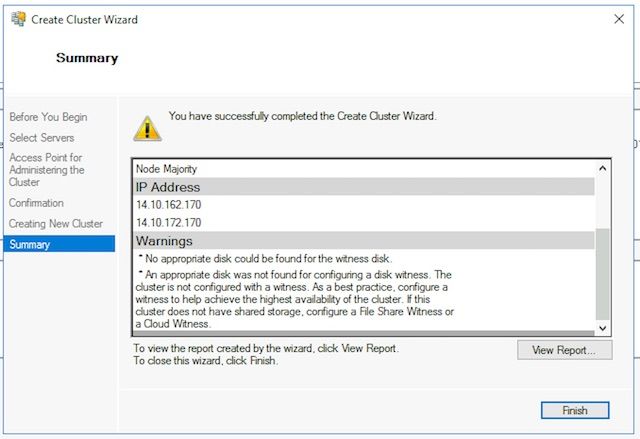
- Review the output to ensure there are no errors, select Finish on the Summary screen.
Note: You may see a message that there was no appropriate disk found as the witness disk. This is corrected in the next steps.
-
Configure Cluster Quorum
Since ECE does not have an extra physical drive that is shared between the two nodes, Windows Server Failover Cluster requires a shared UNC path drive to act as the quorum drive. The quorum does not require much space, 500 megabytes is ideal. It must be a drive though that is available to both collocated servers, has some level of redundancy/high-availability, but is not part of the local DFS share. For a lab system, there are several ways to implement this. For a production system though, the placement of this drive is quite important. It is outside the scope of this document to cover how to setup the shared quorum drive.
Once you allocate the share in your environment, setup the Quorum drive location .- In the Failover Cluster Manager, select the new cluster that you created, then select More Actions > Configure Cluster Quorum Settings... in the Actions pane on the right.
- In the Configure Cluster Quorum Wizard box, select Next > past the first page.
- On the Select Quorum Configuration page, choose the Select the quorum witness option, then select Next >.
- On the Select Quorum Witness page, choose Configure a file share witness option, then select Next >.
- On the Configure File Share Witness page, in the File Share Path: box, type the UNC path to the file share or choose Browse to select a network location. Select Next > when this is done.
- Review the next page, then select Next >. Finally, review the Summary page, and select Finish.
-
Review Cluster
At this point, the cluster should be fully setup and confirmed to work properly. Review the Failover Cluster Manager for any errors. In the Cluster Events node, you can find Windows Events which are directly related to the WSFC cluster. There are two which you can safely ignore in a dual-subnet WSFC. These are Event ID 1069 and 1045. Because the IP address that matches the subnet of the non-primary server is not be accessible until the cluster switches sides, it is expected that these show up. If you see other errors, investigate and resolve each.
Another helpful tool is the Validate Cluster tool. This is what was run in step 5.1.5. If you run it after you set up the cluster, you can check for any errors or warning.
Note: The management and support of the WSFC is outside the scope of this document. Please contact a Microsoft professional for support if needed.
Warning: It is extremely important that the WSFC cluster is setup and works without error before you proceed to setup the SQL AG or install ECE. It is much more difficult to troubleshoot and fix the WSFC cluster after the SQL AG or ECE has been installed.
Step 6. Configure SQL Server
The last step to prepare for the installation is to create the SQL Server Availability group. Remember, you must run SQL Server 2016 Enterprise Edition to support ECE. These steps do all work with SQL Standard Edition. You are even be able to install ECE and associate one database with the Availability Group. When you attempt to associate more than one database though, SQL Server returns an error. If you receive this, you must first do an in-place upgrade of SQL Server from Standard to Enterprise, then you can add the databases to the Availability Group.
Before you begin, document this information and have it available.
| Item | Example | Value |
| CNO for SQL Server Listener | CC2K125ECEDB | |
| IP Address in Subnet on side A | 14.10.162.171 | |
| IP Address in Subnet on side B | 14.10.172.171 | |
| SQL Listener Port | 1433 |
Note: Values used in this document are shown in the Example column.
-
Enable SQL Server Availability Groups
Do the next steps on both SQL Servers.- From the Start Menu, open the folder, Microsoft SQL Server 2016, then select SQL Server 2016 Configuration Manager.
- In the Sql Server Configuration Manager, choose SQL Server Services, then right-click SQL Server (MSSQLSERVER) and choose Properties. Note, if you used an instance name other than the default when you installed SQL Server, the service name contains your instance name in the parentheses.
- In the SQL Server (MSSQLSERVER) Properties page, choose the AlwaysOn High Availability tab.
- Validate that you see the Windows failover cluster name that was created. If you do not, go back and troubleshoot your WSFC setup. If you do, check the Enable AlwaysOn Availability Groups box.
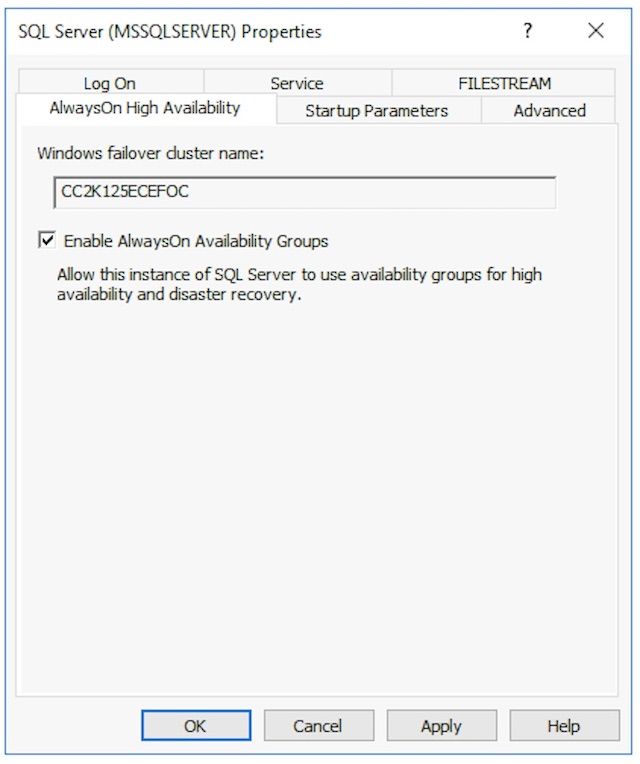
- Select OK to apply this change. You may see a message that the changes do not take effect until the service is stopped and restarted, select OK.
- Right-click and restart the SQL Server (MSSQLSERVER) service.
-
Create a Temporary Database
Before you start the setup of the Availability Group, you need to create a temporary database to be used in the Wizard. This is not the same as the SQL Server's TempDB, it is a user database but can be removed after ECE is setup. The database simply needs to exist and can be quite small with no data in it. Two different ways are shown to create this database.
- Open SQL Server Management Studio and connect to one of the two collocated servers.
Tip: It is generally easier to troubleshoot if you use the side-A server for all SQL AG setup tasks. This also helps to ensure that the side-A server is the Primary Replica when the setup is complete.
- Use one of these the database
- Via GUI
- Right-click Databases and choose New Database.
- Give the database a unique name, accept the default Initial Size (MB) values that SQL Server uses.
- Select the Options node and ensure that Recovery model: is set to Full.
- Select OK.
- Via T-SQL
This creates a database named AGTemp with a data and log file of 1MB.
- Select New Query.
- Paste the TSQL that follows. Ensure that you make any required changes to place the data files where you want.
CREATE DATABASE [AGTemp]
  ON PRIMARY
    (NAME = N'AGTemp' , FILENAME = N'F:\MSSQL\DATA\AGTemp.mdf' , SIZE = 1024KB, FILEGROWTH = 8KB )
 LOG ON
    (NAME = N'AGTemp_log' , FILENAME = N'F:\MSSQL\DATA\AGTemp_log.ldf' , SIZE = 1024KB , FILEGROWTH = 8KB )
GO

ALTER DATABASE [AGTemp] SET RECOVERY FULL
GO - Select Execute to run this.
- Via GUI
-
Make a Full Database Backup After You Create the Database
You can use either the GUI method or the TSQL method to create this backup. Both methods are shown next, and assume that you already have SQL Server Management Studio open and that you use the AGTemp database name.- Via GUI
- Right-click the AGTemp database and choose Tasks > Back Up...
- Check the Back Up Database - AGTemp box that comes up and ensure that the Backup type: is set to Full and that the Destination is Disk. Also ensure that the location shown is correct for your system. Use the Add / Remove buttons to make any necessary changes.
- Select OK and ensure that you see The backup of database 'AGTemp' completed successfully.
- Via T-SQL
- Select New Query.
- Paste the TSQL that follows. Ensure that you make any changes required for both database name and backup file location.
BACKUP DATABASE [AGTemp]
  TO DISK = N'F:\MSSQL\Backups\AGTemp.bak'
  WITH NAME = N'AGTemp-Initial Full Backup',
  COMPRESSION, STATS = 25
GO - Select Execute to run this. Check the Messages tab to see a line similar to this.
BACKUP DATABASE successfully processed 322 pages in 0.054 seconds (46.567 MB/sec).
- Via GUI
- Open SQL Server Management Studio and connect to one of the two collocated servers.
-
Create the Availability Group
Before you start, all previous steps must be done. You must have this information on hand.
SQL Server Availability Group CNO
IP Address(es) for CNO - In SQL Server Management Studio, right-click the Always On High Availability node and choose, New Availability Group Wizard.
- Select Next > past the Introduction page.
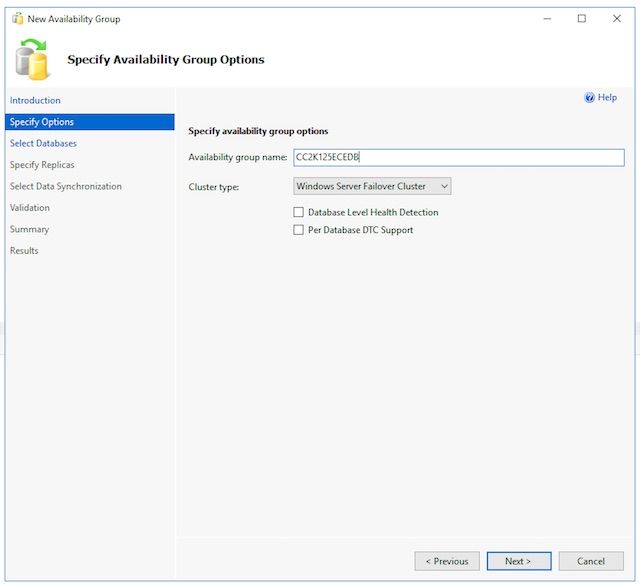
- Fill our the Specify Availability Group Options page as follows.
- Type a display name for the Availability Group into the Availability group name box. While this name does not need to be the same as the CNO, it is generally best to use this as it simplifies management. The examples shown in this document use the same name for both.
- The only valid Cluster type is Windows Server Failover Cluster.
- Ensure that Database Level Health Detection is not selected. Optionally, select Per Database DTC Support.
- Select Next > to proceed.
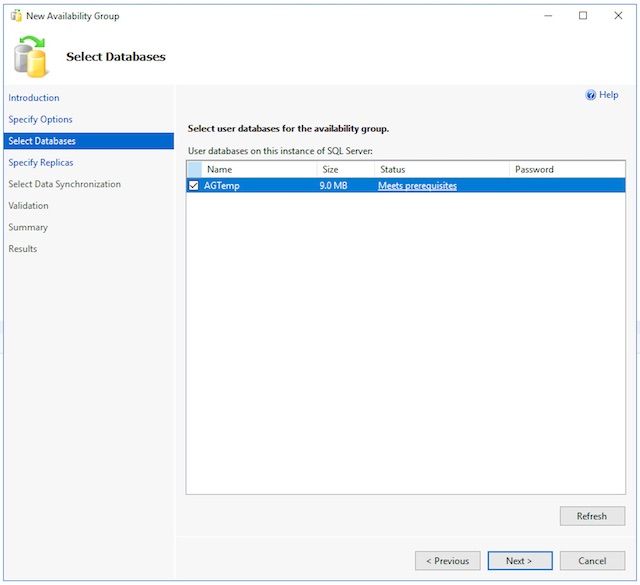
- On the Select Databases page, check the box beside of the temporary database created for this purpose. Ensure that the Status shows Meets Prerequisites. If it does not, fix any issues reported.
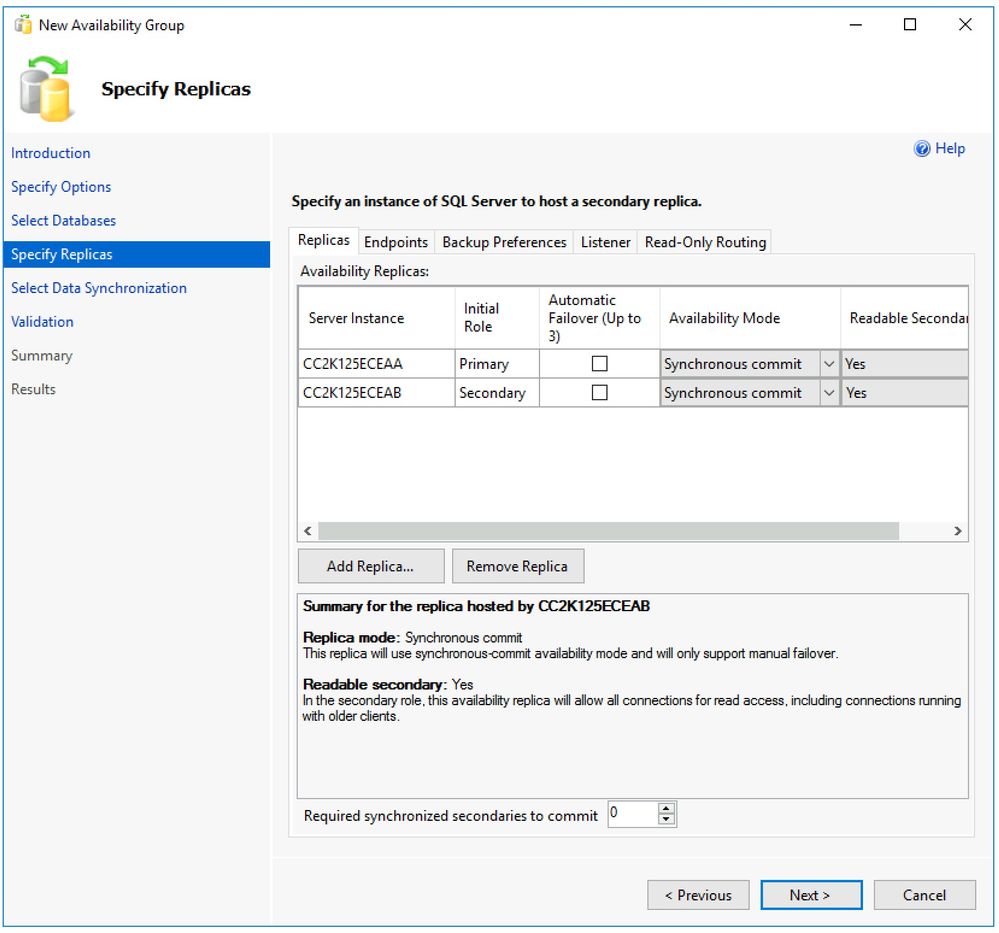
- Fill out each tab on the Specify Replicas page as follows.
- On the Replicas tab.
- Select Add Replica... below the Availability Replicas: box. In the Connect to Server box, type the host name of the other collocated server, then select Connect.
- Change the Availability Mode for each Server Instance to Synchronous commit.
- Change the Readable Secondary for each Server Instance to Yes.
- On the Endpoints tab. Ensure that the port numbers are open and that the firewall rules have been updated to allow these to pass. Make any desired changes to the ports.
- On the Backup Preferences tab. Choose the option, Any Replica.
- On the Listener tab. Choose the Create an availability group listener option, then fill out these details.
- Listener DNS Name: Provide the NetBIOS host name of the SQL Server Availability Group CNO.
- Port: Provide the SQL Listener port you have chosen. This is generally 1433, but can be changed to meet your specific needs. If you change this port, ensure that you open the firewall on both servers and that you enter the port in the databases section of the ECE install later in the document.
- Network Mode: Select Static IP
- Select the Add... button below the Subnet and IP Address box.
- In the Add IP Address box, choose the appropriate Subnet: from the drop-down.
- In the IPv4 Address box, type the full IPv4 address you have allocated for the SQL Server Availability Group.
- Repeat as required for each Subnet in your cluster.
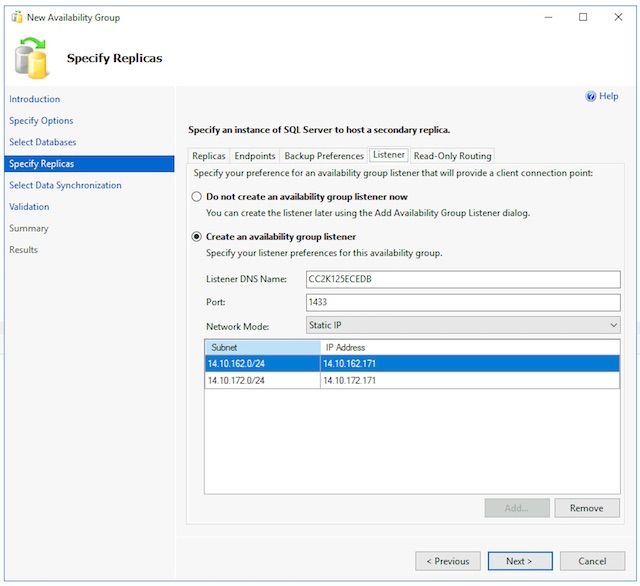
- You can skip the Read-Only Routing tab as ECE currently does not use this feature.
- Select Next > after you complete the tabs.
- On the Replicas tab.
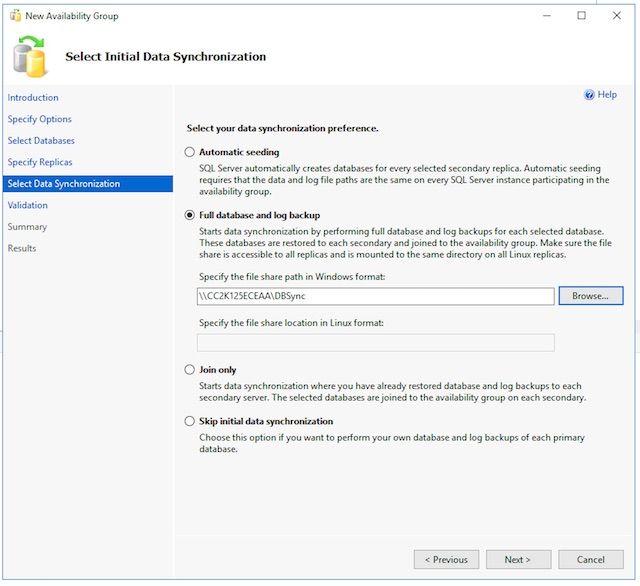
- Fill out the Select Initial Data Synchronization page as follows.
- Choose the Full database and log backup option.
- In the Specify the file share path in Windows format: box, type, or browse to a file share which both servers can access. You can create a directory on the E: drive of one of the servers, share this, then use it for the inital setup.
- After you complete this page, select Next >.
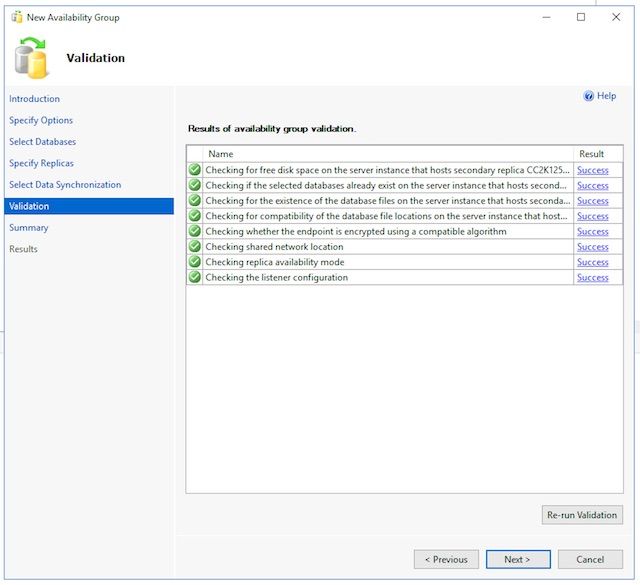
- On the Validation page, review checks. Ensure that all return as Success. If there are any that fail, review the reason and take corrective action. If any changes are required, use the < Previous and Next > buttons to step through the screens and make any required changes. Select the Re-run Validation after you correct any issues to validate. When all validation checks succeed, select Next >.
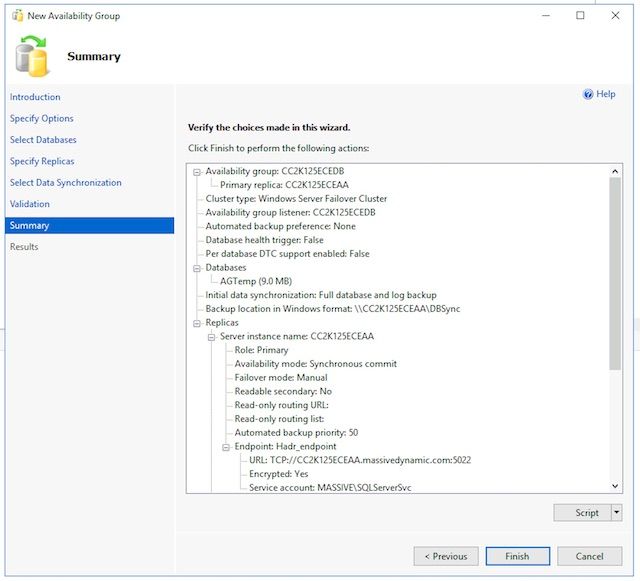
- Review the Summary page for accuracy, then select Finish. to create the Availability Group.
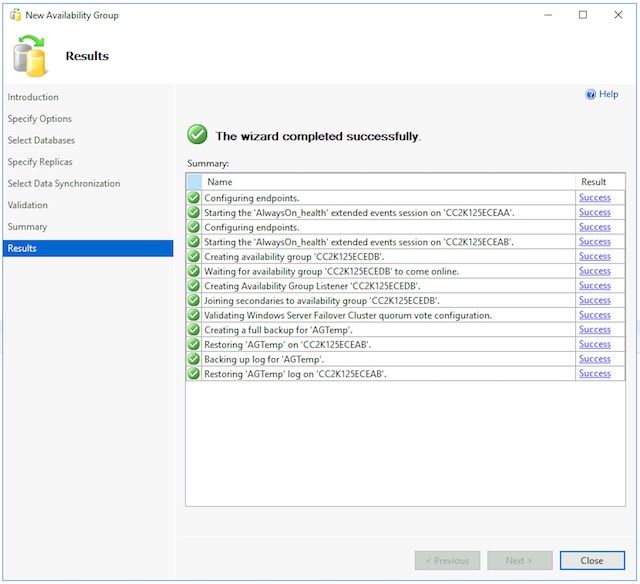
- Select the More details drop-down button to watch each task. If you encounter an error, manually correct the issue or clean up the Availability Group completely from both servers (and Active Directory if necessary), then repeat the configuration.
-
Verify Availability Group Setup
Once the wizard has run successfully, do this to validate that the Availability Group is setup and works properly. Note, it can take several minutes for the Availability Group setup to be complete. After you see the Success screen, the servers still must copy over the database backup, then restore it on the secondary, then setup the High Availability and Disaster Recovery (HADR) connection. Unless the two ECE collocated servers are on the same physical LAN, you may need to wait 5-10 minutes before you do these checks.
- Verify that the Availability Group exists on the primary replica.
Note, the primary replica is generally be whichever side you ran the wizard from initially. The side which is primary is not important at this time, but you do need to know this for the post-install configuration steps.
- While still in SQL Server Management Studio on the side you ran the Wizard from, right-click the server name in the Object Explorer pane on the left and choose Refresh.
- Expand Databases and check that the temporary database you created now shows (Synchronized).
- Expand Always On High Availability > Availability Groups then finally expand the Availability Group name you created and validate each of these.
- Ensure that you see (Primary) beside the AG Name.
- Expand each node under the AG name and validate each of these.
- In Availablity Replicas, check that both servers listed. One is marked as (Primary) the other is marked as (Secondary).
- In Availability Databases, check that the temporary database used to run the wizard is shown. It should have a green indication next to the cylinder icon.
- In Availability Group Listeners, check that the listener name created in the wizard exists. Right-click the listener and choose Properties. Check that the port and IP addresses are all as configured.
- Verify that the Availability Group exists on the secondary replica.
- Open SQL Server Management Studio on the second collocated server and connect to the server by name.
- Expand Databases, and check these items.
- Ensure that you see the database you created on side A to run the wizard. The wizard should have automatically created this database on side B.
- Beside the database name, you should see (Synchronized). If you do not, see the steps in the Availability Group checks section.
- Expand down to Always On High Availability > Availability Groups then finally expand the Availability Group name you created and validate these items.
- Ensure that you see (Secondary) beside the AG Name.
- Expand each node under the AG name and validate these items.
- In Availability Replicas, check that both servers are listed. When you view this from the secondary node, the primary node is listed, but have no indication beside of it. The node you are on shows (Secondary).
- In Availability Databases, check that the temporary database used to run the wizard is shown. It should have a green indication next to the cylinder icon. If it does not, do these steps.
- Right-click the database and choose Join Database.
- Select OK in the Join Database to Availability Group box and check that there are no errors.
- Refresh the Databases node and validate that the database now shows (Synchronized).
- In Availability Group Listeners, check that the listener name created in the wizard exists. Right-click the listener name and choose Properties. Check that the port and IP addresses are all as configured.
- Verify that the Availability Group is accessible via the Listener
- Either open a new SQL Server Management Studio or in an already open SQL Server Management Studio select Connect > Database Engine... from the Object Explorer on the left.
- In the Connect to Server box, type the name of the listener that you created, then choose Connect. You should now see the same nodes as are present on the primary replica.
- Expand Databases and verify that you see the temporary database and that it shows (Synchronized).
- Expand the other nodes as desired.
- Verify via the Availablity Group Dashboard
SQL Server has built in a dashboard which can be used to monitor the Availability Group health, events, and perform certain functions like Failover. This is an extremely useful tool to understand.
- Via SQL Server Management Studio, connect to either the Listener name or the primary replica. In a production system where you do not know which node is primary, connect with the Listener name.
- Right-click Always On High Availability and choose, Show Dashboard. Alternatively, expand Always On High Availablity > Availability Groups and right-click the Availability Group name and choose Show Dashboard.
- If you chose Show Dashboard from the Always On High Availability node or from the Availability Groups node, you see a dashboard that shows the Availability Group name, the current primary replica, failover mode, and whether there are any current issues. While ECE does not require the use multiple Availability Groups on the same set of servers, a system with more than one Availability Group shows all Groups on this page and the current, high-level details.
From here, select the hyperlink name of the Availability Group.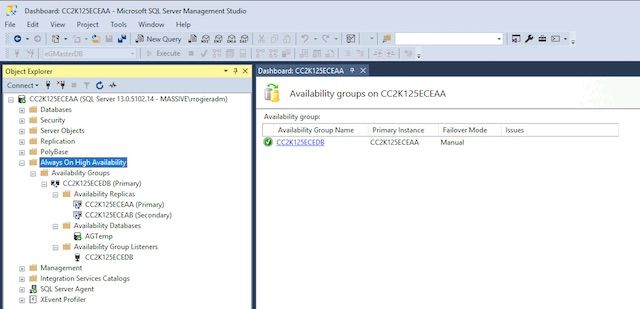
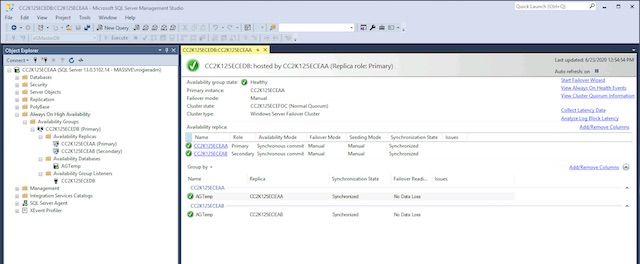
- If you chose Show Dashboard from the Availability Group name, or if you selected on the hyperlink from the summary dashboard, you now see a dashboard with far more details. The key items to look for here are as follows. If you see errors, select the links
- Availability group state: This should be Healthy.
- Availability replica: This should list both servers in the AG and indicate the role of each.
- In the bottom portion of the dashboard, you see both servers listed with all databases that are a member of the AG. Both servers should list the same number of databases, Synchronization State should show Synchronized, and Failover Readiness should show No Data Loss.
- If you chose Show Dashboard from the Always On High Availability node or from the Availability Groups node, you see a dashboard that shows the Availability Group name, the current primary replica, failover mode, and whether there are any current issues. While ECE does not require the use multiple Availability Groups on the same set of servers, a system with more than one Availability Group shows all Groups on this page and the current, high-level details.
- Verify that the Availability Group exists on the primary replica.
-
Update Dynamic DNS (DDNS) Configuration
As a best practice, the DDNS configuration must be updated. By default, DDNS records are refreshed every 20 minutes. Microsoft recommends that this value be changed to 300 seconds. This must be done on both collocated servers.Note: The commands in this section must be entered in sequence, while in the same PowerShell window. If the window is closed accidentially, you must start with the first command again to ensure that the subsequent commands do not fail. There is no issue if the same command is exeuted twice, but you must not skip any steps.
- Open PowerShell window via Run as Administrator.
- Type, or copy and paste the command to import the FailoverClusters module.
Import-Module FailoverClusters
- Identify the resource name.
- Type, or copy and paste the commands into the PowerShell window. Change the input value of $nameAGCluster parameter to match the Availability Group Name you chose.
$nameAGCluster = "CC2K125ECEDB"
Get-Cluster | Get-ClusterResource | ?{$_.ResourceType -like "Network Name" -and $_.OwnerGroup -eq $nameAGCluster} - In the output, identify the value of Name.
PS C:\Windows\system32> Get-Cluster | Get-ClusterResource | ?{$_.ResourceType -like "Network Name" -and $_.OwnerGroup -eq "CC2K125ECEDB"}

Name                      State  OwnerGroup   ResourceType
----                      -----  ----------   ------------
CC2K125ECEDB_CC2K125ECEDB Online CC2K125ECEDB Network Name
- Type, or copy and paste the commands into the PowerShell window. Change the input value of $nameAGCluster parameter to match the Availability Group Name you chose.
- Update mandatory settings
- Type, or copy and paste the commands into the PowerShell window. Change the input value of $nameResource to match your environment.
$nameResource = "CC2K125ECEDB_CC2K125ECEDB"
Get-ClusterResource $nameResource | Set-ClusterParameter HostRecordTTL 300 - Ensure that the properties were stored. The warning message is expected.
PS C:\Windows\system32> Get-ClusterResource $nameResource | Set-ClusterParameter HostRecordTTL 300
WARNING: The properties were stored, but not all changes will take effect until CC2K125ECEDB_CC2K125ECEDB is taken offline and then online again.
- Type, or copy and paste the commands into the PowerShell window. Change the input value of $nameResource to match your environment.
- Repeat on the commands second collocated server.
- Restart the AG
This must be done from only one server.
- Type, or copy and paste the script into the PowerShell window.
Stop-ClusterResource $nameAGCluster
Start-ClusterResource $nameAGCluster
Start-ClusterGroup $nameAGCluster - Ensure that all three commands are successful.
PS C:\Windows\system32> Stop-ClusterResource $nameAGCluster

Name         State   OwnerGroup   ResourceType
----         -----   ----------   ------------
CC2K125ECEDB Offline CC2K125ECEDB SQL Server Availability Group


PS C:\Windows\system32> Start-ClusterResource $nameAGCluster

Name         State  OwnerGroup   ResourceType
----         -----  ----------   ------------
CC2K125ECEDB Online CC2K125ECEDB SQL Server Availability Group


PS C:\Windows\system32> Start-ClusterGroup $nameAGCluster

Name         OwnerNode    State
----         ---------    -----
CC2K125ECEDB CC2K125ECEAA Online - Type, or copy and paste the commands into the PowerShell window
Get-ClusterResource $nameAGCluster
Get-ClusterGroup $nameAGCluster - Ensure that both show the State as Online.
PS C:\Windows\system32> Get-ClusterResource $nameAGCluster

Name         State  OwnerGroup   ResourceType
----         -----  ----------   ------------
CC2K125ECEDB Online CC2K125ECEDB SQL Server Availability Group


PS C:\Windows\system32> Get-ClusterGroup $nameAGCluster

Name         OwnerNode    State
----         ---------    -----
CC2K125ECEDB CC2K125ECEAA Online
- Type, or copy and paste the script into the PowerShell window.
Configuration Checkpoint
Now that all of the prerequisites have been done, you are ready to install ECE. Before you continue, check that all of each item in the list has been completed.
- Both web servers have been deployed, Windows 2016 installed, and all desired Microsoft updates completed.
- Both collocated servers have been deployed, Windows 2016 and SQL Server 2016 Enterprise Edition installed, and all desired Microsoft updates completed.
- Distributed File System must be installed and the required directories for the ECE File server component created, a Domain Namespace and Replication group configured, and all permissions verified.
- Windows Server Failover Cluster must be installed and functional. You must a UNC share as the Quorum drive.
- SQL Server Availability Group must be enabled, a new Availability Group created, with a test DB added. While not in the scope of this document, failover for the Availability Group must be fully tested and either collocated server must be able to become the primary replica.
Before you continue, carefully read the ECE Installation Guide for the version of ECE and which corresponds to the deployment of Contact Center you have in your environment (UCCE or PCCE). Many of the install steps of ECE are the same for both UCCE and PCCE integrated systems, however, it is important that you follow the correct document as the configuration steps on the Contact Center side are quite different. PCCE is largely automated, but has different certificate requirements due to the use of SPOG (single pane of glass). UCCE has more prerequisite steps on the Contact Center side and is administered through the traditional methods. (Internet Explorer to the ECE server at, https://ece.example.com/default, etc.)
This document does not cover the install steps that are common to both standalone and HA installs such as the creation of the ECE Service account, the configuration of the Windows firewall rules, anti-virus/anti-malware scanner exclusion configuration, etc. nor does it give a step-by-step walk through of the install steps. Instead, the remainder of this document assumes that you are familiar with how to install ECE, have completed all of the pre-installation steps covered in the Enterprise Chat and Email Installation and Configuration Guide, and now have the ECE Fresh Install iso file mounted on all 4 servers and are ready to begin the install.
Install ECE
The installation of ECE requires you to run setup five times. You run setup twice on the side-A collocated server, then one time each on the other three servers. The same name convention for the servers that is used in the product documentation is used for this document. For reference, here are the names and roles of each server along with the names that are used, (where names are shown) in the remainder of the document.
| VM Identifier | VM Role | ECE Roles | VM Example Name | VM Example IP |
| VM-1A | Side-A collocated server | File Server (DFS Node 1), Database (Availability Group Replica), Messaging, Services, Application | CC2K125ECEAA | 14.10.162.168 |
| VM-2A | Side-A web server | Web Server | CC2K125ECEWA | 14.10.162.169 |
| VM-1B | Side-B collocated server | File Server (DFS Node 2), Database (Availability Group Replica), Messaging, Services, Application | CC2K125ECEAB | 14.10.172.168 |
| VM-2B | Side-B web server | Web Server | CC2K125ECEWB | 14.10.172.169 |
Note: Before you begin the installation, validate and note which database server is the primary replica. You need to know this in order to complete the post-installation steps.
Note: ECE HA does not support SQL Server Authentication. You must use Integrated Authentication. Please ensure that you have completed the section of the pre-installation steps to properly configure SQL Server to allow Integrated Authentication to succeed.
Step 1. Install ECE on VM-1A
- Run setup.exe the first time.
This is the only server where you need to run setup twice. The first time, the File Server and Database Server components are installed.
- At the Installation Options page, select ONLY File Server and Database Server, then select Next >.
- When prompted to enter the File Server Directory/NAS Path, enter the UNC path of the DFS share you created in the format \\massivedynamic.com\ECE_Root\ECE.
- Fill out the next screens as required for your installation.
- When prompted for SQL Server Database Authentication, select Integrated Authentication.
- Be very careful to enter the correct information when you configure the databases.
- When you enter the Server name for any of the databases, you must use the fully-qualified name of the Listener. Example: CC2K125ECEDB.MassiveDynamic.com.
- The Server Instance Name can generally be left blank unless you have configured a named instance of SQL Server.
- The Database Listen Port is the port configured for the Listener.
- The Datafile Path is the location on the 300GB drive which you created for the databases. Example: F:\MSSQL\DATA
- The Reports Database SSIS Parameters page must be completed as follows.
- SSIS Datafile Path– Location on the 50GB drive you have configured for SSIS. This is the directory configured in the pre-install steps. Example: E:\ssis_data
- Domain User Name – Username for the SQL Server Service account in the format of, DOMAIN\user. Example: MASSIVE\SQLServerSvc
- Domain Password – Active Directory password for the selected user.
- The Reports Database SSIS Catelog Parameters page is the encryption password for the SSIS catalog. This information is required to complete the Post-Installation steps.
- The Domain User Account Parameters page is where you populate the username and password for the service account created to run ECE.
- After you provide this information, ECE install begins. As this install configures the File and Database components, this takes the longest amount of time. Please wait until it is complete, then continue.
- Run setup.exe the second time.
The second time that you run setup.exe, the Messaging, Services, and Application components are installed on the side-A collocated server.- At the Installation Options page, select ONLY, Messaging Server, Application Server, Services Server, then select Next >.
- When prompted to enter the File Server Directory/NAS Path, enter the UNC path of the DFS share you created in the format \\massivedynamic.com\ECE_Root\ECE.
- When prompted to enter the Enterprise Chat & Email Home Directory, enter the location on the 50GB drive you wish to use for ECE at run time. This directory must NOT be the same as the directory that is shared in the DFS. Example: E:\ECE
- Fill out the other pages as required.
- After you reach the summary screen and select Finish, ECE install begins.
Step 2. Install ECE on VM-1B
In contrast to the collocated server on side A, you only need to run setup a single time on side B.
- At the Installation Options page, select ONLY, Messaging Server, Application Server, Services Server, then select Next >.
- When prompted to enter the File Server Directory/NAS Path, enter the UNC path of the DFS share you created in the format \\massivedynamic.com\ECE_Root\ECE.
- When prompted to enter the Enterprise Chat & Email Home Directory, enter the location on the 50GB drive you wish to use for ECE at run time. This directory must NOT be the same as the directory that is shared in the DFS. Example: E:\ECE
- Fill out the other pages as required.
Note: Ensure that all configuration items such as Context Root, Partition Name, etc. match the side-A collocated server.
- After you reach the summary screen and select Finish, ECE install begins.
Step 3. Install ECE on VM-2A and VM-2B
The process to install ECE on VM-2A and VM-2B is quite straightforward. You need to run setup a single time.
-
At the Installation Options page, select ONLY, Web Server, then select Next >.
- When prompted to enter the Enterprise Chat & Email Home Directory, enter the path on the 80GB drive you wish to use for ECE at run time. Example: C:\ECE
- At the Application Server Parameters, provide this information
- Enter the Application Server Name as the fully-qualified name of the collocated server on the same side as the web server.
Example:
CC2K125ECEWA Web Server must point to the CC2K125ECEAA Application Server
CC2K125ECEWB Web Server must point to the CC2K125ECEAB Application Server - Enter the Jetty HTTP Port that you configured when you installed the collocated servers.
- Enter the Application Server Name as the fully-qualified name of the collocated server on the same side as the web server.
- At the IIS Web Site Parameters page, select the IIS Web Site Name you wish to use for ECE. Generally this is Default Web Site.
- Ensure that the Context Root and Partition Name match what is configured when you installed the collocated servers.
- If you install the Web servers off of the domain, you must create a local username and password on each server to use when prompted for Domain Username and Domain User Password.
- After you reach the summary screen and select Finish, ECE install begins.
Once you have completed these steps, ECE is installed. Before you start the services though, there are several post-installation tasks which must be completed.
Complete Post-Installation Tasks
To complete the installation of ECE, you need to do these steps. There is one step referenced in the documentation which must be completed in a different order based on the version of ECE you have installed.
Step 1. Assign Permissions to ECE Directories
- On both collocated servers, open the Windows File Explorer.
- Navigate to the drive that contains the ECE Home directory. Example: E:\
- Right-Click the ECE Home directory and choose Properties.
- Select the Permissions tab, then select the Edit button.
- In the permissions window that comes up, select the Add... button.
- Enter the name of the service account you created to run ECE into the Enter the object names to select box. Example: MASSIVE\ECESvc
- Select OK to return to the permissions window.
- Ensure that the account you just added is selected in the list, then select the Allow check-box beside Full control.
- Select OK then OK again.
Step 2. Start then Stop ECE Service on Collocated Servers
Before you run the ReportsDB utility, the ECE service must be started, then stopped on each collocated server. When the service starts the first time, ECE copies files from the DFS share to the ECE Home directory on the server. These files are required for the ReportsDB utility to run later in this process.
- Log in to both collocated servers.
- Open the Windows Services Control Panel and navigate to the Cisco Service and start the service.
- Repeat this on the second collocated server.
- Open Task Manager, select the Details tab and sort the processes by User name. Monitor until you see the processes start. There are 20-30 processes on one of the collocated servers and 9-10 processes on the second one. The total time to start all processes the first time may be close to 15 minutes.
- Once you see that new processes have started in Task Manager, return to the Services Control Panel and stop the Cisco Service.
- Monitor Task Manager again until all processes stop. The shutdown of ECE generally take 3-5 minutes. Subsequent service startup is faster as the files are already copied down.
Step 3. Prepare Databases to Join the Availability Group
- Open SQL Server Management Studio and connect to the Primary Node.
- Change Recover model for each database.
- To do this via the GUI, do these steps.
- Expand Databases and do these steps on each of the three ECE databases.
- Right-click the database and choose Properties.
- Select the Options page in list on the left of the Database Properties - <Databasename> tab.
- In the drop-down next to Recovery Model:, select Full.
- Select OK.
- Repeat for each database.
- Expand Databases and do these steps on each of the three ECE databases.
- To do this via T-SQL, do these steps.
- Choose New Query in the tool bar.
- In the new query window, copy/paste or type these three commands. Change the database name as required.
ALTER DATABASE eGActiveDB SET RECOVERY FULL WITH NO_WAIT
ALTER DATABASE eGMasterDB SET RECOVERY FULL WITH NO_WAIT
ALTER DATABASE eGReportsDB SET RECOVERY FULL WITH NO_WAIT - Select Execute in the toolbar to run the query
- To do this via the GUI, do these steps.
- Make a full backup of all three databases.
You can use either the GUI method or the T-SQL method to create this backup. Both methods are shown and assume that you already have SQL Server Management Studio open and that you used the default database names for ECE.- Via GUI
- Right-click the eGActiveDB database and choose Tasks > Back Up...
- Check the Back Up Database - eGActiveDB box that comes up and ensure that the Backup type: is set to Full and that the Destination is Disk. Also ensure that the location shown is correct for your system. Use the Add / Remove buttons to make any necessary changes.
- Select OK and ensure that you see The backup of database 'eGActiveDB' completed successfully.
- Repeat for the eGMasterDB and eGReportsDB databases.
- Via T-SQL
- Select New Query in the tool bar.
- In the new query window, copy/paste or type these three commands. Ensure that you make any changes required for both database name and backup file location.
BACKUP DATABASE eGMasterDB
  TO DISK = N'F:\MSSQL\Backups\eGMasterDB.bak'
  WITH NAME = N'eGMasterDB-Initial Full Backup',
  COMPRESSION, STATS = 25
GO

BACKUP DATABASE eGActiveDB
  TO DISK = N'F:\MSSQL\Backups\eGActiveDB.bak'
  WITH NAME = N'eGActiveDB-Initial Full Backup',
  COMPRESSION, STATS = 25
GO

BACKUP DATABASE eGReportsDB
  TO DISK = N'F:\MSSQL\Backups\eGReportsDB.bak'
  WITH NAME = N'eGReportsDB-Initial Full Backup',
  COMPRESSION, STATS = 25
GO - Select Execute to run this. Check the Messages tab to see a line similar to this for each of the three databases.
BACKUP DATABASE successfully processed 110986 pages in 8.153 seconds (106.350 MB/sec).
- Via GUI
- Make a transaction log backup of all three databases.
You need to make a Transaction Log backup of all three databases in order to join them to the Availability Group. Use one of the two methods shown to do this.- Via the GUI.
- Right-click the eGActiveDB database and choose Tasks > Back Up...
- In the Back Up Database - eGActiveDB box verify each item below.
- The Backup type: is set to Transaction Log
- The Destination is Disk and the location shown is correct for your system
- Use the Add / Remove buttons to make any necessary changes.
- Select OK.
- Ensure that you see The backup of database 'eGActiveDB' completed successfully.
- Repeat for the eGMasterDB and eGReportsDB databases.
- Via T-SQL
- Select New Query in the tool bar.
- In the new query window, copy/paste or type these three commands. Ensure that you make any changes required for both database names and file location.
BACKUP LOG eGMasterDB
  TO DISK = N'F:\MSSQL\Backups\eGMasterDB.trn'
  WITH NAME = N'eGMasterDB-Initial T Log Backup',
  COMPRESSION, STATS = 25
GO

BACKUP LOG eGActiveDB
  TO DISK = N'F:\MSSQL\Backups\eGActiveDB.trn'
  WITH NAME = N'eGActiveDB-Initial T Log Backup',
  COMPRESSION, STATS = 25
GO

BACKUP LOG eGReportsDB
  TO DISK = N'F:\MSSQL\Backups\eGReportsDB.trn'
  WITH NAME = N'eGReportsDB-Initial T Log Backup',
  COMPRESSION, STATS = 25
GO - Select Execute to run this. Check the Messages tab to see a line similar to this for each of the three databases.
BACKUP DATABASE successfully processed 110986 pages in 8.153 seconds (106.350 MB/sec).
- Via the GUI.
Step 4. Restore Database Backup on Side-B Server
Before the databases can be added to the Availability Group, you first need to restore the backup on side B.
- Copy the 3 .bak files and 3 .trn files that you created in steps 3 and 4 to the side-B collocated server. Ensure that you copy these files to the same location where they were on side A. For instance, if you followed the examples given, copy the databases to the F:\MSSQL\Backups folder on the side-B server.
- Open SQL Server Management Studio and connect to the side-B server.
- Select New Query in the tool bar.
- In the new query window, copy/paste or type these commands. Ensure that you make any changes required for your system.
RESTORE DATABASE eGMasterDB
  FROM DISK = N'F:\MSSQL\Backups\eGMasterDB.bak'
  WITH NORECOVERY, STATS = 25
GO

RESTORE DATABASE eGActiveDB
  FROM DISK = N'F:\MSSQL\Backups\eGActiveDB.bak'
  WITH NORECOVERY, STATS = 25
GO

RESTORE DATABASE eGReportsDB
  FROM DISK = N'F:\MSSQL\Backups\eGReportsDB.bak'
  WITH NORECOVERY, STATS = 25
GO

RESTORE LOG eGMasterDB
  FROM DISK = N'F:\MSSQL\Backups\eGMasterDB.trn'
  WITH NORECOVERY, STATS = 25
GO

RESTORE LOG eGActiveDB
  FROM DISK = N'F:\MSSQL\Backups\eGActiveDB.trn'
  WITH NORECOVERY, STATS = 25
GO

RESTORE LOG eGReportsDB
  FROM DISK = N'F:\MSSQL\Backups\eGReportsDB.trn'
  WITH NORECOVERY, STATS = 25
GONote: Ensure that you use the WITH NORECOVERY option when you restore each database. This allows SQL Server to join the database to the Availability Group successfully in the next step.
- Select Execute to run these queries. Review the Messages tab to see that all 6 RESTORE statements completed successfully.
Note: All three databases are listed with the word Restoring next to their name. This is expected.
Step 5. Join Databases to the Availability Group
Now that the databases are restored on the side-B collocated server, add them to the AG.
- Open SQL Server Management Studio and connect to the Primary Node.
- Expand Always On High Availability > Availability Groups.
- Right-click the Availability Group name you created and choose Add Database...
- Select Next > until you see Select Databases.
- All three ECE databases should be shown and the Status should be Meets prerequisites. Select the box beside each database, then select Next >.
Note: The SSISDB must NOT be added to the Availability Group.
- On the Connect to Existing Secondary Replicas screen, select the Connect... button beside the side-B server, then select Connect in the Connect to Server box. Select Next > to continue to the next page.
- On the Select Initial Data Synchronization page, choose the option Join Only. Select Next > to continue to the next page.
- On the Validation page, ensure that all checks are successful. If you receive any errors, select the error in the Results column, and take any necessary corrective action. Select Next > once all show green.
- Review the Summary page, then choose Finish to join the databases to the Availability Group.
- On the Progress page, select the More details button to monitor the specific steps. When you see all steps show a Result of Success, select Close.
Step 6. Validate Availability Group
Once you have done these steps, open the Availability Group Dashboard used after you created the Availability Group to see that all databases are now added to the Availability Group and show synchronized with no data loss.
Step 7. Run Reports DB Utility
Due to a defect in the 12.0 base release, the reportsDBUtility included on the install media does not work. If you installed 12.5 or higher, proceed with the next steps. If you installed 12.0, complete the next major section, Patch ECE, then return and complete the last three tasks in this section.
- Copy the directory to the side-A collocated server.
- On a 12.5 or higher release, open the DVD drive, then navigate to the Utilities directory and copy the ReportsDB Utility (SQL Server Always ON) directory to the same drive where you have installed ECE. Example: E:\ReportsDB Utility (SQL Server Always ON).
- On as 12.0 release, after you apply the latest ES in the Patch ECE section, open the location where you unzipped the ES, then navigate to the Utilities directory and copy the ReportsDB Utility (SQL Server Always ON) directory to the same drive where you have installed ECE. Example: E:\ReportsDB Utility (SQL Server Always ON).
- Update the batch file.
- In the directory you copied over, edit the reportsdb_utility.bat file in notepad.
- Find the line that reads, SET JAVA_HOME=<JAVA_HOME> and replace the <JAVA_HOME> with the local directory which is shared into DFS.
Example: SET JAVA_HOME=E:\ECEFile\env\jdk - Save the file and exit notepad.
- Update the .properties file
Note: Since this file is used by Java, certain characters need to be escaped. One of these is the \. Whenever a file location is referenced, the path must be escaped correctly. For example, E:\ssis_data needs to be escaped as E:\\ssis_data. The DFS share must be fully escaped. Pay close attention to the example. This holds true throughout the entire file.
- In the same directory, edit the reportsdb_utility.properties file in notepad.
- Edit these lines
- ECE_HOME_DIR=C:\\ECE – Update to the properly escaped DFS share. Example: ECE_HOME_DIR=\\\\massivedynamic.com\\ECE_Root\ECE
- REPORTS_DB_SERVER_NAME= – Provide the fully qualified server name of the server which was the secondary replica server at install time. If you have performed a failover after install, ensure that you failover the Availability Group back to the original configuration. One way to tell is that the secondary replica generally does not have the SSISDB on it. Example: CC2K125ECEAB.massivedynamic.com
- REPORTS_DB_LST_PORT= – Provide the Listener port. Typically this is 1433.
- REPORTS_DB_INSTANCE_NAME= – If you installed the listener on a named instance, provide that instance name here. Otherwise, this can be left blank.
- REPORTS_DB_NAME= – Provide the name of the reports database. Example: eGReportsDB
- ACT_DB_SERVER_NAME= – Provide the fully qualified server name of the server which was the secondary replica server at install time. If you have performed a failover after install, ensure that you failover the Availability Group back to the original configuration. One way to tell is that the secondary replica generally does not have the SSISDB on it. ;
- Example: CC2K125ECEAB.massivedynamic.com
- ACT_DB_LST_PORT= – Provide the Listener port. Typically this is 1433.
- ACT_DB_INSTANCE_NAME= – If you installed the listener on a named instance, provide that instance name here. Otherwise, this can be left blank.
- ACT_DB_NAME= – Provide the name of the active database. Example: eGActiveDB
- If present – MAST_DB_NAME= – Provide the name of the master database. Example: eGMasterDB
- SSIS_INSTALL_PATH= – Provide the path to the SSIS folder created on the secondary server. Example: E:\\ssis_data
- SSIS_USER_ID= – Provide the SSIS Username that you gave when you set up ECE. Example: MASSIVE\\SQLServerSvc
- SSIS_USER_PASSWORD= – Provide the Active Directory password for the SSIS User which was given in the initial setup.
- SSIS_CATALOG_PASSWORD= – Provide the SSIS Catalog password chosen when you installed ECE.
- If the field is not referenced in this list, then it can be safely left at its default setting or left blank.
- Save the file and exit notepad.
- Run the batch file
- Open a new command prompt and change to the location where you copied the ReportsDB Utility (SQL Server Always ON) directory. Example: cd e:\ReportsDB Utility (SQL Server Always ON)
- Run the command exactly as shown. reportsdb_utility.bat createDBObjects
- This can take several minutes to complete.
- Once the command prompt returns, open the Windows File Explorer and navigate to the same directory, then open the logs directory.
- Open the log file that ends with ReportsDBUtil.log. Example: eg_log_CC2K125ECEAA_ReportsDBUtil.log
- Scroll to the bottom of the file and ensure that you see a line which contains this line.
com.egain.platform.module.reportsdbutility.CreateReportsDB <@> main() <@> ****************** ReportsDB utility is executed successfully !!! ****************** <@> - If you do not see the success output, review the the ReportsDBUtil.log file and other log files in the directory to determine the cause.
Step 8. Fix SSIS Server Maintenance Job
When the SQL Server Integration Services is enabled, Microsoft creates a job in the SQL Server Agent jobs named SSIS Server Maintenance Job. Without any intervention, this job fails. Use these steps to resolve the issue that causes this failure.
- Log in to both collocated servers.
- Open SQL Server Management Studio and connect to the SQL Sever by the local server name.
- Select New Query from the toolbar.
- In the new query window, paste these T-SQL commands.
USE [SSISDB]
GO

GRANT EXECUTE ON [internal].[cleanup_server_execution_keys] TO [##MS_SSISServerCleanupJobUser##]
GO

GRANT EXECUTE ON [internal].[cleanup_server_log] TO [##MS_SSISServerCleanupJobUser##]
GO

GRANT EXECUTE ON [internal].[cleanup_server_project_version] TO [##MS_SSISServerCleanupJobUser##]
GO

GRANT EXECUTE ON [internal].[cleanup_server_retention_window] TO [##MS_SSISServerCleanupJobUser##]
GO - Select Execute in the toolbar and monitor the Messages tab for this line.
Commands completed successfully. - Repeat this on the other collocated server.
Step 9. Schedule Database Backups
Database backups are important in any production system, but when ECE is installed in an HA configuration, they become vital to ensure that the product remains stable and that your disks do not become completely full. When a SQL Sever database is in Full recovery mode, different rules apply to how the transaction log is managed. In a Simple recovery model database, the transaction log can be reused as soon as the data in it has been committed to the data file and there are no open transactions which reference the data. In a Full recovery model database however, the transaction log can only be reused after one of two things occurs.
1. A Full database backup – Once a full database backup has been completed, then the transactions in the transaction log are automatically committed into the data file(s) and therefore the log can be safely reused.
2. A Transaction log backup – This is a special backup which is only valid for Full or Bulk Logged recovery models. A full database backup is required before the first transaction log backup can occur, but after this, the transaction log can be backed up and the log space reused.
Because of this, you must carefully design your database backup plan. If backups are not done frequently enough, the transaction log continues to grow and, after time, fill up the entire disk. One possible backup plan is shown, but there are many others. This document does not give the specifics on how to configure the backups. Please consult Microsoft documentation or a qualified SQL Server expert for details.
Here are the definitions of some terms used.
Full Backup
– This backup type results in a single file that contains an the entire backup of a database. This file contains all information required to restore the database to the point-in-time at which the backup was made.
– To fully restore this backup, you simply need the backup file which corresponds to the last full backup.
Differential Backup
– This backup type contains the differences in the database since the last full backup. Since most databases grow at a fairly consistent rate, each differential backup file is quite a bit smaller than the Full backup.
– To fully restore restore the database, you need the file that contains the last Full database backup, plus the file that contains the last differential backup.
Note: SQL Server does not have any native concept of an incremental backup.
Transaction Log Backup
– This backup type contains the changes in the transaction log since the last backup. The last backup can be any one of the three backup types, Full, Differential, or Transaction Log. If performed on a regular basis, the size of the transaction log backup can be extremely small, sometimes only 1-2MB. Since the size is dependent on how busy the database is and when the last backup occurred, it is almost always better to do more frequent Transaction Log backups rather than fewer. Transaction log backups do allow you to restore a database to a point in time. If you know that data corruption happened at, for example 14:53:27.003 server time yesterday afternoon, you could restore the backup files in the correct order and choose to roll the database forward to 14:53:27.000. Any data after this time would be lost, but you would have a known good database.
– To fully restore the database, you need all of these:
– File that contains the last full backup
– File that contains the last differential backup
– ALL of the files that contain Transaction log backups made since either the last full or differential backup, whichever occurred last.
User Database – In Microsoft SQL Server, a user database is any database that is not required to run the server itself.
System Database – In Microsoft SQL Server, a system database is one of the 4 databases which the server requires in order to run, plus the distribution database if SQL Replication is configured. The four databases are, master, model, msdb, and tempdb. In SQL Server Management Studio, the system databases are in a folder named System Databases under the Databases folder node in the tree.
- Full Backup - In this plan, all User databases are scheduled for a Full backup each Sunday morning at 01:30AM server time. The backups are compressed and the last 8 weeks of backups are retained on the server. A SQL Job is used to purge the SQL Backups older than 8 weeks.
- Differential Backup – In this plan, all User databases are scheduled for a Differential backup every morning, with the exception of Sunday morning, at 01:30AM. The backups are compressed and the last 2 weeks of backups are retained on the server.
- Transaction Log Backup – In this plan, all User databases are scheduled for Transaction Log backup that starts at 01:30AM and repeats every 1 minute. The backups are UNcompressed and the last 49 hours of backups are retained on the server. While every 1 minute can seem extreme, since this backup file size is based the rate of change of the transaction log since the last backup, the total size of the files over time remains roughly the same whether this is done ever 1 minute, 5 minutes, 30 minutes, or longer. If a backup is made every 1 minute however, the actual transaction log is allowed to be reused much more quickly and this, over time, reduces the overall space required to store both the database files and the backup files.
The details to implement this plan are outside the scope of this document. Please consult Microsoft SQL Server documentation for assistance.
Step 10. Update Key Configuration Files
There are two files on each web server which generally need to be updated in a HA installation of ECE.
The first is the ece_config.js file that is used to load the Finesse gadget. At install, this file is created that contain the fully qualified host name of the web server. Since most HA ECE is accessed through a fully qualified name that is not a part of one server or the other, This file must be updated to ensure the proper functionality of the Finesse gadget.
The second file is not required to be updated, but it makes later changes the Finesse desktop layout much easier if it is updated.
Tip: Download and use a text editor such as Notepad++ to make these and other files on ECE much easier to edit. If you open the files in either Notepad or Wordpad you may see display issues and cause format corruption.
- Log in to each web server.
- Navigate to the ECE home directory.
- In this directory, navigate to this path, eService\templates\finesse\gadget\.
- Update the ece_config.js file.
- Navigate in to the agent directory.
- Locate the ece_config.js file and make a backup copy in a safe location.
- Open the current ece_config.js file in a text editor.
- Locate these two lines and update them to match your deployment.
The web_server_protocol must be https, update if required.
Update the web_server_name to match the fully qualified name that you allocated to use to access ECE. Example: ece.massivedynamic.com- var web_server_protocol = "https";
- var web_server_name = "CC2K125ECEWB.massivedynamic.com";
- Review and, if desired, update the agent.xml file.
This update is not required. The contents of this file are designed to be copied, then pasted directly into the Desktop Layout in Finesse CFAdmin. The file is not used directly by ECE, but if you update it with the correct configuration, it makes any required changes to Finesse at a later time much easier.
- Return to the gadget directory, then navigate to the layout directory.
- Locate the agent.xml file and make a backup copy in a safe location.
- Open the current agent.xml file in a text editor.
- Locate and update the URL that is shown between the <gadget> and </gadget> tags to match the fully qualified name that you allocated to use to access ECE.
Once you have reached this point, ECE is fully installed and you are ready to log in to Partition 1 and Partition 0 to complete the setup. Please review the final notes section for other items which you may need to configure or check based on your deployment. There are many items which you may need to configure which are outside of the scope of this document. Some are listed in the final notes section, but this is by no means an exhaustive list. Please ensure that you review all relevant documentation for the most up-to-date configuration requirements.
Patch ECE
It is recommended that ECE be kept as close as possible at the latest ES and ET patch level. This is especially important for issue resolution. All defects are fixed based on the latest patch release. You may be asked to apply the latest patch before a new defect can be confirmed. ECE does not currently support non-stop updates. This means that all patches must be applied while in a maintenance window when ECE can be completely stopped.
Step 1. Prepare Servers to be Patched
-
Stage Patch File
- Download the patch and copy it to all four servers.
- Unzip the file, then carefully review the included readme.
-
Stop ECE Processes
If ECE does not have any active email accounts or if all email accounts configured are for test purposes only, this step may safely be skipped. After you have run ECE in a production environment with email data for which you do not want to risk any loss, perform this step in order to test the ability to log in to ECE and even receive chats without the risk of data loss due to the retrieval of new emails by ECE. Since emails are deleted off the mail server when they are retrieved, this minimizes the possibility of loss of data should you need to uninstall the ES and restore the database backup.
Tip: The system partition is also known as partition 0.
- Open Internet Explorer and navigate to the ECE system partition. Example: https://ece.massivedynamic.com/system
- Log in with the sa account.
- In the Consoles screen, select the System console.
- Expand Shared Resources > Services > Email. Under this are two folder, Dispatcher and Retriever. Do these tasks in each folder.
- In the top half of the right-hand side of the page, select each process.
- In the bottom half of the right-hand side, select the drop-down arrow beside Start type and select Manual.
- Select the save button that is just above the General tab.
- Back in the top half, select the Stop button.
- Monitor the State column until it reads Stopped.
- Repeat with any other processes.
-
Stop ECE
- Log in to both collocated servers.
- Open the Windows Services Control Panel and navigate to the Cisco Service and stop the service.
- Repeat this on the second collocated server.
- Open Task Manager, select the Details tab and sort the processes by User name. Monitor until all processes which are owned by the ECE Service account have stopped. There are be 35-40 processes on one of the collocated servers and 9-10 processes on the second one. The total time to stop all processes is generally 5-10 minutes.
Step 2. Backup Servers
-
Backup SQL Databases
Before you apply any patch to ECE or start any upgrade, a database backup of all three databases must always be made. When is in HA mode, ECE mandates that backups be scheduled on a regular basis. Even though the backup is scheduled, you must always make a separate backup before you start the patch or update installation so that you have an up-to-date copy.- Open SQL Server Management studio and connect to the Listener.
- Select New Query in the toolbar.
- Copy and paste the SQL shown into the query window. Make any required changes to the path or database names.
BACKUP DATABASE eGActiveDB
  TO DISK = N'E:\MSSQL\Backup\eGActiveDB_PrePatch.bak'
  WITH NOFORMAT, NOINIT, NAME = N'eGActiveDB-Full Backup Before Patch',
  SKIP, NOREWIND, NOUNLOAD, STATS = 25
GO

BACKUP DATABASE eGMasterDB
  TO DISK = N'E:\MSSQL\Backup\eGMasterDB_PrePatch.bak'
  WITH NOFORMAT, NOINIT, NAME = N'eGMasterDB-Full Backup Before Patch',
  SKIP, NOREWIND, NOUNLOAD, STATS = 25
GO

BACKUP DATABASE eGReportsDB
  TO DISK = N'E:\MSSQL\Backup\eGReportsDB_PrePatch.bak'
  WITH NOFORMAT, NOINIT, NAME = N'eGReportsDB-Full Backup Before Patch',
  SKIP, NOREWIND, NOUNLOAD, STATS = 25
GO - Select Execute in the toolbar.
- Monitor the Messages tab until all three database have completed backup. You should see lines similar to these after each successful backup.
BACKUP DATABASE successfully processed 111346 pages in 9.877 seconds (88.072 MB/sec).
BACKUP DATABASE successfully processed 130283 pages in 9.629 seconds (105.704 MB/sec).
BACKUP DATABASE successfully processed 3533 pages in 0.298 seconds (92.611 MB/sec).
-
Backup Key Files
- Log in to each web server.
- Make a backup of any chat entry point directories you have customized.
- Make a backup of these files.
Note: Replace {install_directory} the the ECE home directory on your system.- {install_directory}\eService\templates\finesse\gadget\agent\ece_config.js
- {install_directory}\eService\templates\finesse\gadget\layout\agent.xml
Step 3. Install Patch
-
Install patch on Side-A Collocated Server
Install the patch on the side-A collocated server in accordance with the readme file included with the patch. -
Install patch on Side-B Collocated Server
Install the patch on the side-B collocated server in accordance with the readme file included with the patch. -
Install patch on Side-A Web Server
Install the patch on the side-A web server in accordance with the readme file included with the patch. -
Install patch on Side-B Web Server
Install the patch on the side-B web server in accordance with the readme file included with the patch.
Step 4. Post-patch Validation
-
Check and Update Key files
After you patch ECE, you must review the files that were backed up and merge any changes back in. You must not simply replace the new files with the backup copies as any changes made by the patch may be lost.- Log in to each web server.
- Navigate to the ECE home directory.
- Compare these two files with the two that you made a back up of prior to the patch. Merge any changes into the new files.
Note: Replace {install_directory} the the ECE home directory on your system.
- {install_directory}\eService\templates\finesse\gadget\agent\ece_config.js
- {install_directory}\eService\templates\finesse\gadget\layout\agent.xml
-
Merge Chat Template Changes
When you apply a patch to ECE, you must review the documentation included with the patch. Each patch indicates the files which have changed in the chat templates. Merge the new files with the customized files from your system. -
Start ECE
- Log in to both collocated servers.
- Open the Windows Services Control Panel and navigate to the Cisco Service and start the service.
- Repeat this on the second collocated server.
- Open Task Manager, select the Details tab and sort the processes by User name. Monitor until you see the processes start. There are 20-30 processes on one of the collocated servers and 9-10 processes on the second one. The total time to start all processes the after the install of a patch may be close to 15 minutes.
-
Log in to ECE Web Pages
Open the URL that you use to access ECE administration pages. Verify that you are able to log in and that the processes and instances for all services have started.
If you installed the product with the default names for the two partitions, then the URLs are similar to these.- Business Partition – https://ece.massivedynamic.com/default
- System Partition – https://ece.massivedynamic.com/system
-
Log in to Finesse and ECE Gadget
Log in to Finesse and load the ECE gadget. You should now be able to log in as an agent. -
Start ECE Processes
Once you have completed any tests that you wish to do, start the Processes that you stopped before the patch.
Tip: The system partition is also known as partition 0.
- Open Internet Explorer and navigate to the ECE system partition. Example: https://ece.massivedynamic.com/system
- Log in with the sa account.
- In the Consoles screen, select the System console.
- Expand Shared Resources > Services > Email. Under this are two folders, Dispatcher and Retriever. Do these tasks in each folder.
- In the top half of the right-hand side of the page, select each process.
- In the bottom half of the right-hand side, select the drop-down arrow beside Start type and select Automatic.
- Select the save button that is just above the General tab.
- Back in the top half, select the Start button.
- Monitor the State column until it reads Running.
- Repeat with any other processes.
- Expand Partitions > Default > Services > Email. Under this are two folders, Dispatcher and Retriever. Do these tasks in each folder.
- In the top half of the right-hand side of the page, select each instance.
- In the bottom half of the right-hand side, verify that Start type is has Automatic selected.
- Select the Start button and monitor the State column until is reads, Running.
- Repeat with any other instances.
Final Notes
Now that ECE is installed, there are several configuration items which you need to complete. Most of these are covered in the product documentation. A partial list of items which must be reviewed and configured per your site's needs is shown.
- Create a SSL certificate request, have this signed, and then assign this in Internet Information Services Manger to the website where you installed ECE
- Log in to the business partition and configure the Web Server URL or Load Balancer URL partition level setting to match the URL you allocated to use to access ECE
Note: Ensure that you include the protocol when when you configure this setting. Failure to do this may result in erratic system behavior. Example: https://ece.massivedynamic.com
- If you plan to use one of the secure methods to access your email server such as secure IMAP, POP3, or SMTP/ESMTP, and if your email server is an on-premises mail server that is signed with a non-public certificate authority, ensure that you import the appropriate certificates into the shared keystore on the collocated server.
- If you plan to configure Single Sign-On (SSO), ensure that you import the appropriate certificates from your Cisco IDS server into the shared keystore on the collocated server
Note: All certificates must be imported into the keystore located in the Shared Directory, in the \env\jdk folder.
- Configure the load balancer for your environment.
It is outside of the scope of this document to provide specific guidance on load balancer configuration. Cisco does not recommend any specific load balancer. There are, however, several very specific configuration requirements which must be followed exactly to ensure proper system functionality. The most critical of these are as follows.- The load balancer should be configured in a way that only one-half of the web servers are used at any time. Ideally, these should all be located in the same datacenter. For the 400-agent deployment, this means that only one of the two web servers should be active.
- The load balancer must keep all connections sticky via cookie insert. Since only one of the two web server should be used at a time in the 400-agent deployment, it is less critical that the cookie insert method be used. In the 1500-agent deployment however, you must use cookie-insert to maintain sticky sessions.
- The load balancer should perform regular health checks on the server to ensure availability. It is important to note that ECE does have some error handling built into the web server. If the back-end application server is down or offline, the web server does not show a normal html error page. For this reason, ensure that the health check that you choose monitors the content of the web page and not simply the HTML return code.
There are some special considerations when you integrate with a Packaged Contact Center Enterprise (PCCE) solution. PCCE does almost all management through the CCE Administration page which is also referred to as the single pane of glass (SPOG). When ECE is to be integrated with a PCCE system, the only items which should be configured via the classic ECE web pages are these.
- Partition Administrator Single Sign-on configuration
Note, you must configure this even if you do not plan use agent or supervisor SSO. - In addition to the changes to the ece_config.js, covered in the post-installation steps, there is a similar file that is used to load the ECE gadget in SPOG. You can find this under the ECE home directory on each web server at this location, eService\templates\finesse\gadget\spog. Edit spog_config.js and update the parameter, var web_server_name to match the fully qualified name you enter when add the ECE web server to the PCCE Inventory.
- Ensure that you import the SSL certificate that is assigned to ECE to the keystore on all Admin Workstations, then restart the Apache Tomcat Service before you attempt to open the ECE gadget.
It is recommended that you download several tools and keep them on the ECE Servers. These make it far easier to troubleshoot and maintain the solution over time.
- A text editor such as Notepad++
- A archive tool such as 7-Zip
- One of the many Tail for Windows programs
A few examples are:- Baretail – https://www.baremetalsoft.com/baretail/
- Tail for Win32 – http://tailforwin32.sourceforge.net/
Contributed by Cisco Engineers
- Robert W RogierCisco TAC Engineer
Contact Cisco
- Open a Support Case

- (Requires a Cisco Service Contract)
 Feedback