Introduction
This document describes how to configure Finesse agent to agent chat in Finesse 12.0 release.
Prerequisites
Requirements
Cisco recommends that you have knowledge of these topics:
- Cisco Unified Contact Center Enterprise (UCCE)
- Cisco Unified Communication Manager
- Cisco IM&P Presence
- Cisco Finesse
Components Used
The information in this document is based on these software and hardware versions:
- Cisco Finesse version 12.0 and above
- Cisco Unified Communication Manager version 12.5 and above
- Cisco IM & Presence version 12.5 and above
The information in this document was created from the devices in a specific lab environment. All of the devices used in this document started with a cleared (default) configuration. If your network is live, ensure that you understand the potential impact of any command.
Background Information
Since Cisco Finesse replaced Cisco Agent Desktop (CAD) as the agent desktop software, the agent to agent chat function is not available until this Finesse release 12.0 and above.
The Finesse agent to agent chat utilizes the Cisco IMP server as the 3rd part XMPP client integration which is HTTP over BOSH.
Configure
1. After the installation of Finesse server, you need to add the Desktop Chat server via the https://Finesse-server-ip/cfadmin in the Setting section in Desktop Chat Server Setting, as shown in the image.
Note: you need to enter FQDN of your IMP server here

2. These steps need to be done in the Cisco Unified Communication Manager and Cisco Unified IM&P Server.
Pre-Installation Tasks for Cisco Unified IM and Presence Service
Step 1. Log in to Cisco Unified Communication Manager Administration.
Step 2. Navigate to System > Server.
Step 3. Click Add New.
Step 4. Select Server Type as CUCM IM and Presence and click Next.
Step 5. Fill details, as shown in the image, and click on Save.

Installation of Cisco Unified IM and Presence Service
Step 1. Install the IM and Presence server as subscriber to Cisco Unified Communication Manager
Step 2. Multiple subscribers to Cisco Unified Communication Manager can be added.
Post-Installation Tasks for IM and Presence Service
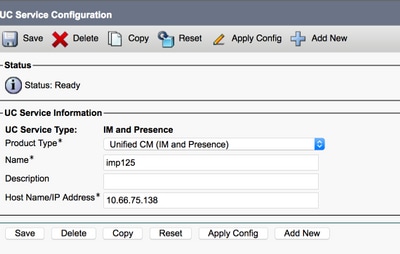
Create UC Service Profile (Optional for finesse agent chat user, this is standard for Jabber client)
Step 1. Log in to Cisco Unified Communication Manager Administration.
Step 2. Navigate to User Management > User Settings > UC Service.
Step 3. Click on Add New.
Step 4. Select UC Service Type as IM and Presence.
Step 5. Fill details, as shown in the image, and click on Save.
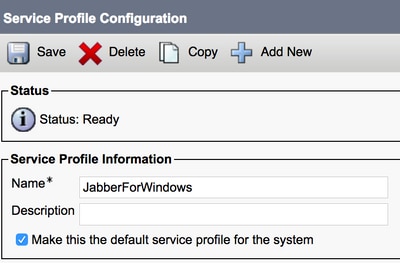
Create Service Profile (Optional for finesse agent chat user, this is standard for Jabber client)
Step 1. Log in to Cisco Unified Communication Manager Administration.
Step 2. Navigate to User Management > User Settings > Service Profile.
Step 3. Click on Add New.
Step 4. Fill details, as shown in the image, and click on Save.

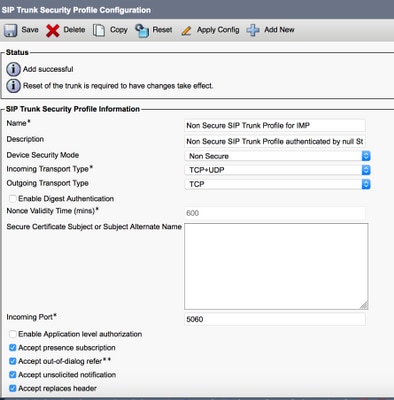
Create SIP Trunk Security Profile Configuration
step 1. Log in to Cisco Unified Communication Manager Administration.
Step 2. Navigate to System > Security > SIP truck Security Profile.
Step 3. Click on Add New.
Step 4. Fill details, as shown in the image, and click on Save.
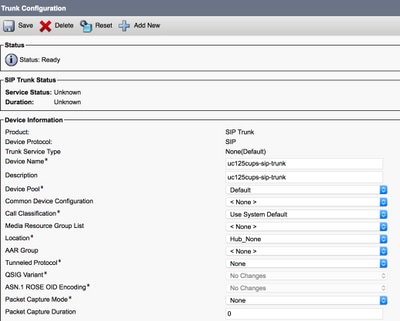
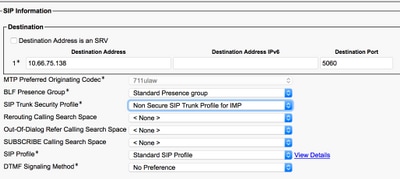
Create SIP Trunk to IM & Presence
Step 1. Log in to Cisco Unified Communication Manager Administration.
Step 2. Navigate to Device > Trunk.
Step 3. Click on Add New.
Step 4. Fill details, as shown in the image, and click on Save.
Add SIP Trunk in IM & Presence
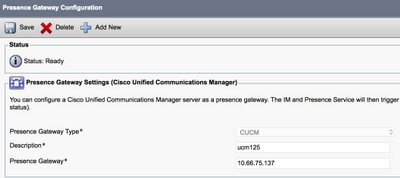
Step 1. Log in Cisco Unified IM & Presence Administration.
Step 2. Navigate to Presence > Gateways.
Step 3. Click on Add New.
Step 4. Fill details, as shown in the image, and click on Save.
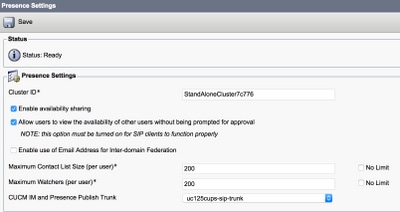
Step 5. Navigate to Presence > Settings > Standard Configuration.
Step 6. Configure the pressence settings, as shown in the image and click on Save.
Associate agents with IM & Presence
Step 1. Log in to Cisco Unified Communication Manager Administration.
Step 2. Go to User Management > End User.
Step 3. Find and select one of the Agent.
Step 4. Configure, as shown in the image, and click on Save.

Activation of Services in IM & Presence
Step 1. Log in Cisco Unified IM & Presence Serviceability.
Step 2. navigate to Tools > Service Activation.
Step 3. Select IM & Presence Server.
Step 4. Activate Cisco SIP Proxy, Cisco Presence Engine, Cisco XCP Text Conference Manager, Cisco XCP Web Connection Manager, Cisco XCP Connection Manager and Cisco XCP Authentication Service, as shown in the image.

Step 5. Verify Agents are sync to IM & Presence Administration (System → Presence Topology).
After these steps, you are able to log in to the IM&P enabled users in the Finesse agent desktop

3. For the contact search to work in Finesse agent chat, you need to configure the 3rd party clients LDAP server and LDAP setting.
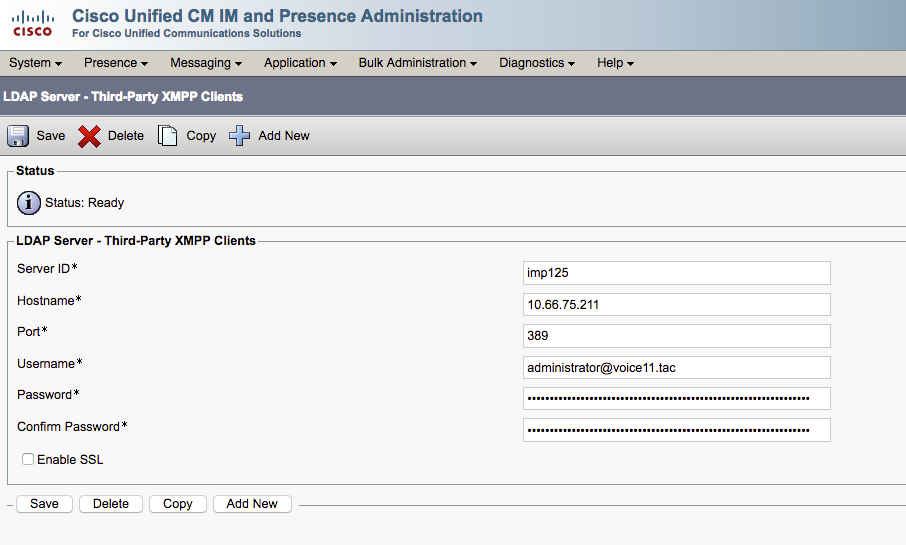
Step 1. Log in Cisco Unified IM & Presence Administration.
Step 2. Navigate to Application > Third-Party Clents > Third-Party LDAP Servers.
Step 3. Click on Add New.
Step 4. Fill details, as shown in the image, and click on Save.
Step 5. Log in Cisco Unified IM & Presence Administration.
Step 6. Navigate to Application > Third-Party Clents > Third-Party LDAP Settings.
Step 7. Click on LDAP Server 1*.
Step 8. Select the above LDAP Server.
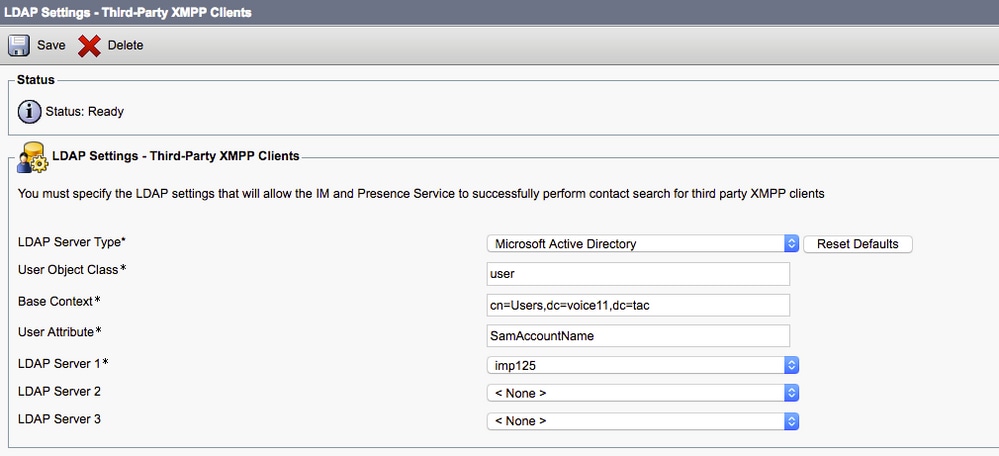
You can search the contact in the Finesse agent Chat window now.

Note: The local users in the Cisco Unified IM&P server can not be searched, only LDAP users can be added into the contacts in the Cisco Finesse agent chat.
Note: The XCP Router service needs to be restarted for the changes.
Verify
There is currently no verification procedure available for this configuration.
Troubleshoot
There is currently no specific troubleshoot information available for this configuration.
Related Information
