Exchange Self-Signed Certificates in a PCCE Solution
Available Languages
Download Options
Bias-Free Language
The documentation set for this product strives to use bias-free language. For the purposes of this documentation set, bias-free is defined as language that does not imply discrimination based on age, disability, gender, racial identity, ethnic identity, sexual orientation, socioeconomic status, and intersectionality. Exceptions may be present in the documentation due to language that is hardcoded in the user interfaces of the product software, language used based on RFP documentation, or language that is used by a referenced third-party product. Learn more about how Cisco is using Inclusive Language.
Contents
Introduction
This document describes how to exchange self signed certificates between principal administration server (ADS/AW) and other application server in Cisco Packaged Contact Center Enterprise (PCCE) solution.
Contributed by Anuj Bhatia, Robert Rogier and Ramiro Amaya, Cisco TAC Engineers.
Prerequisites
Requirements
Cisco recommends that you have knowledge of these topics:
- PCCE Release 12.5(1)
- Customer Voice Portal (CVP) Release 12.5 (1)
Components Used
The information in this document is based on these software versions:
- PCCE 12.5(1)
- CVP 12.5(1)
The information in this document was created from the devices in a specific lab environment. All of the devices used in this document started with a cleared (default) configuration. If your network is live, ensure that you understand the potential impact of any command.
Background
In PCCE solution from 12.x all devices are controlled via Single Pane of Glass (SPOG) which is hosted in the principal AW server. Due to security-management-compliance (SRC) in PCCE 12.5(1) version all the communication between SPOG and other servers in the solution are strictly done via secure HTTP protocol.
Certificates are used in order to achieve seamless secure communication between SPOG and the other devices. In a self-signed certificate environment, certificate exchange between the servers becomes a must. This certificate exchange is also necessary to enable new features that are present in 12.5(1) version such as Smart Licensing, Webex Experience Management (WXM) and Customer Virtual Assistant (CVA).
Procedure
These are the the components from which self-signed certificates are exported and components into which self-signed certificates need to be imported.
(i) Principal AW server: This server requires certificate from:
- Windows platform:
- ICM: Router and Logger(Rogger){A/B}, Peripheral Gateway (PG){A/B}, all ADS and Email and Chat (ECE) servers.
- Note: IIS and diagnostic framework certificates are needed.
- CVP: CVP servers, CVP Reporting server.
- Note 1: Web Service Management (WSM) certificate from the servers are needed.
- Note 2: Certificates must be with Fully Qualified Domain Name (FQDN).
- ICM: Router and Logger(Rogger){A/B}, Peripheral Gateway (PG){A/B}, all ADS and Email and Chat (ECE) servers.
- VOS Platform: Cloud Connect, Cisco Virtual Voice Browser (VVB), Cisco Unified Call Manager (CUCM), Finesse, Cisco Unified Intelligent Center (CUIC), Live Data (LD), Identity Server (IDS) and other applicable servers.
Same applies for other ADS servers in the solution.
(ii) Router \ Logger Server: This server requires certificate from:
- Windows platform: All ADS servers IIS certificate.
(iii) CUCM PG Server: This server requires certificate from:
- VOS Platform: CUCM publisher.
- Note: This is needed to download the JTAPI client from CUCM server.
(iv) CVP Server: This server requires certificate from
- Windows platform: All ADS servers IIS certificate
- VOS Platform: Cloud Connect server for WXM Integration, VVB Server for Secure SIP and HTTP communication.
(v) CVP Reporting server: This server requires certificate from:
- Windows platform: All ADS servers IIS certificate
(vi) VVB Server: This server requires certificate from:
- Windows platform: CVP VXML Server (Secure HTTP), CVP Call server (Secure SIP)
The steps needed to effectively exchange the self-signed certificates in the solution are divided in three sections.
Section 1: Certificate Exchange Between CVP Servers and ADS Servers.
Section 2: Certificate Exchange Between VOS Platform Applications and ADS Server.
Section 3: Certificate Exchange Between Roggers, PGs and ADS Server.
Section 1: Certificate Exchange Between CVP and ADS Servers
The steps needed to complete this exchange successfully are:
Step 1. Export CVP Server WSM Certificates.
Step 2. Import CVP Server WSM Certificate to ADS Server.
Step 3. Export ADS Server Certificate.
Step 4. Import ADS Server to CVP Servers and CVP Reporting Server.
Step 1. Export CVP Server Certificates
Before you export the certificates from the CVP servers you need to regenerate the certificates with the FQDN of the server, otherwise, few features like Smart Licensing, CVA and the CVP synchronization with SPOG can experience problems.
Caution: Before you begin, you must do this:
- Obtain the keystore password. Run this command:
more %CVP_HOME%\conf\security.properties - Copy the %CVP_HOME%\conf\security folder to another folder.
- Open a Command window as Administrator to run the commands.
Note: You can streamline the commands used in this document by the use of the keytool parameter -storepass. For all CVP servers, you paste in the password obtained from the security.properties file specified. For the ADS servers you type the password: changeit
To regenerate the certificate on the CVP servers follow these steps:
(i) List the certificates in the server
%CVP_HOME%\jre\bin\keytool.exe -storetype JCEKS -keystore %CVP_HOME%\conf\security\.keystore -list
Note: The CVP Servers have these self-signed certificates: wsm_certificate , vxml_certificate , callserver_certificate. If you use the parameter -v of the keytool you are able to see more detailed information of each certificate. In addition you can add the ">" symbol at the end of the keytool.exe list command to send the output to a text file, for exmple: > test.txt
(ii) Delete the old self-signed certificates
CVP servers : command to delete the self-signed certificates:
%CVP_HOME%\jre\bin\keytool.exe -storetype JCEKS -keystore %CVP_HOME%\conf\security\.keystore -delete -alias wsm_certificate

%CVP_HOME%\jre\bin\keytool.exe -storetype JCEKS -keystore %CVP_HOME%\conf\security\.keystore -delete -alias vxml_certificate

%CVP_HOME%\jre\bin\keytool.exe -storetype JCEKS -keystore %CVP_HOME%\conf\security\.keystore -delete -alias callserver_certificate
CVP Reporting servers: command to delete the self-signed certificates:
%CVP_HOME%\jre\bin\keytool.exe -storetype JCEKS -keystore %CVP_HOME%\conf\security\.keystore -delete -alias wsm_certificate

%CVP_HOME%\jre\bin\keytool.exe -storetype JCEKS -keystore %CVP_HOME%\conf\security\.keystore -delete -alias callserver_certificate
Note: CVP Reporting servers have these self-signed certificates wsm_certificate, callserver_certificate.
(iii) Generate the new self-signed certificates with the FQDN of the server
CVP servers
Command to generate the self-signed certificate for WSM:
%CVP_HOME%\jre\bin\keytool.exe -storetype JCEKS -keystore %CVP_HOME%\conf\security\.keystore -genkeypair -alias wsm_certificate -keysize 2048 -keyalg RSA -validity XXXX
Specify the FQDN of the server, on the question what is your fist and last name?

Complete these other questions:
What is the name of your organizational unit?
[Unknown]: <specify OU>
What is the name of your organization?
[Unknown]: <specify the name of the org>
What is the name of your City or Locality?
[Unknown]: <specify the name of the city/locality>
What is the name of your State or Province?
[Unknown]: <specify the name of the state/province>
What is the two-letter country code for this unit?
[Unknown]: <specify two-letter Country code>
Specify yes for the next two inputs.
Perform the same steps for vxml_certificate and callserver_certificate:
%CVP_HOME%\jre\bin\keytool.exe -storetype JCEKS -keystore %CVP_HOME%\conf\security\.keystore -genkeypair -alias vxml_certificate -keysize 2048 -keyalg RSA -validity XXXX

%CVP_HOME%\jre\bin\keytool.exe -storetype JCEKS -keystore %CVP_HOME%\conf\security\.keystore -genkeypair -alias callserver_certificate -keysize 2048 -keyalg RSA -validity XXXX
Reboot the CVP call server.
CVP Reporting servers
Command to generate the self-signed certificates for WSM:
%CVP_HOME%\jre\bin\keytool.exe -storetype JCEKS -keystore %CVP_HOME%\conf\security\.keystore -genkeypair -alias wsm_certificate -keysize 2048 -keyalg RSA -validity XXXX
Specify the FQDN of the server for the query what is your fist and last name ? and follow the same steps as done with CVP servers.
Perform the same steps for callserver_certificate:
%CVP_HOME%\jre\bin\keytool.exe -storetype JCEKS -keystore %CVP_HOME%\conf\security\.keystore -genkeypair -alias callserver_certificate -keysize 2048 -keyalg RSA -validity XXXX
Reboot the Reporting servers.
Note: By default, the self-signed certificates are generated for two years. Use -validity XXXX to set the expiry date when certificates are regenerated, otherwise certificates are valid for 90 days. For most of these certificates, 3-5 years must be a reasonable validation time.
Here are some standard validity inputs:
|
One Year |
365 |
|
Two Years |
730 |
|
Three Years |
1095 |
|
Four Year |
1460 |
|
Five Years |
1895 |
|
Ten Years |
3650 |
Caution: In 12.5 certificates must be SHA 256, Key Size 2048, and encryption Algorithm RSA, use these parameters to set these values: -keyalg RSA and -keysize 2048. It is important that the CVP keystore commands include the -storetype JCEKS parameter. If this is not done, the certificate, the key, or worse the keystore can become corrupted.
(iv) Export wsm_Certificate from CVP and Reporting servers
a) Export WSM Certificate from each CVP server to a temporary location, and rename the certificate with a desired name. You can rename it as wsmcsX.crt. Replace "X" with a unique number or letter. that is wsmcsa.crt, wsmcsb.crt.
Command to export the self-signed certificates:
%CVP_HOME%\jre\bin\keytool.exe -storetype JCEKS -keystore %CVP_HOME%\conf\security\.keystore -export -alias wsm_certificate -file %CVP_HOME%\conf\security\wsm.crt
b) Copy the certificate from the path C:\Cisco\CVP\conf\security\wsm.crt, rename it to wsmcsX.crt and move it to a temporary folder on the ADS server.
Step 2. Import CVP Servers WSM Certificate to ADS Server
To import the certificate in ADS server you need to use the keytool which is a part of java toolset. There are couple of ways you can find the java home path where this tool is hosted.
(i) CLI command > echo %JAVA_HOME%

(ii) Manually via Advanced system setting, as shown in the image.
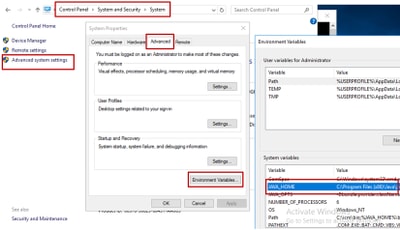
On PCCE 12.5 default path is C:\Program Files (x86)\Java\jre1.8.0_221\bin
Command to import the self-signed certificates:
keytool -keystore "C:\Program Files (x86)\Java\jre1.8.0_221\lib\security\cacerts" -import -storepass changeit -alias {fqdn_of_cvp} -file c:\temp\certs\wsmcsX.crt
Note: Repeat the commands for each CVP in the deployment and perform the same task on other ADS servers
d) Restart the Apache Tomcat service on the ADS servers.
Step 3. Export ADS Server Certificate
For CVP Reporting server you have to exports the ADS certificate and import i into the Reporting server. Here are the steps:
(i) On ADS server from a browser, navigate to the server url : https://{servername}
(ii) Save the certificate to a temporary folder, for example: c:\temp\certs and name the certificate as ADS{svr}[ab].cer
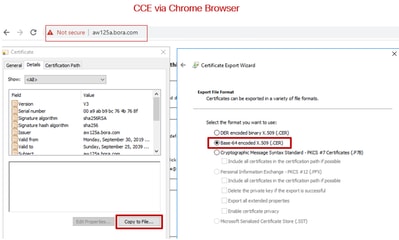
Note: Select the option Base-64 encoded X.509 (.CER).
Step 4. Import ADS Server to CVP Servers and Reporting Server
(i) Copy the certificate to CVP Servers and CVP Reporting server in the directory C:\Cisco\CVP\conf\security.
(ii) Import the certificate to CVP servers and CVP Reporting server.
%CVP_HOME%\jre\bin\keytool.exe -storetype JCEKS -keystore %CVP_HOME%\conf\security\.keystore -import -trustcacerts -alias {fqdn_of_ads} -file %CVP_HOME%\conf\security\ICM{svr}[ab].cer
Perform the same steps for other ADS servers.
(iii) Restart the CVP Servers and Reporting server
Section 2: Certificate Exchange Between VOS Platform Applications and ADS Server
The steps needed to complete this exchange successfully are:
Step 1. Export VOS Platform Application Server Certificates.
Step 2. Import VOS Platform Application Certificates to ADS Server.
This process is applicable for all VOS applications such as:
- CUCM
- VVB
- Finesse
- CUIC \ LD \ IDS
- Cloud Connect
Step 1. Export VOS Platform Application Server Certificates.
(i) Navigate to Cisco Unified Communications Operating System Administration page: https://FQDN:8443/cmplatform
(ii) Navigate to Security > Certificate Management and find the application primary server certificates in tomcat-trust folder.
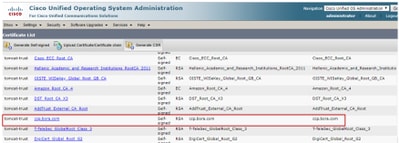
(iii) Select the certificate and click on download .PEM file to save it in a temporary folder on the ADS server.
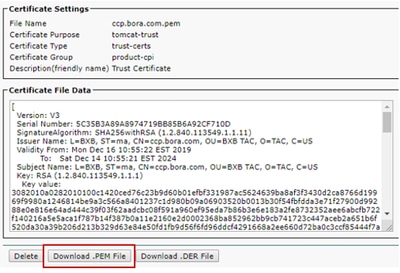
Note: Perform the same steps for the subscriber.
Step 2. Import VOS Platform Application to ADS Server
Path to run the Key tool: C:\Program Files (x86)\Java\jre1.8.0_221\bin
Command to import the self-signed certificates:
keytool -keystore "C:\Program Files (x86)\Java\jre1.8.0_221\lib\security\cacerts" -import -storepass changeit -alias {fqdn_of_vos} -file c:\temp\certs\vosapplicationX.cer
Restart the Apache Tomcat service on the ADS servers.
Note: Perform the same task on other ADS servers
Section 3: Certificate Exchange Between Roggers , PG and ADS Servers
The steps needed to complete this exchange successfully are:
Step 1: Export IIS Certificate from Rogger and PG Servers
Step 2: Export Diagnostic Framework Portico (DFP) Certificate from Rogger and PG Servers
Step 3: Import Certificates into ADS Servers
Step 1. Export IIS Certificate from Rogger and PG Servers
(i) On ADS server from a browser, navigate to the servers (Roggers , PG) url: https://{servername}
(ii)Save the certificate to a temporary folder, for example c:\temp\certs and name the cert as ICM{svr}[ab].cer
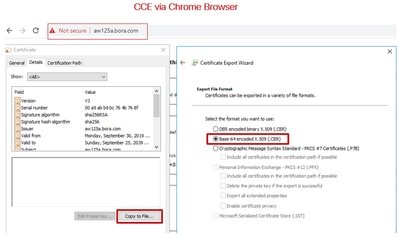
Note: Select the option Base-64 encoded X.509 (.CER).
Step 2. Export Diagnostic Framework Portico (DFP) Certificate from Rogger and PG Servers
(i) On ADS server from a browser, navigate to the servers (Roggers, PGs) DFP url : https://{servername}:7890/icm-dp/rest/DiagnosticPortal/GetProductVersion
(ii) Save the certificate to folder example c:\temp\certs and name the cert as dfp{svr}[ab].cer
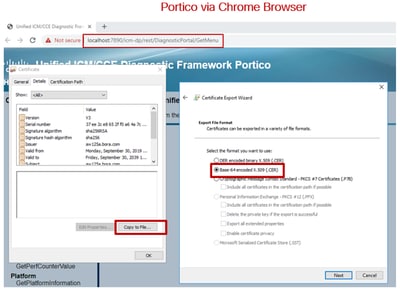
Note: Select the option Base-64 encoded X.509 (.CER).
Step 3. Import Certificates into ADS Server
Command to import the IIS self-signed certificates into ADS server. The path to run the Key tool: C:\Program Files (x86)\Java\jre1.8.0_221\bin.
keytool -keystore "C:\Program Files (x86)\Java\jre1.8.0_221\lib\security\cacerts"  -import -storepass changeit -alias {fqdn_of_server}_IIS -file c:\temp\certs\ ICM{svr}[ab].cer

Example: keytool -keystore "C:\Program Files (x86)\Java\jre1.8.0_221\lib\security\cacerts"  -import -storepass changeit -alias myrgra.domain.com_IIS -file c:\temp\certs\ICMrgra.cer
Note: Import all the server certificates exported into all ADS servers.
Command to import the diagnostic self-signed certificates into ADS server
keytool -keystore "C:\Program Files (x86)\Java\jre1.8.0_221\lib\security\cacerts"  -import -storepass changeit -alias {fqdn_of_server}_DFP -file c:\temp\certs\ dfp{svr}[ab].cer

Example: keytool -keystore "C:\Program Files (x86)\Java\jre1.8.0_221\lib\security\cacerts"  -import -storepass changeit -alias myrgra.domain.com_DFP -file c:\temp\certs\dfprgra.cer
Note: Import all the server certificates exported into all ADS servers.
Restart the Apache Tomcat service on the ADS servers.
Section 4: CVP CallStudio WEBService Integration
For detailed information about how to establish a secure communication for Web Services Element and Rest_Client element
Related Information
- CVP Configuration Guide: CVP Configuration Guide - Security
- UCCE Configuration Guide: UCCE Configuration Guide - Security
- PCCE Administration Guide: PCE Admin guide - Security
- UCCE Self-Signed Certificates: Exchange UCCE Self-Signed Certificates
- Install and Migrate to OpenJDK in CCE 12.5(1): CCE OpenJDK Migration
- Install and Migrate to OpenJDK in CVP 12.5(1): CVP OpenJDK Migration
Revision History
| Revision | Publish Date | Comments |
|---|---|---|
2.0 |
14-Jul-2022 |
Release 1.0 |
1.0 |
01-Apr-2020 |
Initial Release |
Contributed by Cisco Engineers
- Anuj BhatiaCisco TAC Engineer
- Robert RogierCisco TAC Engineer
- Ramiro AmayaCisco TAC Engineer
Contact Cisco
- Open a Support Case

- (Requires a Cisco Service Contract)
 Feedback