Configure Orchestration for UCCE
Available Languages
Download Options
Bias-Free Language
The documentation set for this product strives to use bias-free language. For the purposes of this documentation set, bias-free is defined as language that does not imply discrimination based on age, disability, gender, racial identity, ethnic identity, sexual orientation, socioeconomic status, and intersectionality. Exceptions may be present in the documentation due to language that is hardcoded in the user interfaces of the product software, language used based on RFP documentation, or language that is used by a referenced third-party product. Learn more about how Cisco is using Inclusive Language.
Contents
Introduction
This document describes the steps to configure Contact Center Enterprise Orchestration.
Prerequisites
Requirements
Cisco recommends that you have knowledge of these topics:
- Unified Contact Center Enterprise (UCCE) 12.x
- Packaged Contact Center Enterprise (PCCE) 12.x
- Cisco Voice Portal (CVP) 12.x
- Finesse 12.x
- Cisco Unified Intelligence Center (CUIC) 12.x
- Virtual Voice Browser (VVB) 12.x
Components Used
The information in this document is based on these software versions:
- Cloud Connect 12.6(1) ES3
- UCCE 12.5(1)
- Finesse 12.5(1)
- CUIC 12.5(1)
- CVP 12.5(1)
- VVB 12.5(1)
Note: Throughout the document, CUIC refers to both co-resident installs as well as standalone installs of CUIC, Live Data (LD), and Identity Server (IDS). Only when an instruction is specific to a sub-component, is that component referenced.
The information in this document was created from the devices in a specific lab environment. All of the devices used in this document started with a cleared (default) configuration. If your network is live, ensure that you understand the potential impact of any command.
Version Requirements
UCCE/PCCE 12.5(1) (either)
- ES66 (ES55 is a mandatory install prior to the installation of ES66)
- UCCE 12.5(2) MR
UCCE/PCCE 12.6(1)
- No additional requirements
Cloud Connect Version: 12.6(1)
- ES3
Finesse, CUIC, VVB: 12.5(1)
- ucos.orchestration.enable-12.5.1.cop.sgn
- ucos.keymanagement.cop.sgn
Finesse, CUIC, VVB: 12.6(1)
- ucos.keymanagement.cop.sgn
CVP 12.5(1)
- ES23
CVP 12.6(1)
- No additional requirements
Special notes for Cloud Connect upgrades.
Note: When you upgrade Cloud Connect from 12.5 to 12.6, it is mandatory to install ucos.keymanagement.cop.sgn first. Upgrade fails if this is not done.
Note: When you upgrade Cloud Connect from 12.5 to 12.6, it is mandatory to increase the disk from 146GB to 246GB. If this step has been missed prior to the upgrade, perform these steps:
Step 1: Stop the Cloud Connect server.
Step 2: Expand the disk in vSphere to 246GB.
Step 3: Start the Cloud Connect server.
VOS expands the partitions automatically. This ensures that the downloaded updates do not cause an out of space condition on the common partition.
Overview
CCE Orchestration is supported from Cloud Connect 12.6(1) onwards.
Cloud Connect server version 12.6 (1) supports orchestration in these scenarios:
- CCE 12.5 ES/COP and Windows Updates can be orchestrated from 12.6 Cloud Connect server
- CCE 12.5 to 12.6 software upgrade can be orchestrated from 12.6 Cloud Connect server
Setup and Configuration Steps
Step 1. Generate the Artifactory API Key
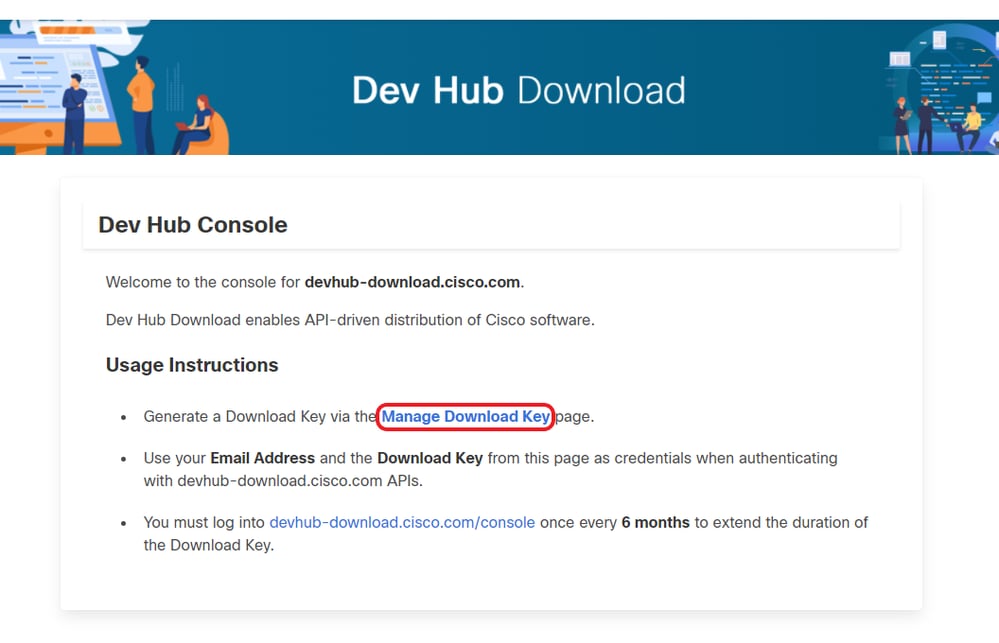
- Login to https://devhub-download.cisco.com/console/ with your CCO User Name and Password.
- Select Manage Download Key on the console page as shown in the image.
- Click Generate Key option to Generate the API key. Option to View and Revoke Key is available in Manage Download Key page.
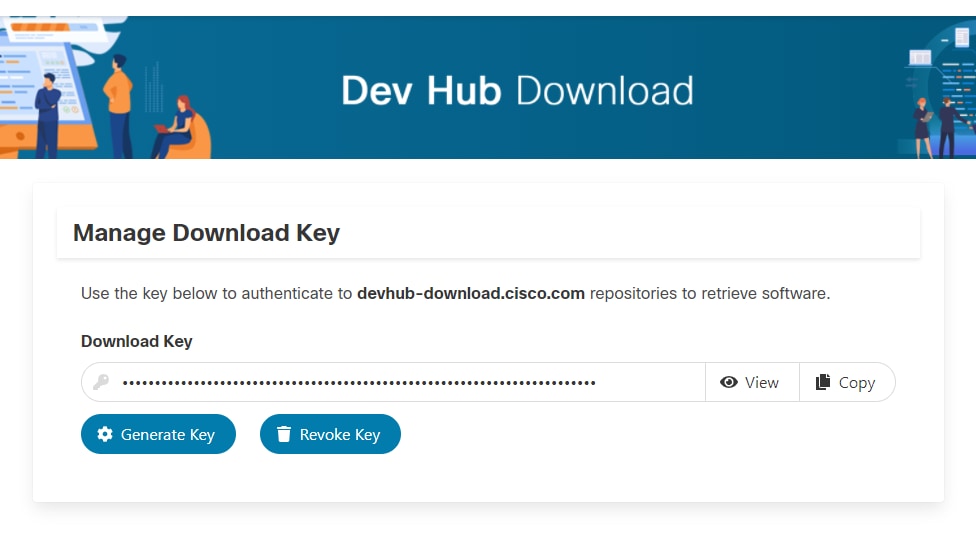
- Select the Copy button to copy the API key to the clipboard.
Note: It is mandatory for the CCO ID used to generate API keys to have necessary software upgrade entitlements. The CCO ID you use must have a valid SWSS (service contract) or Flex subscription in order to have the necessary entitlement.
Note: You must log into https://devhub-download.cisco.com/console once every six months to extend the validity of the API key.
Step 2. Configure the Artifactory URL and API Key on Cloud Connect
- Cisco hosts all the software artifacts in a cloud-based artifactory which is used by Cloud Connect server to download and notify new updates.
- Cloud Connect server must be configured with Cisco hosted software Artifactory URL, Repository Name, and API Key.
1. Run the command, utils image-repository set to configure artifactory download as shown in the image.

a. Provide the artifactory URL, https://devhub-download.cisco.com/binaries.
b. Provide the artifactory repository name, ent-platform-release-external.
c. Paste the API key that you generated. API key is shown as asterisks for security reasons.
2. Run the command, utils image-repository show to view the configured Artifactory URL, Repository Name, and API Key in the Cloud Connect server as shown in the image.

Note: Before the utils image-repository set command is run on the CLI, please navigate to the EULA URL (https://software.cisco.com/download/eula) and accept EULA. If this is not done the utils image-repository set command fails with error: CCO ID used to generate API key is not compliant to End User License Agreement, please use a valid CCO ID.
See Cisco bug ID CSCvy78680 for more information.

Note: Both these commands can be executed only from the publisher node of the Cloud Connect server.
The replication of image repository configuration occurs automatically from the publisher node to the subscriber node when the utils image-repository set command is executed with successful results on the publisher node.
Note: The utils image-repository set CLI can be used anytime to change the export restricted vs unrestricted software option in the deployment.
Restart the Cloud Connect server to enforce the cleanup and download of restricted vs unrestricted software. Download starts 10 minutes post restart.
Note: Notes on artifactory operations:
Upon successful configuration of artifactory details, artifacts are downloaded locally to the Cloud Connect server at 02:00 A.M. server time.
Orchestration operations, such as patch install, rollback, or upgrade can be performed only after the artifacts are downloaded.
If the artifacts have to be downloaded immediately after the configuration steps, then the Cloud Connect server can be restarted and the download starts 10 minutes after restart.
Usage of orchestration related CLI commands are blocked when download starts and this duration depends on the number of artifacts to be downloaded.
Note: If the Cloud Connect server requires a proxy to access the Internet, then ES3 or higher must be installed. See UCCE Installation and Upgrade Guide for details on proxy configuration.
Step 3. Onboard VOS Nodes to Orchestration Control Node
Prerequisites:
- Ensure all system version requirements are met.
- Import the certificates from the Cloud Connect cluster (Pub and Sub) into the tomcat-trust on all target VOS servers (tomcat for self-signed and root/intermediate for CA-signed)
To onboard each Finesse, CUIC, VVB, IDS, LD system to a Cloud Connect server, run the command, utils system onboard initiate from the publisher node of the respective VOS cluster as shown in the image.

1. Provide the FQDN of the Cloud Connect publisher node.
2. Provide the application user name for the Cloud Connect server.
3. Provide the application user password for the Cloud Connect server.
- The publisher node of the Cloud Connect server must be online when the onboard initiate is run from VOS node.
- When the onboard initiate is run from VOS node, FQDN of the Cloud Connect publisher server must be used.
- utils system onboard initiate command must be run on all of the VOS Publishers (Finesse, CUIC, LD, IdS, all VVBs)
Note: If the system (cluster) onboards to the Cloud Connect server with partial error, check the reason for the error and correct it. Then, run the utils system onboard update command instead of the utils system onboard initiate command.
Note: Onboard is allowed only when both the publisher and subscriber nodes in the Cloud Connect server are reachable.
Note: If the Cloud Connect server is corrupted and redeployed with a fresh install, the administrator has to run utils system onboard remove from the VOS node and then run utils system onboard initiate to onboard the VOS nodes again.
Note: To verify/find the Cloud Connect Servers' application user name, run the command run sql select * from applicationuser on the Cloud Connect Servers' CLI.
Step 4: Onboard Windows Nodes to Orchestration Control Node
The onboard process helps to establish a password-less connection between the Cloud Connect node and the Windows nodes. To onboard the Windows-based nodes to Orchestration control node, perform these steps:
Configure SSH public key on the Windows nodes:
a. Navigate to %Users%\<logonUser>\.ssh\ and create authorized_keys file, if it does not exist. (The authorized_keys extension type is File and cannot be modified)
Note: The user must not be removed from the system and must be a domain user with either domain admin or local administration priviligies.
b. Open the browser and enter the Cloud Connect publisher URL: https://<CloudConnectIP>:8445/inventory/controlnode/key
c. Provide your Cloud Connect application user credentials. Upon successful authentication, a REST API response fetches the Cloud Connect Public SSH Key.
d. Copy this public key value into the authorized_keys file in %Users%\<logonUser>\.ssh\.
An example of the output from the URL is shown. In the output, copy only the portion that starts with ssh-rsa and ends with root@localhost into the authorized_keys file.
{"category":"PUBLISHER","hostName":"cc125clouda.uclabservices.com","publicKey":"ssh-rsa AAAAB3NzaC1yc2EAAAADAQABAAABAQDfJDl7RUZ/Umdflp5r3IqMaoV8WSrr7iLBOWindC0lGeGPYkprVW2xq6H6I8FuEjnBkrfEe8DUahVDVe783lFTb9nGdgRxAF7LR1MpKFOqOV9WRY8btYwRb0ZViO/GDupB2jBNaAj4M2EPPkKoC5OhcZrZ+4Zry/GEMd9uVwziyOh/nBxGuqg28euMiU2+G7m3qE3wo4zoJlvyOHkoM4tKzpiqqn0VdIRQ5xPhOl771AW6Rsiq4naG0f/hmVF347goavmF0O0lf1CbF4RfMoO1zxxlj+zi7RE1jl9aRMtzRmZC4uyIIQFtrZBbBbkzbk8dJo1u9A7Ds1rUcdEuc0Vv root@localhost"}The authorized_keys file for the example is shown.
ssh-rsa AAAAB3NzaC1yc2EAAAADAQABAAABAQDfJDl7RUZ/Umdflp5r3IqMaoV8WSrr7iLBOWindC0lGeGPYkprVW2xq6H6I8FuEjnBkrfEe8DUahVDVe783lFTb9nGdgRxAF7LR1MpKFOqOV9WRY8btYwRb0ZViO/GDupB2jBNaAj4M2EPPkKoC5OhcZrZ+4Zry/GEMd9uVwziyOh/nBxGuqg28euMiU2+G7m3qE3wo4zoJlvyOHkoM4tKzpiqqn0VdIRQ5xPhOl771AW6Rsiq4naG0f/hmVF347goavmF0O0lf1CbF4RfMoO1zxxlj+zi7RE1jl9aRMtzRmZC4uyIIQFtrZBbBbkzbk8dJo1u9A7Ds1rUcdEuc0Vv root@localhost
e. Repeat steps b, c, and d to fetch the Cloud Connect Subscriber public key (if Cloud Connect is HA setup).
Note: Cloud Connect publisher and subscriber public keys must be copied into a single authorized_keys file. The publisher and subscriber entries must be in separate lines and must not use any extra space, comma, or any special characters at the end of the line.
f. Restart the OpenSSH services:
- OpenSSH SSH Server
- OpenSSH Authentication Agent
Troubleshoot the SSH login with these steps:
a. Navigate to C:\ProgramData\ssh and open the file sshd_config in a text editor.
b. Locate the section of this file that begins # Logging
c. Uncomment both the SyslogFacility and LogLevel lines.
d. Change the SyslogFacility to LOCAL0 and the LogLevel to DEBUG as shown in the example
# Logging
SyslogFacility LOCAL0
LogLevel DEBUG
e. Save the sshd_config file, then restart the OpenSSH SSH Server service.
f. The log file is written to C:\ProgramData\ssh\logs\sshd.log
Step 5: Update the inventory.conf file
1. Run the command, utils system inventory export to upload the inventory to an SFTP server as shown in the image.

a. Provide the IP address or FQDN of an SFTP server.
b. Provide the user name that has read/write access to the SFTP server.
c. Provide the password for the user.
d. Provide the directory to write the inventory file in UNIX/Linux format.
Example: /voice/ipcc/Enterprise/Orchestration
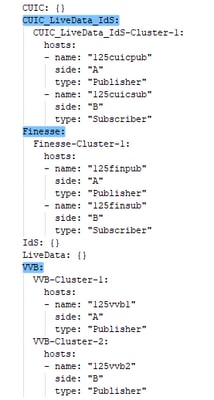
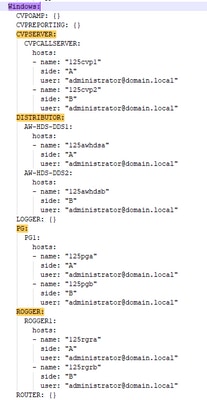
2. Edit the inventory to include the VOS and Windows components.
- The syntax, alignment, and indentation must be exactly the same as in the inventory file.
- CRLF line endings must be UNIX-Style. Hence a Linux-based or a Mac OS-based editor can be used to create the Windows inventory file. A program like Notepad++ can also be used.
- The component names, such as CVPREPORTING, ROGGER, PG, and so on, must be in upper case.
Note: The inventory.conf file is sensitive to indentations, please refer/use images and example configuration files
Example files that show proper format can be downloaded here: https://github.com/CXCCSummit/Repository
VOS Server example is shown in image:
Windows Server example is shown in image:
3. Edit the strings in the inventory file, as required.
deploymentName: Provide a unique name for the deployment.
- This name appears in the subject line of the email notification. If it is not configured, the subject line of the email notification contains only the type of procedure and the overall status.
deploymentType: This field is used for compatibility check in the upgrade, rollback, or switch forward procedures.

The supported deployment types are:
- UCCE-2000-Agents
- UCCE-4000-Agents
- PCCE-2000-Agents
- PCCE-4000-Agents
- HCS-CC-2000-Agents
- HCS-CC-4000-Agents
Note: Review these notes on the supported deployment types.
Orchestration is not supported for 12000, 24000, and 26000 agent deployment models.
HCS-SCC (Small Contact Center) deployment model is currently not supported for Orchestration.
Ensure that the values entered in this field conform to the supported deployment type list format. The deployment type is case sensitive.
Note: The administrator can update or edit the default values, if required, based on their deployment type and preferred deployment name.
4. Run the command, utils system inventory import on the Cloud Connect publisher node to import the updated inventory from the SFTP server as shown in the image.

a. Provide the IP address or FQDN of an SFTP server.
b. Provide the user name that has read/write access to the SFTP server.
c. Provide the password for the user.
d. Provide the directory to write the inventory file in UNIX/Linux format.
Example: /voice/ipcc/Enterprise/Orchestration
e. Answer 'yes' to allow the new inventory file to replace the current inventory.
Step 6: Validate Onboarded Nodes for Orchestration
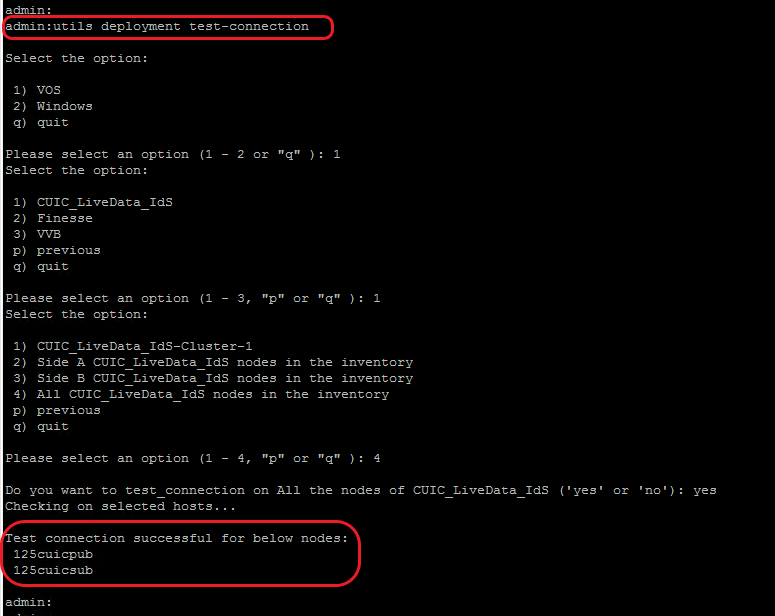
To validate the VOS and Windows nodes have been onboarded successfully, and to check whether the Orchestration feature is ready to be used, run the command, utils deployment test-connection as shown in the image.
Troubleshooting
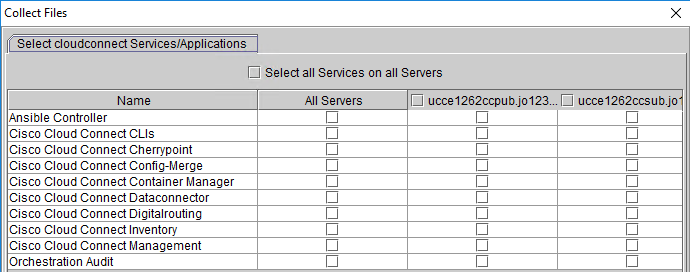
Orchestration Logs in RTMT
To download RTMT from Cloud Connect, access https://FQDN:8443/plugins/CcmServRtmtPlugin.exe.
You can also view the below-mentioned logs using the Real-Time Monitoring Tool (RTMT):
Orchestration Logs through CLI
Audit Logs
Audit trial for administrative operation that is initiated from Orchestration CLI on Cloud Connect is captured in Orchestration Audit logs.
Audit trial captures the user, action and date/time details of the CLI operation.
- file get activelog orchestration-audit/audit.log*
CLI Logs
- file get activelog platform/log/cli*.log
Ansible Logs
Ansible log, generated during the running of utils patch-manager ms-patches install CLI, captures the details of the Windows updates, along with the Knowledge Base (KB) number of the updates that were installed on the target node.
- Current transaction logs: file get activelog ansible/ansible.log
- Historical logs: file get activelog ansible/ansible_history.log
Operation Status HA Synchronization Logs
- file get activelog ansible/sync_ansible_log_to_remote_cc.log
Email Notification-related Logs
- Current transaction logs:file get activelog ansible/ansible_email_cron.log
Software Download Logs
- Current transaction logs: file get activelog ansible/software_download_ansible.log
- Historical logs: file get activelog ansible/software_download_ansible_history.log
- Process logs: file get activelog ansible/software_download_process.log
List the log files in respective directories
- file list activelog ansible/* detail
file list activelog platform/log/cli*.log detail
Revision History
| Revision | Publish Date | Comments |
|---|---|---|
1.0 |
11-Oct-2022 |
Initial Release |
Contributed by Cisco Engineers
- Joshua RajaCisco TAC Engineer
- Robert W RogierCisco TAC Engineer
Contact Cisco
- Open a Support Case

- (Requires a Cisco Service Contract)
 Feedback