Introduction
This document describes how to secure Session Initiation Protocol (SIP) signaling in Contact Center Enterprise (CCE) comprehensive call flow.
Prerequisites
Certificates generation and import are out of the scope of this document, so certificates for Cisco Unified Communication Manager (CUCM), Customer Voice Portal (CVP) call server, Cisco Virtual Voice Browser (CVVB), and Cisco Unified Border Element (CUBE) have to be created and imported to the respective components. If you use self-signed certificates, certificate exchange has to be done among different components.
Requirements
Cisco recommends that you have knowledge of these topics:
Components Used
The information in this document is based on Package Contact Center Enterprise (PCCE), CVP, CVVB, and CUCM version 12.6, but it is also applicable to the earlier versions.
The information in this document was created from the devices in a specific lab environment. All of the devices used in this document started with a cleared (default) configuration. If your network is live, ensure that you understand the potential impact of any command.
Configure
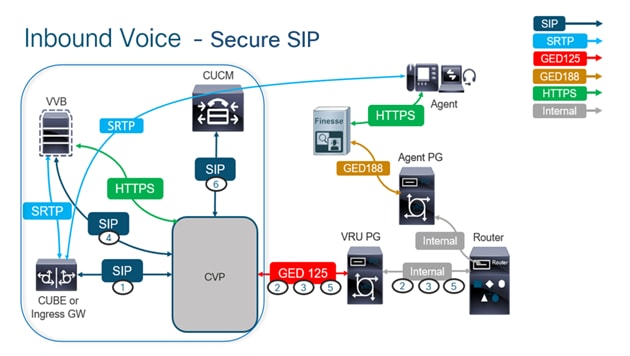
The next diagram shows the components engaged in SIP signaling in the contact center comprehensive call flow. When a voice call comes to the system, first comes via the ingress gateway or CUBE, so start secure SIP configurations on CUBE. Next, configure CVP, CVVB, and CUCM.
Task 1. CUBE Secure Configuration
In this task, configure CUBE to secure the SIP protocol messages.
Required configurations:
- Configure a Default Trustpoint for the SIP User Agent (UA)
- Modify the Dial-peers to use Transport Layer Security (TLS)
Steps:
- Open Secure Shell (SSH) session to CUBE.
- Run these commands to have the SIP stack use the Certificate Authority (CA) certificate of the CUBE. CUBE establishes a SIP TLS connection from/to CUCM (198.18.133.3) and CVP (198.18.133.13).
conf t
sip-ua
transport tcp tls v1.2
crypto signaling remote-addr 198.18.133.3 255.255.255.255 trustpoint ms-ca-name
crypto signaling remote-addr 198.18.133.13 255.255.255.255 trustpoint ms-ca-name
exit

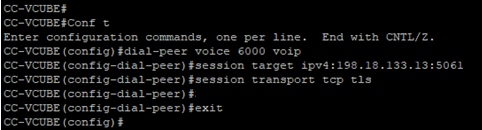
- Run these commands to enable TLS on the outgoing dial peer to CVP. In this example, dial-peer tag 6000 is used to route calls to CVP.
Conf t
dial-peer voice 6000 voip
session target ipv4:198.18.133.13:5061
session transport tcp tls
exit
Task 2. CVP Secure Configuration
In this task, configure the CVP call server to secure the SIP protocol messages (SIP TLS).
Steps:
- Log in to
UCCE Web Administration.
- Navigate to
Call Settings > Route Settings > SIP Server Group.

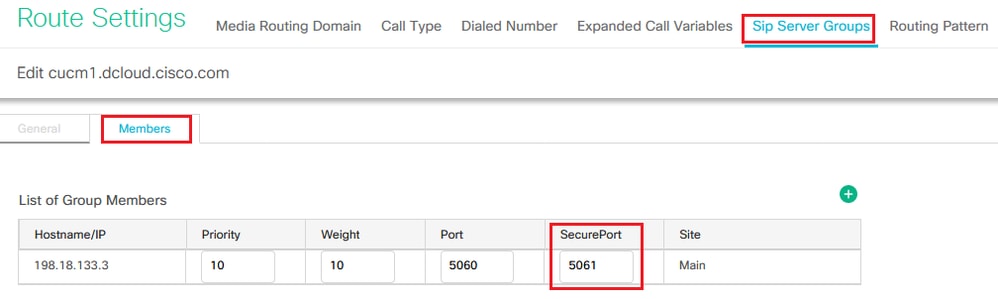
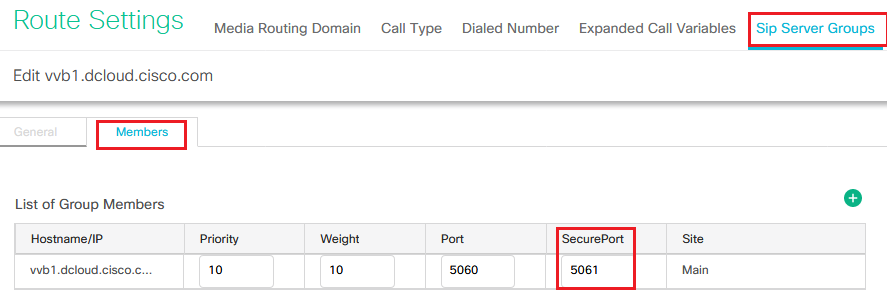
Based on your configurations, you have SIP Server Groups configured for CUCM, CVVB, and CUBE. You need to set secure SIP ports to 5061 for all of them. In this example, these SIP server groups are used:
cucm1.dcloud.cisco.com for CUCMvvb1.dcloud.cisco.com for CVVBcube1.dcloud.cisco.com for CUBE
- Click
cucm1.dcloud.cisco.com and then in the Members tab, which shows the details of the SIP Server Group Configuration. Set SecurePort to 5061 and click Save .
- Click
vvb1.dcloud.cisco.com and then in the Members tab. Set SecurePort to 5061 and click Save.
Task 3. CVVB Secure Configuration
In this task, configure CVVB to secure the SIP protocol messages (SIP TLS).
Steps:
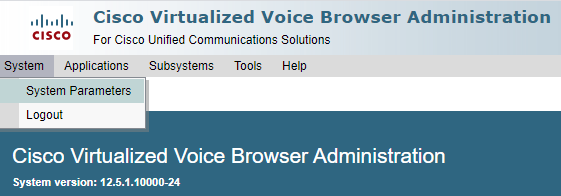
- Log in to
Cisco VVB Administration page.
- Navigate to
System > System Parameters.
- In the
Security Parameters section, choose Enable for TLS(SIP) . Keep Supported TLS(SIP) version as TLSv1.2.

- Click Update. Click
Ok when prompted to restart CVVB engine.

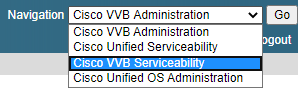
- These changes require a restart of the Cisco VVB engine. In order to restart the VVB engine, navigate to
Cisco VVB Serviceability then click Go.
- Navigate to
Tools > Control Center – Network Services.
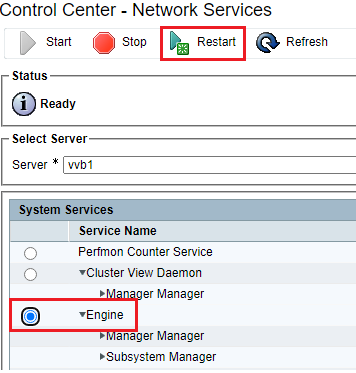
- Choose
Engine and click Restart.
Task 4. CUCM Secure Configuration
In order to secure SIP messages on CUCM, perform the next configurations:
- Set CUCM Security Mode to Mixed Mode
- Configure SIP Trunk Security Profiles for CUBE and CVP
- Associate SIP Trunk Security Profiles to Respective SIP Trunks
- Secure Agents’ Device Communication with CUCM
Set CUCM Security Mode to Mixed Mode
CUCM supports two security modes:
- Non-secure mode (default mode)
- Mixed mode (secure mode)
Steps:
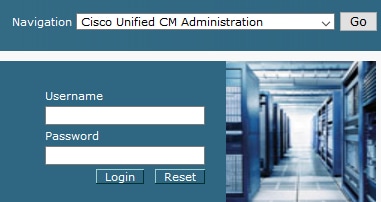
- In order to set the security mode to Mixed Mode, log in to
Cisco Unified CM Administration interface.
- After you have successfully logged in to CUCM, navigate to
System > Enterprise Parameters.
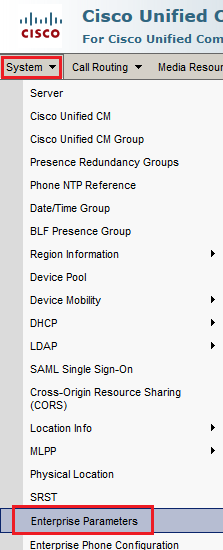
- Underneath the
Security ParametersCluster Security Mode is set to 0.

- If Cluster Security Mode is set as 0, this means cluster security mode is set to non-secure. You need to enable the mixed Mode from CLI.
- Open an SSH session to the CUCM.
- After you have successfully logged to CUCM via SSH, run this command:
utils ctl set-cluster mixed-mode
- Type
y and click Enter when prompted. This command sets cluster security mode to mixed mode.

- For the changes to take effect, restart
Cisco CallManager and Cisco CTIManager services.
- In order to restart the services, navigate and log in to
Cisco Unified Serviceability
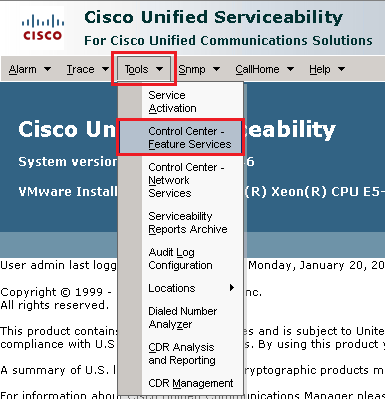
- After you have successfully logged in, navigate to
Tools > Control Center – Feature Services.
- Choose the server then click
Go.

- Underneath the CM services, choose
Cisco CallManager Restart button on top of the page.
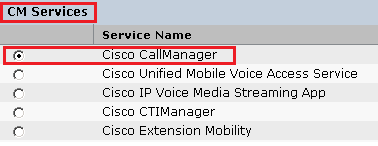
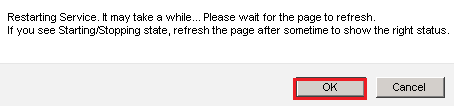
- Confirm the pop-up message and click
OK. Wait for the service to successfully restart.
- After a successful restart of
Cisco CallManager, choose Cisco CTIManager then click Restart button to restart Cisco CTIManager service.
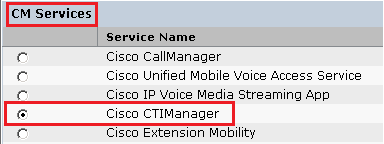
- Confirm the pop-up message and click
OK. Wait for the service to successfully restart.

- After services successfully restart, verify cluster security mode is set to mixed mode, navigate to CUCM administration as explained in Step 5. then check the
Cluster Security Mode. Now it must be set to 1.

Configure SIP Trunk Security Profiles for CUBE and CVP
Steps:
- Log in to
CUCM administration interface.
- After successful login to CUCM, navigate to
System > Security > SIP Trunk Security Profile
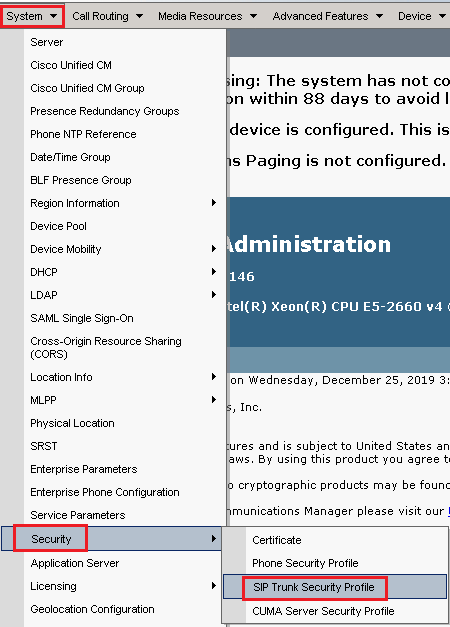
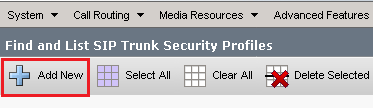
- On the top left, click
Add New in order to add a new profile.
- Configure
SIP Trunk Security Profile as shown in this image then click Save at the bottom left of the page to Save it.
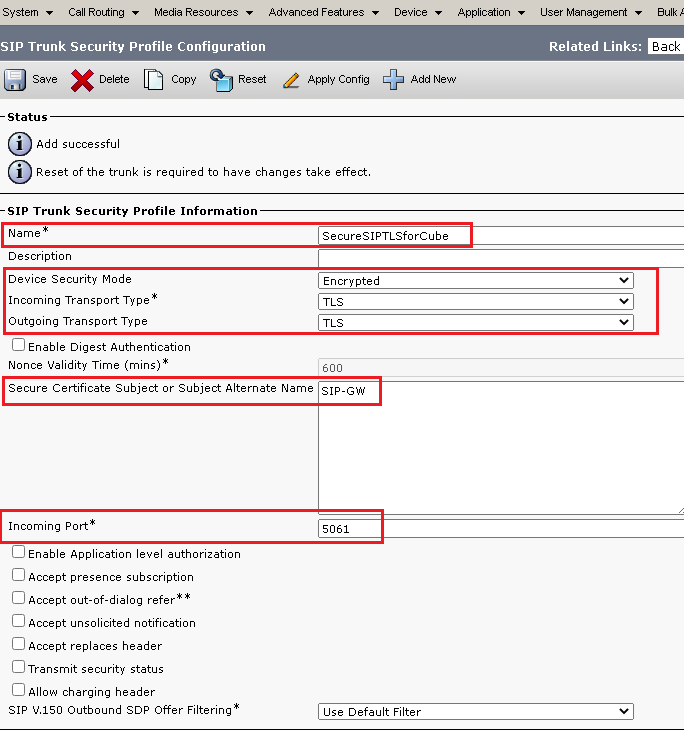
5. Ensure to set the Secure Certificate Subject or Subject Alternate Name to the Common Name (CN) of the CUBE certificate as it must match.
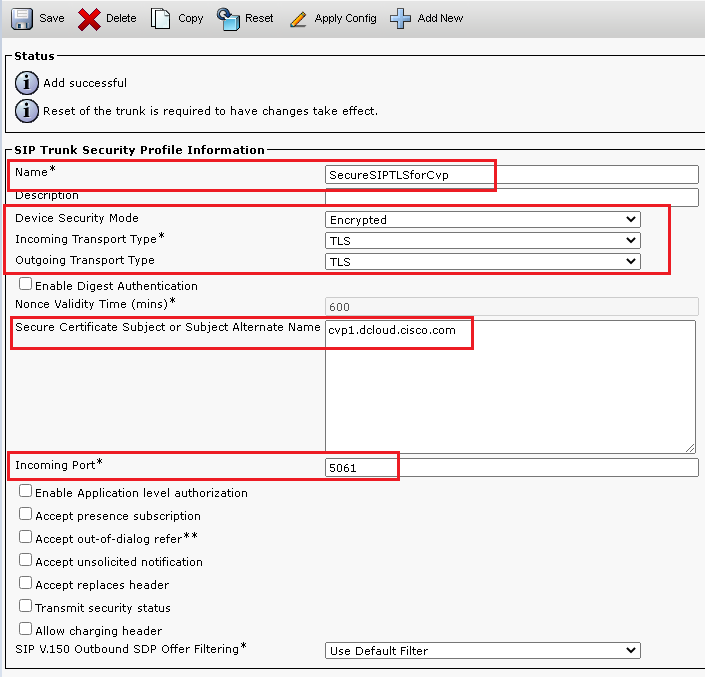
6. Click Copy button and change the Name to SecureSipTLSforCVP and the Secure Certificate Subject to the CN of the CVP call server certificate as it must match. Click Save
Associate SIP Trunk Security Profiles to Respective SIP Trunks
Steps:
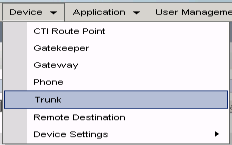
- On the CUCM Administration page, navigate to
Device > Trunk.
- Search for CUBE trunk. In this example, the CUBE trunk name is
vCube . Click Find.
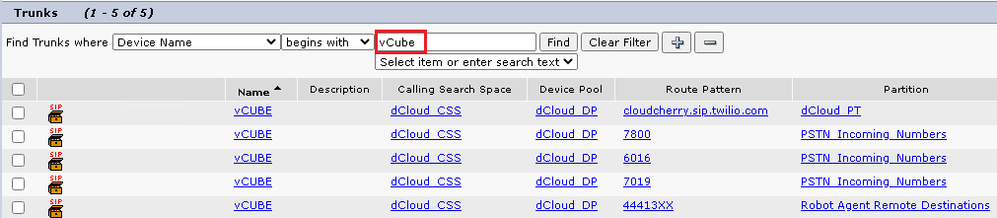
- Click vCUBE to open the vCUBE trunk configuration page.
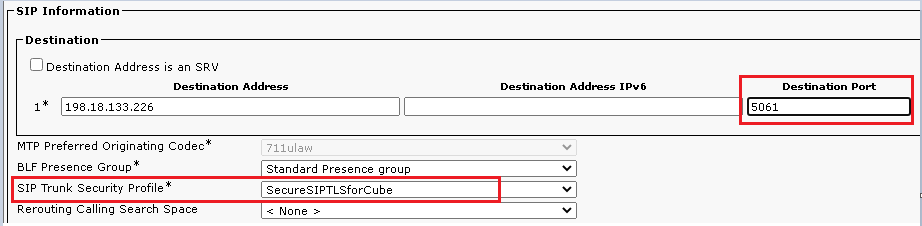
- Scroll down to
SIP Information section, and change the Destination Port to 5061.
- Change
SIP Trunk Security Profile to SecureSIPTLSForCube.
- Click
SaveRest in order to Save and apply changes.

- Navigate to
Device > Trunk, and search for CVP trunk. In this example, the CVP trunk name is cvp-SIP-Trunk . Click Find.

- Click
CVP-SIP-Trunk in order to open the CVP trunk configuration page.
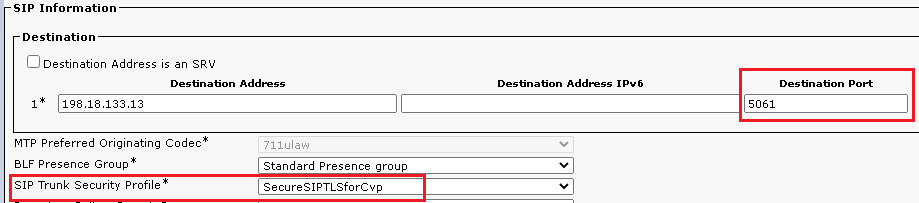
- Scroll down to
SIP Information section, and change Destination Port to 5061 .
- Change
SIP Trunk Security Profile to SecureSIPTLSForCvp.
- Click
Save then Rest in order to save and apply changes.


Secure Agents’ Device Communication with CUCM
In order to enable security features for a device, you must install a Locally Significant Certificate (LSC) and assign a security profile to that device. The LSC possesses the public key for the endpoint, which is signed by the Certificate Authority Proxy Function (CAPF) private key. It is not installed on phones by default.
Steps:
- Log in to
Cisco Unified Serviceability Interface.
- Navigate to
Tools > Service Activation.
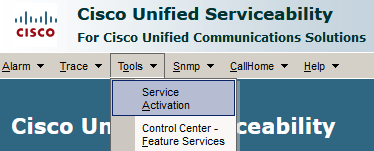
- Choose the CUCM server and Click
Go .

- Check
Cisco Certificate Authority Proxy Function and click Save to activate the service. Click Ok to confirm.

- Ensure the service is activated then navigate to
Cisco Unified CM Administration.
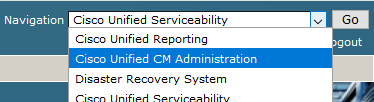
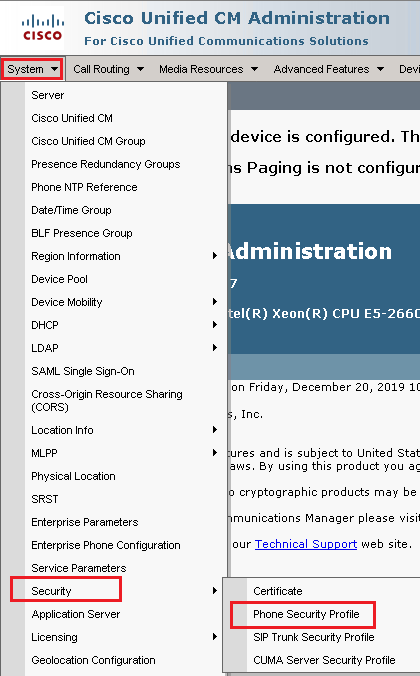
- After you have successfully logged in to CUCM administration, navigate to
System > Security > Phone Security Profile in order to create a device security profile for the agent device.
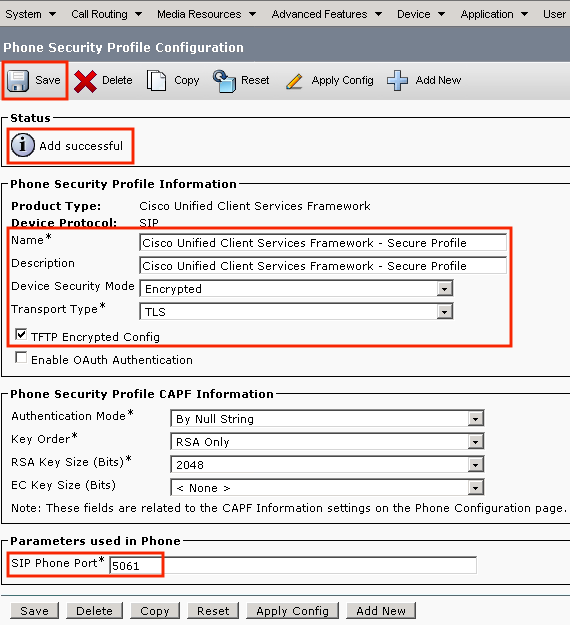
- Find the security profiles respective to your agent device type. In this example, a soft phone is used, so choose
Cisco Unified Client Services Framework - Standard SIP Non-Secure Profile . Click Copy in order to copy this profile.

- Rename the profile to
Cisco Unified Client Services Framework - Secure Profile,change the parameters as shown in this image, then click Save at the top left of the page.
- After the successful creation of the phone device profile, navigate to
Device > Phone.
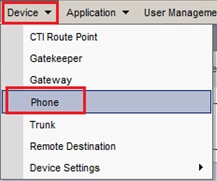
- Click
Find in order to list all available phones, then click agent phone.
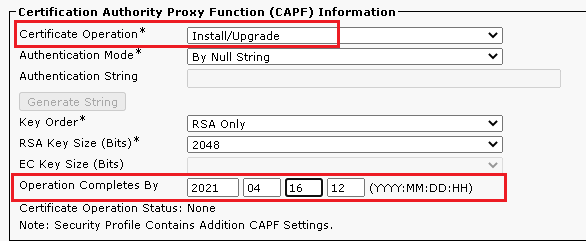
- Agent phone configuration page opens. Find
Certification Authority Proxy Function (CAPF) Information section. In order to install LSC, set Certificate Operation to Install/Upgrade and Operation Completes by to any future date.
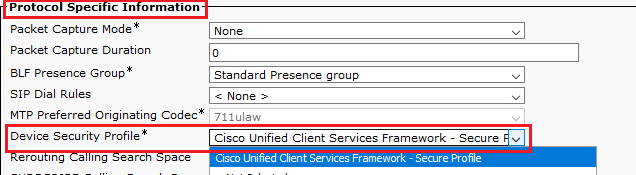
- Find
Protocol Specific Information section. Change Device Security Profile to Cisco Unified Client Services Framework – Secure Profile.
- Click
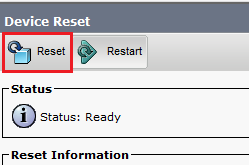
Save at the top left of the page. Ensure the changes are saved successfully and click Reset.
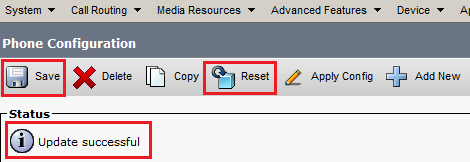
- A pop-up window opens, click
Reset to confirm the action.
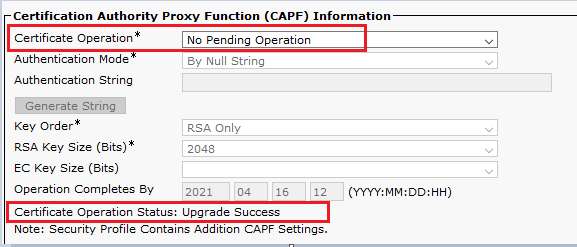
- After the agent device registers once again with CUCM, refresh the current page and verify the LSC is installed successfully. Check
Certification Authority Proxy Function (CAPF) Information section, Certificate Operation must be set to No Pending Operation, and Certificate Operation Status is set to Upgrade Success .
- Refer Steps. 7-13 in order to secure other agents devices that you want to use to secure SIP with CUCM.
Verify
In order to validate SIP signaling is properly secured, perform these steps:
- Open SSH session to vCUBE, run the command
show sip-ua connections tcp tls detail , and confirm that there is no TLS connection established at the moment with CVP (198.18.133.13).
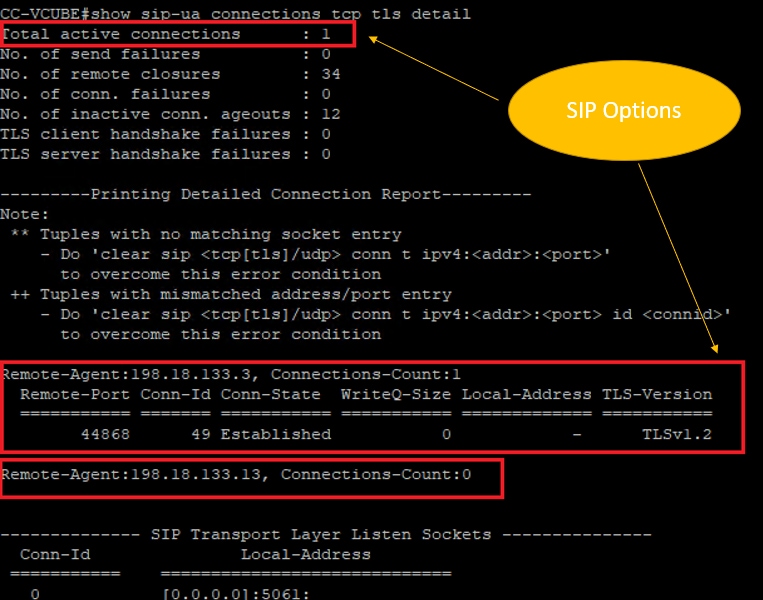
Note: At this moment, only one active TLS session with CUCM, for SIP Options is enabled on CUCM (198.18.133.3). If no SIP Options are enabled, no SIP TLS connection exists.
- Log in to CVP and start Wireshark.
- Make a test call to contact center number.
- Navigate to the CVP session; on Wireshark, run this filter in order to check SIP signaling with CUBE:
ip.addr == 198.18.133.226 && tls && tcp.port==5061
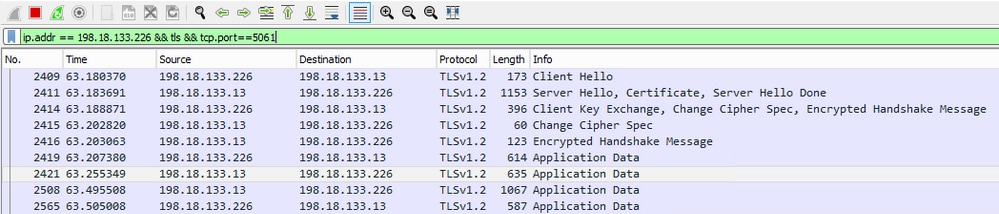
Check: Is SIP over TLS connection established? If yes, the output confirms SIP signals between CVP and CUBE are secured.
5. Check the SIP TLS connection between CVP and CVVB. In the same Wireshark session, run this filter:
ip.addr == 198.18.133.143 && tls && tcp.port==5061
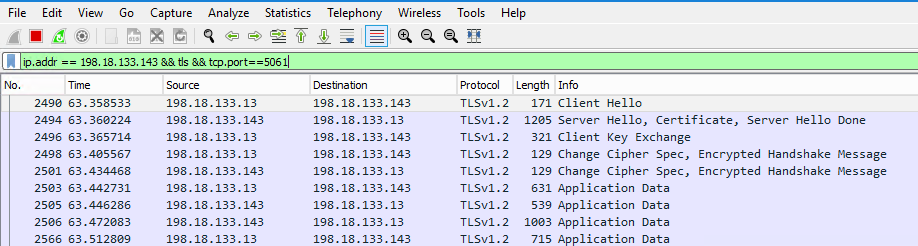
Check: Is SIP over TLS connection established? If yes, the output confirms SIP signals between CVP and CVVB are secured.
6. You can also verify the SIP TLS connection with CVP from CUBE. Navigate to the vCUBE SSH session, and run this command to check secure sip signals:
show sip-ua connections tcp tls detail
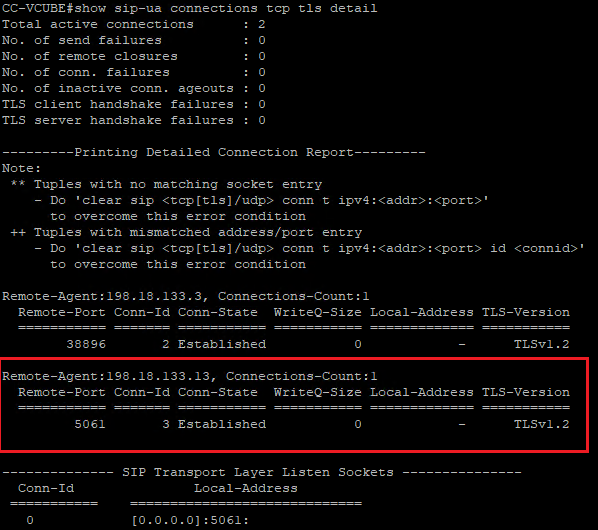
Check: Is SIP over TLS connection established with CVP? If yes, the output confirms SIP signals between CVP and CUBE are secured.
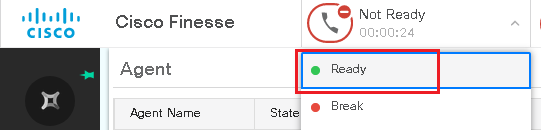
7. At this moment, the call is active and you hear Music on Hold (MOH) as there is no agent available to answer the call.
8. Make the agent available to answer the call.
.
9. Agent gets reserved and the call is routed to him/her. Click Answer to answer the call.
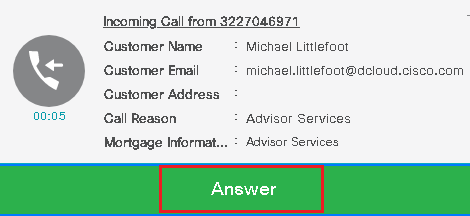
10. Call connects to the agent.
11. In order to verify SIP signals between CVP and CUCM, navigate to the CVP session, and run this filter in Wireshark:
ip.addr == 198.18.133.3 && tls && tcp.port==5061
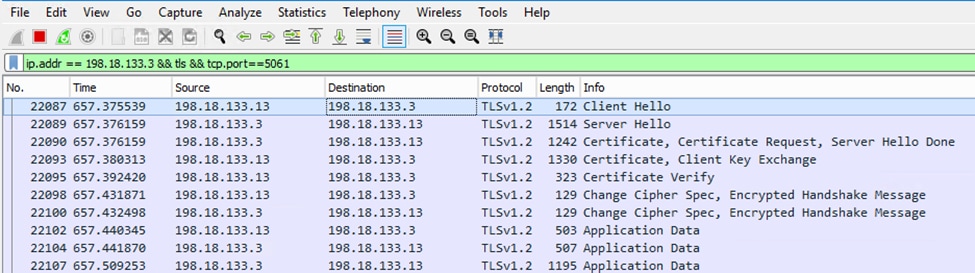
Check: Are all SIP communications with CUCM (198.18.133.3) over TLS? If yes, the output confirms SIP signals between CVP and CUCM are secured.
Troubleshoot
If TLS is not established, run these commands on CUBE to enable debug TLS to troubleshoot:
Debug ssl openssl errorsDebug ssl openssl msgDebug ssl openssl states
 Feedback