Introduction
This document describes the configuration of Calendar in Unified Contact Center Express (Unified CCX) and its use case. This allows to change the schedule of Contact Center from the administration/Finesse Desktop page rather than from the script. Currently, the calendar functionality is integrated with Voice and Chat channels from UCCX release 12.0 and later.
Prerequisites
Requirements
Cisco recommends that you have knowledge of these topics:
- Script
- Bubble Chat
- UCCX 12.0 and later
- CCP 12.0 and later
Components Used
The information in this document is based on UCCX version 12.0 and above.
The information in this document was created from the devices in a specific lab environment. All of the devices used in this document started with a cleared (default) configuration. If your network is live, ensure that you understand the potential impact of any command.
Configure
Create a Calendar
Sample calendar configuration:
Log in to UCCX Administrator > Applications > Calendar Management > Add New as shown in the image.

Here are the requirements for the sample Calendar:
- Business hours are from Monday to Friday from 5:30 am to 9:30 am and 10:30 am to 1:30 pm (Fixed hours are used for this)
- The first day of the month has shortened Business hours (Custom business days)
- Standard public holidays added to the holiday list
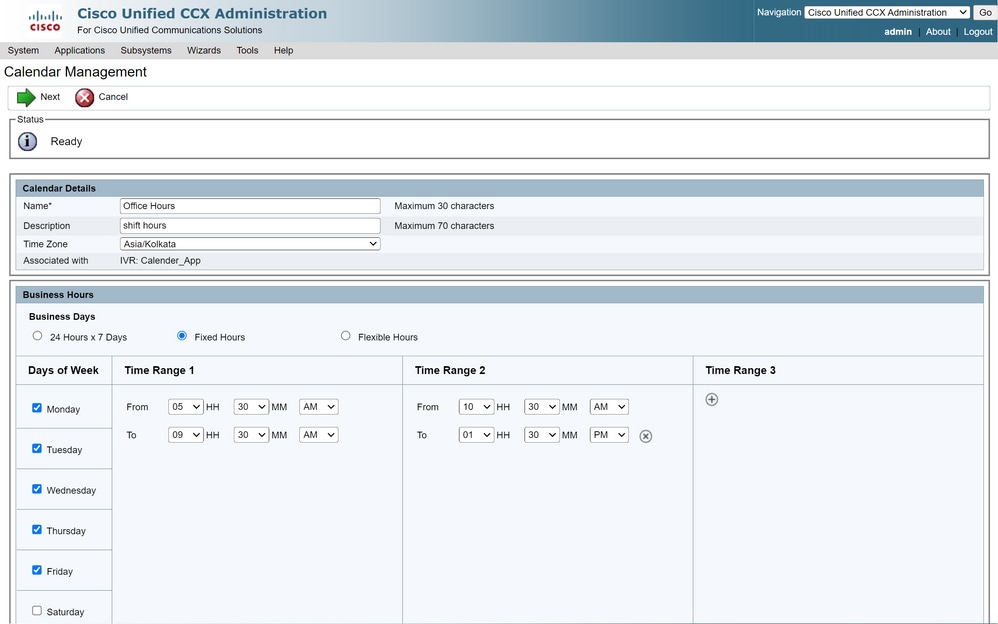
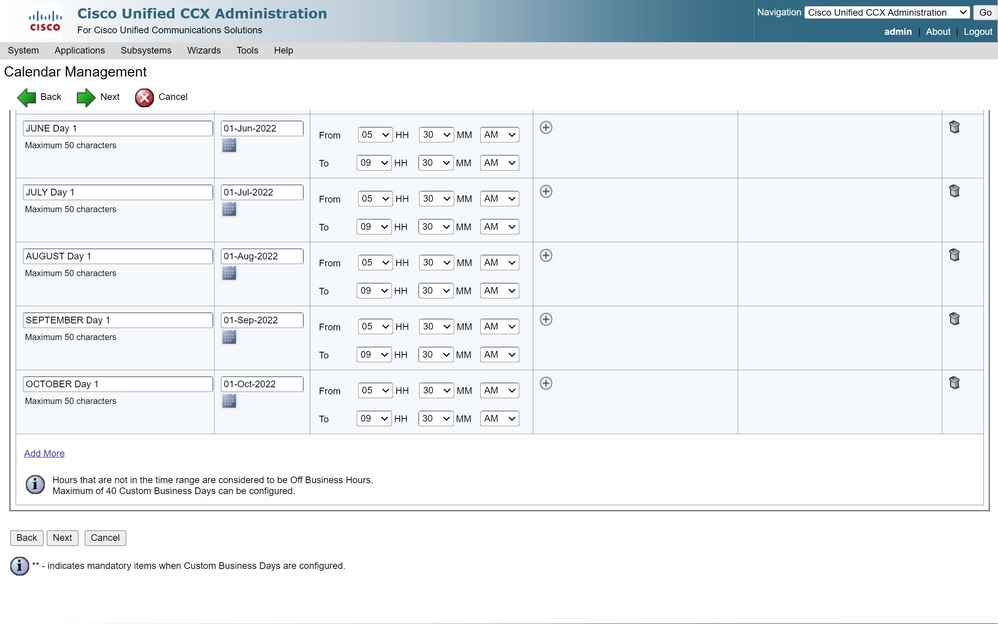
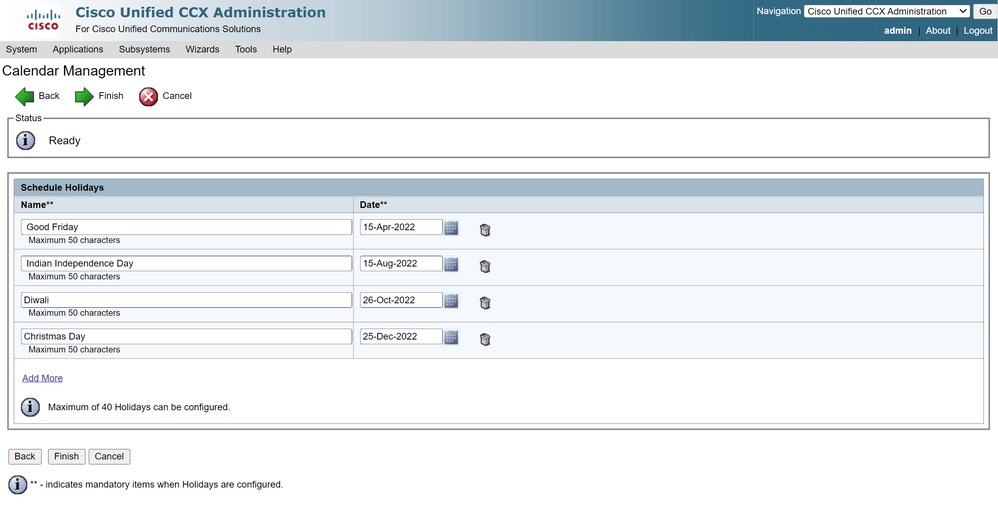

The calendar is now configured. Let us talk about how to use it in the next section.
Use the Calendar
The calendar can be used with Script (Voice path) and Bubble Chat (multi-channel path).
1. With Script Application
- Open CCX Editor version 12.0 and above
- Open an script or a pre-configured calendar script via (File > New > Queuing > Sample_Queueing_WithCalendar)
- If you use the pre-configured calendar script, the configuration is already applied in the script
- To add calendar functionality to the existing script, create a new variable from the variable pane of type CCCalendar as shown in the image.
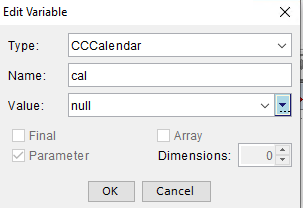
- Add the Calendar Step in your script
- Right-click the Calendar step and assign the calendar variable created earlier to it
- Assign the right logic to each branch of the calendar step
- The Business Hours and Holidays step are derived from the Calendar configuration from the CCX Administration page
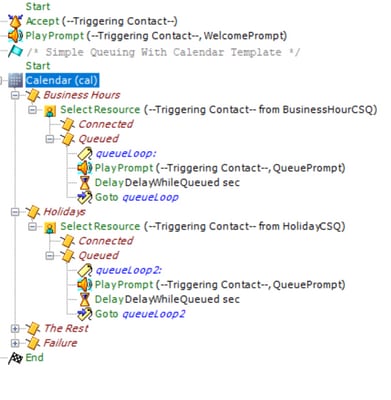
- Save the script and upload it to Script Management in CCX Administration
- Create an Application and assign it the uploaded script along with the trigger
- Under the calendar variable, we see a dropdown along with a calendar symbol
- Select the configured Calendar (Office Hours) in our case and save the application
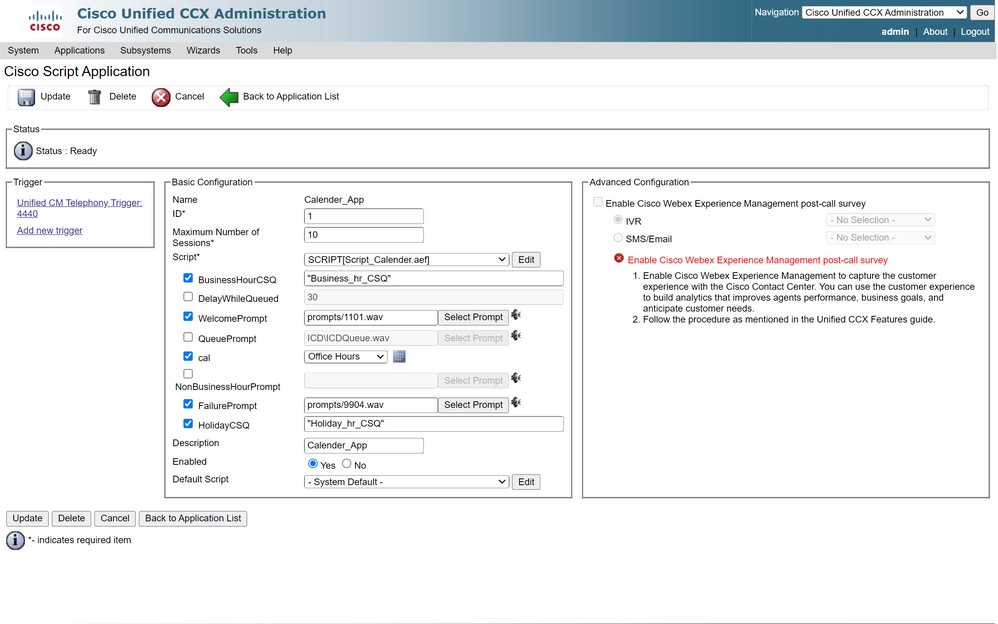
Place a Call to the trigger, the call is routed based on hours configured under the calendar.
- As a prerequisite, CCX needs has to be integrated with CCP
- Create chat CSQ so that it elects the agents
- Create a chat widget and go to the last section to Select Calendar
- Select the calendar previously created (Office Hours)
- On the right is the preview shown for holiday and non-business hours
- Save the chat widget and deploy the code.
With Bubble Chat:
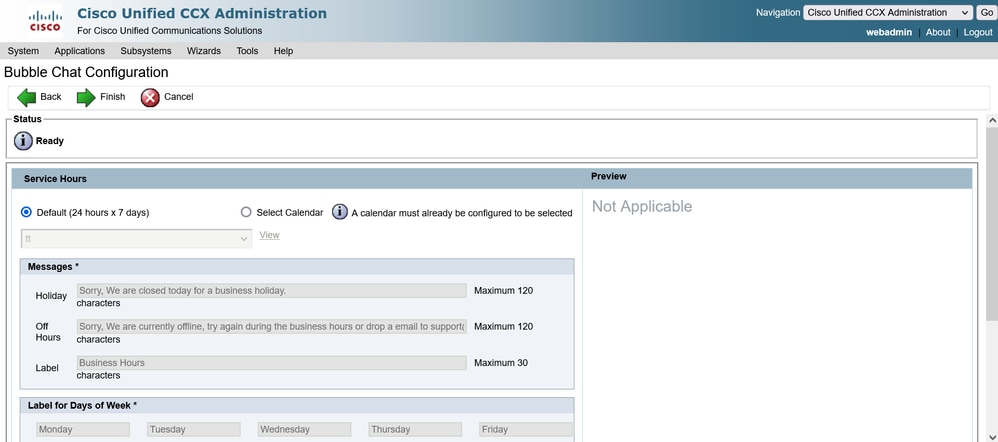
Edit the Calendar
You can edit the calendar configuration in these ways:
CCX Administration
- Log in to CCX Administration > Applications > Calendar Management
- Edit the calendar from this pane
Advanced Supervisor Capability Gadget
- Supervisors can also edit the calendar from the finesse page
- Login to CCX Administration > Tools > User Management > Supervisor Capability View
- Select any supervisor from the list
- Check the box and associate the Calendar (Office Hours) and Application (CalendarApp), with the supervisor. Save the settings.
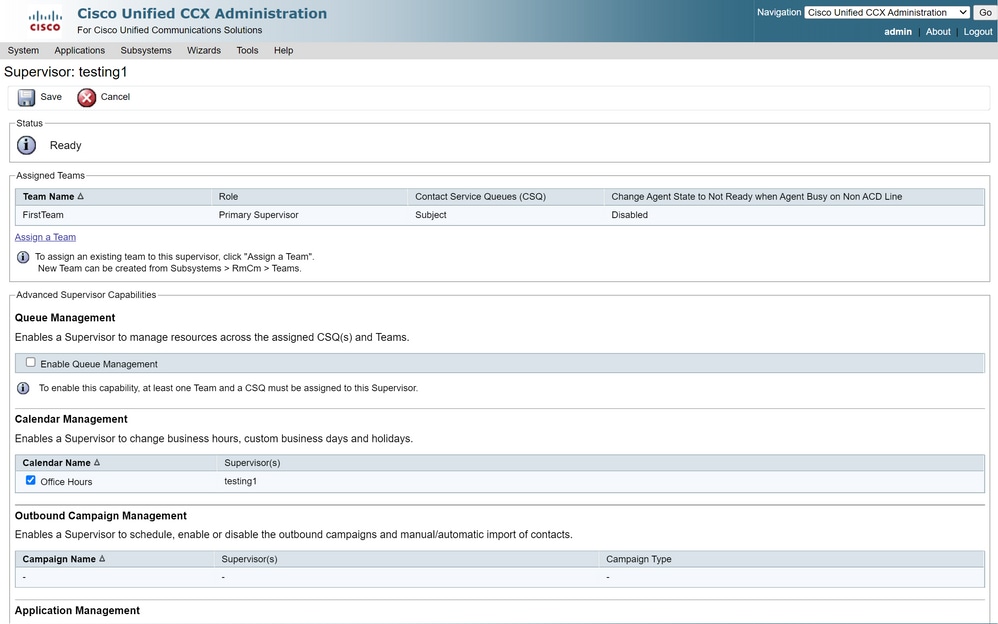
- After you assign the data to the supervisor, you need to edit the finesse layout to show the Calendar management settings.
- Login to Finesse Administration. The desktop layout can be edited per Team basis (Team Resources > Select Team > Desktop Layout Configuration > Override System Default) or Globally via Desktop Layout settings.
- Navigate to XML Layout > Supervisor section > ASC Gadget section and comment out the code snippet and Save.
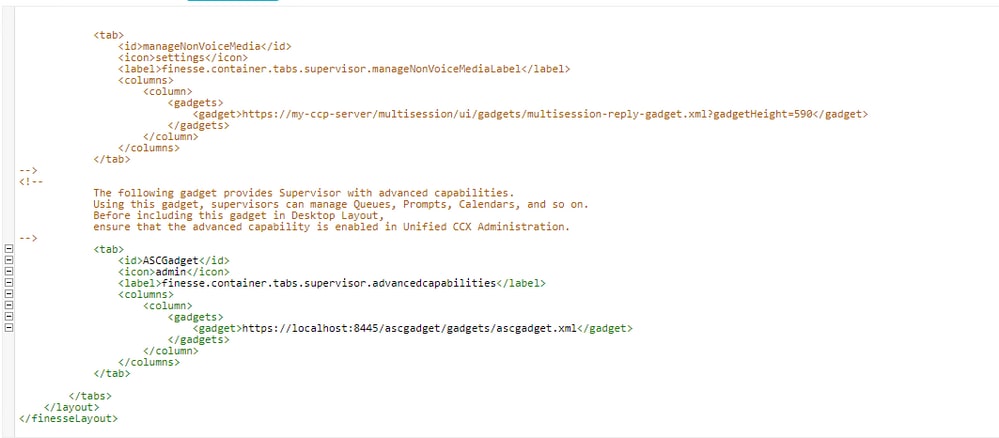
- Login to Finesse Desktop with supervisor credentials. Navigate to the New pane for Advanced Capabilities that is shown on the left
- Navigate to Application Management > Manage Application > Calendars. Here, you can change the calendar from the dropdown or preview the calendar from the calendar icon.
- Navigate to Calendar Management > Manage Calendar. The same editing functionality is provided as present on the CCX Administration page.
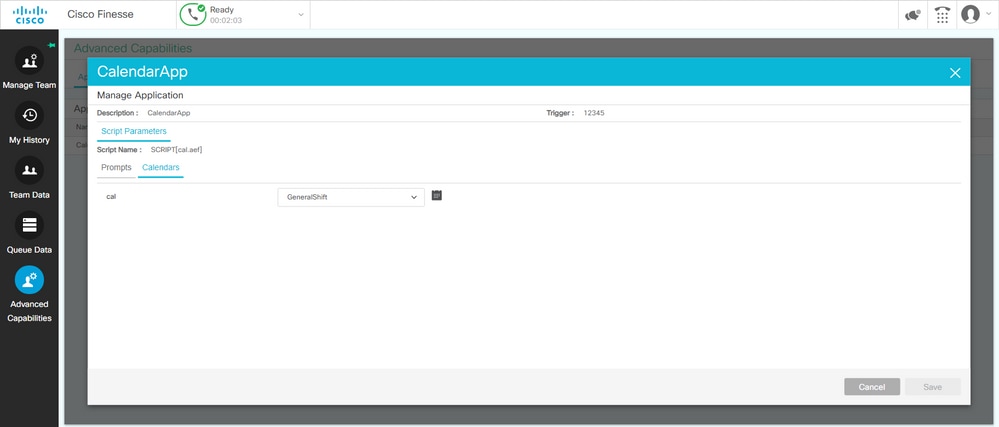
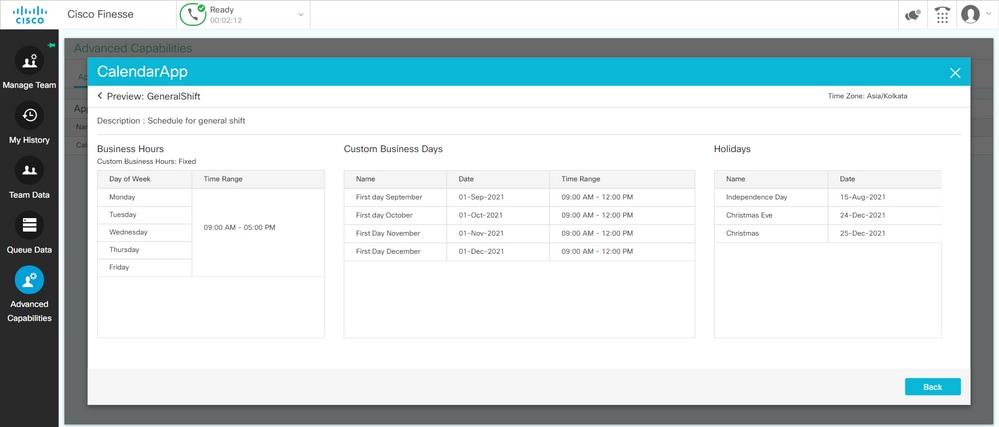
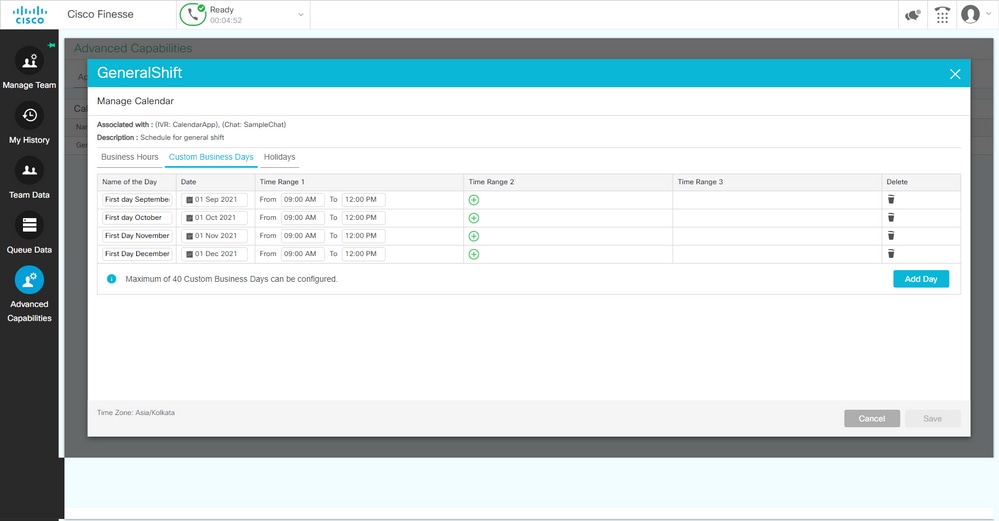
REST API
- There is also the functionality to edit calendar settings via REST API provided with CCX.
- The structure and format of APIs can be checked here: https://developer.cisco.com/docs/contact-center-express/#!calendar.
- A sample query via POSTMAN to create a calendar looks like this.
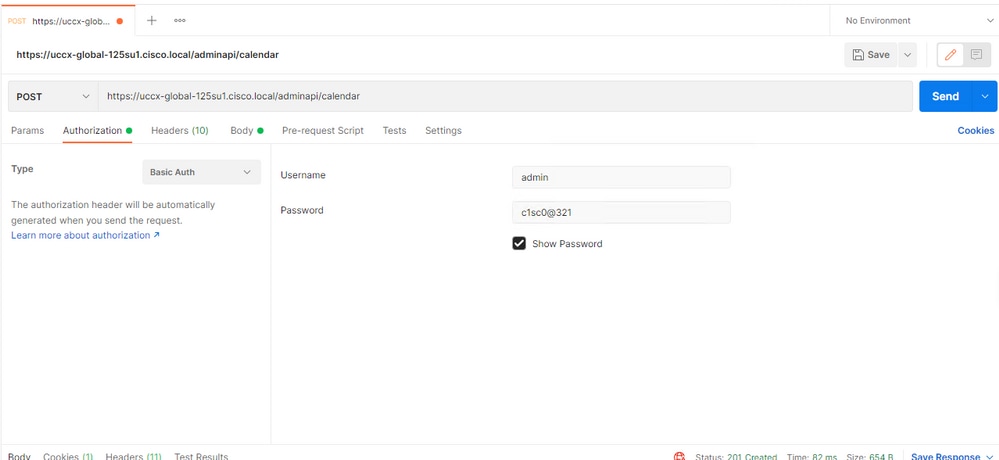
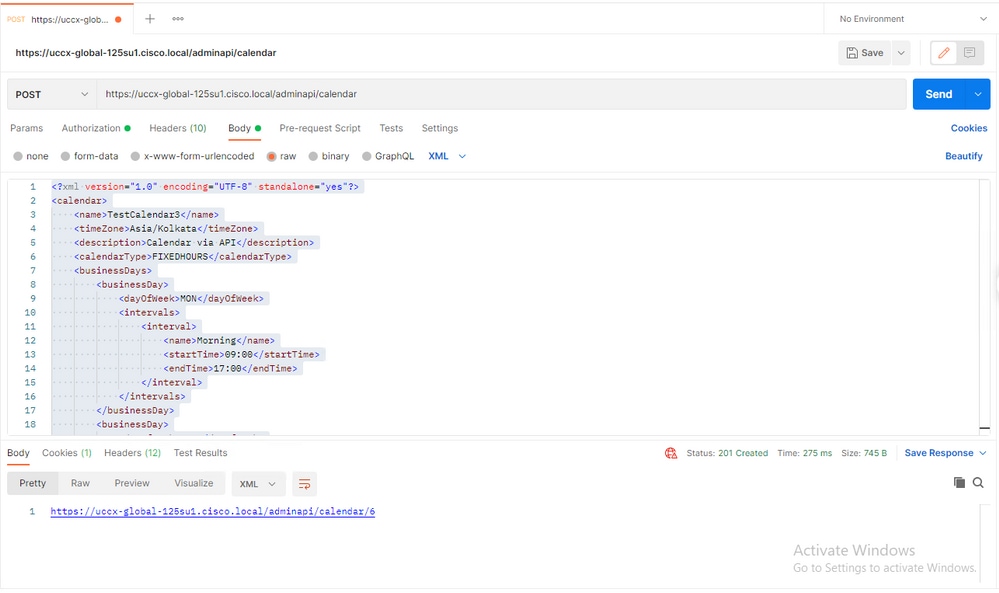

Sample XML body to create a calendar for FIXED HOURS.
<?xml version="1.0" encoding="UTF-8" standalone="yes"?>
<calendar>
    <name>TestCalendar3</name>
    <timeZone>Asia/Kolkata</timeZone>
    <description>Calendar via API</description>
    <calendarType>FIXEDHOURS</calendarType>
    <businessDays>
        <businessDay>
            <dayOfWeek>MON</dayOfWeek>
            <intervals>
                <interval>
                    <name>Morning</name>
                    <startTime>09:00</startTime>
                    <endTime>17:00</endTime>
                </interval>
            </intervals>
        </businessDay>
        <businessDay>
            <dayOfWeek>TUE</dayOfWeek>
            <intervals>
                <interval>
                    <name>Morning</name>
                    <startTime>09:00</startTime>
                    <endTime>17:00</endTime>
                </interval>
            </intervals>
        </businessDay>
    </businessDays>
    <holidays>
        <holiday>
            <name>NewYear</name>
            <date>2022-01-01</date>
        </holiday>
        <holiday>
            <name>Christmas</name>
            <date>2021-12-25</date>
        </holiday>
    </holidays>
</calendar>
Verify
Use this section in order to confirm that your configuration works properly.
Make a Test call and based to the time range configured, Agents get the call.
Troubleshoot
This section provides information you can use in order to troubleshoot your configuration.
- Collect CCX Engine logs for further troubleshooting
- Mark SS _RM, SS_CM, SS_TEL, SS_RMCM to debugging level for CCX engine.
- CCX Engine service under the Serviceability page must be INSERVICE


 Feedback