Understand JTAPI Architecture and Call Flow in UCCX
Available Languages
Download Options
Bias-Free Language
The documentation set for this product strives to use bias-free language. For the purposes of this documentation set, bias-free is defined as language that does not imply discrimination based on age, disability, gender, racial identity, ethnic identity, sexual orientation, socioeconomic status, and intersectionality. Exceptions may be present in the documentation due to language that is hardcoded in the user interfaces of the product software, language used based on RFP documentation, or language that is used by a referenced third-party product. Learn more about how Cisco is using Inclusive Language.
Contents
Introduction
This document describes the basic functionality of JTAPI, its architecture and the call flow with regards to UCCX.
Prerequisites
Requirements
Cisco recommends knowledge of these tools and features:
- JTAPI - Java Telephony API
- API - Application Programming Interface
- UCCX - Unified Contact Center Express
- CUCM - Cisco Unified Communications Manager
- CTI - Computer Telephony Integration
Cisco recommends knowledge of these topics:
- Cisco Unified Communications Manager (CUCM) configuration
- Unified Contact Center Express (UCCX) configuration
Components Used
The information in this document is based on these software versions:
- UCCX version 12.5.1.11002-481
- CUCM version 12.5.1.11900-146
The information in this document was created from the devices in a specific lab environment. All of the devices used in this document started with a cleared (default) configuration. If your network is live, ensure that you understand the potential impact of any command.
Background Information
This document describes the JTAPI architecture, call flow, enabling debugs and collecting the logs.
JTAPI Overview
Cisco Unified JTAPI serves as a programming interface standard developed by Sun Microsystems for use with Java-based, computer–telephony applications. Cisco JTAPI implements the Sun JTAPI 1.2 specification with additional Cisco extensions. You need to use Cisco JTAPI to develop applications that:
-
Control and observe Cisco Unified Communications Manager phones.
-
Route calls by using Computer–Telephony Integration (CTI) ports and route points (virtual devices).
JTAPI and UCCX
Cisco Unified JTAPI is used in a contact center to monitor device status and to issue routing instructions to send calls to the right place at the right time. In addition to it, JTAPI is used to start and stop recording instructions while retrieving call statistics for analysis and to screen-pop calls into CRM applications, automated scripting, and remote call control.
JTAPI Architecture
Cisco Unified JTAPI, used in an enterprise environment, combines user availability, location, and preferences for a uniquely tailored environment for presence-based routing.
Here are the applications of JTAPI:
- JTAPI can monitor or being notified about two or more phone and line combinations.
- Contact Center Applications use Full Call Model for JTAPI.
- JTAPI provides the this functionality:
- Call Control
- Media Control
- Media Negotiation
JTAPI Observer Model
The next diagram explains the Provider-Observer model that JTAPI works ons.
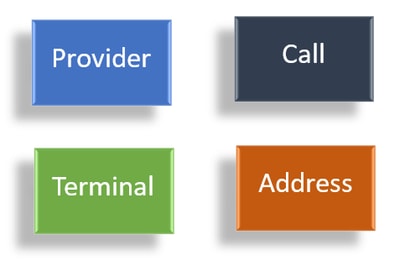 Observers
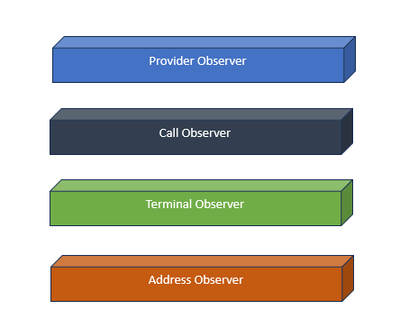 Observer Interfaces
JTAPI is based on the idea of observer. By observer, it references to the idea of the one who observes the events. You can have multiple observers placed on different things within the system. JTAPI uses observers to get to know about the state changes of the objects.
For example, you can have observers placed on Lines, Phones, terminal, addresses and so on, and learn about their state changes.

Note: If you do not have observers placed on an object, you cannot get notified about the actions taken on them.
JTAPI Provider Model
The next diagram explains the Provider model that JTAPI works ons:
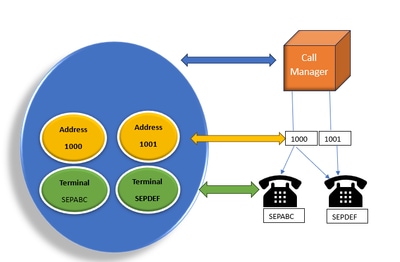 JTAPI Provider Model
 Provider Model
JTAPI provider is a connection from the application into Call Manager or CTI Manager. Providers are used to attach observers to the objects. You can also attach an observer to a provider. Providers are used to get notified about the actions taken on the objects. (You can also take control of the devices on which the observer is attached(from the provider which attached that observer).
JTAPI User
The next screenshots are taken from the CUCM (Left) and UCCX (Right) that explain about the JTAPI application user.
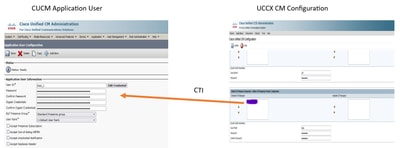
- When you start an application and want to make a connection to the CTI manager, you open a provider.
- The reason to open a provider is so that you can monitor the actions taken on the devices, terminals , and so on.
- The way it is implemented in CUCM is through an Application user.
- You create this user and give credentials so that it can first authenticate over CTI to the CUCM.
- So, the JTAPI application user that is created in the CUCM is the provider.
- Apart from just monitoring, you need to make sure those devices are under Associated Devices to make sure you can control the devices.

Note: You do not create the JTAPI user on cucm, this is created by the application(UCCX) through AXL on CUCM.
P1 and P2 Handles
P1 and P2 are the Provider Handles. These become important when you are going to open multiple providers from the same application. From UCCX, you create 2 providers, one of which is in control of the CTI ports and Route points, the other which is in control of the agent phones called RM-JTAPI provider. You, as UCCX create the provider which controls the CTI ports and Route points first which is the JTAPI P1 provider. The other provider you create after the P1 is the P2 provider or the RmCm provider which handles the agent devices.
If you see P1 new call event, you know that is a call event from a CTI port or a CTI route point. If you see P2 new call event, you know that is a call event from the actual phone. You create one RM-JTAPI user and one JTAPI user on the CCX side but on the CUCM side, you see 2 JTAPI users created. This is because each CCX node gets it own JTAPI user, but they share the one RM-JTAPI user. When you create a Trigger on UCCX, it gets added to both JTAPI users. Both nodes open a provider separately. So, any action taken on route point gets notified on both CCX nodes.
Other than that, secondary node just sits there and keeps on informing that it is still the secondary node. Each node has a separate group of CTI ports. Node 1’s CTI ports are controlled by the jtapi_1. Node 2’s CTI ports are controlled by the jtapi_2.
When the call arrives at the CTI Route point, both the CCX nodes are notified about the new call event, but the active CCX node replies to the Call Manager with a redirect request for one of its CTI ports that it controls.
If you see an IP against a CTI route point in CUCM, it is one of the CCX’s IP but that does not mean that specific node is routing the call.
One common thing you do is that we unassociate the device from the JTAPI user and re-add it. The reason behind it is when you unassociate it, the provider gets notified about it and removes all connections to it and then when it is re-added, the observer gets added again and provider starts to monitor it again using open provider request. You can see that apart from the device being added in the controlled device list, there is another thing called Allow Control of Device from CTI checkbox on the individual device as well. This is to bring an additional level of granularity. So if you have the Route Point added in the controlled list but CTI checkbox is not checked, you can still be able to get notified about the events on that Route Point but no actions on call control are possible.
Call Flow
Here is the sequents of events involved in the UCCX call flow:
- When the call arrives at the CTI Route point, it gets redirected to a cti port.
- CTI port opens the media channel with the ipvms driver on the uccx box.
- Once you decide that the agent needs to take the call, a consult transfer is done from the port to the agent.
- New call event is sent to the CTI Route Point.
- Redirect request goes to CTI Port.
- State of the call id becomes idle.
- Then another new call event comes for the call to the CTI Port.
- If the redirect response is 0, it is good, if non zero, it means it failed.
- Then you send call accept request (this is not answered, just accepted on port).
- Then accept step hits on the script, this is when call answer request comes in Jtapi.

Note: This happens so fast and sometimes there are multiple events happening at the same time, like calls coming from Cisco Unity Connection or transfer taking time from CUCM, this can cause RACE condition in the accept step which is why you want to slow this down. You do so by adding delay step before accept step.
11. Then you get an answer response from the port.
12. Call state changes to connected.

Note: CTI is asynchronous unlike sip or skinny phones which wait for the response before sending new request which is why the order of messages in the JTAPI CTI messages can be jumbled up.
13. After getting answer response from the port, media negotiation happens.
14. Port sends open_logical_channel request in which it shares its port and ip on which it wants the remote party to send the RTP to.
15. Before opening the logical channel, it creates a connection with the IPVMS driver on the UCCX box and opens an RTP stream.
16. Next event is the start_reception event which tells us the far end information(i.e the ip and port of the calling device).
17. Then you get start_transmission event just like any other media signal.
18. Now you are listening to the IVR and the prompts.

Note: This is where the call setup completes.
19. Now when the call hits a step in the script which enables the call to transfer to agent, you see a CallSetupTransferRequest.
20. Unlike the first message, this is a consult transfer and not a redirect.
21. The reason of this being a consult transfer is because if an agent is READY but not at its seat, and we redirect the call, it just remains unanswered, but if we do a consult transfer, then if the agent is not there, then the call again gets placed in the queue.
22. Just like any other consult transfer, this is the CTI port hitting the transfer button for the first time on the phone.

Note: ConsultWithoutMedia is the API for the consult transfer.
23. In a regular consult transfer, there is a media path between A and C but in this you instruct CUCM not to do this as there is no sense that you establish media between the UCCX and the Agent.
24. So you are going to do a consult transfer without doing a media cut over between the agent and the CTI port.
25. At this point, the CTI port puts the caller on hold and we see a call state changed event=HOLD.
26. Now you see a newcall event from the CTI port to the agent device.(Using the original call id, but a subset of it and a P2 event.)
27. If you search the P2 event call id, you see the next message as CallAnswer request which means agent picked up the call.
28. Once you know that the agent has picked up the call (using P2) and call is in connected state on the CTI port side as well (using P1), then you Route Point see a CallDirectTransferRequest, which means that the transfer button has been pressed for the second time.
29. Now as the CTI port knows that the agent has picked up the call, there is no point waiting, it immediately sends a CallDirectTransferRequest which is the CTI port pressing the transfer button second time as explained above.
30. Now, the original call leg(the one which was on hold) is the one surviving.
31. The other call leg gets destroyed (between port and agent).
32. At this point, CUCM and UCCX out of the picture and RTP gets established between the caller and the agent through Gateway.
The next diagram explains the call flow mentioned earlier in a summarized way.
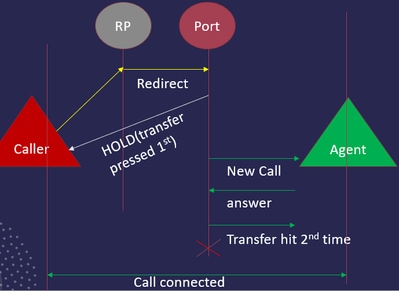 JTAPI Call Flow Summary
Troubleshoot
Enable and Collect JTAPI logs
Enable JTAPI debugs
Please check these steps to enable JTAPI debug levels.
- Log into UCCX.
- Go to CCX Serviceability.
- Go to Trace.
- Go to Configuration.
- From Select Service drop down, select Cisco Unified CM Telephony Client.
- Select Debugging checkbox.
- Select all the checkboxes except MISC_DEBUGGING.
Collect JTAPI debugs
Please check these steps to enable JTAPI debug levels from RTMT or CLI.
From RTMT
- Log into CCX Real Time Monitoring Tool.
- Click on Trace & Log Central.
- Clck on Collect Files.
- Select JTAPI Client for all servers.
- Click Next.
- Select the timestamps and location you wish to save the log files to.
From CLI
JTAPI log location
activelog /uccx/log/JTAPI
Command to collect the JTAPI logs:
file get activelog /uccx/log/JTAPI/* recurs compress
Syntax:
file get {activelog|inactivelog|install} file-spec [options]
file-spec mandatory file to transfer
options optional reltime months|weeks|days|hours|minutes timevalue
abstime hh:mm:MM/DD/YY hh:mm:MM/DD/YY
match regex
recurs
compress
5 ways to download the logs based upon the timestamp
reltime—Relative time period, specified as minutes | hours | days | weeks | months value
abstime—Absolute time period, specified as hh:mm:MM/DD/YY hh:mm:MM/DD/YY
match—Match a particular string in the filename, specified as string value
recurs—Get all files, includes subdirectories
compress option allows you to download the files in a zipped format.

Tip: In order to download the files, ensure that external Secure File Transfer Protocol (SFTP) server is configured and accessible.

Tip: The recurs option allows you to traverse the directory for all subdirectories and files. This is used if you want to pull all logs from a directory.
Reference Links
Revision History
| Revision | Publish Date | Comments |
|---|---|---|
1.0 |
01-Feb-2024 |
Initial Release |
Contributed by Cisco Engineers
- Prabhat BhallaCisco TAC Engineer
Contact Cisco
- Open a Support Case

- (Requires a Cisco Service Contract)
 Feedback