Introduction
This document describes different ways that CVP 12.5(1) servers can be configured so that it is OpenJDK JRE compliant.
Prerequisites
Requirements
Cisco recommends that you have knowledge of these topics:
- Cisco Unified Customer Voice Portal (CVP) application
- OpenJdK
Components Used
The information in this document is based on CCE 12.5(1) version and not based on specific hardware.
The information in this document was created from the devices in a lab environment. All of the devices used in this document started with a cleared (default) configuration. If you are performing these tasks in a production environment, ensure that you understand the potential impact of any command.
Bakground Information
Contact Center CVP applications from 12.5(1) onwards support OpenJDK as Java runtime environment. This document highlights different ways CVP 12.5(1) servers can be configured so that it is OpenJDK JRE compliant and also explains the steps required to update OpenJDK JRE to latest patch in the same train for CVP components. For easy navigation the document has been divided into these sections:
CVP 12.5(1) Oracle JRE Migration to OpenJDK
12.5(1)a Installer
Update OpenJDK to latest patch
CVP 12.5(1) Oracle JRE Migration to OpenJDK
Existing 12.5(1) CVP applications, for example, Call\VXML server, OAMP and reporting servers can transition to OpenJDK JRE by the installation of engineering special (ES) 16 patch. More details about the ES can be gathered from these links:
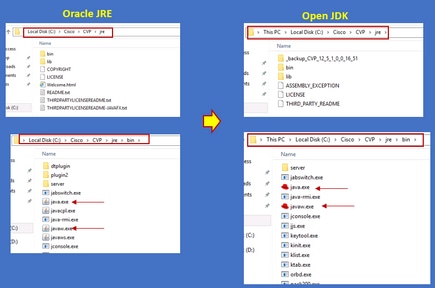
Post ES_16 patch install, existing C:\Cisco\CVP\jre folder gets backed up and replaced with OpenJDK JRE 1.8.275 folder in the same path. Hence any configuration changes done to files under earlier jre folders need to be done again after this ES install. Also any manual security hardeing done in java.security and other files need to be done again.

ES_18 patch installation should be followed after ES_16 as this patch replaces all the issued binaries in CVP ES's from ES_1 to ES_14 with OpenJDK compatible binaries. More details on the ES can be gathered from these links
Note: ES_18 is also required and should be installed before you apply any patch greater than ES_18 on CVP application.
Note: Migration to OpenJDK does not impact existing certificates which are stored, as cvp uses its own keystore located in C:\Cisco\CVP\conf\security folder and not JAVA specific one.
CVP 12.5(1)a Installer
CVP applications which are upgraded to 12.5(1) version can now use the new 12.5(1)a installer. It is no different from the preceding 12.5(1) version except for the Java runtime environment installed on the virtual machines (VMs). CVP 12.5(1)a installer can be downloaded via this link https://software.cisco.com/download/home/270563413/type/280840592/release/12.5(1)
Post 12.5(1)a installation, install ES_18 patch which is a cumulative one and has all the older fixes included in it. Details on the patch can be checked from these links:
Note: It is recommended not to install any ES's which is less than 18 on 12.5(1)a CVP server.
Note: In regards to Call Studio application there is no upgrade path to 12.5(1)a from older versions. Hence the application needs to be backed up and fresh install of 12.5(1)a call studio needs to be done. Post installation applications needs to be recompiled using new call studio.
Update OpenJDK to Latest Patch
Step 1. Disable Federal Information Processing Standards (FIPS) if enabled on the CVP server, to confirm run the batch file fips.bat located in the C:\Cisco\CVP\bin\FipsConfig folder with the argument false. If the FIPS is disabled you see a false message as showed in the image.

Step 2. Download the java development kit (JREUpdate.zip) from the site and extract the files to a known location on CVP Server. For example,C:\Cisco\CVP\bin.
https://software.cisco.com/download/home/270563413/type/280840592/release/CVP%20JRE%20Update
Step 3. Download the latest Redhat 64 bit OpenJDK JREs 1.8 patch from the Redhat site and install the JDK kit on the personal machine.
https://developers.redhat.com/products/openjdk/download
Step 4. Copy the JRE folder from the installed JDK and save it in a folder on the CVP machine (for example,C:\JRE)
Step 5. Run the script from the command prompt, for example, C:\Cisco\CVP\bin >JREUpdate.bat apply C:\JRE. The script under the hood does the following
- It backs up the current cvp\jre folder and stores in this folder location 'C:\Cisco\CVP\jre.old'
- It puts the new patch as the latest JRE folder in the location 'C:\cisco\cvp\jre\bin'
Step 6. Restart the server. When the system restarts all the cvp services are designed to check this path C:\cisco\cvp\jre\bin and as this jre\bin is the new folder with new updated version of redhad OpenJDK jre patch automatically start with the new files.
Step 7. If needed the old backed up jre folder can be deleted.
Related Information
