Troubleshoot the Cisco Outbound Option Dialer When it Does Not Dial
Available Languages
Contents
Introduction
This document describes the step-by-step procedure you use to troubleshoot the Cisco Outbound Option Dialer when the Dialer does not dial.
Prerequisites
Requirements
Cisco recommends you have knowledge of these topics:
-
Cisco Intelligent Contact Management (ICM)
-
Blended Agent Outbound Dialing
-
Familiar with Dialogic Cards and software/drivers
Components Used
The information in this document is based on Cisco ICM version 5.0 and later.
The information in this document was created from the devices in a specific lab environment. All of the devices used in this document started with a cleared (default) configuration. If your network is live, make sure that you understand the potential impact of any command.
Conventions
Refer to the Cisco Technical Tips Conventions for more information on document conventions.
Troubleshoot the Problem
There are twelve steps to follow when you troubleshoot the Cisco Outbound Option Dialer when the Dialer does not dial.
Figure 1: Twelve Steps You Use to Troubleshoot the Cisco Outbound Option Dialer 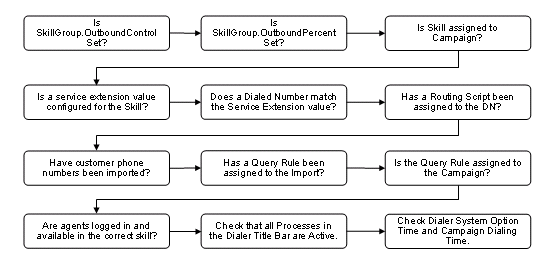
SkillGroup.OutboundControl Set
Contact Center Managers control the agent mode by setting a well-defined skill group variable, "Outbound Control," to one of the values in Table 1.
Table 1: Skill Group Variable| Value String | Corresponding Numeric Value | Description |
|---|---|---|
| INBOUND | 0 | Dedicated Inbound Mode |
| PREDICTIVE_ONLY | 1 | Dedicated Outbound Mode |
| PREDICTIVE_BLENDED | 2 | Call by Call Blending |
| PREVIEW_ONLY | 3 | Dedicated Outbound Mode |
| PREVIEW_BLENDED | 4 | Call by Call Blending |
| PROGRESSIVE_ONLY | 5 | Dedicated Outbound Mode |
| PROGRESSIVE_BLENDED | 6 | Call by Call Blending |
Complete these steps in order to verify if it is configured correctly.
-
Double-click the Script Editor icon in the Cisco ICM Admin Workstation (AW) group. The Script Editor window opens.
-
In Script Editor, choose File > Open.
-
Select the Administrative Script that controls the specific skill group that has the problem.
-
Click Open.
-
Double-click the Set Variable node that defines the OutboundControl variable for the specific skill group that has the problem. The Set Proprieties dialogue menu opens, as Figure 2 shows.
-
Verify that Object type, Object, Variable, and Value are configured correctly.
Figure 2: Set Properties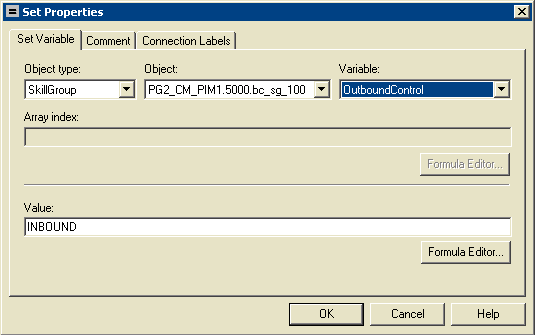
SkillGroup.OutboundPercent Set
The OutboundPercent variable controls the percentage of agents, which are logged into a particular skill group, and should be used to dial outbound. This variable does not allocate specific agents for outbound dialing, just a total percentage.
-
Double-click the Script Editor icon in the Cisco ICM AW group. The Script Editor window opens.
-
In Script Editor, choose File > Open from the menu bar. The Open dialog box opens.
-
Select the Administrative Script that controls the specific skill group that has the problem. Click Open.
-
Double-click the Set Variable node that defines the OutboundPercent variable for the specific skill group that has the problem. The Set Proprieties dialogue menu opens, as Figure 3 shows.
-
Verify that Object type, Object, Variable, and Value are configured correctly.
Figure 3: Set Properties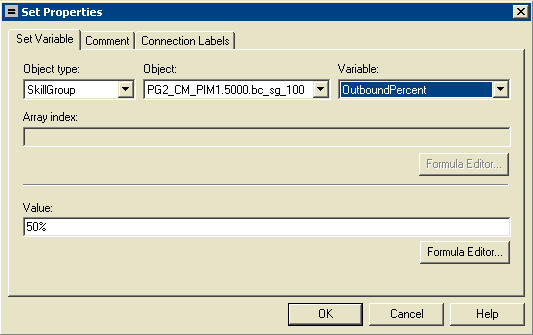
Skill Assigned to Campaign
Blended agent views campaigns and query rules as logical entities that group a set of contacts together. Use the Blended Agent - Campaign tool in order to build a relationship between skill groups and campaigns.
Note: The maximum number of skill groups per campaign is 20.
-
From the Configuration Manager menu, select Blended Agent > Blended Agent - Campaign. The Blended Agent Campaign window opens, as Figure 4 shows.
-
In the Select filter data box, select the filters you want.
-
Click Retrieve. This displays a list of the retrieved blended agent campaign(s) in a list box..
-
In the list box, select the blended agent campaign whose records you want to view. The configuration information of the selected blended agent campaign displays in the tabbed fields on the right.
-
Click the Skill Group Selection tab.
-
Verify the information in the Skill Group Selection tab fields.
Figure 4: Blended Agent Campaign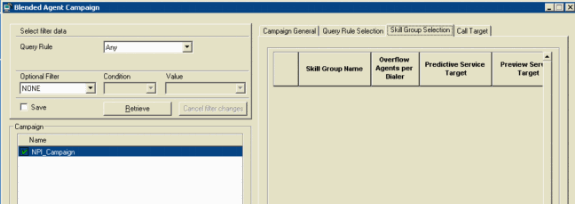
Service Extension Value Configured for the Skill
Complete these steps in order to verify a service extension value is configured for the skill.
Select the target service in the left pane.
-
On an AW, from the Configuration Manager menu, choose Tools > Explore Tools > Service Explorer, as Figure 5 shows.
-
In the Select filter data box, select the filters you want.
-
Click Retrieve.
-
Click the Advanced tab in order to verify the extension, as Figure 5 shows.
Figure 5: Service Explorer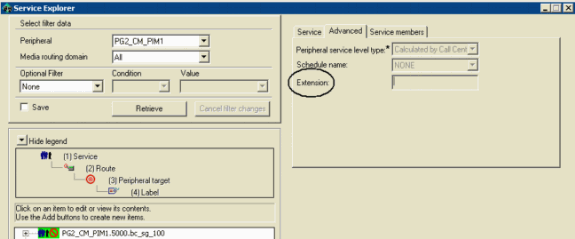
-
Click the Service Member tab in order to verify the Skill group name, as Figure 6 shows.
Figure 6: Service Explorer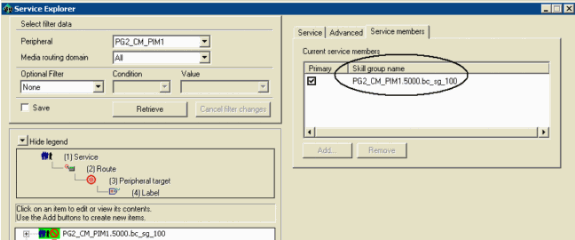
Does a Dialed Number Match the Service Extension Value?
Service Extension is used by the Dialer to reserve agents. This extension must match the dialed number that is configured in the Media Routing (MR) Peripheral Gateway (PG). Complete these steps in order to verify that a dialed number matches the service extension value.
-
From the Configuration Manager menu, choose Service Explorer Tools > Explore Tools.
-
In the Select filter data box, select the filters you want.
-
Click Retrieve.
-
Select the target service in the left pane.
-
Click the Advanced tab in order to verify the extension, as Figure 5 shows.
-
From the Configuration Manager menu, choose Tools > List Tools > Dialed Number/Script Selector List.
-
Click Retrieve.
-
Select the target name in the Dialed Number/Script Selector section.
-
Click the Attributes tab in order to verify the Dialed number string/Script selector, as Figure 7 shows.
Figure 7: Dialed Number/Script Selector List
Has a Routing Script Been Assigned to the DN?
Complete these steps in order to verify that a routing script is assigned to the dialed number (DN):
-
Launch Script Editor from the AW, the Script Editor menu appears.
-
Select Script > Call Type Associations. The Script/Call Type Association menu appears, as Figure 8 shows.
Figure 8: Script/Call Type Associations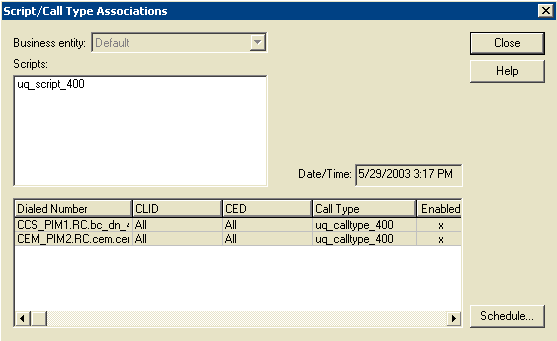
-
Verify Scripts, Dialed Number, and other related information.
Have Customer Phone Numbers been Imported?
The BA Import component, which resides on the Cisco ICM Logger, imports a customer's contact list. BA Import imports two types of lists:
-
contact_list: Contains the phone number BA dials.
-
do_not_call_list: Contains a list of customers that do not want to be called.
Complete these steps in order to check that customer phone numbers are imported:
-
From the Configuration Manager menu, choose Blended Agent > Blended Agent - Import. The Blended Agent Import Rule window opens.
-
Click Retrieve. This displays a list of the retrieved Import Rule names in the left window.
-
Select the target Import Rule name and the Blended Agent Import Rule window refreshes.
-
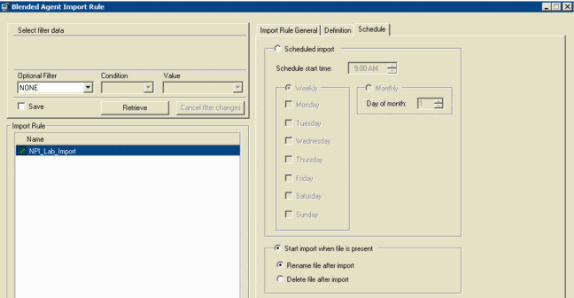
Click Import Rule General, Definition, and Schedule. Figure 9, Figure 10, and Figure 11 appear respectively.
Figure 9: Blended Agent Import Rule
Figure 10: Blended Agent Import Rule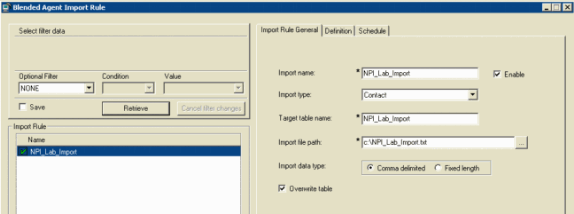
Figure 11: Blended Agent Import Rule
-
Verify all related information in Figure 9, Figure 10, and Figure 11.
Has a Query Rule been Assigned to the Import?
Complete these steps in order to check that a query rule is assigned to the Import.
-
From the Configuration Manager menu, choose Blended Agent > Blended Agent - Query Rule. The Blended Agent Query Rule window opens.
-
In the Select filter data box, select the filters you want.
-
Click Retrieve. This displays a list of the retrieved Query Rule name in the left side of the window.
-
Select the target Query Rule name and the Blended Agent Query Rule window refreshes, as Figure 12 shows.
Figure 12: Blended Agent Query Rule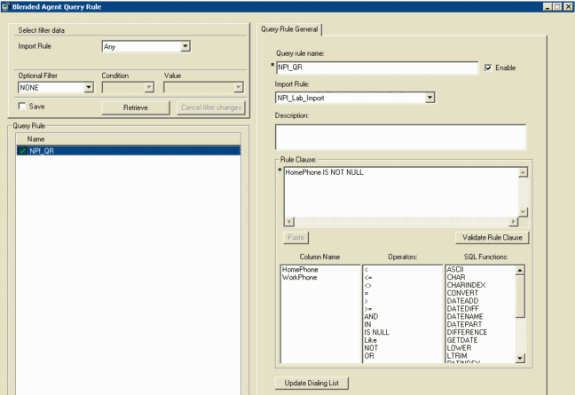
-
Verify all related information in Figure 12.
Is the Query Rule Assigned to the Campaign?
Blended agent views campaigns and query rules as logical entities that group a set of contacts together. Use the Blended Agent - Campaign tool to build relationship between query rules and campaigns.
-
From the Configuration Manager menu, choose Blended Agent > Blended Agent - Campaign. The Blended Agent Campaign window opens.
-
In the Select filter data box, select the filters you want.
-
Click Retrieve. This displays a list of the retrieved blended agent campaign(s) in a list box on the left pane of the window.
-
In the list box, select the blended agent campaign records you want to view. The configuration information of the selected blended agent campaign displays in the tabbed fields on the right, as Figure 13 shows.
-
Click the Query Rule Selection tab.
-
Verify the information in the Query Rule Selection tab fields.
Figure 13: Blended Agent Campaign
Are Agents Logged in and Available in the Correct Skill?
Complete these steps in order to verify that agents are logged in and available in the correct skill.
-
Connect Procmon to dialers.
-
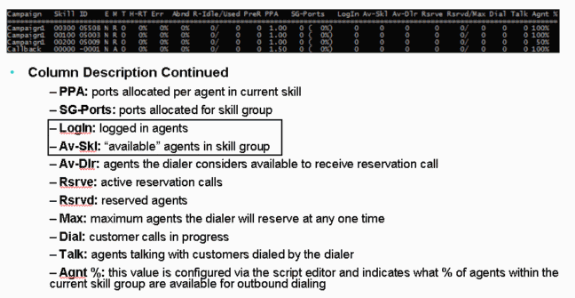
Use the dumpalloc command to view how many records are available for dialing, how many agents are logged in, and how many agents are available for dialing.
-
The dumpalloc command provides real-time skill group dialing information, as Figure 14 and Figure 15 show.
Figure 14: Real-time Skill Group Dialing Information
Figure 15: Real-time Skill Group Dialing Information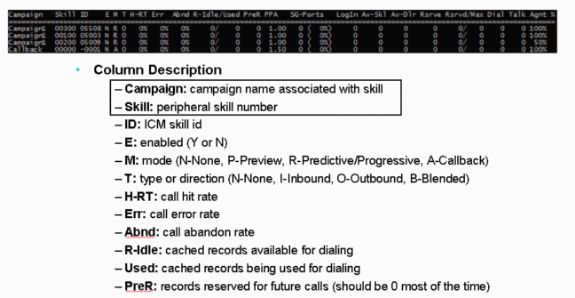
-
Check the Campaign, Skill, Login, and Av-Skl columns.
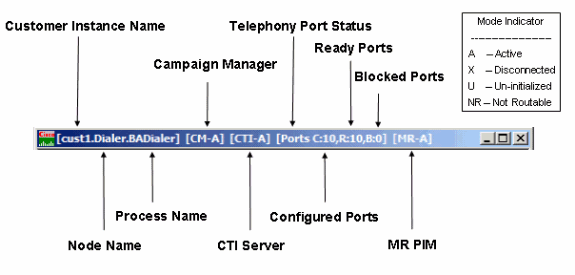
Confirm All Processes in the Dialer Title Bar are Active
Confirm all processes in the dialer title bar are active. The detail of the Dialer title bar is shown in Figure 16. This list shows the valid statuses:
-
A : Active
-
X : Disconnect
-
U : Un-Initialized
-
NR : Not Routable
Confirm Dialer System Option Time and Campaign Dialing Time
For General System Time options, this time range applies to all campaigns which the BA system runs, and supersedes any individual campaign time ranges. Complete these steps in order to check the General System Time options.
-
From the Configuration Manager menu, choose Blended Agent > Blended Agent - System Options, as Figure 17 shows.
-
Click General Options in order to verify the Start time and End time in the Customer Dialing Time Range section.
Figure 17: Blended Agent System Options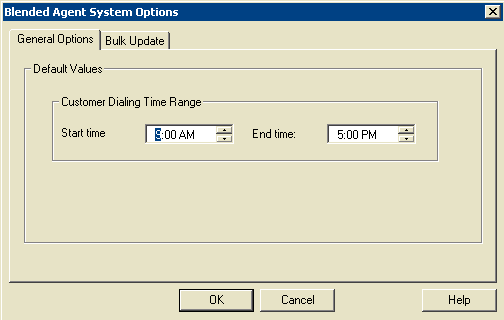
Complete these steps in order to check the individual Campaign Dialing Time option.
-
From the Configuration Manager menu, choose Blended Agent > Blended Agent - Campaign. The Blended Agent Campaign window opens.
-
Select the query rule from the Query Rule drop-down list in the Select filter data section.
-
Click Retrieve. This lists all the existing campaigns in the left window under the Campaign section.
-
Select the target Campaign name.
-
Click the Query Rule Selection tab in the right window and the Blended Agent Campaign window refreshes, as Figure 18 shows.
Figure 18: Blended Agent Campaign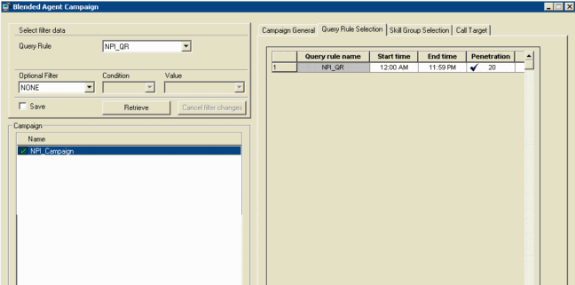
-
Verify Start Time and End Time in the corresponding row with Query Rule Name.
Related Information
Revision History
| Revision | Publish Date | Comments |
|---|---|---|
1.0 |
31-Jul-2006 |
Initial Release |
Contact Cisco
- Open a Support Case

- (Requires a Cisco Service Contract)


 Feedback