Introduction
This document aims to explain in detail the steps involved to obtain and install a Certification Authority (CA) certificate, generated from a third-party vendor to establish a HTTPS connection between Finesse, Cisco Unified Intelligence Center (CUIC), and Live Data (LD) servers.
Prerequisites
Requirements
Cisco recommends that you have knowledge of these topics:
- Cisco Unified Contact Center Enterprise (UCCE)
- Cisco Live Data (LD)
- Cisco Unified Intelligence Center (CUIC)
- Cisco Finesse
- CA certificated
Components Used
The information used in the document is based on UCCE solution 11.0(1) version.
The information in this document was created from the devices in a specific lab environment. All of the devices used in this document started with a cleared (default) configuration. If your network is live, make sure that you understand the potential impact of any step.
Background Information
In order to use HTTPS for secure communication between Finesse, CUIC and Live Data servers, security certificates setup is needed. By Default these servers provide self-signed certifcates that are used or customers can procure and install Certificate Authority (CA) signed certificates. These CA certs can be obtained either from a third-party vendor like VeriSign, Thawte, GeoTrust or can be produced internaly.
Configure
Setting up certificate for HTTPS communication in Finesse, CUIC and Live Data servers require these steps:
- Generate and download Certificate Signing Request (CSR).
- Obtain Root, intermediate (if applicable) and application certificate from Certificate Authority using CSR.
- Upload certificates to the servers.
Step 1. Generate and download Certificate Signing Request (CSR).
- The steps described here for generating and downloading CSR is same for Finesse, CUIC and Live data severs.
- Open Cisco Unified Communications Operating System Administration page using the stated URL and sign in with the OS admin account created during the installation process
https://FQDN:8443/cmplatform
- Generate the Certificate Signing Request (CSR) as shown in the image:

Step 1. Navigate to Security > Certificate Management > Generate CSR.
Step 2. From the Certificate Purpose Name drop-down list, select tomcat.
Step 3. Select Hash Algorithm and key length depeding upon the business needs.
- Key Length: 2048 \ Hash Algorithm: SHA256 is recommended
Step 4. Click Generate CSR.
Note: If business requires Subject Alternate Names (SANs) parent domain field to be filled with the domain name then please be aware of the issue addresses in the document "SANs issue with a Third Party Signed Certificate in Finesse".
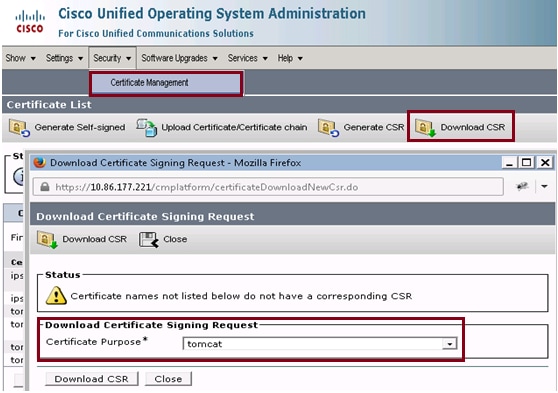
- Download the Certificate Signing Request (CSR) as shown in the image:

Step 1. Navigate to Security > Certificate Management > Download CSR.
Step 2. From the Certificate Name drop-down list, select tomcat.
Step 3. Click Download CSR.
Note:
Note: Perform the above mentioned steps on the secondary server's using the url https://FQDN:8443/cmplatform to obtain CSR's for Certificate Authority
Step 2. Obtain Root, Intermediate (if applicableStep 5. and Application certificate from Certificate Authority.
- Provide the primary and secondary servers Certificate Signing Request (CSR) information to third party Certifcate authority like VeriSign, Thawte, GeoTrust etc.
- From certifcate authority one should receive the following certificate chain for the primary and secondory servers.
- Finesse servers: Root, Intermediate (optional) and Application certificate
- CUIC servers: Root, Intermediate (optional) and Application certificate
- Live data serves: Root, Intermediate (optional) and Application certificate
Step 3. Upload certificates to the servers.
This section describes on how to upload the certificate chain correctly on Finesse, CUIC and Live data servers.
Finesse Servers

- Upload the Root certificate on Primary Finesse server with the help of these steps:
Step 1. On primary server Cisco Unified Communications Operating System Administration page, navigate to Security > Certificate Management > Upload Certificate.
Step 2. From the Certificate Name drop-down list, select tomcat-trust.
Step 3. In the Upload File field, click browse and browse to the root certificate file.
Step 4. Click Upload File.
- Upload the intermediate certificate on Primary Fineese server with the help of these steps:
Step 1. Steps on uploading the intermediate certififcate is same as the root certificate as shown in step 1.
Step 2. On primary server Cisco Unified Communications Operating System Administration page, navigate to Security > Certificate Management > Upload Certificate.
Step 3. From the Certificate Name drop-down list, select tomcat-trust.
Step 4. In the Upload File field, click browse and browse to the Intermediate certificate file.
Step 5. Click Upload.
Note: As Tomcat-trust store is replicated between the primary and secondary servers it is not needed to upload the root or Intermediate certificate to the secondary finesse server.
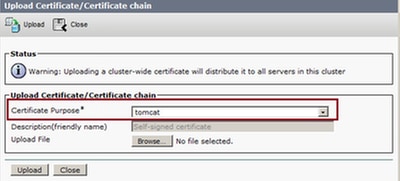
- Upload the Primary Finesse server application certificate as shown in the image:

Step 1. From the Certificate Name drop-down list, select tomcat.
Step 2. In the Upload File field, click Browse and browse to the application certificate file.
Step 3. Click Upload to upload the file.
- Upload the Secondary Fineese server application certificate.
In this step follow the same process as mentioned in Step 3 on the secondary server for its own application certificate.
- Now you can restart the servers.
Access the CLI on the primary and secondary Finesse servers and enter the command utils system restart to restart the servers.
CUIC Servers (Assuming no intermediate certificates present in the certificate chain)
- Upload Root certificate on primary CUIC server.
Step 1. On primary server Cisco Unified Communications Operating System Administration page, navigate to Security > Certificate Management > Upload Certificate/Certificate chain .
Step 2. From the Certificate Name drop-down list, select tomcat-trust.
Step 3. In the Upload File field, click browse and browse to the root certificate file.
Step 4. Click Upload File.
Note: As tomcat-trust store is replicated between the primary and secondary servers it is not needed to upload the root certificate to the Secondary CUIC server.
- Upload primary CUIC server application certificate.
Step 1. From the Certificate Name drop-down list, select tomcat.
Step 2. In the Upload File field, click Browse and browse to the application certificate file.
Step 3. Click Upload File.
- Upload secondary CUIC server application certificate.
Follow the same process as stated in step (2) on the secondary server for its own application certificate
- Restart servers
Access the CLI on the primary and secondary CUIC servers and enter the command "utils system restart" to restart the servers.
Note: If the CA authority provides the certificate chain which includes intermediate certificates then the steps mentioned in the Finesse Servers section are applicable to CUIC serves as well.
Live Data Servers
- Steps involved on Live-Data servers to upload the certificates is identical to Finesse or CUIC servers depending upon the certificate chain.
- Upload Root certificate on Primary Live-Data server.
Step 1. On primary server Cisco Unified Communications Operating System Administration page, navigate to Security > Certificate Management > Upload Certificate.
Step 2. From the Certificate Name drop-down list, select tomcat-trust.
Step 3. In the Upload File field, click browse and browse to the root certificate file.
Step 4. Click Upload.
- Upload intermediate certificate on Primary Live-Data server.
Step 1. Steps on uploading the intermediate certififcate is same as the root certificate as shown in step 1.
Step 2. On primary server Cisco Unified Communications Operating System Administration page, navigate to Security > Certificate Management > Upload Certificate.
Step 3. From the Certificate Name drop-down list, select tomcat-trust.
Step 4. In the Upload File field, click browse and browse to the Intermediate certificate file.
Step 5. Click Upload.
Note: As Tomcat-trust store is replicated between the primary and secondary servers it is not needed to upload the root or Intermediate certificate to the Secondary Live-Data server.
- Upload Primary Live-Data server application certificate.
Step 1. From the Certificate Name drop-down list, select tomcat.
Step 2. In the Upload File field, click Browse and browse to the application certificate file.
Step 3. Click Upload.
- Upload Secondary Live-Data server application certificate.
Follow the same steps as mentioned above in (4) on the secondory server for its own application certificate.
- Restart servers
Access the CLI on the primary and secondary Finesse servers and enter the command "utils system restart" to restart the servers.
Live Data Servers Certificate Dependencies
As live data servers interact with CUIC and Finesse servers, there are certificate dependencies between these servers as shown in the image:

In regards to the third party CA certificate chain the Root and Intermediate certificates are same for all the servers in the organization. As a result for Live data server to work properly, you have to ensure that the Finesse and CUIC servers have the Root and intermediate certificates properly loaded in there Tomcat-Trust containers.
Verify
There is currently no verification procedure available for this configuration.
Troubleshoot
There is currently no specific troubleshooting information available for this configuration.


 Feedback