Introduction
This document describes the procedure to troubleshoot the problem when the Customer Voice Portal (CVP) upgrade version is not reflected on the Windows Add and Remove Software.
Prerequisites
Requirements
Cisco recommends that you have knowledge of these products:
-
CVP Server
-
Windows Operating System
Components Used
The information in this document is based on these products and software versions:
- CVP Server 10.5
- CVP Server 9.0(1)
- CVP Operations Console (OAMP)
The information in this document was created from the devices in a specific lab environment. All of the devices used in this document started with a cleared (default) configuration. If your network is live, ensure that you understand the potential impact of any command.
Problem
When CVP servers are upgraded to 10.5 version, the version details in Add/Remove programs could not get updated. it could still show the old version. As shown in the image.

Solution
Since the version details are not updated in the Add/Remove programs of the CVPserver. First you need to confirm that the upgrade happened successfully. Here are all the detailed steps.
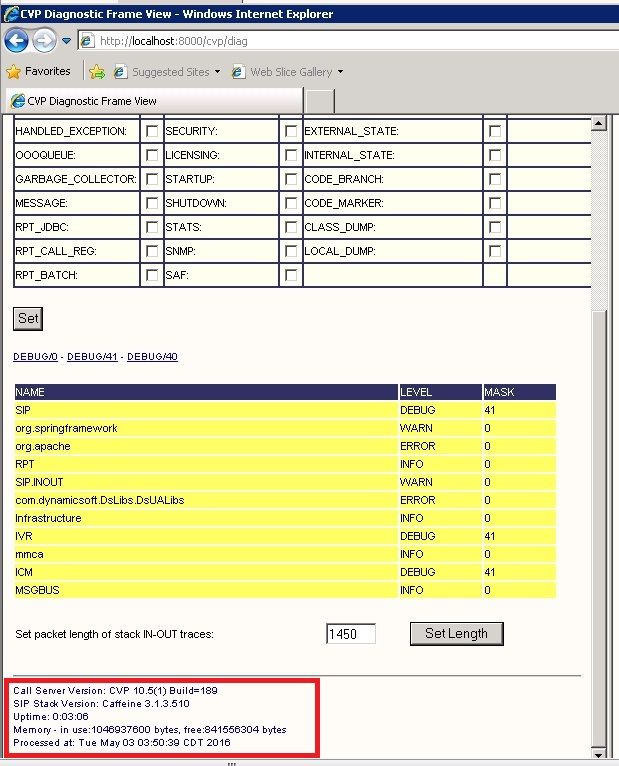
Step 1. Verify this information and make sure there is no production impact. Cross verify the CVP version in CVP diag page: https://<CVP SERVER IP/Hostname>:8443/cvp/diag. As shown in the image.

Step 2. Check the Installation logs, path: C:\Temp\CiscoUnifiedCVPInstall.log file and ensure that the files are copied successfully without any error. As shown in this log snippet.
[5-3-2016 03:46:40] Informational:  "wrapper.java.additional.9= -Djava.rmi.server.hostname=XX.XX.XX.XX" has been inserted into wrapper.conf
[5-3-2016 03:46:40] Informational:  UpdateWrapperConfwithIPAddress: conf file found. Exit the ifelse block completely
[5-3-2016 03:46:40] Informational:  Exit UpdateWrapperConfwithIPAddress
[5-3-2016 03:46:40] Informational:  Set file attributes for C:\Cisco\CVP\conf\cvp_pkgs.properties to FILE_ATTR_NORMAL
[5-3-2016 03:46:40] Informational:  "cvp-pkgs.CVPServer = 1" has been inserted into cvp-pkgs.properties
[5-3-2016 03:46:40] Informational:  "cvp-pkgs.was-VoiceXMLServer = TOMCAT" has been inserted into cvp-pkgs.properties
[5-3-2016 03:46:40] Informational:  Found and deleted old Log Analysis shortcut link
[5-3-2016 03:46:40] Informational:  LaunchApp - success running: Executing cmd=<cmd.exe /C echo "F"|xcopy  /Y "C:\Softwares\CVP\Installer_Windows\VERSION" "C:\Cisco\CVP\conf\VERSION">.
[5-3-2016 03:46:40] Informational:  Copy succeeded.
[5-3-2016 03:46:52] Informational:  Updating Time Zone Information
[5-3-2016 03:46:52] Informational:  Running Sun Java Time Zone updater for JRE 1.6
[5-3-2016 03:46:52] Informational:  LaunchApp - success running: Executing cmd=<cmd.exe /C echo "F"|xcopy  /Y "C:\Softwares\CVP\Installer_Windows\VERSION" "C:\Cisco\CVP\conf\VERSION">.
[5-3-2016 03:46:52] Informational:  Copy succeeded.
[5-3-2016 03:46:52] Informational:  update Complete.
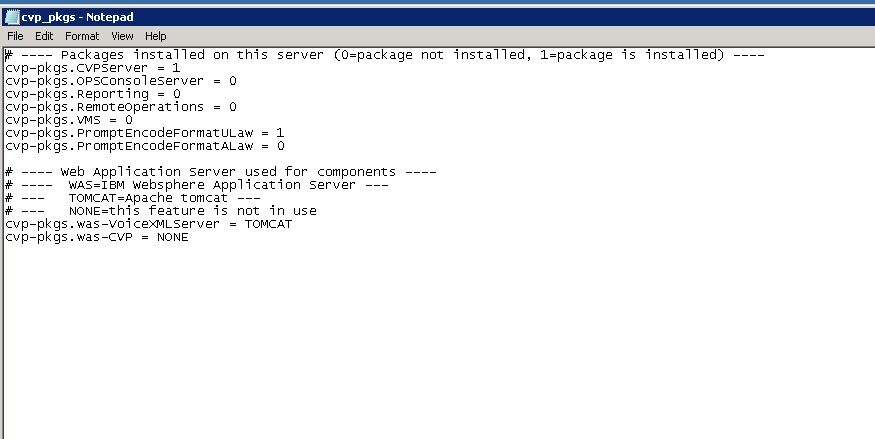
Step 3. Confirm the packages details from C:\Cisco\CVP\conf\cvp_pkgs.properties. As shown in the image.

Step 4. Cross verify the version update on CVP version file, Path: C:\Cisco\CVP\conf\VERSION. This are te details of the file.
PRODUCT_NAME=CVP
MAJOR_NUMBER=10
MINOR_NUMBER=5
MAINT_NUMBER=1
SR_NUMBER=0
ES_NUMBER=0
DROP_NUMBER=0
BUILD_NUMBER=189
BUILD_TIMESTAMP=1401424905000
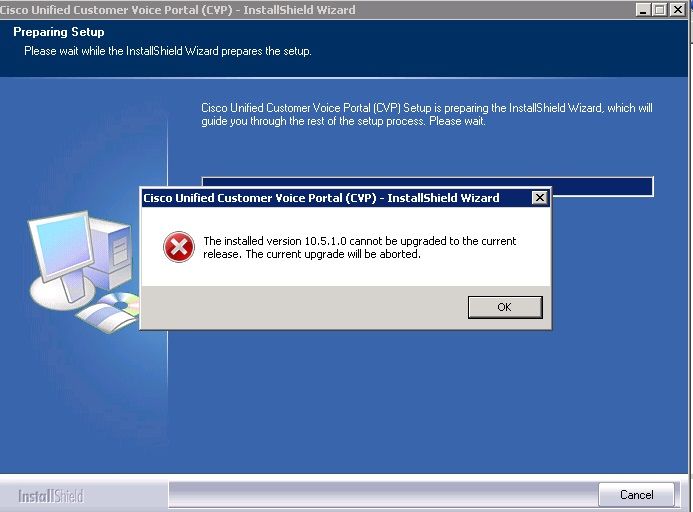
Step 5. Re-run the CVP installer file of exactly same build. If the file has the same as latest version installed, the current upgrade is aborted. This also confirm that the installation was completed successfully before. As shown in the image.

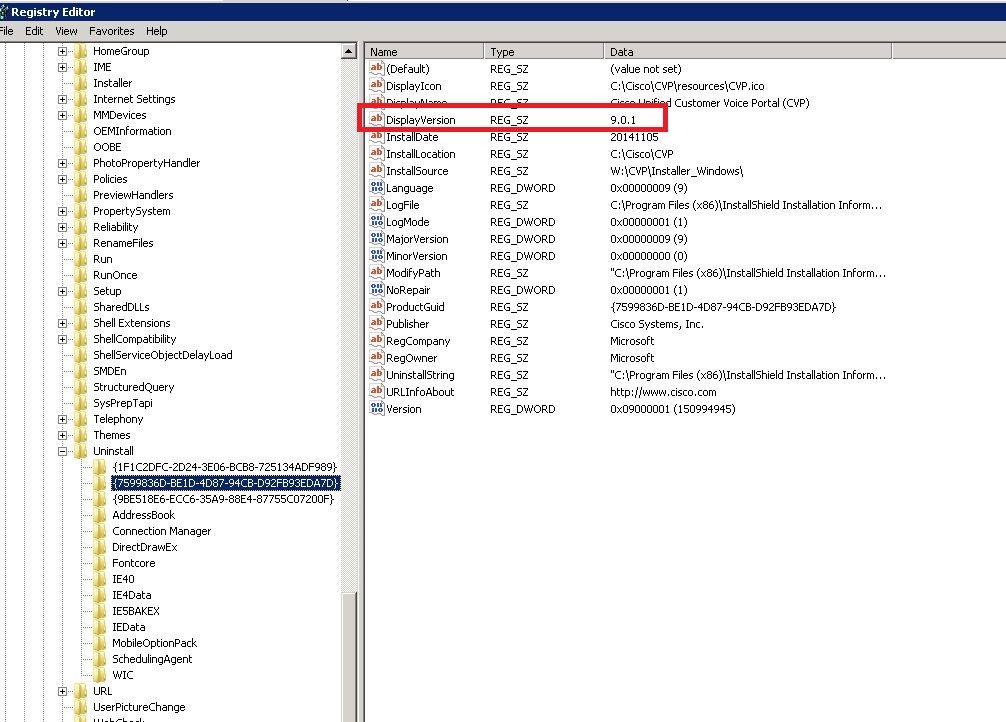
Step 6. Ensure you have the correct version in Microsoft uninstall CVP registry value, HKEY_LOCAL_MACHINE\SOFTWARE\Wow6432Node\Microsoft\Windows\CurrentVersion\Uninstall\{7599836D-BE1D-4D87-94CB-D92FB93EDA7D}. This registry details are directly linked with version shown in add/remove programs.
This steps help you to fix the issue if the registy value has the old version number, as shown in the image.
- Navigate to the location in the registry editor - HKEY_LOCAL_MACHINE\SOFTWARE\Wow6432Node\Microsoft\Windows\CurrentVersion\Uninstall\{7599836D-BE1D-4D87-94CB-D92FB93EDA7D}
- On the right pane of the screen, right-click on the icon Display Version.
A pop is displayed, select Modify
- Another pop is displayed, edit the Value Data field to 10.5.1 .


 Feedback