Introduction
This document describes how to replace Self-Signed SSL Certificates in Hyperflex clusters with third-party certificates.
Prerequisites
Requirements
Cisco recommends that you have knowledge of these topics:
- Basic understanding of SSL certificates.
- Basic understanding of Linux command line.
- Hyperflex Cluster Operations.
Components Used
The information in this document is based on:
Hyperflex Data Platform(HXDP) 5.0.(2a) and higher
The information in this document was created from the devices in a specific lab environment. All of the devices used in this document started with a cleared (default) configuration. If your network is live, ensure that you understand the potential impact of any command.
Background Information
In the Cisco HyperFlex deployment, a set of local certificates are generated between the components to allow for trusted communication.
If your organizations have a certificate authority already in place, it is recommended that you replace the default SSL Certificates with your own certificates.
Ensure that you have these requirements before you attempt this configuration :
- Certificate Authority Server
- Linux Machine
Configure
Step 1. Create a copy of openssl.cnf
Connect to Hyperflex Cluster Management IP (CMIP) using SSH as an administrative user and then switch to diag user.
HyperFlex StorageController 5.0(2a)
admin @ X.X.X.X's password:
This is a Restricted shell.
Type '?' or 'help' to get the list of allowed commands.
hxshell:~$ su diag
Password:
 _____ _                     _____ _                              ___                       ____
|  ___(_)_   _____     _    |_   _| |__  _ __ ___  ___     _     / _ \ _ __   ___          / ___|  _____   _____ _ __
| |_  | \ \ / / _ \  _| |_    | | | '_ \| '__/ _ \/ _ \  _| |_  | | | | '_ \ / _ \  _____  \___ \ / _ \ \ / / _ \ '_ \
|  _| | |\ V /  __/ |_   _|   | | | | | | | |  __/  __/ |_   _| | |_| | | | |  __/ |_____|  ___) |  __/\ V /  __/ | | |
|_|   |_| \_/ \___|   |_|     |_| |_| |_|_|  \___|\___|   |_|    \___/|_| |_|\___|         |____/ \___| \_/ \___|_| |_|


Enter the output of above expression: 2
Valid captcha
diag#

Note: From the 5.0(2a) version, diag user is available to allow users to have more privileges, if your cluster is in 4.5, please contact Cisco TAC to complete this procedure.
Create a directory in /tmp folder
In this example, it is named ssl.
diag# mkdir /tmp/ssl
Modify directory permissions.
diag# chmod 777 /tmp/ssl
Create a copy of openssl.cnf
In this example, the copy of openssl.cnf is named as openssl-san.cnf.
diag# cp /etc/ssl/openssl.cnf /tmp/ssl/openssl-san.cnf
diag# ls -l /tmp/ssl/
total 12
-rwxr-xr-x 1 diag diag 10835 Aug  3 21:39 openssl-san.cnf
Step 2. Edit openssl-san.cnf file
Create a directory on your local Linux Machine to copy openssl-san.cnf content from CMIP .
Edit the content of the file on your Linux Machine.

Note: openssl-san.cnf can be edited under SCVM with vi.
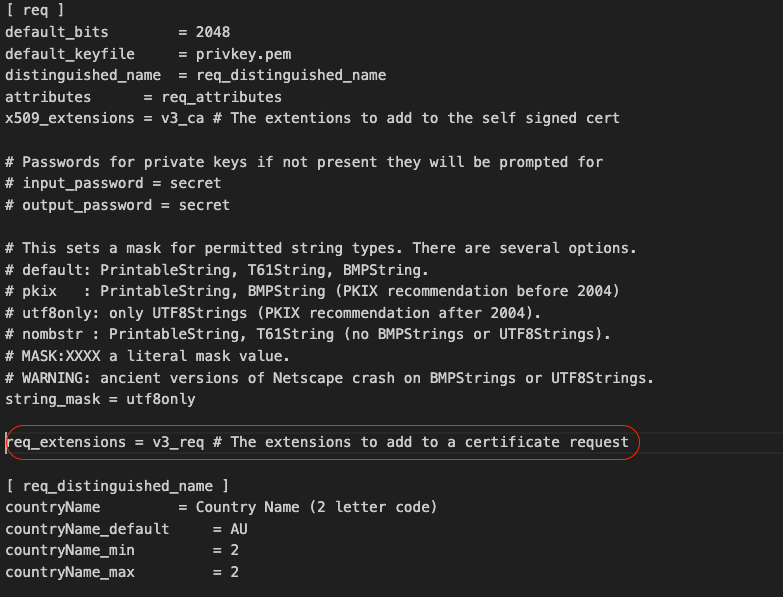
Uncomment the req-extensions line in the [ req ] section.
Remove the # symbol from the line.

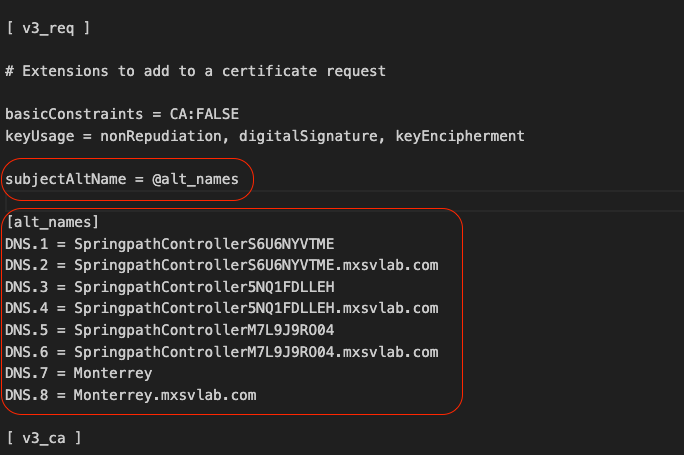
Add the Subject Alternative Name (SAN) in the [ v3_req ] section.
Add the SAN lines in the [ v3_req ] section. Ensure you add all Storage Controller Virtual Machines (SCVMs) and the Hyperflex Cluster Fully qualified domain name (FQDN).

Note: Chrome no longer supports the usage of Common Name and now requires Subject Alternative Names (SAN) to be present in the certificate.


Note: DNS server must resolve all SCVMs in your cluster.
Step 3. Create the Certificate
Step 3a. Create the CSR
From your Linux Machine run the command :
openssl req -nodes -newkey rsa:2048 -keyout /<path where you have openssl-san.conf>/<Host Name of the CVM>.key -out /<path where you have openssl-san.conf>/<Host Name of the CVM>.csr -config /<path where you have openssl-san.conf>/openssl-san.cnf
user$ openssl req -nodes -newkey rsa:2048 -keyout /Users/user/Documents/SpringpathController5NQ1FDLLEH.key -out /Users/user/Documents/SpringpathController5NQ1FDLLEH.csr -config /Users/user/Documents/openssl-san.cnf
Generating a 2048 bit RSA private key
..........................+++++
.....................................................................................................+++++
writing new private key to '/tmp/ssl/SpringpathControllerM7L9J9RO04.key'
-----
You are about to be asked to enter information that will be incorporated
into your certificate request.
What you are about to enter is what is called a Distinguished Name or a DN.
There are quite a few fields but you can leave some blank
For some fields there will be a default value,
If you enter '.', the field will be left blank.
-----
Country Name (2 letter code) [AU]:MX
State or Province Name (full name) [Some-State]:CDMX
Locality Name (eg, city) []:Benito Juarez
Organization Name (eg, company) [Internet Widgits Pty Ltd]:Cisco Systems
Organizational Unit Name (eg, section) []:TAC
Common Name (e.g. server FQDN or YOUR name) []:Monterrey.mxsvlab.com
Email Address []:

Please enter the following 'extra' attributes
to be sent with your certificate request
A challenge password []:<password>
An optional company name []:Cisco Systems
Two files are generated after the command is run; .key and .csr.
user$ ls -l
total 54
-rw-r--r--@ 1 user staff 1549 Aug 3 14:24 SpringpathControllerM7L9J9RO04.csr
-rw-r--r-- 1 user staff 1704 Aug 3 14:24 SpringpathControllerM7L9J9RO04.key
-rw-r--r-- 1 user staff 11193 Aug 3 14:19 openssl-san.cnf
Step 3b. Create a certificate from Certificate Authority (CA)
Navigate to http://<CA-IP>/certsrv/certrqxt.asp

Copy the content of <Host Name of the CVM>.csr file and paste it to your Certificate Authority (CA).
Select Web Server under Certificate template.
Type ALT Names in the next format on Attributes.
san:dns=<SCVM01 FQDN>&dns=<SCVM02 FQDN>&dns=<SCVM03 FQDN>&dns=<CMIP FQDN>

Click submit to generate the certificate as .cer file

Note: Ensure the certificate type is a Web server and the Attributes field has ALT Names.

Note: The content of the X.509 CSR is entered by the user. There are no backend checks on the contents of the entry. If you specify the [multiple] hostnames or IPs of the nodes as subject alternative names, or if you use the wildcard character to specify the hostname for the Common Name, a single certificate can be used for all nodes
Step 4. Convert the certificate from .cer to .crt
Copy the .cer certificate to your Local Linux Machine
In your local Linux Machine, run the command:
openssl x509 -inform PEM -in certnew.cer -out certnew.crt
user$ openssl x509 -inform PEM -in certnew.cer -out certnew.crt
user$ ls -l
total 56
-rw-r--r--@ 1 user  staff   1549 Aug  3 14:24 SpringpathControllerM7L9J9RO04.csr
-rw-r--r--  1 user  staff   1704 Aug  3 14:24 SpringpathControllerM7L9J9RO04.key
-rw-r--r--@ 1 user staff   2380 Aug  3 15:03 certnew.cer
-rw-r--r--  1 user  staff   2342 Aug  3 15:04 certnew.crt
-rw-r--r--  1 user  staff  11193 Aug  3 14:19 openssl-san.cnf
Step 5. Import the certificate.
Upload the .key and .crt files from your local Linux VM to /tmp/ssl on the CMIP.

Note: You can use SCP to copy the files to the SCVM
diag# ls -l
total 20
-rw-r--r-- 1 admin springpath  1704 Aug  3 22:46 SpringpathControllerM7L9J9RO04.key
-rw-r--r-- 1 admin springpath  2342 Aug  3 22:46 certnew.crt
-rwxr-xr-x 1 diag  diag       10835 Aug  3 21:39 openssl-san.cnf
Run this command
diag# /usr/share/springpath/storfs-misc/hx-scripts/certificate_import_input.sh
Enter the path for the key: /tmp/ssl/SpringpathControllerM7L9J9RO04.key
Enter the path for the certificate in crt format: /tmp/ssl/certnew.crt
Successfully installed certificate
The cluster needs to be re-registered with vCenter for the certificate import to be completed.
Do you want to continue with re-registration? (y/n): y
Enter vCenter username (user@domain): administrator @ vsphere.local
Enter vCenter Password:
Trying to retrieve vCenter information ....
Cluster re-registration in progress ....
Cluster re-registered successfully with vCenter !!

Note: vCenter re-registration is required. Submit administrator credentials.
Verify
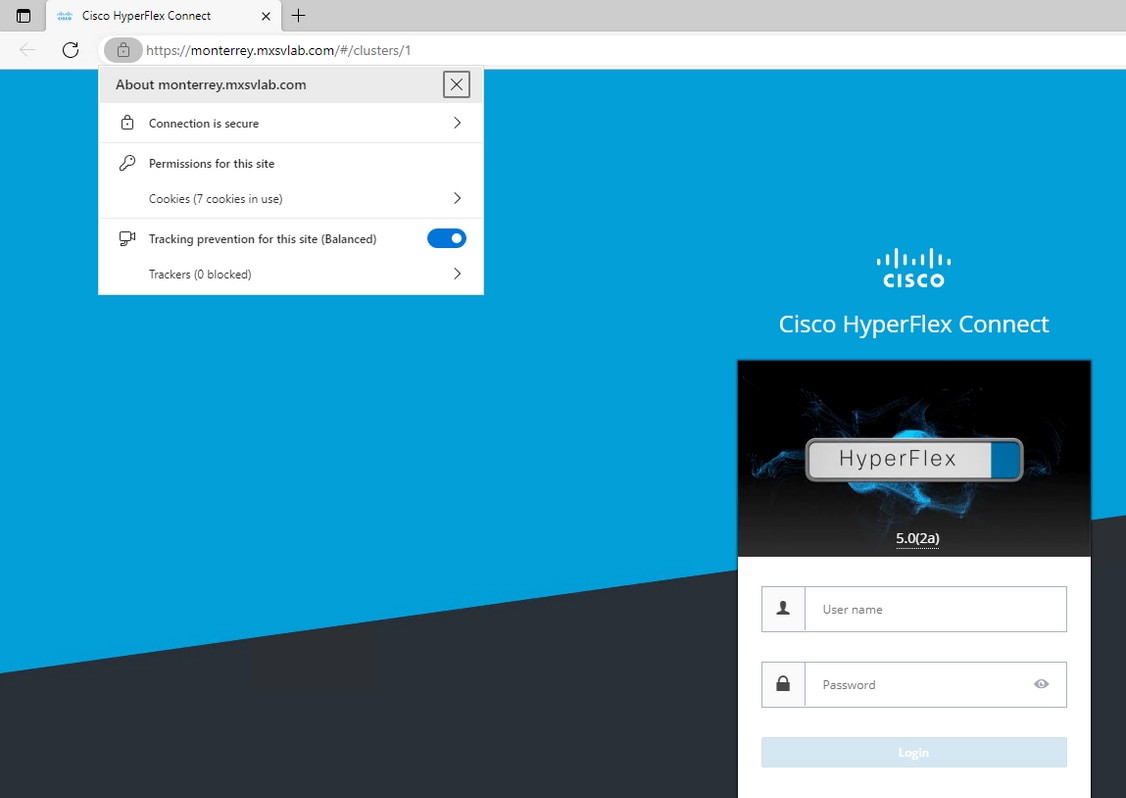
Confirm you have a secure connection after you import the certificate.

Troubleshoot
Certificate not valid using IP.
The use of SCVMs IP does not have a secure connection as the certificate is generated with FQDNs.

When you use FQDN you have a secure connection.

Related Information


 Feedback