Deploy HyperFlex Remote Plugin - Deployment Guide
Available Languages
Download Options
Bias-Free Language
The documentation set for this product strives to use bias-free language. For the purposes of this documentation set, bias-free is defined as language that does not imply discrimination based on age, disability, gender, racial identity, ethnic identity, sexual orientation, socioeconomic status, and intersectionality. Exceptions may be present in the documentation due to language that is hardcoded in the user interfaces of the product software, language used based on RFP documentation, or language that is used by a referenced third-party product. Learn more about how Cisco is using Inclusive Language.
Contents
Introduction
This document describes how to deploy the Cisco HyperFlex Remote Plugin Appliance.
Pre-requisites
Requirements
Cisco recommends that you have knowledge in these topics:
- HyperFlex
- vCenter
- Networking
- DNS
Components used
The information in this document is based on these software and hardware versions:
- HyperFlex Connect 5.0.2d
- Hyperflex Standard Cluster
- VMware vCenter, 8.0.2.00100
- VMware ESXi, 7.0.3, 21930508
- Cisco HyperFlex Remote Plugin Appliance 3.0.0.1173
- WinSCP 6.1.1 (Build 13736)
The procedure performed in this document was created from the devices in a specific lab environment. All of the devices used in this document started with a cleared (default) configuration. If your network is live, ensure that you understand the potential impact of any command.
Background Information
The vSphere Client Remote vCenter plug-in architecture is designed to integrate plug-in functionality into the vSphere Client without the need to run inside vCenter Server. This provides plug-in isolation and enables scale-out of plug-ins that operate in large vSphere environments.
The main difference between the local and remote plug-in is that local plugin stores all its files on the vCenter itself, whereas remote plug-in stores the files in an appliance.
Starting with vSphere 8.0.0, the only architecture supported in vSphere releases is remote plugin.
Table 1. Cisco Hyperflex Remote Plugin Appliance Compatibility Matrix
|
vCenter Plugin Version |
Cisco Hyperflex Release |
ESXi version |
vCenter version |
|
3.0.0 and later |
4.0 (2f) and later |
6.7 u3 and later |
7.0 and later |
The deployment is an OVA-based installation with a Cisco Secured Linux Image.
Cisco Hyperflex Remote Plugin can be done in two ways.
- Deployment through vCenter.
- Deployment directly on a standalone ESXi host.

Note: The recommended deployment method is through vCenter
Once deployed, the Appliance have the configuration describe in Table 2 and Table 3.
Table 2. VM Hardware configuration
|
CPU |
1 vCPUs |
|
Memory |
8 GB |
|
Hard disk 1 |
48.83 GB |
|
Network Adapter |
1 |
Table 3. VM Software configuration
|
Guest OS |
Ubuntu Linux 20.04.6 LTS Cisco Secured Linux |
|
Compatibility |
ESXi 6.7 U2 virtual machine |
|
VMware Tools |
open-vm-tools 11.3.0.29534 (build-18090558) |
Procedure
Step 1. Download the Cisco HyperFlex HTML plugin OVA for VMware vCenter from the Cisco Software Download site.
To do this, navigate Downloads Home > Hyperconverged Infrastructure > Hyperflex HX Data Platform > Hyperflex Remote vCenter Plugin - 3.0.0.
 Cisco Downloads Website
Step 2. Login to the vCenter and select the host you want to deploy the Remote Plugin appliance. Right click on the host and click on Deploy OVF Template
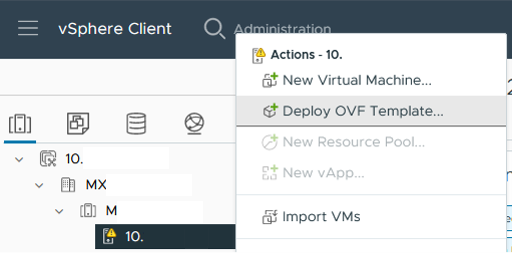 Deploy OVF Template
Step 3. Select the Local file option and upload the HTML5-remote-plugin-Appliance-3.0.0-1173.ova file, click Next.
 Select an OVF template
Step 4. Select the name for the Virtual machine and select a location for the virtual machine, click on Next.
 Select VM name and folder
Step 5. Select a Server(ESXi host) for the deployment, click on Next.
 Select Server
Step 6. On the Review details section you see these warnings:
- The OVF package contains advanced configuration options, which poses a potential security risk. Review the advanced configuration options. Click next to accept the advanced configuration options.
- The certificate is not trusted.
You can safely ignore those warnings, click on Ignore and then click on Next
 Review Details
Step 7. Select the datastore and select the disk format (Thin or thick provisioned), click on Next
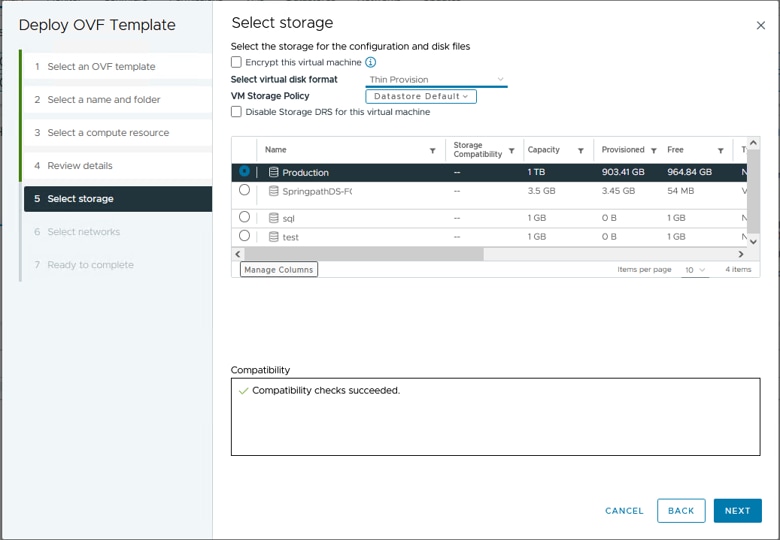 Select Datastore
Step 8. Select the portgroup for the VM network interface, click on Next
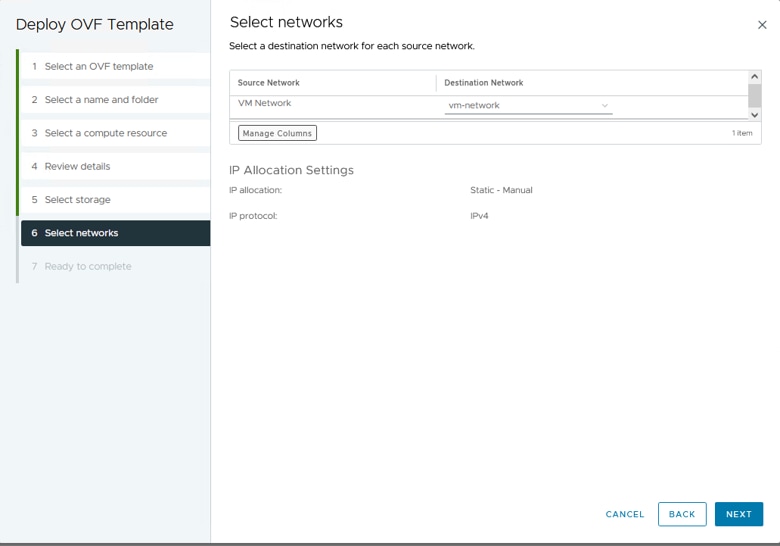 Select networks
Step 9. Review your selections before finishing the wizard, then click Finish.
 Review your selections
Step 10. Watch the progress in the vCenter Recent Tasks tab
 vCenter Recent Tasks
Step 11. Power on the Hypeflex Remote Plugin Virtual appliance. After the initial startup process a login prompt appears, use these credentials to Log in.
- Default username: vcp-admin
- Default password: C^scohxplugin@1984

Note: The creation of additional users or the use of the root user is not supported.

Caution: To get access to the Web GUI you need to change the default password. Otherwise, you get this error message:
Login using factory default password is disabled for security reasons. Please change the factory default password via ssh login/console and try login with new password.
 Console Login screen
Configure Management IP Address
By default, the Appliance gets an IP address from a DHCP Server available in the Portgroup/VLAN where the vnic was assigned.
Once you login into the Appliance you can find the assigned IPv4 address.
 Current IP Address
It is recommended to configure a static IP address to the virtual Appliance. To do this use the command hx-ip-address-change and follow the configuration wizard.
 Change IP Address
Verify the configured IP address using the ifconfig command.
 Verify IP Address
Change Password
You can change current password for user vpc-admin using the command passwd vcp-admin providing the current password and the New password.
 Change Password
Register a vCenter
The registration of vCenter into the Cisco Hyperflex Remote Plugin Appliance is UI based.

Caution: Users with an active firewall need to verify that ports 433, 9443 and 22 are open and allow traffic to pass in or out between vCenter and Remote Plugin Appliance.
Step 1. Enter the IP in browser (https://ip) to open the plugin server management UI. Login with vcp-admin user and your current new password.
 Hyperflex Remote vCenter Plug-in Appliance Login screen

Tip: To verify the current Application version and supported vCenter versions, once you successfully log in, click on the Gear on the top right corner of the screen.
Step 2.. Once you login click on the REGISTER button on the main dashboard.
 Main Dashboard
Step 3. Click on the REGISTER button to add the vCenter information where you want to deploy the remote plugin. Provide the IP address, port (443 by default) and vCenter username with enough privileges to perform the deployment. Click Next
 Add vCenters
Step 4. The system performs a connectivity test and appear online if it is able to reach the vCenter with the information provided. To proceed with registration click on the green REGISTER button
 Add vCenter Summary
Step 5. Confirm that the configured vCenter is in the Registered vCenters list.

Note: Click on the three dots menu on the left of a registered vCenter if you wish to Update the Installed Plug-in Version currently installed on that vCenter or Unregister the vCenter.
 Registered vCenters
Step 6. Verify in vCenter that the plug-in was successfully deployed. Two task are visible and marked as completed. “Download plug-in” and “Deploy plug-in".
 Verify Deployment tasks in vCenter
Step 7. Verify that the the plug-in is registered under vCenter Administration Client Plugins tab. As you can see, the type of plug-in is Remote and it is successfully deployed.
 Verify plug-in is installed
Step 8.. To view the Cisco HyperFlex HTML5 plugin options in the vSphere UI, log out and log in again to vCenter.. Once you log in again, right click on your Hyperflex cluster to find at the bottom the Cisco Hyperflex plugin
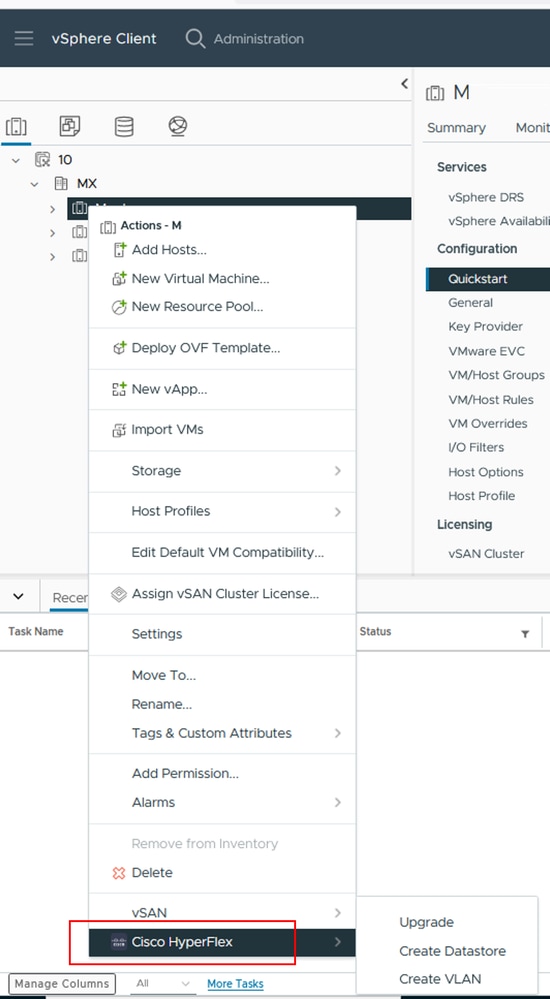 Verify plug-in availability
Step 9. Verify that your clusters are discovered by the plugin. In vCenter click on the Hamburguer menu, click on the Cisco Hyperflex plugin
 Accessing Plug-in
Step 10. In the Cisco Hyperflex plugin section you can find the Current Hyperflex cluster detected by the plug-in, if your cluster is not in the list click on Rescan.
 List of discovered Hyperflex clusters

Note: The configuration and feature functionality for the Remote and Local plugin are identical. For more information on any feature see the Cisco HyperFlex HTML5 Plugin for VMware vCenter section available in the Cisco HyperFlex Data Platform Administration Guide, Release 5.5, link available in the Related information section.
Troubleshooting
Unsupported hardware family
If you try to install on a lower version, such as ESXi 6.5, in the last step of the implementation you get this error:
Line 26: Unsupported hardware family 'vmx-15'
 Unsupported hardware error
This is due to the virtual hardware version used by the VM, it is necessary to deploy on ESXi 6.7 U2 or higher.
It is important to note that a hardware version 15 VM cannot be vMotioned to a host on a prior version of ESXi, including ESXi 6.7u1, ESXi 6.7, ESXi 6.0 etc, as these prior ESXi versions are not compatible with the new hardware version. Similarly, vCenter 6.7 or vCenter 6.7u1 can be used to manage ESXi 6.7u2 hosts as long as hardware version 15 VMs are not in use. For customers looking to create, run, and manage hardware version 15 VMs, both the ESXi hosts in the cluster and vCenter need to be upgraded to at least 6.7u2.
For additional details please refer to VMware article: Virtual machine hardware versions (KB 1003746)
A required disk image was missing
If you try to deploy using the OVA file directly to a host with ESXi 6.7 U2 or higher, in the last step before starting the deployment you get this warning 'A required disk image was missing'.
 A required disk image was missing error
To mitigate this warning it is necessary to unzip the OVA file 'HTML5-remote-plugin-Appliance-3.0.0-1173.ova', for this you can use the decompressor of your choice, such as 7zip.
Inside the unzipped folder you find this list of files:
- HTML5-remote-plugin-Appliance-3.0.0-1173.cert
- HTML5-remote-plugin-Appliance-3.0.0-1173.mf
- HTML5-remote-plugin-Appliance-3.0.0-1173.ovf
- HTML5-remote-plugin-Appliance-3.0.0-1173-disk1.vmdk
- HTML5-remote-plugin-Appliance-3.0.0-1173-file1.nvram
The required files for the deployment are:
- HTML5-remote-plugin-Appliance-3.0.0-1173.ovf
- HTML5-remote-plugin-Appliance-3.0.0-1173-disk1.vmdk
- HTML5-remote-plugin-Appliance-3.0.0-1173-file1.nvram
 Providing required files
Once you provide the three files, the warning is gone
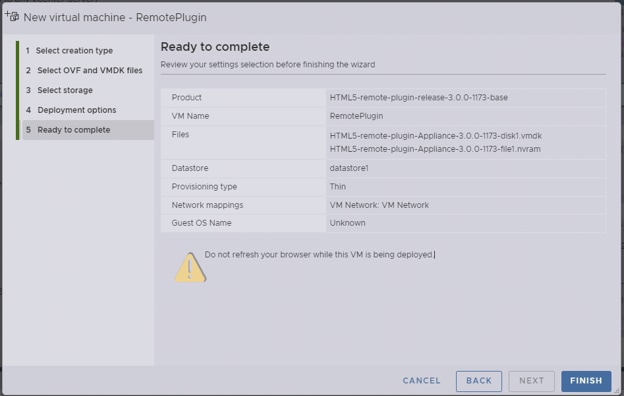 Ready to complete
vCenter Integration
Step 1. Verify that communication is allowed towards TCP port 443 of the FQDN (requires having configured DNS on the appliance) or vCenter IP address, in case of communication failure this can be seen in the Host Status column.
Step 2. Verify that the vCenter version is 7.0 or higher. If you try to register with an incompatible version, a 'Failed' message appears in Registration status. By placing the mouse over the red box for a short period of time, it shows a description of the error message. In this image, you can see an example of failure message when integrating VM Remote plugin with Vcenter due to an incompatible version
 Incompatible vCenter version
Additional Assistance
If you need additional support regarding the implementation or integration, you must contact Cisco TAC and attach the necessary log files.
Support bundle Generation
Support bundle generation is available only if you have at least one vCenter registered in the Cisco Hyperflex Remote Plugin Virtual Appliance.
Currently the support bundle generation is through commandline. You need to login into the console of the appliance (or use SSH) and run the command hx-plugin-supportbundle, by default the support bundle is saved in the /var/log/plugin_support/ directory.
User can specify the vCenter FQDN or IP address to proceed with the support bundle generation.

Note: root user credentials from the selected vCenter are required to generate the support bundle.
Step 1. SSH into the HyperFlex Remote Plugin Virtual appliance, login and run the command hx-plugin-supportbundle, this generates a tar file with vCenter logs and Hyperflex Remote Plugin appliance logs
 Support Bundle Generation
Step 2. Establish an SCP connection to the VM Remote Plugin, for this you can use software like WinSCP
- File Protocol: SCP
- Host name: [[ip.address.remotepluginappliance]
- Port number: 22
- Username: vcp-admin
- Password: [your-configured-password]
 SCP Connection parameters
Step 3. Navigate to the /var/log/plugin_support/ directory and download the support bundle file.
 Support bundle location
Collect logs manually from the Cisco HyperFlex Remote Plugin Appliance
If you are not able to register any vCenter in the appliance, you cannot generate a Support Bundle. A manual collection of the log files is needed.
Step 1. Establish an SCP connection to the VM Remote Plugin, for this you can use software like WinSCP
- File Protocol: SCP
- Host name: [ip.address.remotepluginappliance]
- Port number: 22
- Username: vcp-admin
- Password: [your-configured-password]
Step 2. Once you login you automatically find yourself in the path /home/vcp-admin, go to the root directory and then to the indicated paths to collect these log files:
- /var/log/auth.log
- /var/log/audit/audit.log
- /var/log/cisco/hx-plugin.log
- /var/log/cisco/hx-plugin-install.log
- /var/log/cisco/plugin-config.log
- /var/log/cisco/plugin-server.log
 Cisco logs location
Step 3. Upload the log files to your current Service Request. The steps to upload the files to the case are in the link "Customer File Uploads to Cisco Technical Assistance Center" available in the Related information section.
Related Information
Customer File Uploads to Cisco Technical Assistance Center
Cisco HyperFlex Data Platform Administration Guide, Release 5.5
Revision History
| Revision | Publish Date | Comments |
|---|---|---|
1.0 |
09-Feb-2024 |
Initial Release |
Contributed by Cisco Engineers
- Walter GuzmanTechnical Consulting Engineer
Contact Cisco
- Open a Support Case

- (Requires a Cisco Service Contract)
 Feedback