Configure Smart Licensing for IOS Enterprise Routing Platforms
Available Languages
Download Options
Bias-Free Language
The documentation set for this product strives to use bias-free language. For the purposes of this documentation set, bias-free is defined as language that does not imply discrimination based on age, disability, gender, racial identity, ethnic identity, sexual orientation, socioeconomic status, and intersectionality. Exceptions may be present in the documentation due to language that is hardcoded in the user interfaces of the product software, language used based on RFP documentation, or language that is used by a referenced third-party product. Learn more about how Cisco is using Inclusive Language.
Contents
Introduction
This document describes the types of Cisco Smart Licensing (SL) deployment and the required configuration.
Prerequisites
Requirements
- A Smart Account with access to the Cisco Smart Software Manager (CSSM) portal
- A device with Cisco IOS® version between 16.5.1 to 17.3.1
- Cisco Smart Software Manager On-Prem server
- HTTPS connectivity between the device and the CSSM or On-Prem server
Note: For some deployments, the Cisco Smart Software Manager On-Prem is not necessary. It is an optional component for the feature.
Caution: Smart Licensing is optional for versions between 16.5.1 and 16.9.8. For physical devices with Cisco IOS® XE 16.10.1a up to Cisco IOS® XE 17.3.1 Smart Licensing is mandatory. From 17.3.2 and onwards, Smart Licensing Using Policy is mandatory. For virtual devices and other Cisco platforms check the release notes of the specific code.
Components Used
This document applies to Cisco IOS XE Enterprise Routing Platforms.
The information in this document is based on the these hardware and software versions:
- Cisco ASR1001-X with Cisco IOS XE version 16.9.4 and Cisco ISR4351 with Cisco IOS XE version 16.12.1.
- Smart Software Manager server with 8-202108 version.
The information in this document was created from the devices in a specific lab environment. All of the devices used in this document started with a cleared (default) configuration. If your network is live, ensure that you understand the potential impact of any command.
Types of Deployment
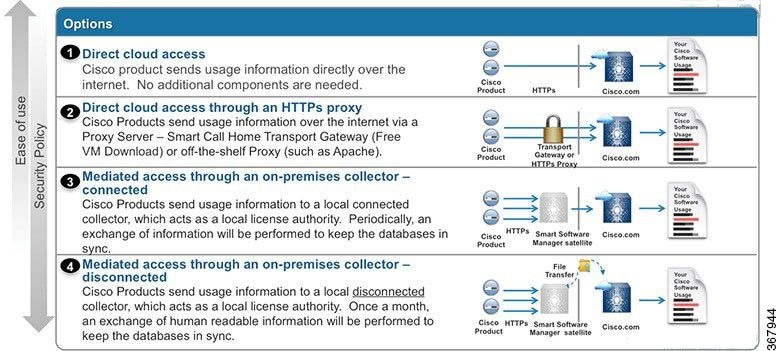
There are four main deployment options available for Smart Licensing registration and consumption:
- Direct CSSM Acces
- Direct CSSM Access with Proxy
- SSM On-Prem Access
- Specific License Reservation (SLR)
Direct CSSM Access
This deployment option allows you to transfer usage information over the Internet directly to Cisco via HTTPS.
From Cisco IOS XE 16.10.1a, smart licensing is enabled by default, and is the only licensing model available. For this deployment, Layer 3 configuration is required, and reachability to tools.cisco.com in HTTPS port (443) from the proper interface. DNS configuration is required.
Once the connectivity is confirmed, the steps to register the devices are:
Step 1. Enable Smart license on the device (Optional). From 16.10.1a it is enabled by default.
Router#configure terminal
Enter configuration commands, one per line.  End with CNTL/Z.
Router(config)#license smart enable
Note:This command enables service call-home which is required.
Step 2. Configure a Domain Name System (DNS) server or static host entry for tools.cisco.com.
Router(config)#ip name-server X.X.X.X
or
Router(config)#ip host tools.cisco.com X.X.X.X
Step 3. Generate a new token from Cisco Smart Software Manager.
- Log in to Cisco Smart Software Manager at https://software.cisco.com/# and navigate to Smart Software Manager section.
- Select the Inventory tab, and select Virtual Account from the Virtual Account drop-down list.
- Select the General tab, and then select New Token.
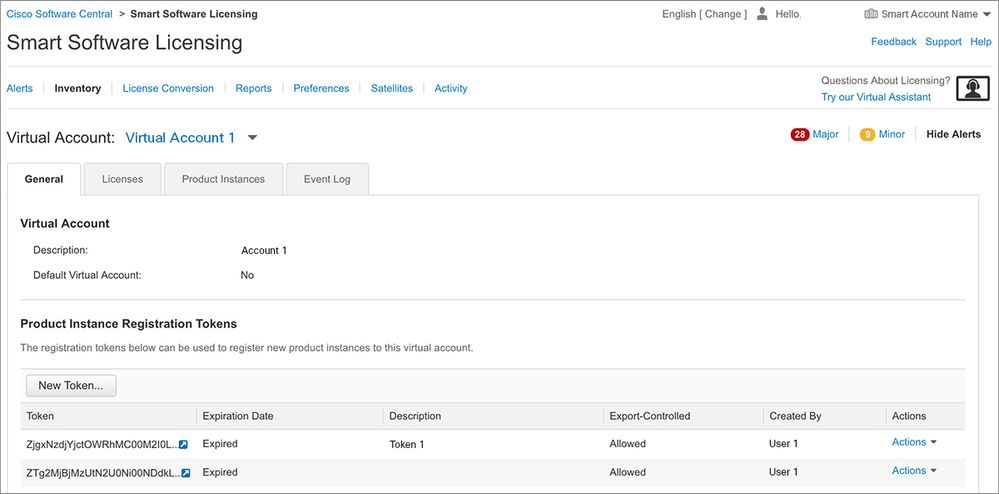
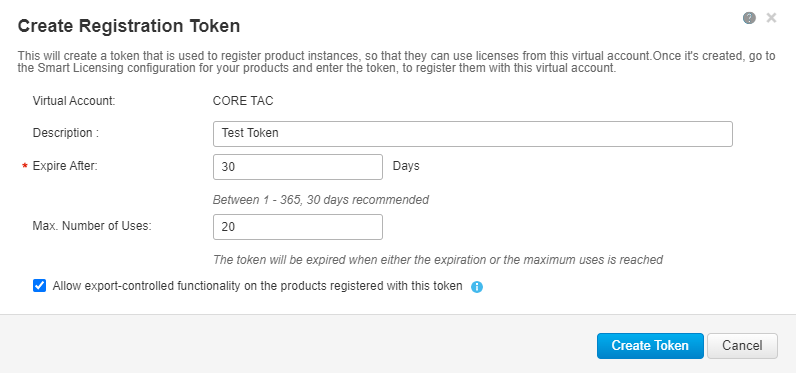
- Enter the token description and specify the number of days the token must be active.
- Enable Allow export-controlled functionality on the products registered with this token.This permits the request of high encryption license in the devices registered.
- Select Create Token. After the token is created, select Copy.
Step 4. Change call-home configuration (Optional).
The default call-home profile configuration is enough to register the device. You can verify the current call-home profile configuration here:
Router#show run | sec call-home
service call-home
call-home
! If contact email address in call-home is configured as sch-smart-licensing@cisco.com
! the email address configured in Cisco Smart License Portal will be used as
contact email address to send SCH notifications.
contact-email-addr sch-smart-licensing@cisco.com
profile "CiscoTAC-1"
active
destination transport-method http
no destination transport-method email
Step 5. Register the device with CSSM with the token.
Router#license smart register idtoken < token from CSSM portal > force

Note: The force keyword forces the registration attempt immediately. If not used, the registration procedure can take more time.
Step 6. Verify that the device registered correctly with the CSSM.
Router#show license status
Smart Licensing is ENABLED

Registration:
 Status: REGISTERED
 Smart Account: TAC Cisco Systems, Inc.
 Virtual Account: CORE TAC
 Export-Controlled Functionality: Allowed
 Initial Registration: SUCCEEDED on Sep 01 12:54:22 2017 UTC
 Last Renewal Attempt: None
 Next Renewal Attempt: Feb 28 12:54:22 2018 UTC
 Registration Expires: Sep 01 12:49:04 2018 UTC

License Authorization:
 Status: AUTHORIZED on Sep 01 12:54:28 2017 UTC
 Last Communication Attempt: SUCCEEDED on Sep 01 12:54:28 2017 UTC
 Next Communication Attempt: Oct 01 12:54:28 2017 UTC
 Communication Deadline: Nov 30 12:49:12 2017 UTC
Direct CSSM Access with Virtual Routing and Forwarding (VRF)
If the device uses a VRF to reach the CSSM, it is necessary to configure the source VRF and the source interface under call-home profile configuration. To configure this deployment, you must follow steps 1-3 from the Direct CSSM Access section. Then, edit the call-home configuration with the correct VRF, and the source interface to reach the CSSM URL. Here is used the management interface GigabitEthernet0 which is in the Mgmt-intf VRF as an example.
Router#configure terminal
Enter configuration commands, one per line. End with CNTL/Z.
Router(config)#call-home
Router(cfg-call-home)#source-interface gigabitEthernet 0
Router(cfg-call-home)#vrf Mgmt-intf
Configure the source HTTP interface with the correct interface assigned to the VRF. This configuration influences in the HTTP and HTTPS traffic.
Router#configure terminal
Enter configuration commands, one per line. End with CNTL/Z.
Router(config)#ip http client source-interface gigabitEthernet 0
Configure DNS for the specific VRF:
Router#configure terminal
Enter configuration commands, one per line. End with CNTL/Z.
Router(config)#ip name-server vrf Mgmt-intf X.X.X.X
Once the VRF configuration is done, it can be continued with steps 5 and 6 from the Direct CSSM Access section.
Direct CSSM Access with Proxy
If a proxy server is required to achieve HTTPS connectivity to the CSSM, it is required to follow the steps in the Direct CSSM Access section and include the http-proxy command inside the call-home configuration.
Router#configure terminal
Enter configuration commands, one per line. End with CNTL/Z.
Router(config)#call-home
Router(cfg-call-home)#http-proxy "10.118.47.99" port 8080
SSM On-Prem Access
This deployment type allows you to manage products and licenses on your premises without a direct connection to CSSM hosted by Cisco. To implement this, you must already have a SSM On-Prem installed in your network. The steps to install SSM On-Prem are outside the scope of this document.
The configuration steps to connect the SSM On-Prem server with a device are:
Step 1. Enable Smart Licensing on the device.
Router#configure terminal
Enter configuration commands, one per line.  End with CNTL/Z.
Router(config)#license smart enable
Note: This command enables service call-home which is required.
Step 2. Ensure that you are able to communicate with your CSSM On-Prem Server.
Router#ping X.X.X.X
Type escape sequence to abort.
Sending 5, 100-byte ICMP Echos to X.X.X.X, timeout is 2 seconds:
!!!!!
Success rate is 100 percent (5/5), round-trip min/avg/max = 8/9/10 ms
Note: If you have a DNS server, you can use it to resolve your On-Prem server IP address to a name.
Step 3. Generate a new token from SSM On-Prem.
3.1 Log in to the SSM Server.
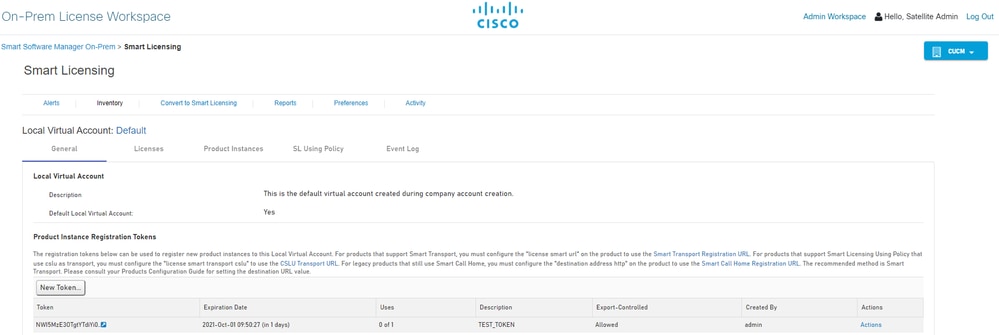
3.2 Token creation
- Enter the token description. Specify the number of days the token must be active.
- Enable the Allow export-controlled functionality on the products registered with this token check box.
- Select Create Token.
- After the token is created, select Copy to copy the newly created token.

Step 4. Configure call-home on the device.
It is required to change the destination address http command with the IP of the On-Prem server (http://X.X.X.X/Transportgateway/services/DeviceRequestHandler) and remove the default one.
Router(config)#call-home
Router(cfg-call-home)#profile CiscoTAC-1
Router(cfg-call-home-profile)#destination transport-method http
Router(cfg-call-home-profile)#destination address http http://X.X.X.X/Transportgateway/services/DeviceRequestHandler
Router(cfg-call-home-profile)#no destination address http https://tools.cisco.com/its/service/oddce/services/DDCEService
Router(cfg-call-home-profile)#active
Router(cfg-call-home-profile)#exit
Router(cfg-call-home)#contact-email-addr test@cisco.com
Router(cfg-call-home)#service call-home
Router(cfg-call-home)#end
Step 5. Configure revocation-check none on the SLA-TrustPoint trustpoint.
Router#configure terminal
Router(config)#crypto pki trustpoint SLA-TrustPoint
Router(ca-trustpoint)#revocation-check none
Step 6. Register the device with the token retrieved from SSM On-Prem.
Router#license smart register idtoken < token from SSM On-Prem portal > force
Step 7. Verify that the device registered correctly with the SSM On-Prem.
Router#show license status
Smart Licensing is ENABLED
Utility:
  Status: DISABLEDData Privacy:
 Sending Hostname: yes
 Callhome hostname privacy: DISABLED
 Smart Licensing hostname privacy: DISABLED
 Version privacy: DISABLED

Transport:
 Type: Callhome

Registration:
 Status: REGISTERED
 Smart Account: manudiaz
 Virtual Account: Default
 Export-Controlled Functionality: ALLOWED
 Initial Registration: SUCCEEDED on Jan 20 15:22:12 2020 UTC
 Last Renewal Attempt: None
 Next Renewal Attempt: Sept 30 14:22:12 2021 UTC
 Registration Expires: Oct 19 04:35:44 2021 UTC
SSM On-Prem Access with VRF Configuration
If you use a VRF to reach SSM On-Prem, you must configure the source VRF so the device generates the request from the correct VRF.
Follow the steps in the SSM On-Prem Access section until Step 3.
Step 1. Edit the call-home configuration with the correct VRF and the source interface where you can reach SSM On-Prem:
Router#configure terminal
Enter configuration commands, one per line. End with CNTL/Z.
Router(config)#call-home
Router(cfg-call-home)#source-interface gigabitEthernet 0
Router(cfg-call-home)#vrf Mgmt-intf
Step 2. Configure the source http-client interface with the correct interface assigned to the VRF:
Router#configure terminal
Enter configuration commands, one per line. End with CNTL/Z.
Router(config)#ip http client source-interface gigabitEthernet 0
Step 3. Configure DNS for the specific VRF.
You can configure a DNS server in your On-Prem environment to resolve the name of your SSM On-Prem server:
Router#configure terminal
Enter configuration commands, one per line. End with CNTL/Z.
Router(config)#ip name-server vrf Mgmt-intf X.X.X.X X.X.X.X
You can continue with the steps 5 and 6 from SSM On-Prem Access after these changes.
Specific License Reservation (SLR)
SLR is a feature that enables you to deploy a software license on a device without directly communicating usage information to Cisco. This functionality is especially useful in highly secure networks, and it is supported on platforms that have Smart Licensing Portal. This configuration guide assumes that you have requested and have been authorized to use SLR.
Note: SLR is not enabled by default. You must specifically request this functionality.
Note: SLR and the license enforcements are supported in Cisco IOS XE 16.11.1a and later releases.
To configure SLR in the device, it is required to perform these steps from the router side as well as CSSM portal
Step 1. Configure the router for SLR. You must enter the license smart reservation command and request the SLR feature with license smart reservation request local.
Note: If the registration is done in an HA platform, you must use license smart reservation request all.
Router# enable
Router# configure terminal
Router(config)# license smart reservation
Router(config)# exit
Router# license smart reservation request local
UDI: PID:ASR1002-X,SN:JAE170XXXXX
  Request code: CB-ZASR1002-X:JAE17010XXXX-AxFL8XXXX-XX
Note: SLR is not enabled by default. You must specifically request this functionality.
Note: To cancel the license reservation request, run the license smart reservation cancel command.
On the CSSM, it is required to reserve the licenses required.
Step 2. Log in to CSSM at https://software.cisco.com/#. You must log in to the portal with your Cisco credentials.
Step 3. Select the Inventory tab. From the Virtual Account drop-down, select your Smart Account.
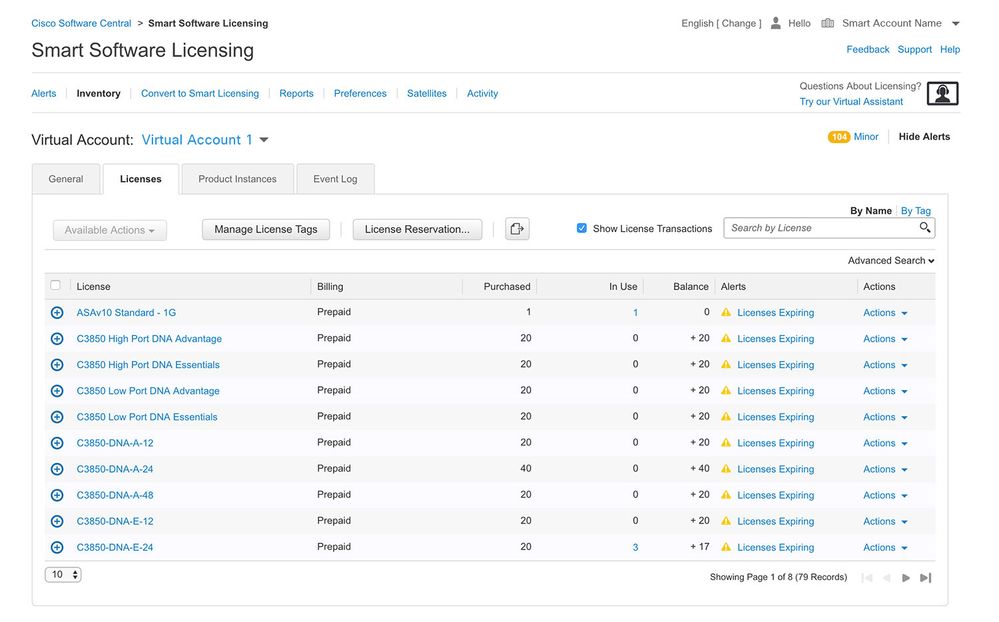
Step 4. From the Licenses tab, select License Reservation.
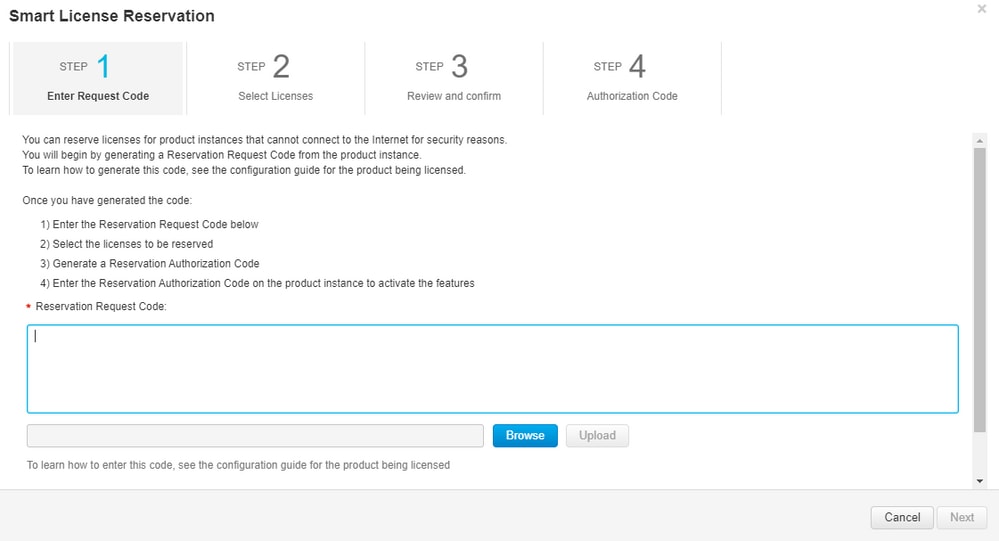
Step 5. On the Enter Request Code page, enter or attach the reservation request code you generated from the router, and select Next.
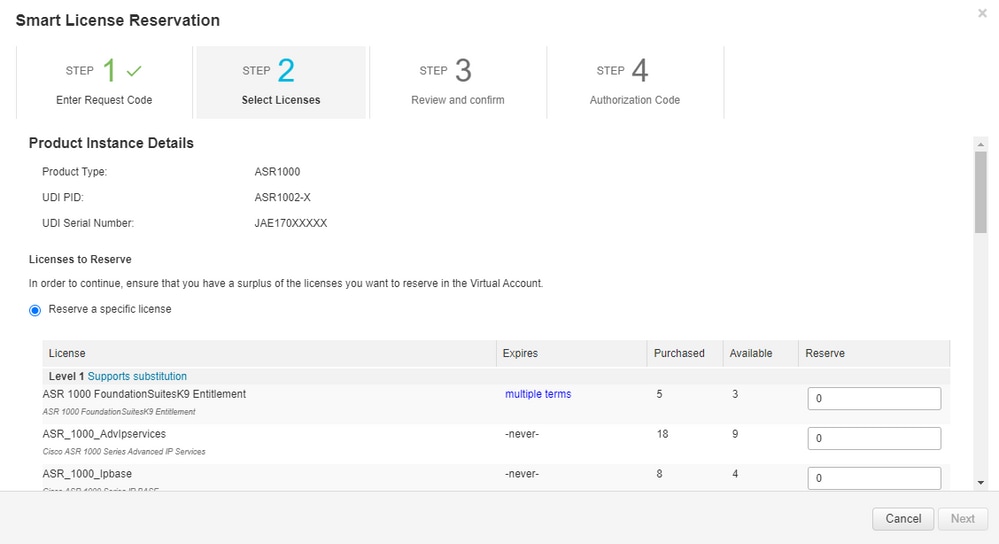
Step 6. Check the Reserve a Specific License box and select the license and the amount of reserved license required for each device.
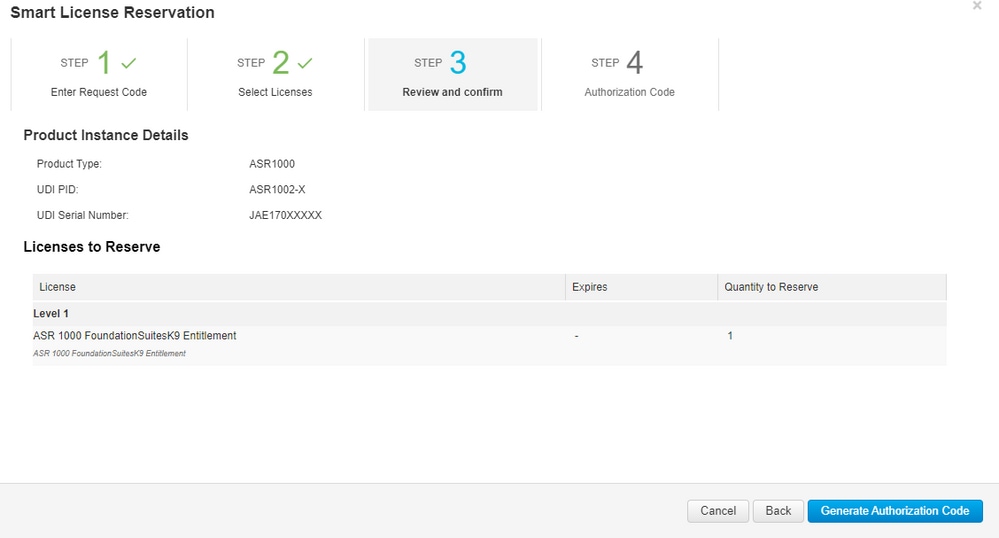
Step 7. From the Review and Confirm tab, select Generate Authorization Code.
Note: After you generate the SLR code for a specific device, the authorization code file is valid until you install the code. If the installation fails, you must contact Cisco Global License Operations (GLO) to create a new authorization code. You can contact GLO.
Step 8. Select Copy to Clipboard to copy the code, or Download it as a file. You need to copy the code or file to your device to continue the process.
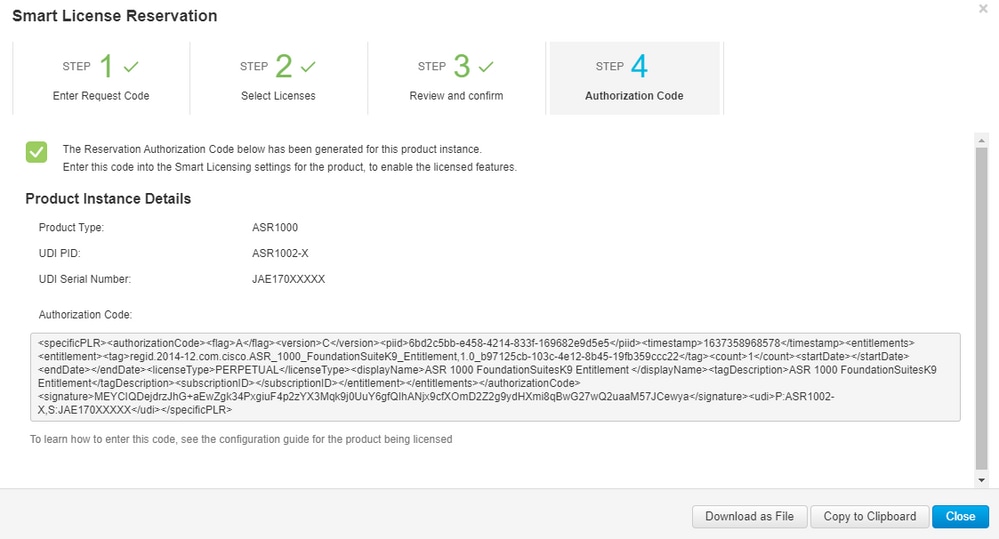
If you configure SLR, you can download or install the authorization code text file. If you configure Permanent License Reservation (PLR), you can copy and paste the authorization code.
Step 9. Log in to your device and use the installation command license smart reservation install file bootflash:<SLR file>.
Router#enable
Router#license smart reservation install file bootflash:
If needed, you can return the licenses reserved in the device and go back to an unregistered state. A return code is generated and must be entered in CSSM to remove the product instance.
Router#enable
Router#license smart reservation return local
Update a Specific License Reservation
After you register a device successfully, if required, you can update the reservation with a new feature or license:
Step 1. Log in to Cisco Smart Software Manager at https://software.cisco.com/#. You must log in to the portal with the Cisco provided username and password.
Step 2. Navigate to the Inventory tab and select your Smart Account from the Virtual Account drop-down.
Step 3. From the Product Instances tab, select Actions for the device you need to update.
Step 4. Select Update Reserved Licenses.
Step 5. Select the license that you want to update.
Step 6. Select Next.
Step 7. From the Review and Confirm tab, select Generate Authorization Code. The Authorization Code tab is displayed. The system displays the authorization code that is generated.
Step 8. Select the Copy to Clipboard option to copy the code, or download it as a file. You need to copy the code or file to your device.
Step 9. Log into the device that you want to update.
Step 10. Run the license smart reservation install file command.
Router#enable
Router#license smart reservation install file bootflash:
Deregister a Specific License Reservation
To deregister a Specific License Reservation for a device, you must return the license reservation in the CLI and remove the instance from CSSM.
Step 1. Log in to the device that you want to deregister.
Step 2. To remove the license reservation authorization code, use the license smart reservation return command.
Router#license smart reservation return local
This command will remove the license reservation authorization code and the device will transition
back to the unregistered state. Some features may not function properly.
Do you want to continue? [yes/no]: yes
Enter this return code in Cisco Smart Software Manager portal:
UDI: PID:ISR4351/K9,SN:FDO210305DQ
    CBURR4-cTgMun-arvYME-gta6ir-yqnXQm-yMKxWM-2ajywD-5kADgZ-a33
Step 3. Log in to CSSM at https://software.cisco.com/#.
Step 4. Select the Inventory tab. From the Virtual Account drop-down list, select your smart account.
Step 5. From the Product instance tab, for the device that you want to deregister, select Actions.
Step 6. Select Remove.
Step 7. When prompted, enter the return code.
Troubleshoot
Device Is Not Able to Resolve tools.cisco.com
Verify that you have correctly configured a DNS server for the correct VRF or global route table. If preferred, you can also create a static DNS entry:
Router(config)#ip host tools.cisco.com 72.163.4.38 173.37.145.8
Note: The IP addresses 72.163.4.38 and 173.37.145.8 are used to reach tools.cisco.com. Those can change as resolved by DNS. Confirm with local equipment before manual configuration.
Router Is Not Able to Communicate with tools.cisco.com
- Ensure that a default route to the Internet is configured.
- Ensure that there is not a firewall or proxy between the device and CSSM.
- Ensure that ports 443 and 80 are not blocked.
Router#telnet tools.cisco.com 443
Trying tools.cisco.com (72.163.4.38, 80)... Open
- Telnet with VRF.
Router#telnet tools.cisco.com 443 /vrf Mgmt-intf
Trying tools.cisco.com (72.163.4.38, 443)... Open
License in "OUT OF COMPLIANCE" Status
This state occurs when the device uses an entitlement and is not in compliance (negative balance). This occurs when a required license is not available in the Virtual Account with which the Cisco device is registered.
Router#show license all

License Authorization:
  Status: OUT OF COMPLIANCE on Mar 25 15:00:27 2019 CDT
  Last Communication Attempt: SUCCEEDED on Mar 25 15:12:32 2019 CDT
  Next Communication Attempt: Mar 26 03:12:31 2019 CDT
  Communication Deadline: Jun 23 15:06:30 2019 CDT
- To enter into Compliance / Authorized state, you must add the correct number and type of licenses to the Smart Account
- When the device is in this state, it automatically sends an authorization renewal request every day
Smart Licensing Debugs
Some debugs that can be used to troubleshoot call-home and smart licensing registration issues are:
- debug call-home trace
- debug call-home error
- debug call-home smart-licensing all
- debug ip http client all
- debug crypto pki <all options>
- debug ssl openssl <all options>
Additional Information
Cisco Smart Licensing Guide for Cisco Enterprise Routing Platforms
Revision History
| Revision | Publish Date | Comments |
|---|---|---|
3.0 |
29-Aug-2024 |
Updated Title, Branding Requirements, Machine Translation, Style Requirements, Spelling and Formatting. |
2.0 |
27-Jun-2023 |
Added Alt Text.
Updated Title, Branding Requirements, Machine Translation, Style Requirements, Spelling and Formatting. |
1.0 |
24-May-2022 |
Initial Release |
Contributed by Cisco Engineers
- Sergio RomeroCustomer Delivery Engineering Technical Leader
- Manuel DiazTechnical Consulting Engineer
Contact Cisco
- Open a Support Case

- (Requires a Cisco Service Contract)
 Feedback