Troubleshoot Wired Dot1x Issues in ISE 3.2 and Windows
Available Languages
Download Options
Bias-Free Language
The documentation set for this product strives to use bias-free language. For the purposes of this documentation set, bias-free is defined as language that does not imply discrimination based on age, disability, gender, racial identity, ethnic identity, sexual orientation, socioeconomic status, and intersectionality. Exceptions may be present in the documentation due to language that is hardcoded in the user interfaces of the product software, language used based on RFP documentation, or language that is used by a referenced third-party product. Learn more about how Cisco is using Inclusive Language.
Introduction
This document describes how to configure a basic 802.1X PEAP authentication for Identity Services Engine (ISE) 3.2 and Windows Native supplicant.
Prerequisites
Requirements
Cisco recommends that you have knowledge of these topics:
- Protected Extensible Authentication Protocol (PEAP)
- PEAP 802.1x
Components Used
The information in this document is based on these software and hardware versions:
- Cisco Identity Services Engine (ISE) Version
- Cisco C1117 Cisco IOS® XE Software, Version 17.12.02
- Laptop using Windows 10
The information in this document was created from the devices in a specific lab environment. All of the devices used in this document started with a cleared (default) configuration. If your network is live, ensure that you understand the potential impact of any command.
Configure
Network Diagram
 Network Diagram
Configurations
Perform these steps to configure:
Step 1. Configure ISR 1100 router.
Step 2. Configure Identity Service Engine 3.2.
Step 3. Configure Windows Native Supplicant.
Step 1. Configure ISR 1100 Router
This section explains the basic configuration that at least the NAD must have in order to make dot1x work.

Note: For multi-node ISE deployment, configure the IP of the node that has the PSN persona enabled. This can be enabled if you navigate to ISE under the Administration > System > Deployment tab.
aaa new-model
aaa session-id common
!
aaa authentication dot1x default group ISE-CLUSTER
aaa authorization network default group ISE-CLUSTER
aaa accounting system default start-stop group ISE-CLUSTER
aaa accounting dot1x default start-stop group ISE-CLUSTER
!
aaa server radius dynamic-author
 client A.B.C.D server-key  <Your shared secret>
!
!
radius server  ISE-PSN-1
 address ipv4 A.B.C.D auth-port 1645 acct-port 1646
 timeout 15
 key <Your shared secret>
!
!
aaa group server radius ISE-CLUSTER
 server name ISE-PSN-1
!
interface GigabitEthernet0/1/0
 description "Endpoint that supports dot1x"
 switchport access vlan 15
 switchport mode access
 authentication host-mode multi-auth
 authentication order dot1x mab
 authentication priority dot1x mab
 authentication port-control auto
 dot1x pae authenticator
 spanning-tree portfast
Step 2. Configure Identity Service Engine 3.2.
2. a. Configure and add the Network Device to use for the authentication.
Add the Network Device to ISE Network Devices section.
Click the Add button to start.
 ISE Network Devices
Enter the values, assign a name to the NAD you are creating, and also add the IP that the Network Device uses to contact ISE.
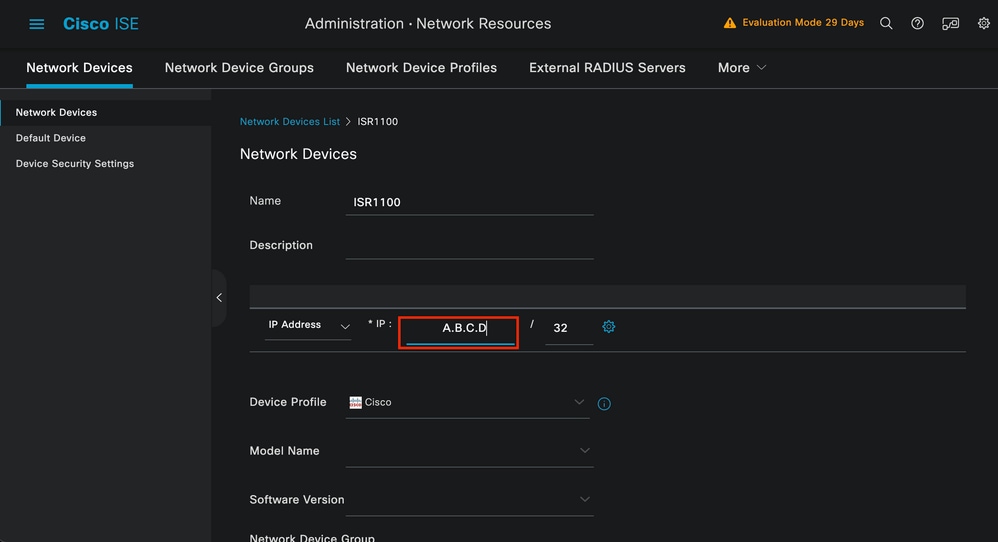 Network Device Creation Page
On this same page, scroll down to find the Radius Authentication Settings. As shown in the next image.
Add the Shared Secret that you used under your NAD configuration.
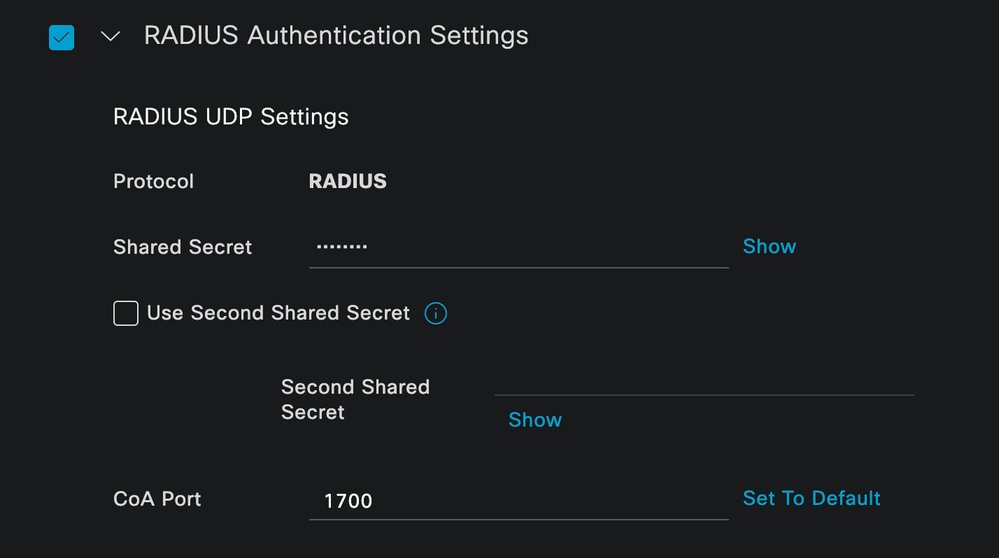 Radius Configuration
Save the changes.
2. b. Configure the identity that is used to authenticate the endpoint.

Note: With the objective of keeping this configuration guide simple ISE local authentication is used.
Navigate to the Administration > Identity Management > Groups tab. Create the group and the identity, the group created for this demonstration is iseUsers.
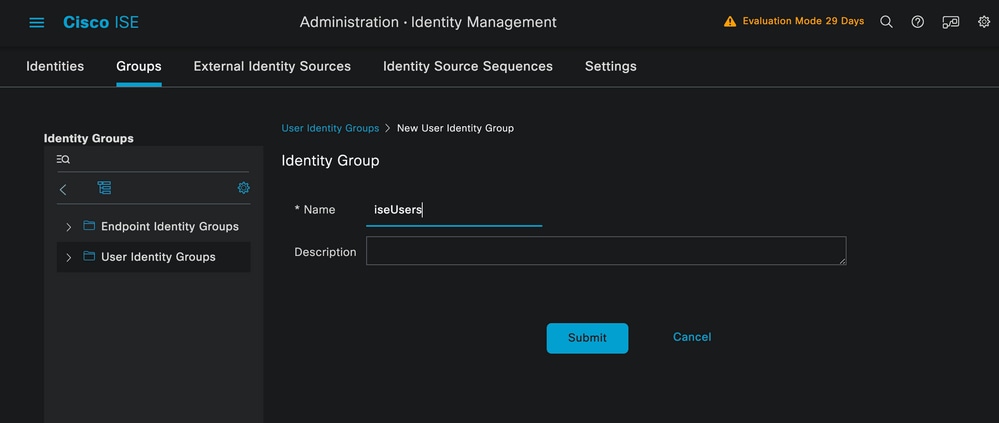 Identity Group Creation Page
Click the Submit button.
Next, navigate to Administration > Identity Management > Identity tab.
Click on Add.
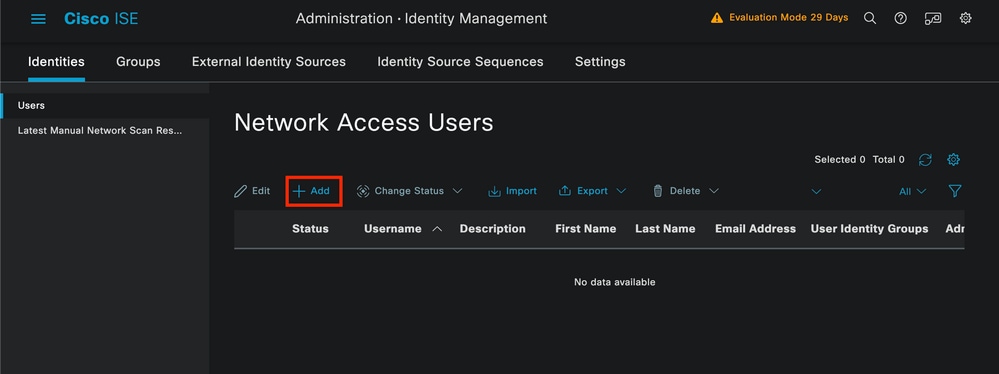 User Creation Page
As part of the mandatory fields start with the name of the user. The username iseiscool is used in this example.
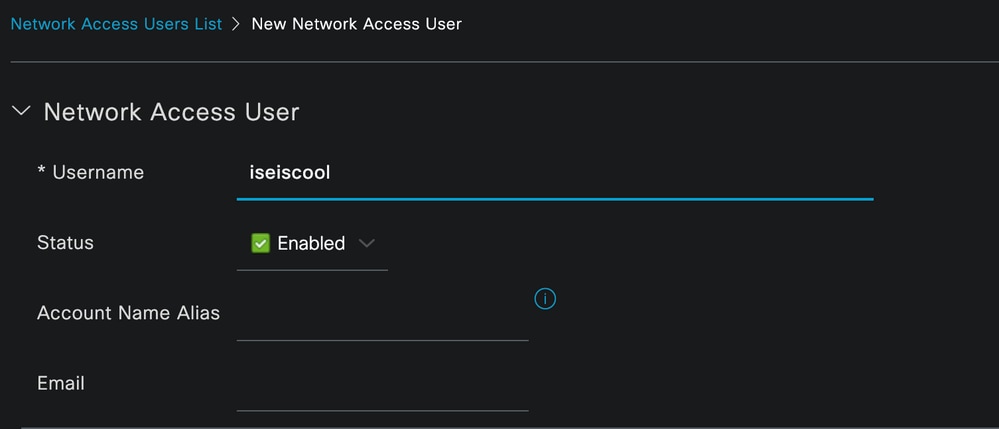 Name Assigned to the Username
The next step is to assign a password to the username created. VainillaISE97 is used in this demonstration.
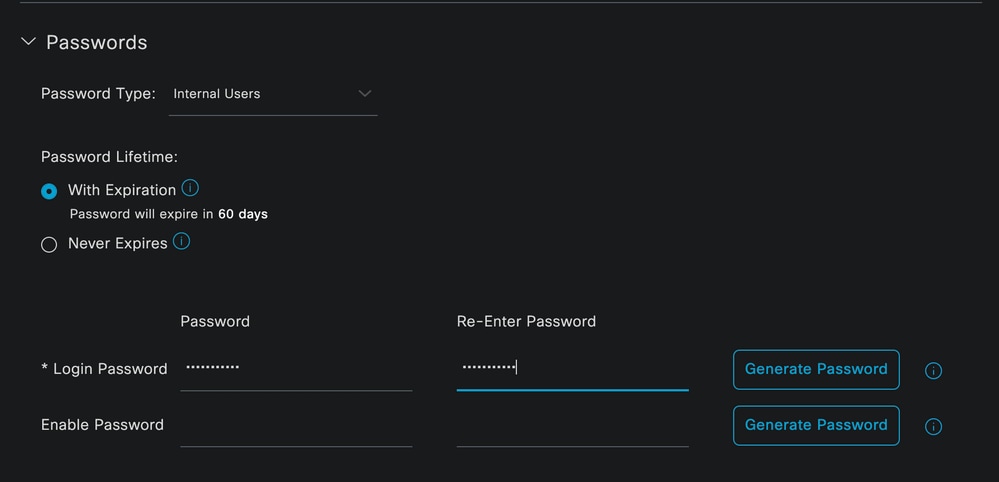 Password Creation
Assign the user to the iseUsers group.
 Assignation of User Group
2. c. Configure the Policy Set
Navigate to the ISE Menu > Policy > Policy Sets.
The default policy set can be used. However, in this example a policy set is created and it is called Wired. Classifying and differentiating the policy sets helps troubleshooting,
If the add or plus icon is not visible, the gear icon of any policy set can be clicked. Select the gear icon and then select Insert new row above.
 Policy creation
The condition configured in this example is Wired 8021x which is a condition preconfigured in ISE fresh deployments. Drag it and then click Use.
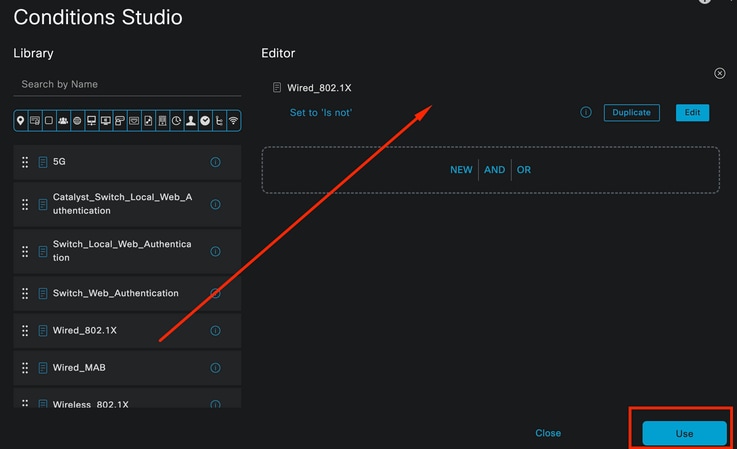 Condition Studio
Finally, select Default Network Access preconfigured allowed protocols service.
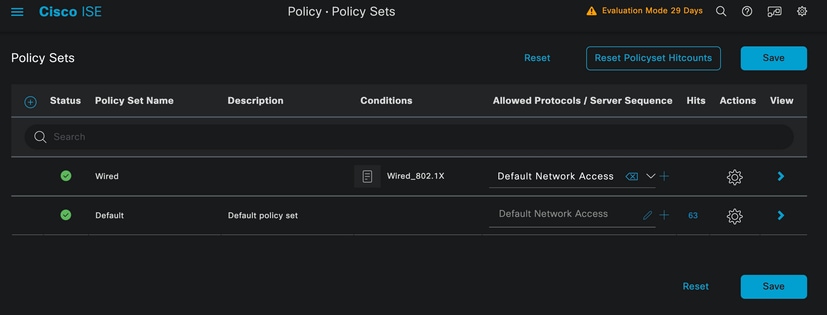 Policy Set view
Click Save.
2. d. Configure the Authentication and Authorization Policies.
Click the arrow that is on the right side of the Policy set that was just created.
 Wired Policy Set
Expand the Authentication Policy
Click on the + icon.
 Add Authentication Policy
Assign a name to the Authentication Policy, for this example Internal Authentication is used.
Click the + icon on the conditions column for this new Authentication Policy.
The preconfigured condition Wired Dot1x ISE comes with can be used.
Finally, under the Use column select Internal Users from the drop-down list.
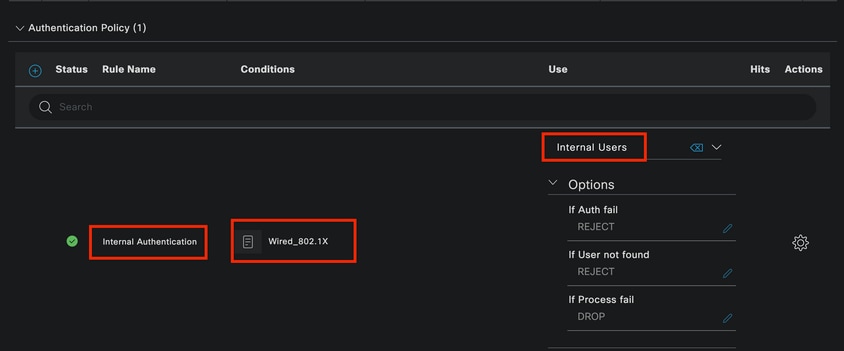 Authentiction Policy
Authorization Policy
The Authorization Policy section is at the bottom of the page. Expand it and click the + icon.
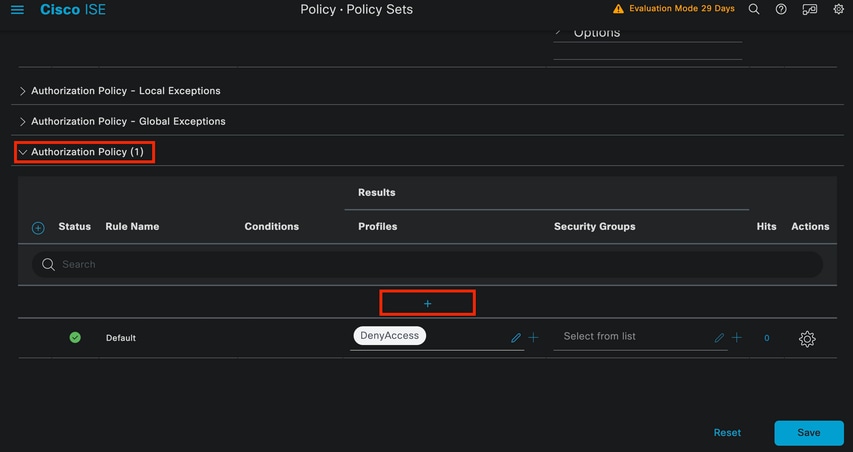 Authorization Policy
Name the Authorization Policy you just added, in this configuration example the name Internal ISE Users is used.
To create a condition for this Authorization Policy, click the + icon under the Conditions column.
The previously created user is part of IseUsers group.
Once in the editor, click on the Click to add an attribute section.
Select the Identity group icon.
From the dictionary, select the InternalUser dictionary that comes with the Identity Group attribute.
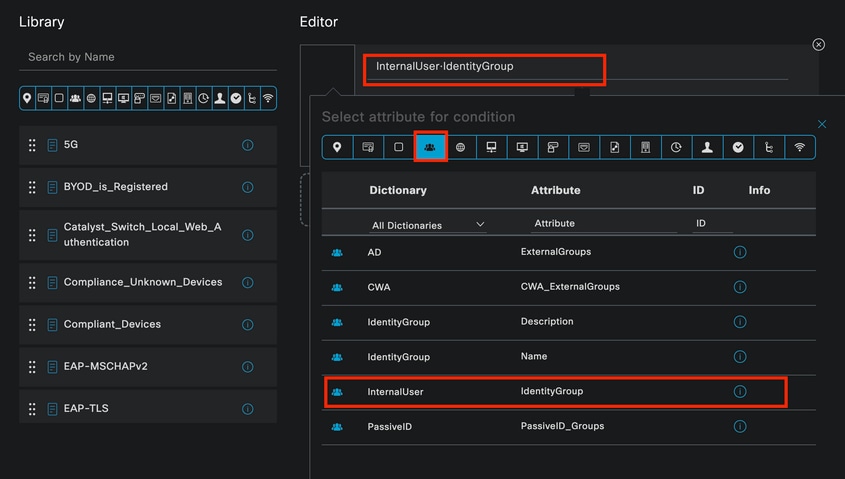 Condition Studio for Authorization Policy
Select the Equals operator.
From the User Identity Groups drop-down list, select the group IseUsers.
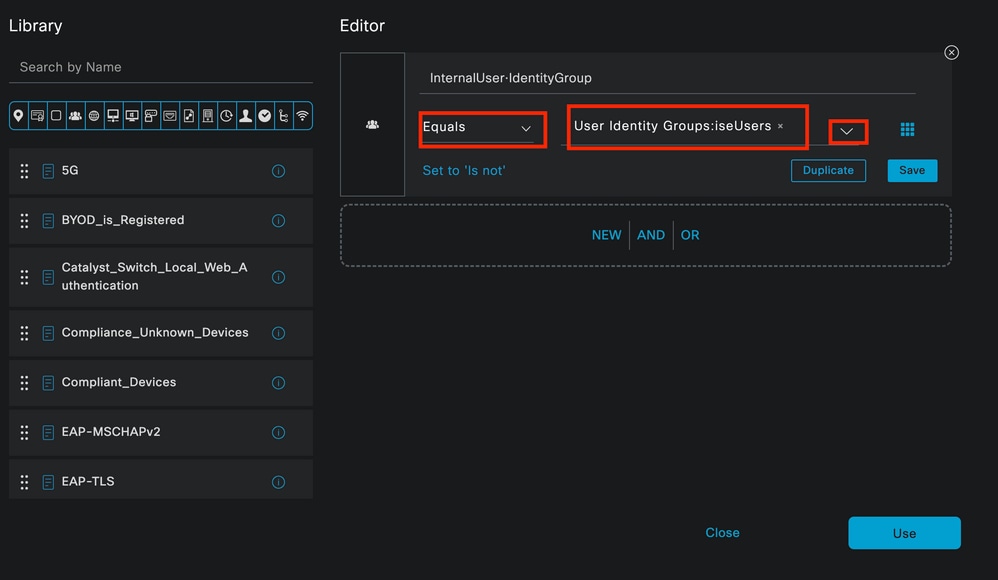 Condition for Authorization Policy Finished
Click Use.
Finally, select the Result Authorization Profile that receives the authentications part of this Identity group.

Note: Notice that the authentications coming to ISE and are hitting this Wired Dot1x Policy set that are not part of the Users Identity Group ISEUsers, now hit the default Authorization Policy. This has the profile result DenyAccess.
ISE is preconfigured with the Permit Access profile. Select it.
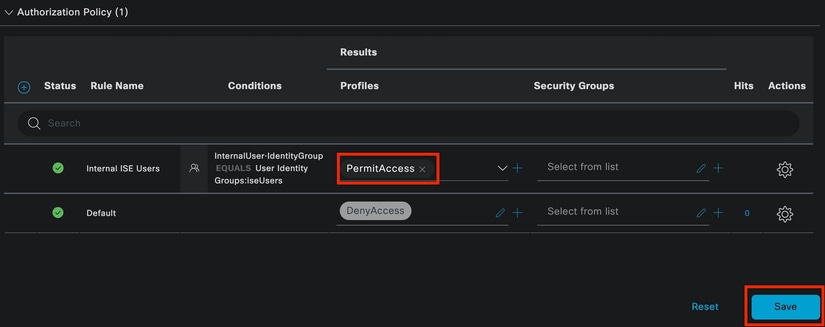 Authorization Policy Finished
Click Save.
The configuration for ISE is complete.
Step 3. Windows Native Supplicant Configuration
3. a. Enable Wired dot1x on Windows.
From the Windows Search Bar open Services.
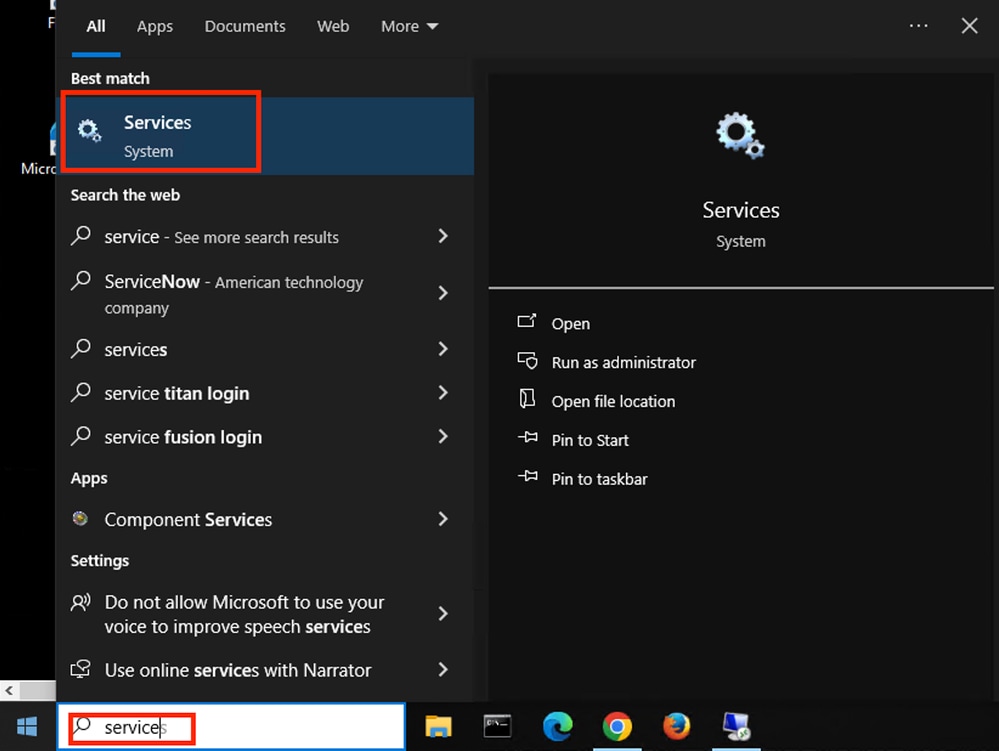 Windows Search Bar
At the bottom of the Services list, locate Wired Autoconfig.
Right-click on Wired AutoConfig and select Properties.
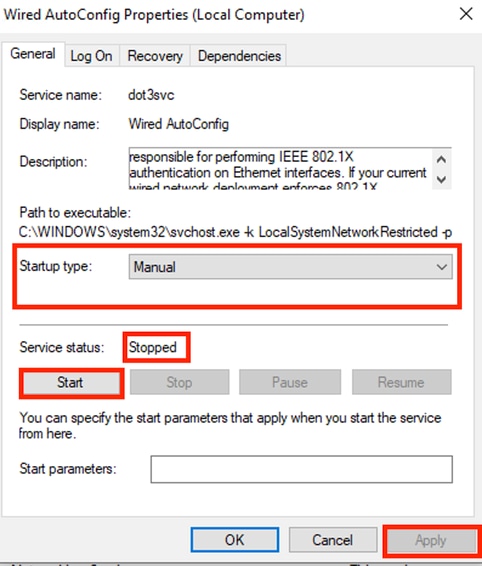 Properties Window

Note: The Wired AutoConfig (DOT3SVC) service is responsible for performing IEEE 802.1X authentication on Ethernet interfaces.
The Manual startup type is selected.
Since the service status is Stopped. Click Start.
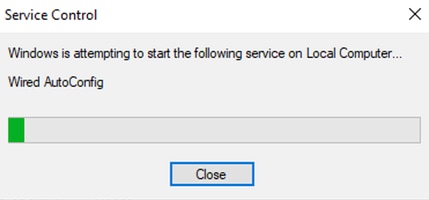 Service Control
Next, click OK.
The service is running after this.
 Wired AutoConfig Service
3. b. Configure the Windows laptop interface that is attached to the NAD Authenticator (ISR 1100).
From the task bar, locate the right-side corner, then use the computer icon.
Double-click on the computer icon.
Select Open Network & Internet Settings.
 Windows Task Bar
Once the Network Connections window is opened, right-click on the Ethernet interface which is attached to the ISR Gig 0/1/0. Click on Properties option.
Click the Authentication tab.
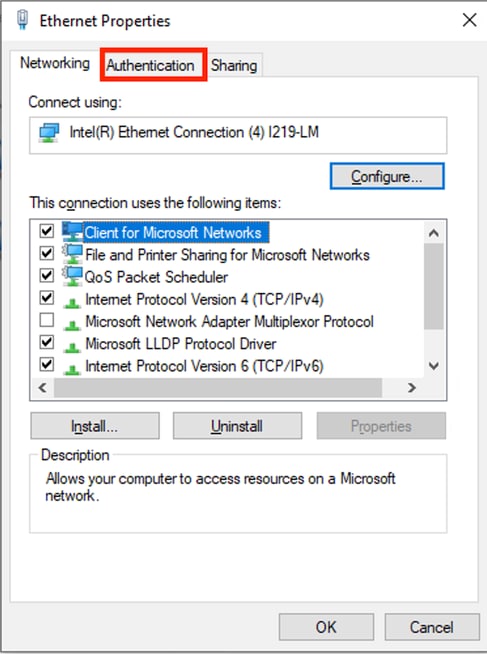 Interface Ethernet Properties
Select the checkbox Enable IEEE 802.1X authentication.
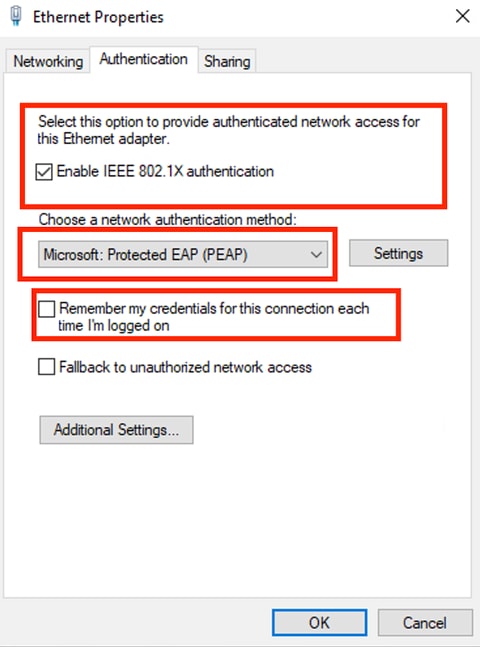 Authentication Ethernet Properties
Select Protected EAP (PEAP).
Uncheck the option Remember my credentials for this connection each time I'm logged on.
Click Settings.
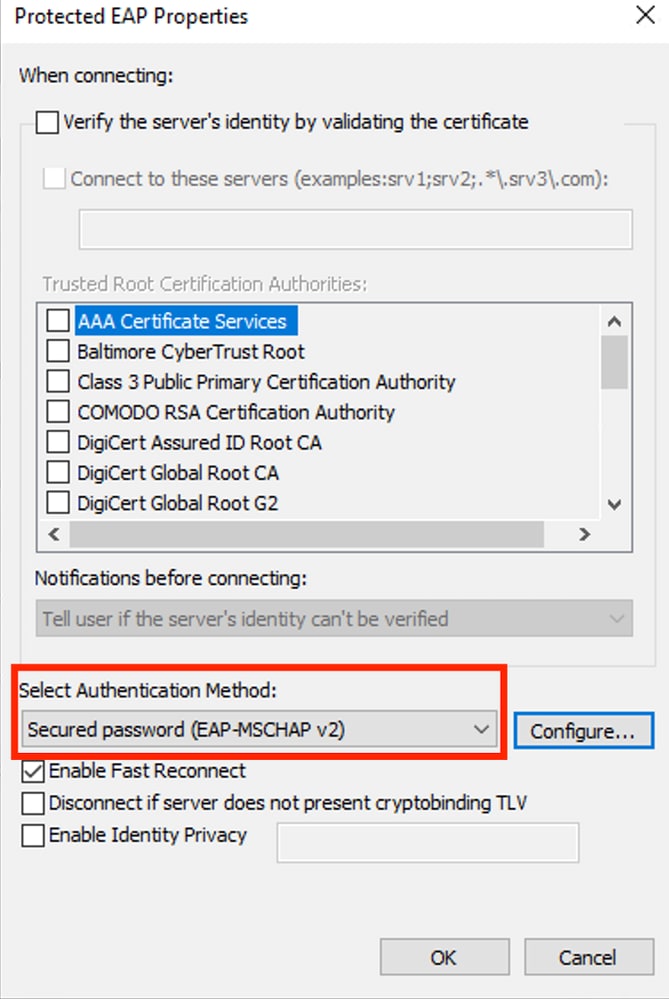 PEAP Properties
Verify that the Authentication Method is EAP-MSCHAP v2.
Click Configure.
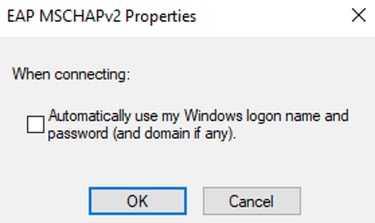 MSCHAPv2 Properties
It is not necessary to use domain credentials, however, if domain credentials are used, ISE must be integrated with Active Directory or LDAP, which is not explained in this article.
Unchecking this option generates a prompt window, asking for a username and a password each time the Windows laptop needs to be authenticated.
Click Ok.
In the protected EAP properties window, click Ok again.
Click the Additional Settings.
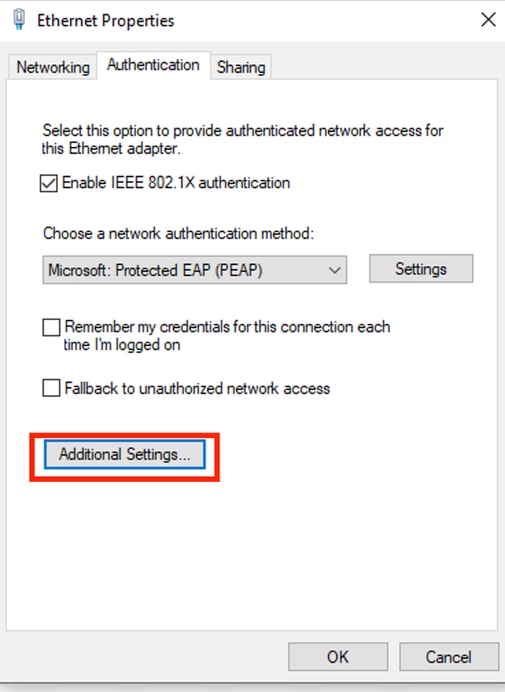 Click Additional Settings...
Verify that the User authentication option under Authentication mode is selected.
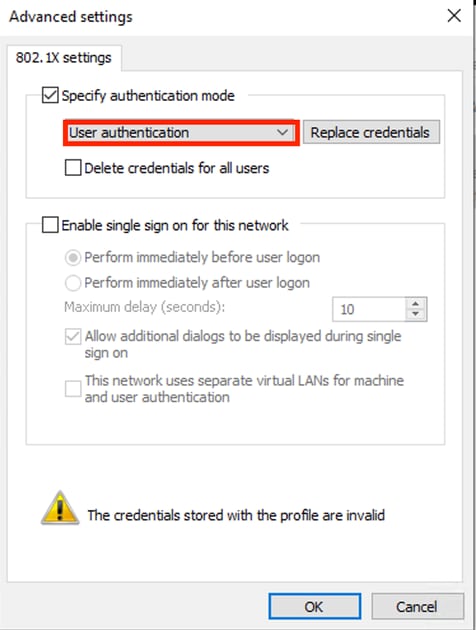 Advanced Settings
Click Replace credentials/Save credentials.
Enter the username and password that were created on ISE.
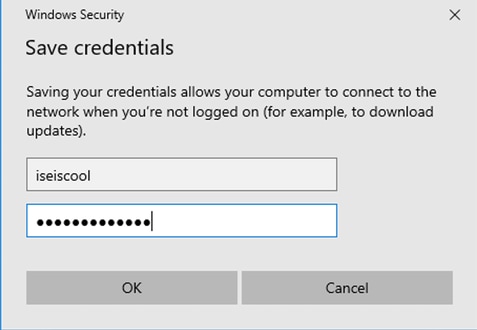 Manually Adding User Credentials
Click OK on the Windows Security window.
Finally, click OK on the Ethernet Properties window to close it.
Notice how the adapter attempts to authenticate with the credentials that were just configured.
 Identifying Network
Verify
ISR Dot1x Session Details
The command show authentication sessions interface <interface where the laptop is attached> details displays detailed information for the dot1x session(s) running on the specified port.
Router#show authentication sessions interface gigabitEthernet 0/1/0 details

            Interface:  GigabitEthernet0/1/0

               IIF-ID:  0x08767C0D

          MAC Address:  8c16.450d.f42b

         IPv6 Address:  Unknown

         IPv4 Address:  Unknown

            User-Name:  iseiscool <--------- The username configured for Windows Native Supplicant

               Status:  Authorized <--------- An indication that this session was authorized by the PSN

               Domain:  DATA

       Oper host mode:  multi-auth

     Oper control dir:  both

      Session timeout:  N/A

    Common Session ID:  22781F0A0000000C83E28461

      Acct Session ID:  0x00000003

               Handle:  0xc6000002

       Current Policy:  POLICY_Gi0/1/0


Local Policies:

        Service Template: DEFAULT_LINKSEC_POLICY_SHOULD_SECURE (priority 150)

      Security Policy:  Should Secure


Server Policies:


Method status list:

       Method           State

        dot1x           Authc Success <--------- An indication that dot1x is used for this authentication


Router#
ISE Logs
Navigate to Operations > Radius > Live logs tab.
Filter by the username identity, in this example the username iseiscool is used.
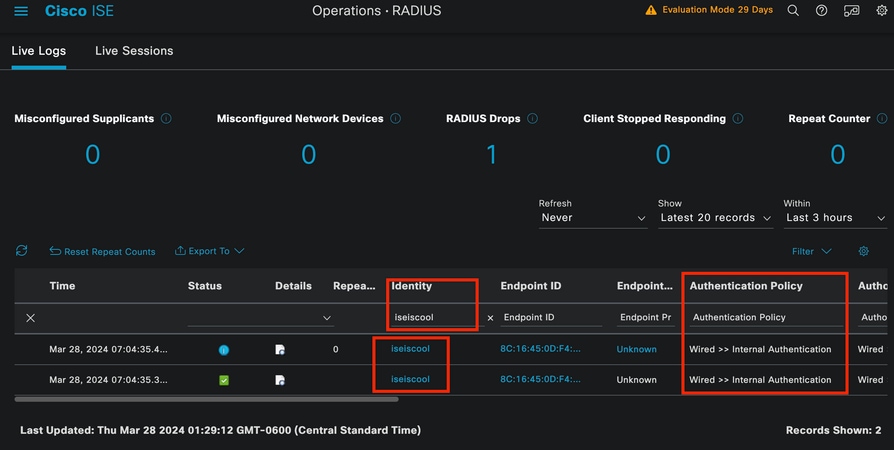 ISE Livelogs
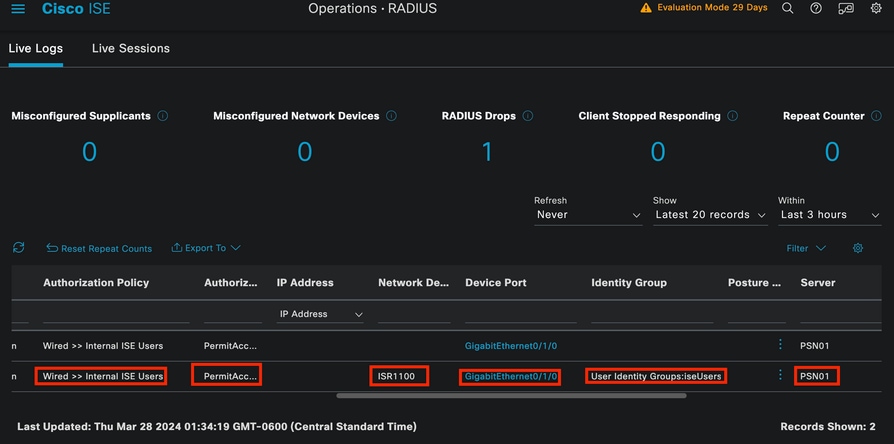 ISE Livelogs
Notice that from this quick view, live logs provide key information:
- Timestamp of the authentication.
- Identity used.
- Endpoint mac address.
- Policy set and Authentication Policy that was hit.
- Policy set and Authorization Policy that was hit.
- Authorization Profile Result.
- The network device that sends the Radius request to ISE.
- The interface where the endpoint is attached to.
- The Identity Group of the user that was authenticated.
- The Policy Server Node (PSN) that handled the authentication.
Troubleshoot
1 - Reading ISE Live Log Details
Navigate to Operations > Radius > Live logs tab, filter by Auth status: Failed OR by the username used OR by the MAC address OR by the Network Access Device used.
Access the Operations > Radius > Live logs > Desired authentication > Live log details.
On the same page, once the authentication is filtered, click on the Search Icon.
First Scenario: The user enters their username with a typo.
 Opening Live Log Details
Once the live log detail is opened you can see that the authentication failed also the username used is listed.
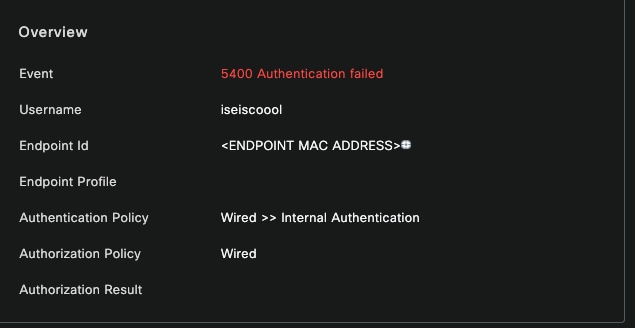 Overview Section
Then on the same live log detail, in the Authentication Details section, it can be found the Failure Reason, Root Cause, and Resolution of the error.
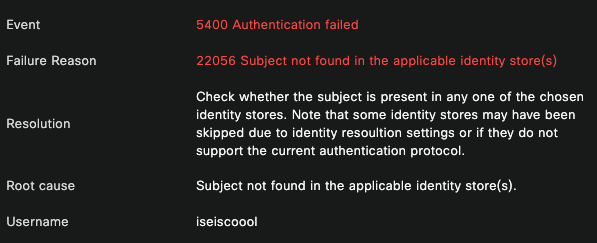 Authentication Details
In this scenario the reason why the authentication fails is because the username has a typo, however, this same error would be presented, if the user is not created in ISE, or if ISE was not able to validate that the user exist in other identity stores, for example, LDAP or AD.
Steps Section
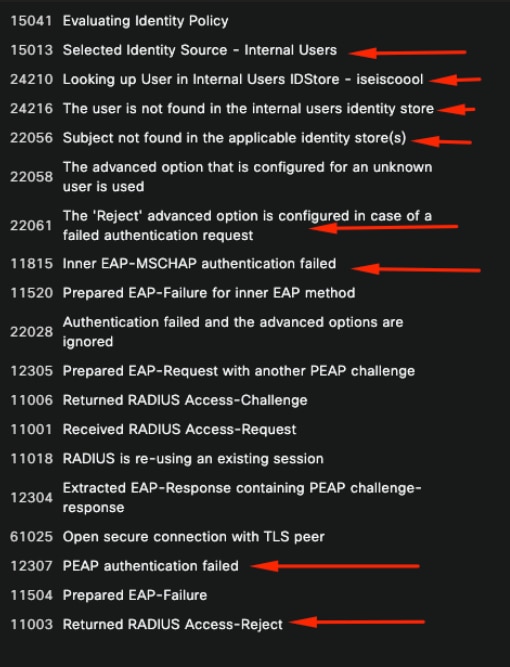 Live Log Details Step Section
The steps section describes in detail the process ISE ran during the RADIUS conversation.
You can find information here like:
- How the conversation was started.
- SSL handshake process.
- The EAP method negotiated.
- EAP method process.
In this example, it can be seen that ISE just checked in the internal identities for this authentication. The user was not found, and for that reason, ISE sent as a response an Access-Reject.
Second Scenario: The ISE Administrator disabled PEAP from the Policy Set Allowed protocols.
2 - Disabled PEAP
Once the live log detail from the session failing is opened, the error message "PEAP is not allowed in the Allowed Protocols" displays.
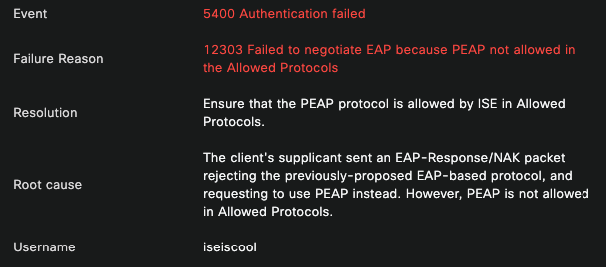 Live Log Detail Report
This error is easy to resolve, the resolution is to navigate to Policy > Policy Elements > Authentication > Allowed Protocols. Verify if the option Allow PEAP is disabled.
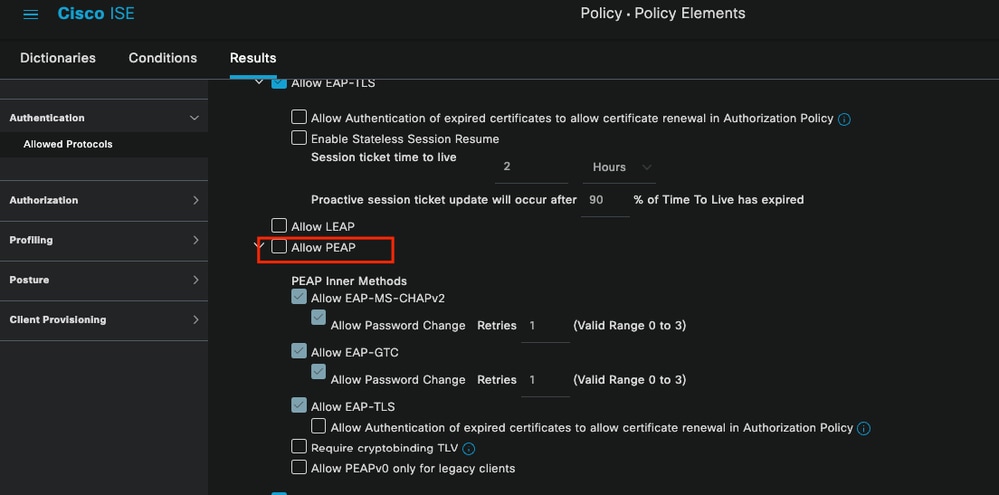 Allowed Portocols Section
Third Scenario: The Authentication fails because the endpoint does not trust the ISE certificate.
Navigate to the live log details. Find the record for the authentication that fails and check the live log details.
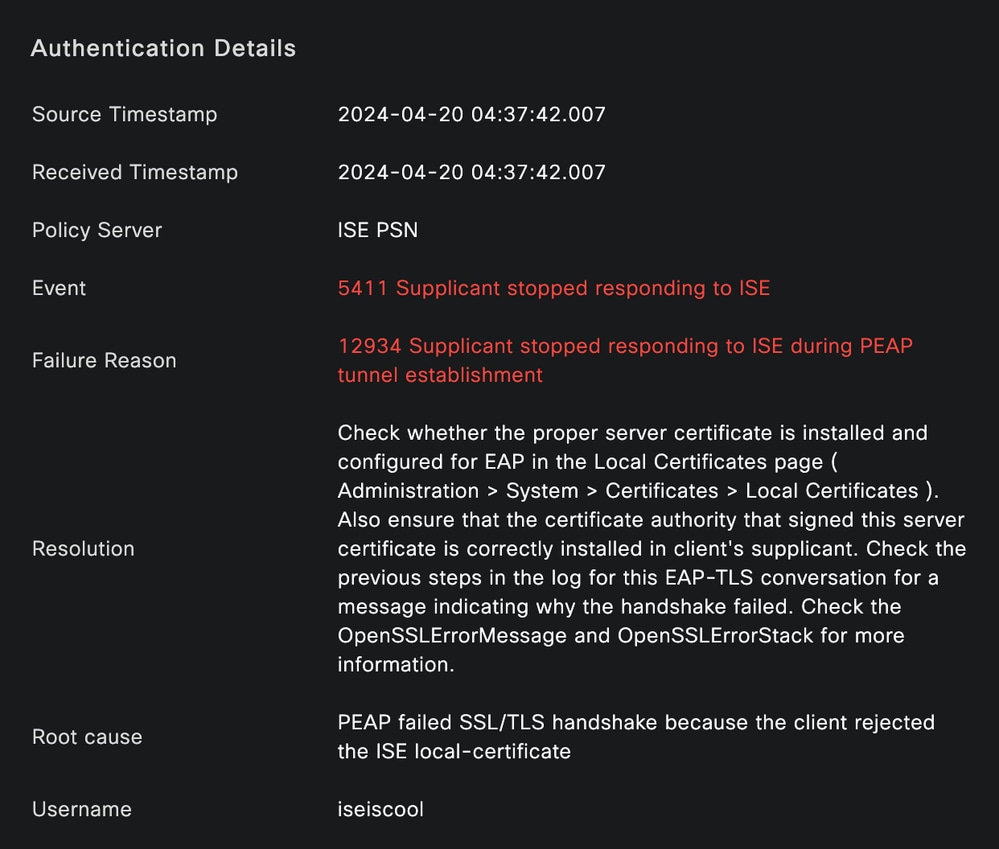 Live Log Detail
The endpoint is rejecting the certificate used for the PEAP tunnel establishment.
To solve this issue, in the Windows endpoint where you have the issue verify that the CA chain that signed the ISE certificate is in the Windows section Manage User Certificates > Trusted Root Certification Authorities OR Manage Computer Certificates > Trusted Root Certification Authorities.
You can access this configuration section on your Windows device by searching them in the Windows search bar.
 Windows Search Bar Results
3 - ISE TCP Dump Tool (Packet Capture)
Packet capture analysis is essential when troubleshooting. Directly from ISE packet captures can be taken on all the nodes and any interface of the nodes.
In order to access this tool, navigate to Operations > Diagnostic Tools > General Tools > TCP Dump.
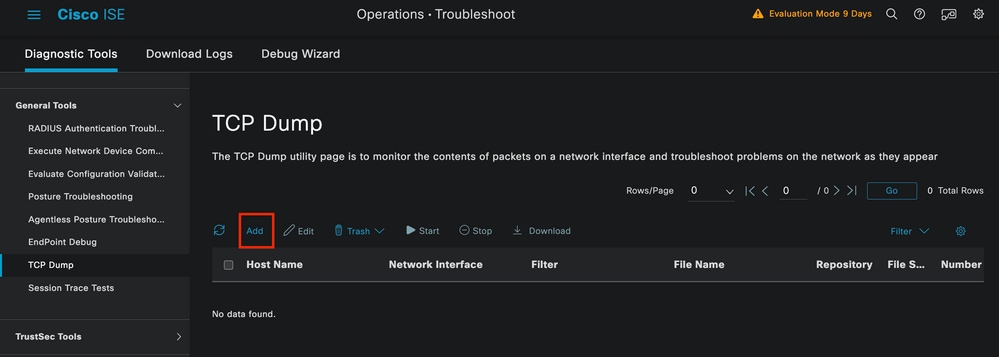 TCP Dump Section
Click the Add button, to start configuring a pcap.
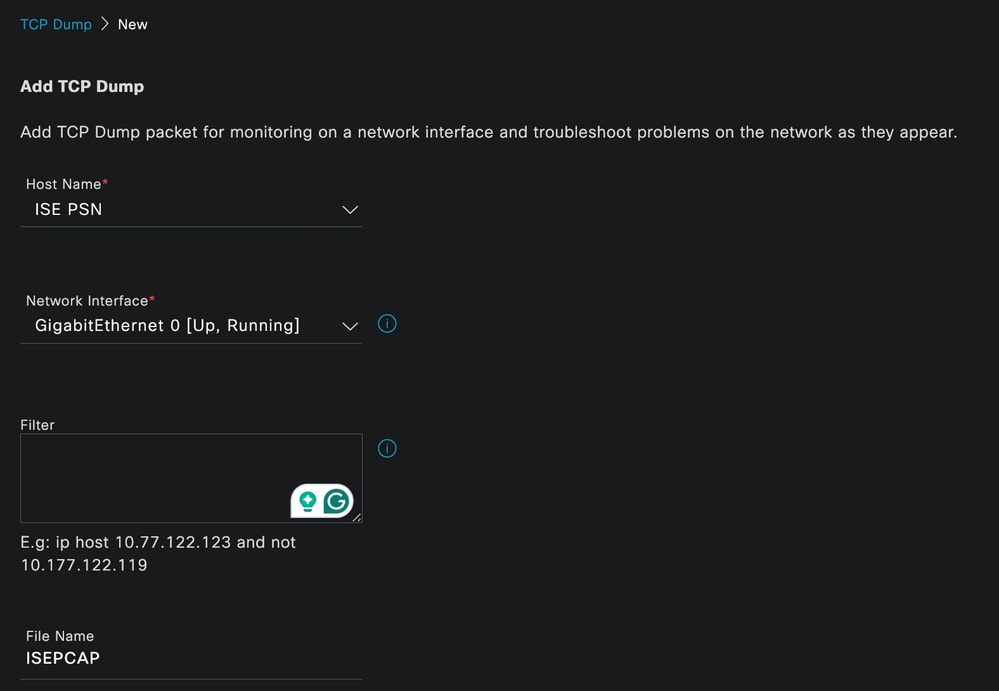 TCP Dump Creation
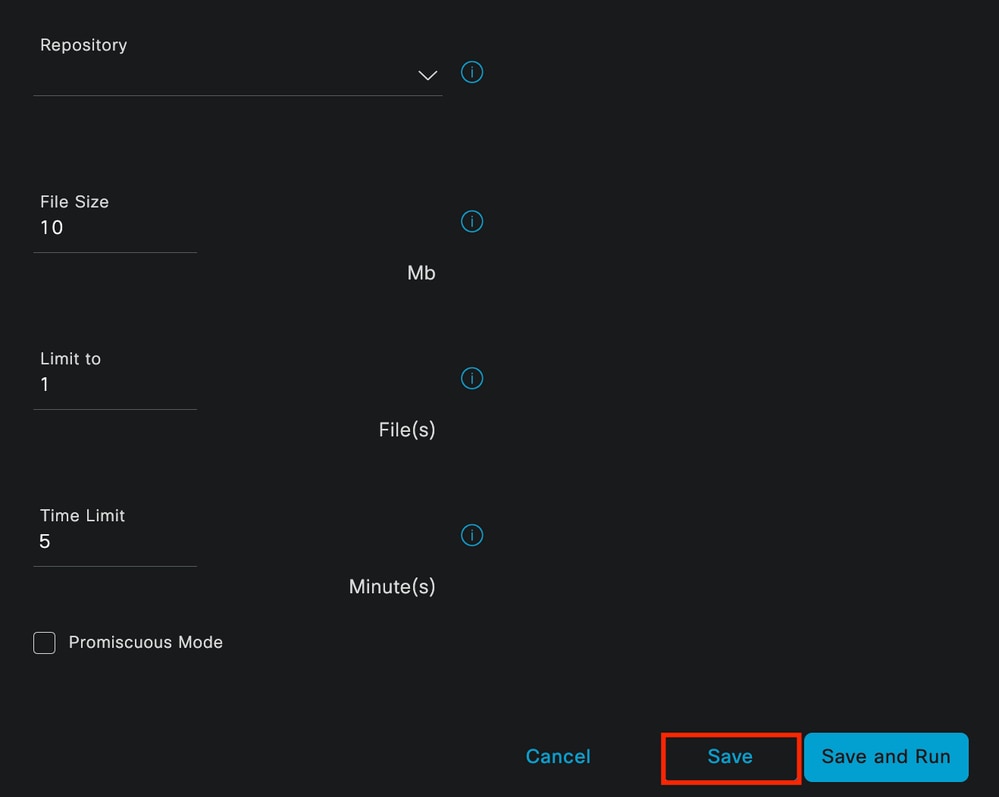 TCP Dump Section
To create a pcap in ISE, this is the data you must enter:
- Select the node in which you need to take the pcap.
- Select the ISE node interface that is used for the pcap.
- In case you need to capture certain traffic, use the filters, ISE provides you some examples.
- Name the pcap. In this scenario we used ISEPCAP.
- Select the repository, if no repository is selected, then the capture is saved on ISE local disk and can be downloaded from the GUI.
- Additionally if necessary, modify the pcap file size.
- If necessary use more than 1 file, so if the pcap exceeds the file size a new file is created subsequently.
- Extend the time capturing traffic for the pcap if required.
Finally, click the Save button.
 TCP Dump Section
Then, when ready select the pcap, and click the Start button.
Once you click Start the Status column is changed to RUNNING state.

Note: While the PCAP is in RUNNING state, replicate the failing scenario or the behavior you need to capture. Once completed, the details of the RADIUS, conversation are visible in the PCAP.
Once the data you need is captured while the PCAP is running, finish the pcap collection. Select it again and click Stop.
3 - 1 ISE Reports
In case a deeper analysis is required, ISE offers useful reports to investigate past events.
To find them, navigate to Operations > Reports > Reports > Endpoints and Users
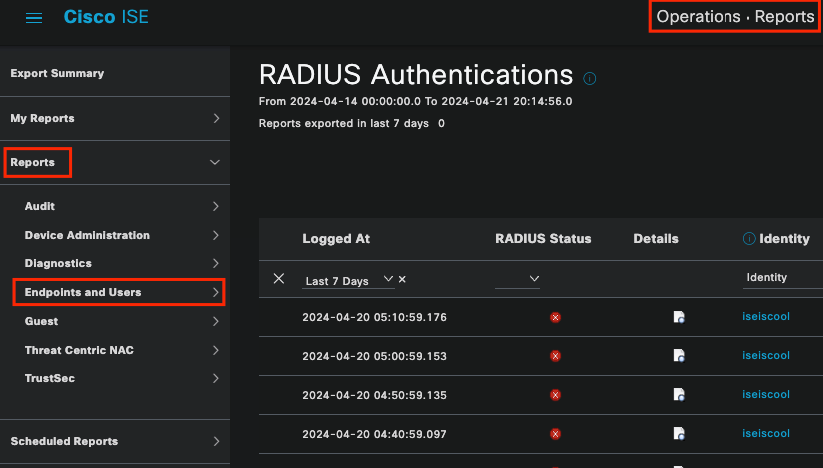 ISE Reports Section
 Endpoint and Users Reports
In this section, you can find multiple reports, that offer different data that can be valuable depending on the scenario you are troubleshooting.
Here are some reports that can be used for authentication errors.
3-2 RADIUS Authentication Reports
From the ISE Live Logs section, you can select up to 24 hours of past data. Sometimes old authentications are needed. When authentications that were working fine in the past suddenly start failing, you must compare the actual non-working ones, with the ones working in the past. You can achieve this with the Radius Authentication Report.
The report allows you to select a range of time up to the previous 30 days. Also, retain the live log detail reports for each authentication.
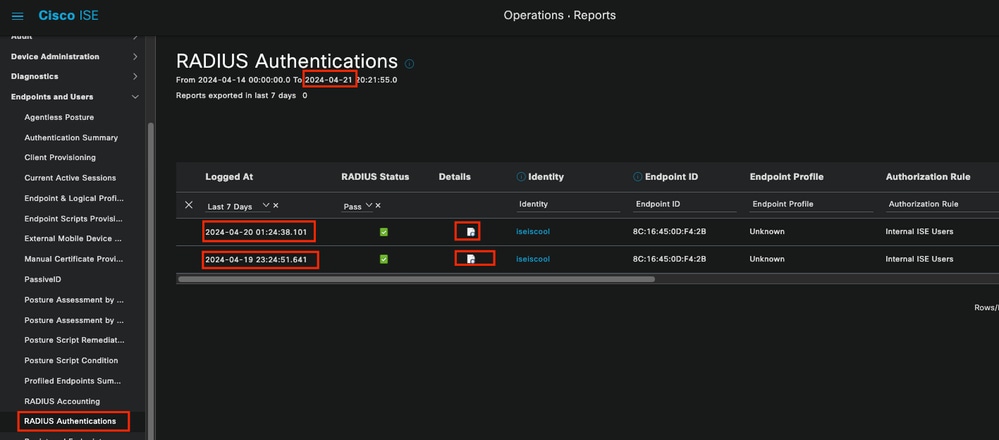 Authentication Report
3-3 Rejected or Released Endpoints
Verify what the failure reasons for rejected endpoints are. You can check the Rejected OR Released Endpoints report. In a scenario, where the EAP Certificate was updated on all PSN nodes in an ISE deployment, and then the PEAP authentications start failing for a complete region. This report can be checked and without checking live log details you would know that the client is rejecting and not trusting the ISE certificate.
 Rejected Endpoints Report
3-4 RADIUS Accounting Report
This is often used when over-licensing consumption issues are seen. In these scenarios, ISE does not release the licenses cause it cannot determine if the session is finished. ISE uses the accounting packets that the Network device sends to determine this. This is how it looks when accounting is correctly shared from the Network Device to ISE:
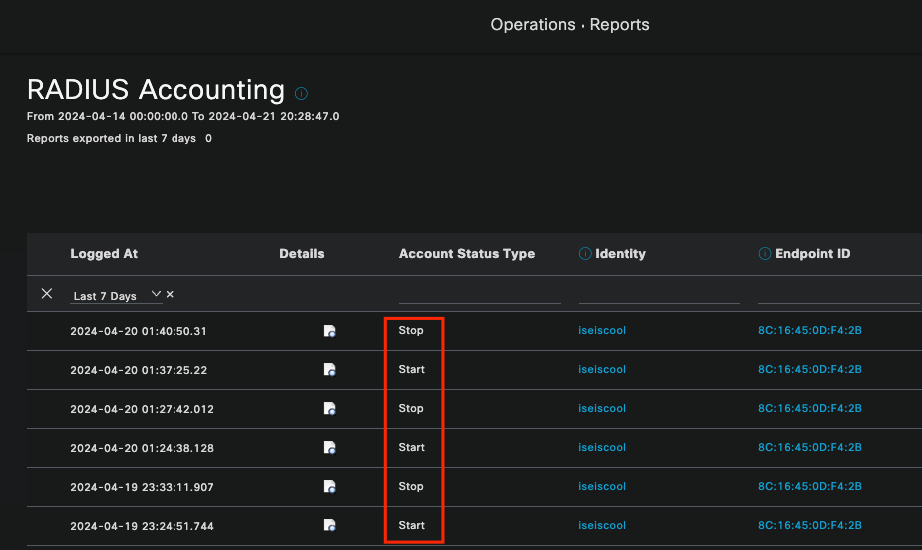 RADIUS Accounting Report
3-5 Authentication Summary Report
These are the commonly used and useful reports that ISE provides. It allows you to select up to 30 days of old data. In this report, you can see information like:
- The percentage of passed and failed authentications by day.
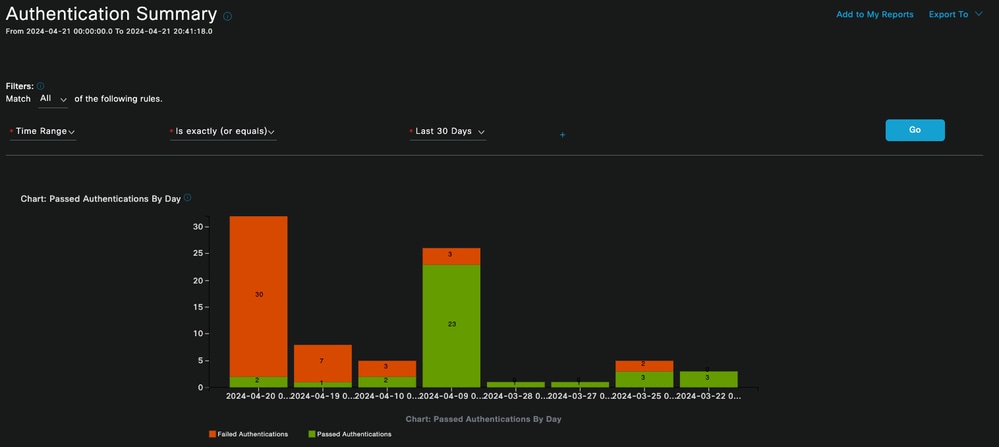 Chart: Passed Authentications by Day
- Number of authentications per day, in a chart, and with the option to click the blue values to see the data in detail.
 Authentications By Day and Quick Link
- Authentication by Failure Reason, listed in a top list, with the most repeated to the less repeated.
 Authentications By Failure Reason
- Option to see the Identity groups that are commonly used in the deployment authentications.
 Authentications By Identity Group
- Which PSN receives more authentications.

Note: In the deployment used for this document, only one PSN was used; however, for larger deployments, this data is useful to see if load balancing is needed.
 Authentications by ISE Server
4 - ISE Alarms
Under the ISE Dashboard, the Alarms section displays the deployment issues.
Here are several ISE alarms that help with troubleshooting.
Unknown NAD — This alarm is shown when there is a network device authenticating an endpoint and reaching out to ISE. But, ISE does not trust it, and it drops the RADIUS connection. The most common reasons are that the Network device is not created or the IP that the Network Device is using is not the same that ISE has registered.
 Unknown NAD
Supplicant Stopped Responding — This alarm occurs when there is an issue with the supplicant communication, most of the time is due to a misconfiguration in the supplicant that has to be checked and investigated on the endpoint side.
 Supplicant Stopped Responding
Active directory diagnostic tool found issues — When Active Directory is used to validate the user identity, if it starts having issues with the communication process, or if the connection is broken you would see this alarm. Then you would realize why the authentications that the identity exists on the AD fail.
 AD Diagnostics Failed
COA (Change of Authorization) Failed — Multiple flows in ISE use CoA, this alarm informs you if issues were encountered during the CoA port communication to any network device.
 Coa Failed
5 - ISE Debug Configuration and Log Collection
To continue with authentication process details, you must enable the next components in DEBUG for mab and dot1x issues:
Problem: dot1x/mab
Attributes to be set to debug level.
- runtime-AAA (prrt-server.log)
- nsf (ise-psc.log)
- nsf-session (ise-psc.log)
To enable the components to DEBUG level, first it is required to identify which is the PSN that receives the authentication that is failing or needs to be investigated. Yu can get this information from the live logs. After that you must go to the ISE Menu > Troubleshoot > Debug Wizard > Debug Log Configuration > Select the PSN > Click the Edit Button.
The next menu is displayed. Click the filter icon:
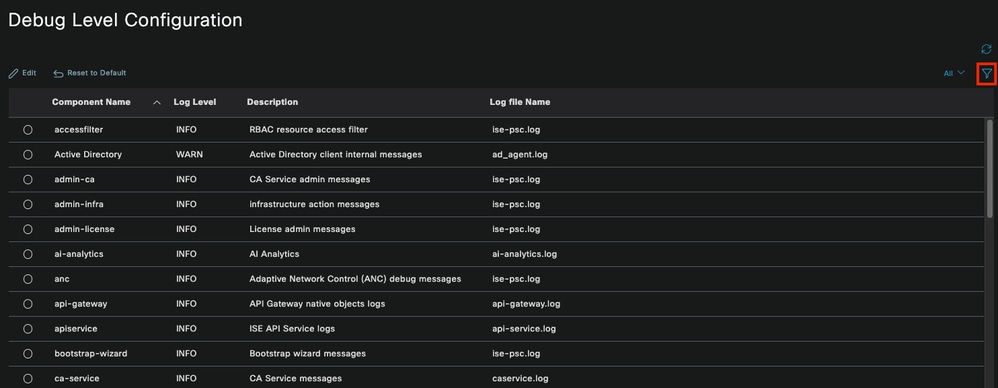 Debug Log Configuration
In the Component Name column, search for the attributes listed previously. Select each log level and change it to DEBUG. Save the changes.
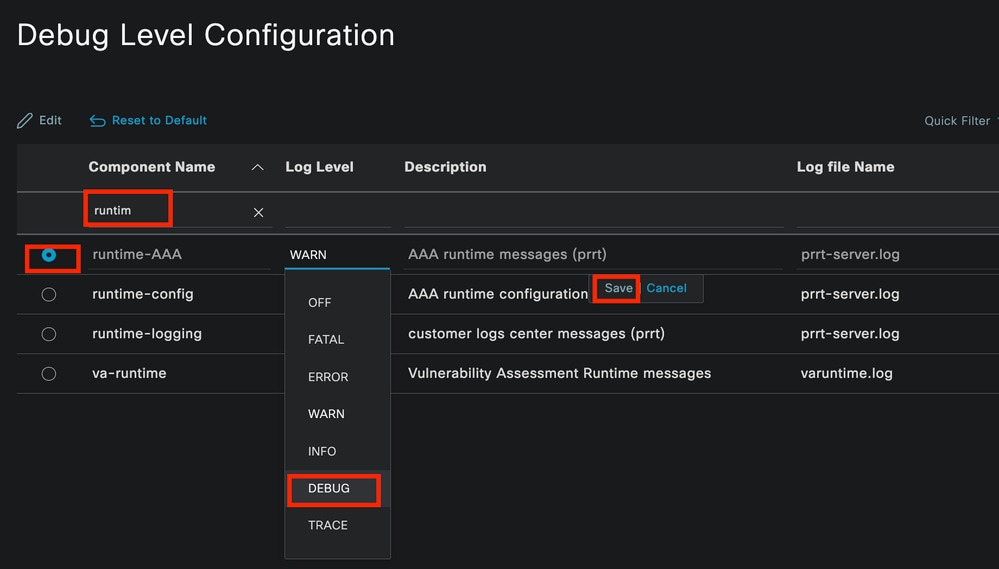 Runtime AAA Component Set Up
Once you finished configuring each component, filter them with DEBUG so you can see if all the components were correctly configured.
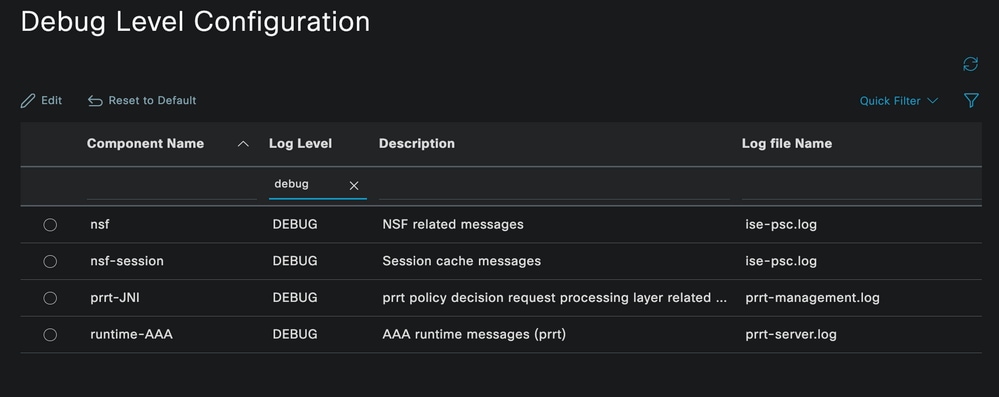 Debug Log Configuration
In case there is the need to immediately analyze the logs, you can download them by navigating to the path ISE Menu > Operations > Troubleshoot > Download Logs > Appliance node list > PSN and enabled the DEBUGS > Debug Logs.
In this case, you must download for dot1x and mab issues in the prrt-server.log and ise-psc.log. The log that you must download is the one with the date of your last test.
Just click the log file shown in this image and download it (Displayed in blue text.)
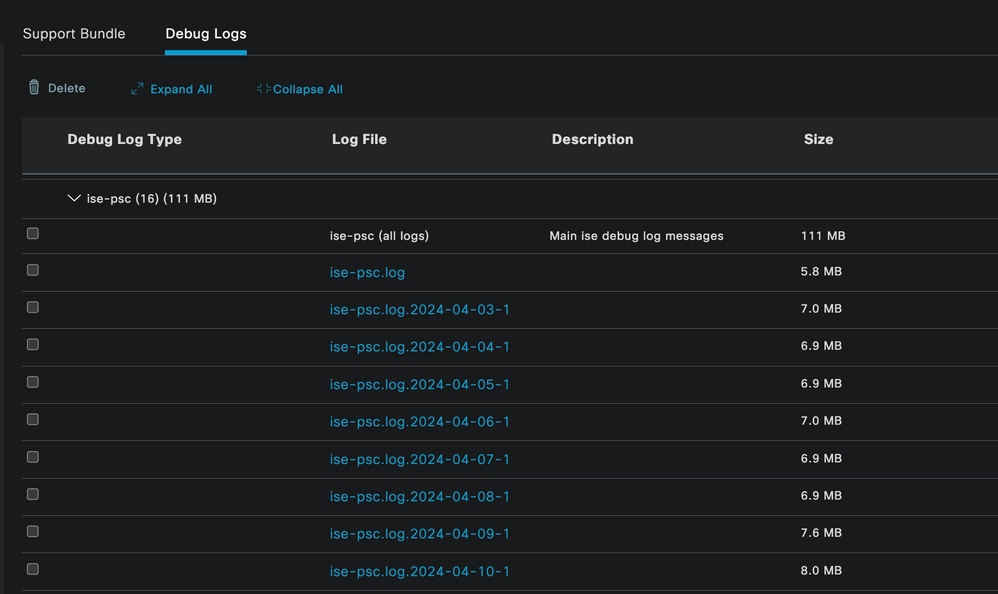 Debug Logs From the PSN Node
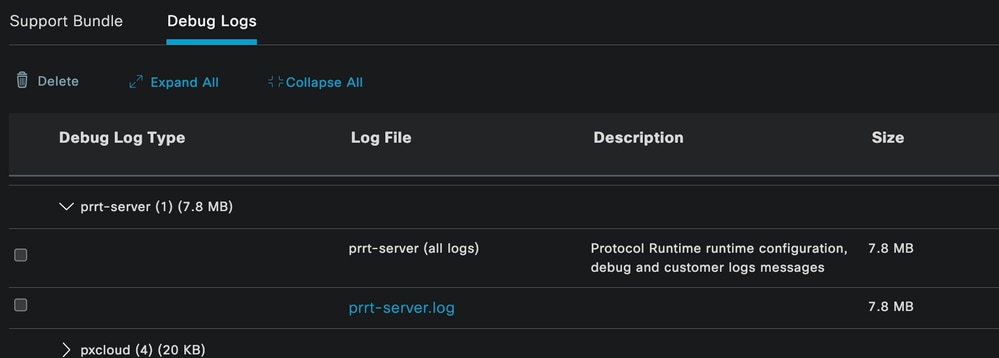 Debug Logs Section
6 - ISE per Endpoint Debug
There is also another option to get DEBUG logs, per endpoint debug logs based on mac address or IP. You can use the Endpoint Debug ISE tool.
Navigate to the ISE Menu > Operations > Troubleshoot > Diagnostic Tools > General Tools > Endpoint Debug.
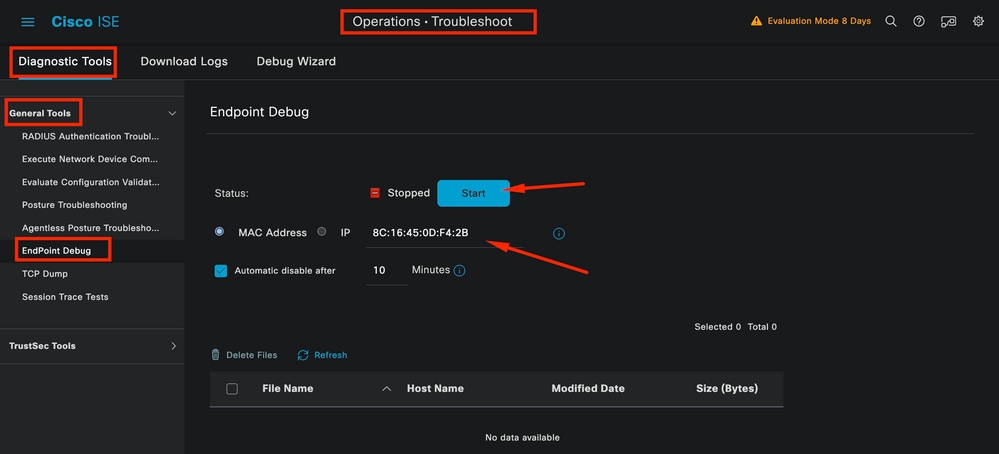 Endpoint Debug
Then enter the desired endpoint information to start capturing logs. Click Start.
Then click Continue in the warning message.
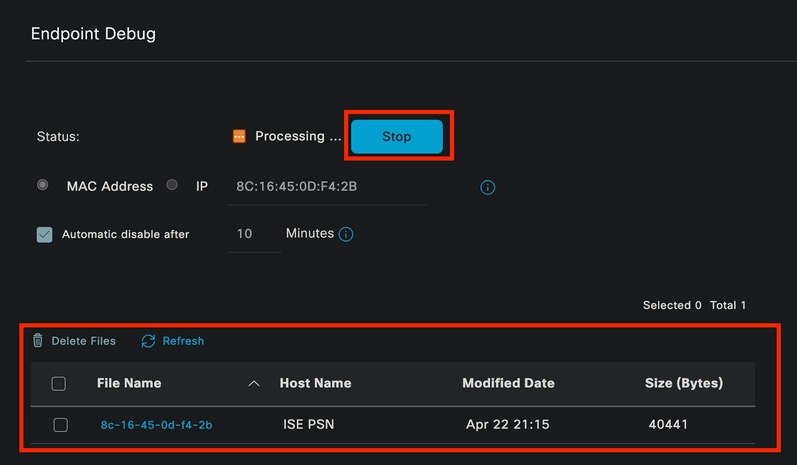 Endpoint Debug
Once the information has been captured, click Stop.
Click the file name shown in blue. in this image.
 Endpoint Debug
You must be able to see the authentication logs with DEBUG logs without enabling them directly from Debug Log Configuration.

Note: Since some things could be omitted in the Endpoint Debug output, you would get a more complete log file generating it with the Debug Log Configuration and downloading all the required logs from any file that you need. As explained in the previous ISE Debug Configuration and Log Collection section.
7 - Decrypt RADIUS Packets
Radius packets are not encrypted except for the user password field. However, you need to verify the password sent. You can see the packet the user sent by navigating to Wireshark > Preferences > Protocols > RADIUS and then add the RADIUS Shared Key used by ISE and the Network Device. After that the RADIUS packets are displayed decrypted.
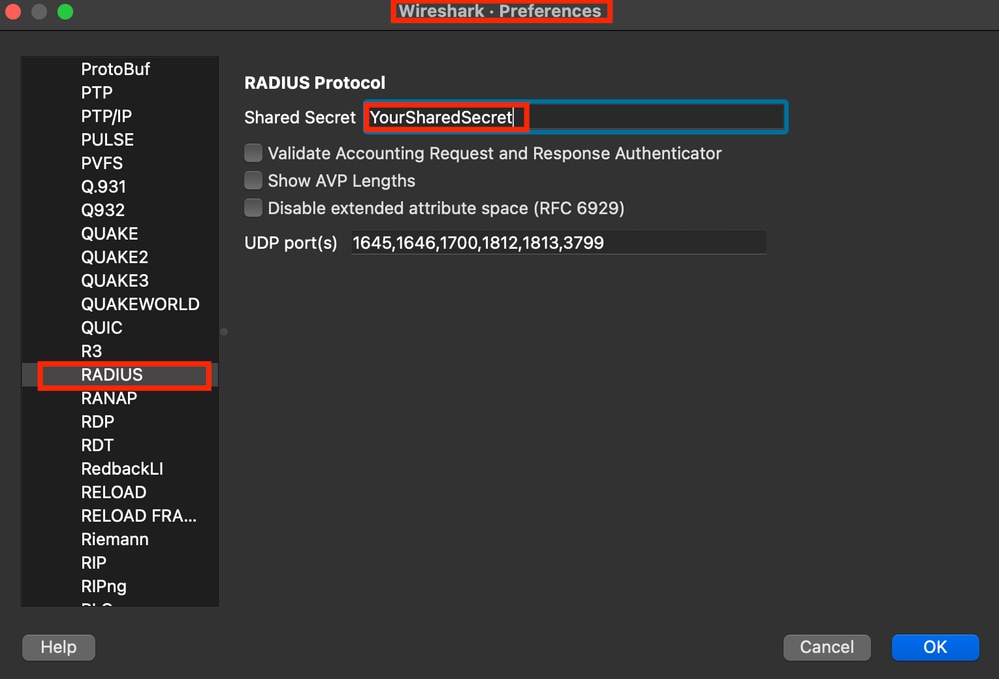 Wireshark Radius Options
8 - Network Device Troubleshooting Commands
The next command helps when troubleshooting issues on the ISR 1100 or Wired NAD device.
8 - 1 To see if the AAA server or ISE is available and reachable from the Network device use show aaa servers.
Router>show aaa servers

RADIUS: id 1, priority 1, host 10.88.240.80, auth-port 1645, acct-port 1646, hostname ISE-PSN-1
     State: current UP, duration 2876s, previous duration 0s
     Dead: total time 0s, count 0

     Platform State from SMD: current UP, duration 2876s, previous duration 0s
     SMD Platform Dead: total time 0s, count 0

     Platform State from WNCD (1) : current UP, duration 3015s, previous duration 0s
     Platform State from WNCD (2) : current UP, duration 3015s, previous duration 0s
     Platform State from WNCD (3) : current UP, duration 3015s, previous duration 0s
     Platform State from WNCD (4) : current UP, duration 3015s, previous duration 0s
     Platform State from WNCD (5) : current UP, duration 3015s, previous duration 0s
     Platform State from WNCD (6) : current UP, duration 3015s, previous duration 0s
     Platform State from WNCD (7) : current UP, duration 3015s, previous duration 0s
     Platform State from WNCD (8) : current UP, duration 3015s, previous duration 0s

     WNCD Platform Dead: total time 0s, count 0UP

     Quarantined: No

     Authen: request 11, timeouts 0, failover 0, retransmission 0

             Response: accept 1, reject 0, challenge 10
             Response: unexpected 0, server error 0, incorrect 0, time 33ms
             Transaction: success 11, failure 0
             Throttled: transaction 0, timeout 0, failure 0
             Malformed responses: 0
             Bad authenticators: 0
             Dot1x transactions:

             Response: total responses: 11, avg response time: 33ms
             Transaction: timeouts 0, failover 0
             Transaction: total 1, success 1, failure 0

             MAC auth transactions:
             Response: total responses: 0, avg response time: 0ms
             Transaction: timeouts 0, failover 0
             Transaction: total 0, success 0, failure 0

     Author: request 0, timeouts 0, failover 0, retransmission 0
             Response: accept 0, reject 0, challenge 0
             Response: unexpected 0, server error 0, incorrect 0, time 0ms
             Transaction: success 0, failure 0

             Throttled: transaction 0, timeout 0, failure 0
             Malformed responses: 0
             Bad authenticators: 0
             MAC author transactions:

             Response: total responses: 0, avg response time: 0ms
             Transaction: timeouts 0, failover 0
             Transaction: total 0, success 0, failure 0

     Account: request 6, timeouts 4, failover 0, retransmission 3
             Request: start 1, interim 0, stop 0
             Response: start 1, interim 0, stop 0

             Response: unexpected 0, server error 0, incorrect 0, time 27ms
             Transaction: success 2, failure 1
             Throttled: transaction 0, timeout 0, failure 0
             Malformed responses: 0
             Bad authenticators: 0

     Elapsed time since counters last cleared: 47m
     Estimated Outstanding Access Transactions: 0
     Estimated Outstanding Accounting Transactions: 0
     Estimated Throttled Access Transactions: 0
     Estimated Throttled Accounting Transactions: 0
     Maximum Throttled Transactions: access 0, accounting 0

     Consecutive Response Failures: total 0
             SMD Platform : max 0, current 0 total 0
             WNCD Platform: max 0, current 0 total 0
             IOSD Platform : max 0, current 0 total 0

     Consecutive Timeouts: total 3
             SMD Platform : max 0, current 0 total 0
             WNCD Platform: max 0, current 0 total 0
             IOSD Platform : max 3, current 0 total 3

     Requests per minute past 24 hours:
             high - 0 hours, 47 minutes ago: 4
             low  - 0 hours, 45 minutes ago: 0
             average: 0

Router>
8-2 In order to see the port status, details, ACLs applied to the session, method of authentication, and more helpful information, use the command show authentication sessions interface <interface where the laptop is attached> details.
Router#show authentication sessions interface gigabitEthernet 0/1/0 details
Interface: GigabitEthernet0/1/0
IIF-ID: 0x01D9BEFB
MAC Address: 8c16.450d.f42b
IPv6 Address: Unknown
IPv4 Address: Unknown
User-Name: iseiscool
Status: Authorized
Domain: DATA
Oper host mode: multi-auth
Oper control dir: both
Session timeout: N/A
Common Session ID: 22781F0A0000000C0777AECD
Acct Session ID: 0x00000003
Handle: 0x0a000002
Current Policy: POLICY_Gi0/1/0


Local Policies:
Service Template: DEFAULT_LINKSEC_POLICY_SHOULD_SECURE (priority 150)
Security Policy: Should Secure

Server Policies:


Method status list:
Method State
dot1x Authc Success

Router#
8-3 To verify you have all the required commands for aaa in the global configuration, run show running-config aaa.
Router#sh run aaa
!
aaa authentication dot1x default group ISE-CLUSTER
aaa authorization network default group ISE-CLUSTER
aaa accounting system default start-stop group ISE-CLUSTER
aaa accounting dot1x default start-stop group ISE-CLUSTER
!
aaa server radius dynamic-author
client <A.B.C.D> server-key Cisc0123
!
!
radius server COHVSRADISE01-NEW
address ipv4 <A.B.C.D> auth-port 1645 acct-port 1646
timeout 15
key Cisc0123
!
!
aaa group server radius ISE-CLUSTER
server name COHVSRADISE01-NEW
!
!
!
!
aaa new-model
aaa session-id common
!
!

Router#
8-4 Another useful command is test aaa group radius server <A.B.C.D> iseiscool VainillaISE97 legacy.
Router#test aaa group radius server <A.B.C.D> iseiscool VainillaISE97 legacy
User was successfully authenticated.

Router#
9 - Network Device Relevant Debugs
- debug dot1x all - Displays all dot1x EAP messages
- debug aaa authentication - Displays authentication debug information from AAA applications
- debug aaa authorization - Displays debug information for AAA authorization
- debug radius authentication - Provides detailed information about protocol-level activities just for the authentication
- debug radius - Provides detailed information about protocol-level activities
Related Information
Revision History
| Revision | Publish Date | Comments |
|---|---|---|
1.0 |
29-Apr-2024 |
Initial Release |
Contributed by Cisco Engineers
- David Albanil De CastillaCisco Security Technical Consulting Engineer
Contact Cisco
- Open a Support Case

- (Requires a Cisco Service Contract)
 Feedback