Introduction
This document describes how to create an Intermediate System-to-Intermediate System (IS-IS) topology from a CLI output of a router with IOS-XR software installed.
Contributed by Agung Semarajaya, Cisco TAC Engineer.
Prerequisites
Requirements
Cisco recommends that you have sound knowledge of these topics:
Components Used
The information in this document is based on these software and hardware versions:
- ASR 9001 with IOS-XR version 6.3.2
- Lenovo P50 with 64-bit Windows 10 Enterprise OS
- Graphviz release 2.38
The information in this document was created from the devices in a specific lab environment. All of the devices used in this document started with a cleared (default) configuration. If your network is live, ensure that you understand the potential impact of any command.
Background Information
In order to troubleshoot an IS-IS network, it is important to understand how the routers are interconnected for various reasons. You can have the topology information, however, the topology is outdated.
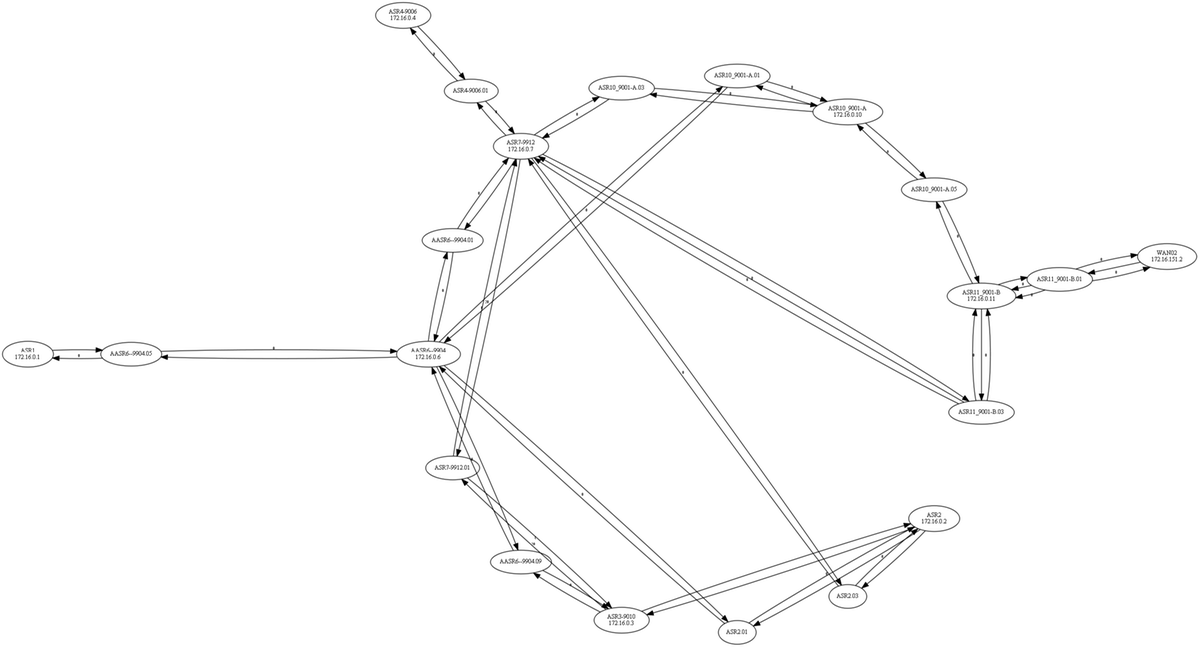
From IOS-XR version 6.3.2, the show isis database graph verbose command is introduced to produce a network topology graph in DOT format which can use as an input to rendering tools.
Configure
Ensure that you have IS-IS adjacencies built and at least one router with IOS-XR version 6.3.2 or above installed. Use these steps to create the updated IS-IS topology from the CLI output.
Step 1. Run the command show isis database graph verbose on the IOS-XR device.
Step 2. Copy the content of the command from step 1 to a text file and save the file in .txt format.
Step 3. Download and install the DOT converter software package on your computer, for example Graphviz - Graph Visualization Software.
Step 4. Once installed, open the command prompt (this applies to Windows) and navigate to the directory where the Graphviz CLI executable files are located. This is an example of the navigation.
C:\Users\user>cd "C:\Program Files (x86)\Graphviz2.38"\bin
Step 5. Use the CLI to convert the file saved on step 1 to other formats, such as .png.
This example indicates how to use the DOT CLI.
C:\Program Files (x86)\Graphviz2.38\bin>dot.exe -Tpng C:\Users\user\Desktop\isis_graph_verbose.txt -o C:\Users\user\Desktop\isis_graph_verbose.png
This example shows how to use the Circo CLI.
C:\Program Files (x86)\Graphviz2.38\bin>circo.exe -Tpng :\Users\user\Desktop\isis_graph_verbose.txt -o C:\Users\user\Desktop\isis_graph_verbose.png
You can find more details about CLI via Graphviz - Graph Visualization Software documentation.
Note: In step 5 you can simply set the path variable to the directory where the Graphviz CLI executable files are located.
Known Limitation
1. If you run level 1 and level 2 in IS-IS and both are present, then only level 1 appears in the show isis database graph verbose output (the first digraph). To fix this issue, you can edit the input file and remove the digraph for level 1 or level 2, or you can take the input and use these commands with the level 1 or level 2 keyword.
show isis database graph level 1 verbose
show isis database graph level 2 verbose
2. DOT tends to crash when the file contains [label=0] elements. One approach is to simply edit these out and then execute the CLI.
Note: Other tools, such as Circo, does not have this issue.
Example
- Run show isis database graph verbose command.
RP/0/RSP0/CPU0:ASR10_9001-A#show isis database graph verbose
Wed Sep 12 11:23:38.651 AEST

/*
* Network topology in DOT format. For information on using this to
* generate graphical representations see http://www.graphviz.org
*/
digraph "level-2" {
graph [rankdir=LR];
node [fontsize=9];
edge [fontsize=6];
"ASR1" [label="\N\n172.16.0.1"];
"ASR1" -> "AASR6--9904.05" [constraint=false];
"ASR2" [label="\N\n172.16.0.2"];
"ASR2" -> "ASR2.01" [constraint=false];
"ASR2" -> "ASR2.03" [constraint=false];
"ASR2" -> "ASR3-9010";
"ASR2.01" -> "ASR2" [label=0] [constraint=false];
"ASR2.01" -> "AASR6--9904" [label=0] [constraint=false];
"ASR2.03" -> "ASR2" [label=0] [constraint=false];
"ASR2.03" -> "ASR7-9912" [label=0] [constraint=false];
"ASR3-9010" [label="\N\n172.16.0.3"];
"ASR3-9010" -> "ASR2";
"ASR3-9010" -> "AASR6--9904.09" [constraint=false];
"ASR3-9010" -> "ASR7-9912.03" [label=20] [constraint=false];
"ASR4-9006" [label="\N\n172.16.0.4"];
"ASR4-9006" -> "ASR4-9006.01" [constraint=false];
"ASR4-9006.01" -> "ASR4-9006" [label=0] [constraint=false];
"ASR4-9006.01" -> "ASR7-9912" [label=0] [constraint=false];
"AASR6--9904" [label="\N\n172.16.0.6"];
"AASR6--9904" -> "AASR6--9904.05" [constraint=false];
"AASR6--9904" -> "AASR6--9904.09" [constraint=false];
"AASR6--9904" -> "AASR6--9904.01" [constraint=false];
"AASR6--9904" -> "ASR2.01" [constraint=false];
"AASR6--9904" -> "ASR10_9001-A.01" [constraint=false];
"AASR6--9904.01" -> "AASR6--9904" [label=0] [constraint=false];
"AASR6--9904.01" -> "ASR7-9912" [label=0] [constraint=false];
"AASR6--9904.05" -> "AASR6--9904" [label=0] [constraint=false];
"AASR6--9904.05" -> "ASR1" [label=0] [constraint=false];
"AASR6--9904.09" -> "AASR6--9904" [label=0] [constraint=false];
"AASR6--9904.09" -> "ASR3-9010" [label=0] [constraint=false];
"ASR7-9912" [label="\N\n172.16.0.7"];
"ASR7-9912" -> "ASR7-9912.03" [label=20] [constraint=false];
"ASR7-9912" -> "ASR2.03" [constraint=false];
"ASR7-9912" -> "ASR4-9006.01" [constraint=false];
"ASR7-9912" -> "AASR6--9904.01" [constraint=false];
"ASR7-9912" -> "ASR10_9001-A.03" [constraint=false];
"ASR7-9912" -> "ASR11_9001-B.03" [constraint=false];
"ASR7-9912.03" -> "ASR7-9912" [label=0] [constraint=false];
"ASR7-9912.03" -> "ASR3-9010" [label=0] [constraint=false];
"ASR10_9001-A" [label="\N\n172.16.0.10"];
"ASR10_9001-A" -> "ASR10_9001-A.01" [constraint=false];
"ASR10_9001-A" -> "ASR10_9001-A.03" [constraint=false];
"ASR10_9001-A" -> "ASR10_9001-A.05" [constraint=false];
"ASR10_9001-A.01" -> "ASR10_9001-A" [label=0] [constraint=false];
"ASR10_9001-A.01" -> "AASR6--9904" [label=0] [constraint=false];
"ASR10_9001-A.03" -> "ASR10_9001-A" [label=0] [constraint=false];
"ASR10_9001-A.03" -> "ASR7-9912" [label=0] [constraint=false];
"ASR10_9001-A.05" -> "ASR10_9001-A" [label=0] [constraint=false];
"ASR10_9001-A.05" -> "ASR11_9001-B" [label=0] [constraint=false];
"ASR11_9001-B" [label="\N\n172.16.0.11"];
"ASR11_9001-B" -> "ASR11_9001-B.03" [constraint=false];
"ASR11_9001-B" -> "ASR11_9001-B.01" [constraint=false];
"ASR11_9001-B" -> "ASR10_9001-A.05" [constraint=false];
"ASR11_9001-B.01" -> "ASR11_9001-B" [label=0] [constraint=false];
"ASR11_9001-B.01" -> "WAN02" [label=0] [constraint=false];
"ASR11_9001-B.01" -> "ASR11_9001-B" [label=0] [constraint=false];
"ASR11_9001-B.01" -> "WAN02" [label=0] [constraint=false];
"ASR11_9001-B.03" -> "ASR11_9001-B" [label=0] [constraint=false];
"ASR11_9001-B.03" -> "ASR7-9912" [label=0] [constraint=false];
"ASR11_9001-B.03" -> "ASR11_9001-B" [label=0] [constraint=false];
"ASR11_9001-B.03" -> "ASR7-9912" [label=0] [constraint=false];
"WAN02" [label="\N\n172.16.151.2"];
"WAN02" -> "ASR11_9001-B.01" [constraint=false];
}
- Convert the output using the CLI. This result shows the output via Circo tool.

