Introduction
This document describes a configuration example in order to get Lightweight Directory Access Protocol (LDAP) to work on the C880 with the use of Microsoft Active Directory (AD). The C880's LDAP implementation is unique in a way that the user has to be in Common Name (CN) = Users. There are also some specific configuration requirements in order for it to work.
Prerequisites
Requirements
There are no specific requirements for this document.
Components Used
The information in this document is based on these software and hardware versions:
- Server: C880-M4
- Firmware: 1.0.5
- Microsoft Active Directory Server
The information in this document was created from the devices in a specific lab environment. All of the devices used in this document started with a cleared (default) configuration. If your network is live, ensure that you understand the potential impact of any command.
LDAP Implementation
When userX wants to log in to MMB:
Step 1. MMB firmware asks AD server to search userX under the CN=Users (hard coded).
Step 2. If the MMB firmware receives a response that userX is found in the CN=Users from the AD server, then the MMB firmware asks the AD server to search for userX in the Organizational Unit's (OU's) tree of Directory Information Tree (DIT) from the location specified by Groups directory as sub-tree from base DN field on the MMB Web-UI.
Step 3. If the MMB firmware receives a response that userX is found in the OU's tree from AD server (group name which userX belongs to is also sent from AD server), then the MMB firmware checks whether the group name received is a match with the group name registered in LDAP User Group page in the MMB Web-UI.
Step 4. If group name is a match, then userX can log in.
Source: Fujitsu
Configure
Create Special Accounts
Step 1. Secure Shell (SSH) to the server's management IP address and log in as Administrator.
Step 2. Create special admin and ce accounts:
Administrator> set special_account spadmin admin
Are you sure you want to add spadmin? [Y/N]: y
Password:xxxxxxxxxx
Confirm Password:xxxxxxxxxx
Administrator>
Administrator> set special_account spce ce
Are you sure you want to add spce? [Y/N]: y
Password:zzzzzzzzzz
Confirm Password:zzzzzzzzzz
Administrator>
Directory Service
Step 1. Navigate to User Administration > LDAP Configuration > Directory Service Configuration.
Step 2. Click Enabled for LDAP.
Step 3. Choose whether to Enable/Disable LDAP SSL.
Step 4. Select Active Directory from the drop down menu for Directory Server Type.
Step 5. Enter the details for Primary LDAP Server and Backup LDAP Server configuration.
Step 6. Enter the Domain Name.
Step 7. Enter the Groups directory as sub-tree from base DN. This is where the AD group which is created in the User Group here needs to reside.
Step 8. Enter the LDAP Auth UserName and Password. This user needs to exist in CN=Users, DC=domain, DC=com.
Step 9. Click Apply.
Step 10. Click Test LDAP, as shown in the images.


Create User Group
Step 1. Navigate to User Administration > LDAP Configuration > LDAP User Group List.
Step 2. Click the Add Group button to add a new group.
Step 3. Enter the LDAP User Group Name and Privilege (e.g. Admin)
Step 4. Click Apply as shown in the images.


Active Directory
Step 1. Create c880bind User.
Step 2. Create ldaptest User as shown in the image.
CN=Users, DC=VXI, DC=local:

Step 3. Create MMBadmin Security Group in OU as shown in the image.
MMBadmin group in OU=VXI-TAC-Team, OU=VXI-IT, OU=VXI:

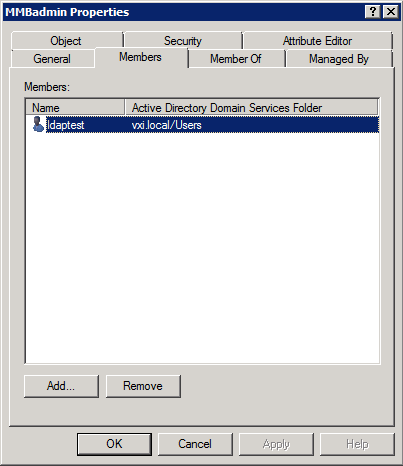
Step 4. Add ldaptest to MMBadmin as shown in the image.

Verify
Use this section in order to confirm that your configuration works properly.
- Test LDAP must work
- You must be able to log in with ldaptest account
Troubleshoot
This section provides information you can use in order to troubleshoot your configuration.
- Verify server and AD configuration which conforms to Fujitsu's LDAP implementation
- Collect a packet capture from the AD server
Related Information