Configure SNMPv3 on Cisco ONS15454/NCS2000 Devices
Available Languages
Download Options
Bias-Free Language
The documentation set for this product strives to use bias-free language. For the purposes of this documentation set, bias-free is defined as language that does not imply discrimination based on age, disability, gender, racial identity, ethnic identity, sexual orientation, socioeconomic status, and intersectionality. Exceptions may be present in the documentation due to language that is hardcoded in the user interfaces of the product software, language used based on RFP documentation, or language that is used by a referenced third-party product. Learn more about how Cisco is using Inclusive Language.
Contents
Introduction
This document describes step-by-step instructions on how to configure the Simple Network Management Protocol version 3 (SNMPv3) on ONS15454/NCS2000 devices. All topics include examples.
Note: The list of attributes provided in this document are not exhaustive or authoritative and might change at any time without an update to this document.
Prerequisites
Requirements
Cisco recommends that you have knowledge of these topics:
- Cisco Transport Controller (CTC) GUI
- Basic server knowledge
- Basic Linux/Unix commands
Components Used
This document is not restricted to specific software and hardware versions.
The information in this document was created from the devices in a specific lab environment. All of the devices used in this document started with a cleared (default) configuration. If your network is live, ensure that you understand the potential impact of any command.
Configure
On a Standalone/Multishelf Node
Configure authPriv Mode on ONS15454/NCS2000 Device
Step 1. Log in to the node via CTC with the use of the Super User credentials.
Step 2. Navigate to Node view > Provisioning > SNMP > SNMP V3.
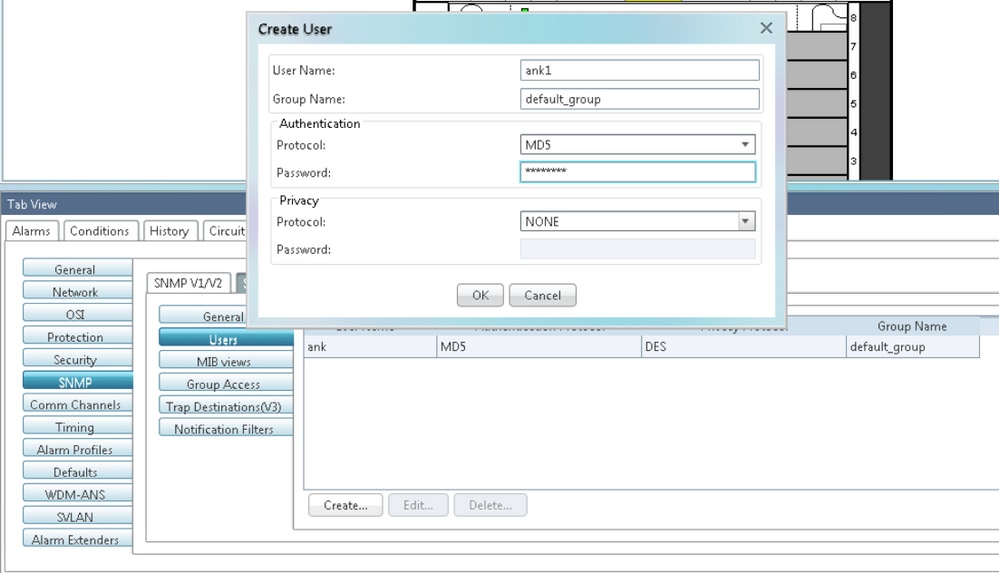
Step 3. Navigate to the Users tab. Create users.
User Name:<anything based on specifications>

Group name:default_group

Authentication

       Protocol:MD5

           Password:<anything based on specifications>

    Privacy

           Protocol:DES

           Password:<anythingbased on specifications>
Step 4. Click on OK as shown in the image.

Specifications:
User Name - Specify the name of the user on the host that connects to the agent. The user name must be a minimum of 6 and a maximum of 40 characters (up to only 39 characters for the TACACS and RADIUS authentication). It includes alphanumeric (a-z, A-Z, 0-9) characters and the allowed special characters are @, "-" (hyphen), and "." (dot). For TL1 compatibility, the user name must be of 6 to 10 characters.
Group Name - Specify the group to which the user belongs.
Authentication:
Protocol - Select the authentication algorithm that you want to use. The options are NONE, MD5, and SHA.
Password - Enter a password if you select MD5 or SHA. By default, the password length is set to a minimum of eight characters.
Privacy - Initiates a privacy authentication level setting session that enables the host to encrypt the contents of the message that is sent to the agent.
Protocol - Select the privacy authentication algorithm. The available options are None, DES, and AES-256-CFB.
Password - Enter a password if you select a protocol other than None.
Step 5. Ensure that MIB views are configured as per this image.

Specifications:
Name - Name of the view.
Subtree OID - The MIB subtree which, when combined with the mask, defines the family of subtrees.
Bit Mask - A family of view subtrees. Each bit in the Bit Mask corresponds to a sub-identifier of the subtree OID.
Type - Select the view type. Options are Included and Excluded.
The type defines whether the family of subtrees that are defined by the subtree OID and the Bit Mask combination are included or excluded from the notification filter.
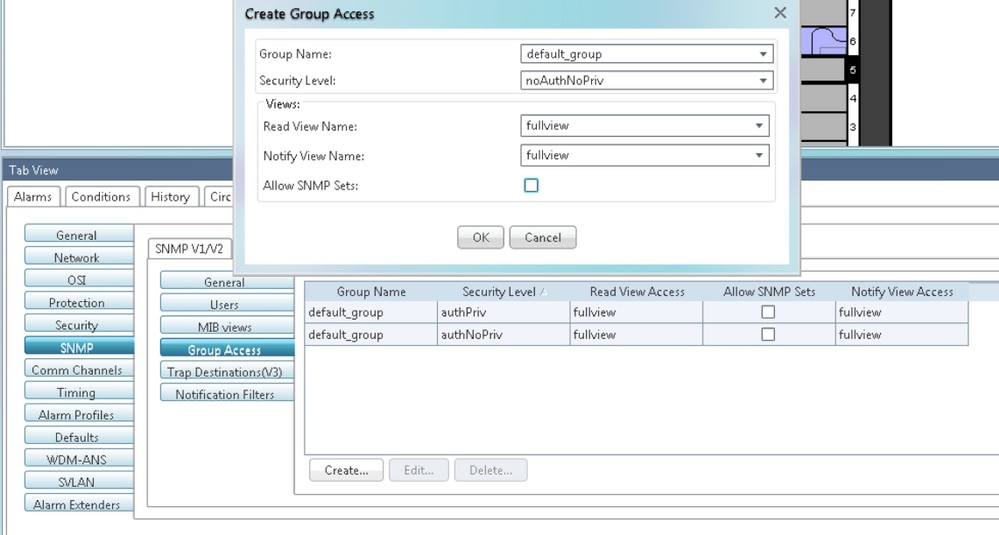
Step 6. Configure Group Access as shown in the image. By default, Group name will be default_group and security level as authPriv.
Note: Group name should be the same as the one used when you create the User in Step 3.

Specifications:
Group Name - The name of the SNMP group, or collection of users, who share a common access policy.
Security Level - The security level for which the access parameters are defined. Select from these options:
noAuthNoPriv - Uses a user name match for authentication.
AuthNoPriv - Provides authentication based on the HMAC-MD5 or HMAC-SHA algorithms.
AuthPriv - Provides authentication based on the HMAC-MD5 or HMAC-SHA algorithms. Provides DES 56-bit encryption based on the CBC-DES (DES-56) standard, in addition to authentication.
If you select authNoPriv or authPriv for a group, the corresponding user must be configured with an authentication protocol and password, with privacy protocol and password, or both.
Views
Read View Name - Read view name for the group.
Notify View Name - Notify view name for the group.
Allow SNMP Sets - Select this check box if you want the SNMP agent to accept SNMP SET requests. If this check box is not selected, SET requests are rejected.
Note: SNMP SET request access is implemented for very few objects.
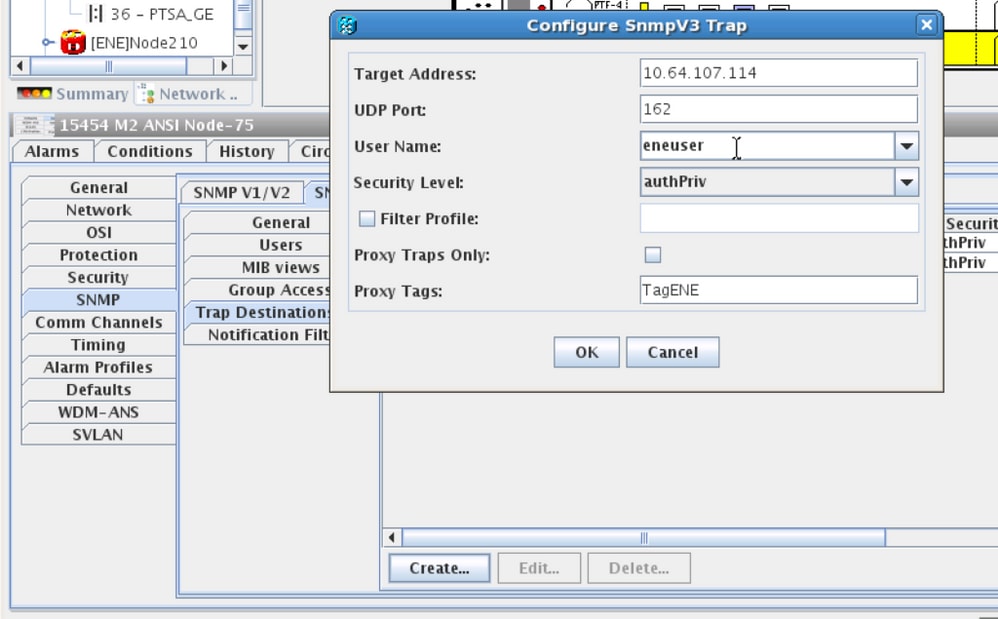
Step 7. Navigate to Node View > Provisioning > SNMP > SNMP V3 > Trap Destination (V3). Click on Create and Configure.
Target address:<any build server> (eg: blr-ong-lnx10)

UDP port: <anything between 1024 to 65535>

User name:<same as we created in step 3>

Security Level:AuthPriv
Step 8. Click on OK as shown in the image.

Note: blr-ong-lnx10 is the NMS server.
Specifications:
Target Address - Target to which the traps should be sent. Use an IPv4 or an IPv6 address.
UDP Port - UDP port number that the host uses. The default value is 162.
User Name - Specify the name of the user on the host that connects to the agent.
Security Level - Select one of these options:
noAuthNoPriv - Uses a user name match for authentication.
AuthNoPriv - Provides authentication based on the HMAC-MD5 or HMAC-SHA algorithms.
AuthPriv - Provides authentication based on the HMAC-MD5 or HMAC-SHA algorithms. Provides DES 56-bit encryption based on the CBC-DES (DES-56) standard, in addition to authentication.
Filter Profile - Select this check box and enter the filter profile name. Traps are sent only if you provide a filter profile name and create a notification filter.
Proxy Traps Only - If selected, forwards only proxy traps from the ENE. Traps from this node are not sent to the trap destination identified by this entry.
Proxy Tags - Specify a list of tags. The tag list is needed on a GNE only if an ENE needs to send traps to the trap destination identified by this entry, and wants to use the GNE as the proxy.
Configure NMS Server (blr-ong-lnx10)
Step 1. In your home directory of the server, create a directory with the name snmp.
Step 2. Under this directory, create a file snmptrapd.conf.
Step 3. Change the snmptrapd.conf file to:
vi snmptrapd.conf

createUser -e 0xEngine ID <user_name>< MD5> <password > DES <password>
For example:
createUser -e 0x0000059B1B00F0005523A71C ank MD5 cisco123 DES cisco123
In this example:
user_name=ank

MD5 password = cisco123

DES password  = cisco123

Engine ID = can be available from CTC.
Node view > Provisioning > SNMP > SNMP V3 > General
Verify authPriv Mode
Step 1. In CTC, navigate to Node View > Provisioning > Security > Access > change snmp access state to Secure as shown in the image.

Step 2. Navigate to NMS server and do snmpwalk.
Syntax:
snmpwalk -v 3 -l authpriv -u <user name> -a MD5 -A <password> -x DES -X <password> <node IP> <MIB>
Example:
blr-ong-lnx10:151> snmpwalk -v 3 -l authpriv -u ank -a MD5 -A cisco123 -x DES -X cisco123 10.64.106.40 system

RFC1213-MIB::sysDescr.0 = STRING: "Cisco ONS 15454 M6 10.50-015E-05.18-SPA Factory Defaults PLATFORM=15454-M6"

RFC1213-MIB::sysObjectID.0 = OID: CERENT-GLOBAL-REGISTRY::cerent454M6Node

DISMAN-EVENT-MIB::sysUpTimeInstance = Timeticks: (214312) 0:35:43.12

RFC1213-MIB::sysContact.0 = ""

RFC1213-MIB::sysName.0 = STRING: "Ankit_40"

RFC1213-MIB::sysLocation.0 = ""

RFC1213-MIB::sysServices.0 = INTEGER: 79
SNMP Trap:
snmptrapd -f -Lo -OQ -Ob -Ot -F "%V\n%B\n%N\n%w\n%q\n%P\n%v\n\n" <port number>
Trap cmd is the same for all versions.
Configure authNoPriv Mode on ONS15454/NCS2000 Device
Step 1. In CTC, navigate to Node View > Provisioning > Security > Access > change snmp access state to Non-secure mode as shown in the image.

Step 2. Navigate to Node View > Provisioning > SNMP > SNMP V3 > Users > Create User and configure as shown in the image.

Step 3. Ensure that MIB views are configured as shown in the image.

Step 4. Configure Group Access as shown in the image for authnopriv mode.

Step 5. Navigate to Node View > Provisioning > SNMP > SNMP V3 > Trap Destination (V3). Click on Create and Configure as shown in the image.

Verify authNoPriv Mode
Step 1. Navigate to the NMS server and do snmpwalk.
Syntax:
snmpwalk -v 3 -l authnopriv -u <user name> -a MD5 -A <password> <node IP> <MIB>
Example:
blr-ong-lnx10:154> snmpwalk -v 3 -l authnopriv -u ank1 -a MD5 -A cisco123  10.64.106.40 system

RFC1213-MIB::sysDescr.0 = STRING: "Cisco ONS 15454 M6 10.50-015E-05.18-SPA Factory Defaults PLATFORM=15454-M6"

RFC1213-MIB::sysObjectID.0 = OID: CERENT-GLOBAL-REGISTRY::cerent454M6Node

DISMAN-EVENT-MIB::sysUpTimeInstance = Timeticks: (430323) 1:11:43.23

RFC1213-MIB::sysContact.0 = ""

RFC1213-MIB::sysName.0 = STRING: "Ankit_40"

RFC1213-MIB::sysLocation.0 = ""

RFC1213-MIB::sysServices.0 = INTEGER: 79
SNMP Trap:
snmptrapd -f -Lo -OQ -Ob -Ot -F "%V\n%B\n%N\n%w\n%q\n%P\n%v\n\n" <port number>
Trap cmd is the same for all versions.
Configure noAuthNoPriv Mode on ONS15454/NCS2000 Device
Step 1. In CTC, navigate to Node View > Provisioning > Security > Access > change snmp access state to Non-secure mode as shown in the image.

Step 2. Navigate to Node View > Provisioning > SNMP > SNMP V3 > Users > Create User and Configure as shown in the image.

Step 3. Ensure that MIB views are configured as shown in the image.

Step 4. Configure Group Access as shown in the image for noauthnopriv mode.

Step 5. Navigate to Node View > Provisioning > SNMP > SNMP V3 > Trap Destination (V3). Click on Create and Configure as shown in the image.

Verify noAuthNoPriv Mode
Step 1. Navigate to NMS server and do snmpwalk.
snmpwalk -v 3 -l noauthnopriv -u <user name> <node IP> <MIB>
Example:
blr-ong-lnx10:155> snmpwalk -v 3 -l noauthnopriv -u ank2 10.64.106.40 system

RFC1213-MIB::sysDescr.0 = STRING: "Cisco ONS 15454 M6 10.50-015E-05.18-SPA Factory Defaults PLATFORM=15454-M6"

RFC1213-MIB::sysObjectID.0 = OID: CERENT-GLOBAL-REGISTRY::cerent454M6Node

DISMAN-EVENT-MIB::sysUpTimeInstance = Timeticks: (486910) 1:21:09.10

RFC1213-MIB::sysContact.0 = ""

RFC1213-MIB::sysName.0 = STRING: "Ankit_40"

RFC1213-MIB::sysLocation.0 = ""

RFC1213-MIB::sysServices.0 = INTEGER: 79

blr-ong-lnx10:156>
SNMP Trap:
snmptrapd -f -Lo -OQ -Ob -Ot -F "%V\n%B\n%N\n%w\n%q\n%P\n%v\n\n" <port number>
Trap cmd is the same for all versions.
SNMP V3 Trap for GNE/ENE Setup
On GNE Node
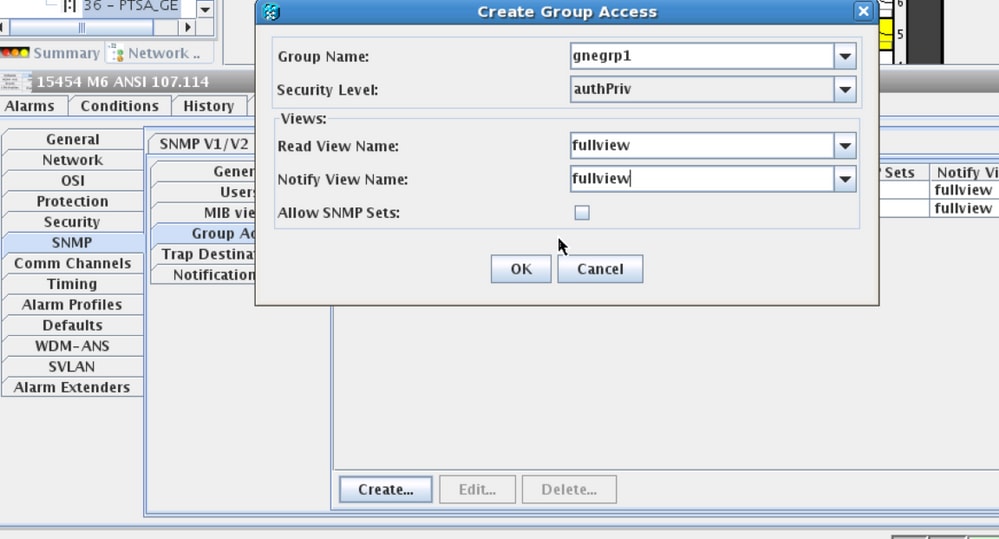
Step 1. Navigate to Provisioning > SNMP > SNMP V3 and Create Group Access (Group Access Tab): provide a group name with Security level (noAuthnoPriv|AuthnoPriv|authPriv) and full view Read and Notify access as shown in the image.

Step 2. Create User Access (Users Tab): create a user with the group name as same as created earlier in Group Access tab. Also, provide the Authentication based on access level as shown in the image.

Step 3. Trap Destination(V3) Tab:
Target Address: Address of NMS server from where the trap will be running(ex. Blr-ong-lnx10).
UDP Port: Any port number where the trap will be listened(Ex. 9977).
User Name: Name of the User in the User tab.
Security level: As configured earlier in the User tab.
Proxy Tags: Provide a proxy tag (Ex. Tag75).

On ENE Node
Step 1. Navigate to Provisioning > SNMP > SNMP V3 and Create Group Access (Group Access Tab): provide a group name with access level (noAuthnoPriv|AuthnoPriv|authPriv) and full view Read and Notify access as shown in the image.

Step 2. Create User Access (Users Tab): create a user with the group name as same as created earlier in Group Access tab. Also, provide the Authentication based on access level.

Ensure a default_group if shown in the User tab is created in Group access Tab in case it is missing in the Group Access Tab.
Step 3. Trap Destination(V3) Tab:
Target Address: GNE node IP.
UDP Port: 162.
User Name: Name of the User in the User tab.
Security level: As configured earlier in the User tab.
Proxy Tags: Provide any proxy tag same as GNE (Ex. Tag75).

In CTC, navigate to network view:
Step 1. Navigate to SNMPv3 tab.
Step 2. SNMPv3 Proxy Trap Forwarder Table: You can do either Manual or Auto Create.
Select Auto Create. Under that:
- Target Tag: Proxy tag set in GNE.
- Remote Trap Source List: select the ENE node IP as shown in the image.

Verify GNE/ENE Setup
Configure NMS Server (blr-ong-lnx10):
Step 1. In your home directory of the server, create a directory and name it snmp.
Step 2. Under this directory, create a file snmptrapd.conf.
Step 3. In snmptrapd.conf, create this configuration:
createUser -e 0x<GNE_ENGINE_NO> <GNE_USER_NAME>  MD5 <password1> DES <password2>

                                Engine_NO = can be available from CTC. Open GNE node-->Node view->Provisioning->SNMP->SNMP V3-->General.
SNMP Trap:
snmptrapd -f -Lo -OQ -Ob -Ot -F "%V\n%B\n%N\n%w\n%q\n%P\n%v\n\n" <port num configured in GNE>
snmpwalk on ENE:
For authpriv mode:
snmpwalk -v 3 -l authpriv -u <user_name> -a MD5 -A <auth_password>123 -x DES -X <des_password> -E <ene_engine_id> <gne_ip_address> <OID>
For authnopriv mode:
snmpwalk -v 3 -l authnopriv -u <user_name> -a MD5 -A <auth_password> -E <ene_engine_id> <gne_ip_address> <OID>
For noauthnopriv mode:
snmpwalk -v 3 -l authpriv -u <user_name> -E <ene_engine_id> <gne_ip_address> <OID>
Troubleshoot
There is currently no specific troubleshooting information available for this configuration.
Contributed by Cisco Engineers
- Abhijith B RCisco TAC Engineer
Contact Cisco
- Open a Support Case

- (Requires a Cisco Service Contract)
 Feedback